Let's talk about how to return Windows 10 to its original state. In other words, do a reset.
Why restore Windows 10 to factory state
There may be two reasons:
- The computer has stopped working normally: the operating system malfunctions, is unstable, system files are damaged by viruses and it is impossible to restore normal operation without reinstalling the OS.
- You are going to give the computer to a stranger: donate it, sell it, dispose of it. Therefore, you need to destroy all personal information.
How to reset Windows 10 to its original state
Hold down the key shift and select Reboot. This can be done from both the Start menu and the Welcome screen:  After this, the computer will begin to shut down.
On the menu Action selection select Diagnostics: Resetting the computer to its original state or using additional tools:
Click: 
Here, choose the option that suits you best in your particular situation. In most cases you should choose Save my files. (Choose delete everything, if your goal is to clear your computer of personal data before selling it): 
Login to your account: 

Click the button Return to original state:
Wait for the Windows 10 factory reset process to complete: 
After resetting the operating system and returning the operating system to its original state, your computer will behave like it was just purchased: you will have to create a user account or sign in to an existing Microsoft account and then install programs.
How to reset Windows 10 if the system won't boot
1. Download the official Microsoft MediaCreationTool utility.


5. Now select System Restore:

6. Click on the item Diagnostics:

7. Select an item Restore your computer to its original state and follow the prompts on the screen:

Due to the presence of viruses, driver or software mismatches, the OS may malfunction. If your Windows crashes, don’t rush to panic. The situation can be corrected by returning the state of files and programs to the moment when the PC was working properly.
While running OS Windows 7, 10 or 8, certain errors and problems may occur. As a result of such failures, starting the operating system again in operating mode becomes impossible. In this case, it is not at all necessary to do a time-consuming reinstallation of the OS. All you need to do is perform a system restore.
Recovering the OS using the recovery environment
When working we use the following scheme of actions:
- Reboot the computer, press the F8 key while loading;
- Troubleshooting;
- System restore, selecting an OS restore point;
- Click "Further" and again "Further";
- Press the button "Ready", we reboot the system (in the Menu, select boot with the last successful configuration).
Windows 7 System Restore
There are several methods you can use to get your OS running again. Some of them rely on rolling back to saved settings. Others simply clear the data.
You can “reanimate” the OS in one of the following ways:
- by selecting restore points;
- using the command line;
- through safe mode;
- using a recovery environment;
- using an image/boot disk.
Restoring the operating system using system “resuscitation” checkpoints is one of the most affordable, effective and popular options. To apply it, you need to make a series of clicks:
- Panel "Start";
- "System Restore";
- "Further";
- "Select a restore point";
- "Ready".
With such an operation, problems with the computer will be corrected, changes will be canceled and the system will be returned to the operating state that allowed the PC to boot normally. There is no loss of data, files and documents with this type of recovery. All data is saved. The operation is reversible. You can roll back the system to a previous computer state and use a different restore point.
Many people wonder how to make a recovery point on their own (manually) in order to choose it in the future? To do this in the same menu "Start" - "System Restore" You can create such a point yourself at any time convenient and suitable for you. It will be saved indicating the current date, which you just have to remember.
From restore point
In computer engineering there is such a thing as a recovery point. These are saved PC settings. As a rule, saving occurs automatically with each successful OS boot. The easiest way to restore Windows 7 is to use this data.
Press F8 when your computer boots. This command will bring up a menu of system startup options. Next, you need to select the Last Known Good Configuration option.
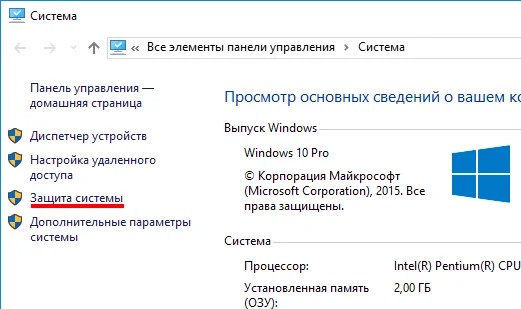
Another method can be used. Go to the properties of the My Computer folder. Find the System Protection line, clicking on it will open the dialog box of the same name. Click Recovery – Next. We set a target date, indicate the disks that need to be fixed, and confirm the actions. After rebooting, the PC should work normally.
No restore points
You can fix problems with the OS even without restore points. To do this you will need to resort to the LiveCD program. You need to download it and burn it to a flash drive with the .iso extension.
Further all actions will take place in the BIOS. You need to configure booting from a flash drive. To do this, in the Boot section, select USB-HDD in the First boot device line.
Before proceeding directly with the recovery, copy all the necessary files to a removable disk. The LiveCD program provides a special menu for these purposes.
We will fix the system error using an archived copy. Connect the USB flash drive, open the Windows\System32\config\ folder. Files with the names default, sam, security, software, system must be moved to any other folder. In their place, transfer similar files from the RegBack folder and restart the computer.

The described method will only help if the problem is related to the registry.
Command line
You can resort to “reanimating” Windows 7 from the command line if the PC begins to freeze or works slowly, however, the system still boots. Enter the menu "Start" and using the right mouse button, launch the command prompt as administrator. Run the rstrui.exe command, which will open the system restore program. Click "Further". In the next window, select the desired rollback point and click again "Further". Once the process is complete, the PC should work normally.
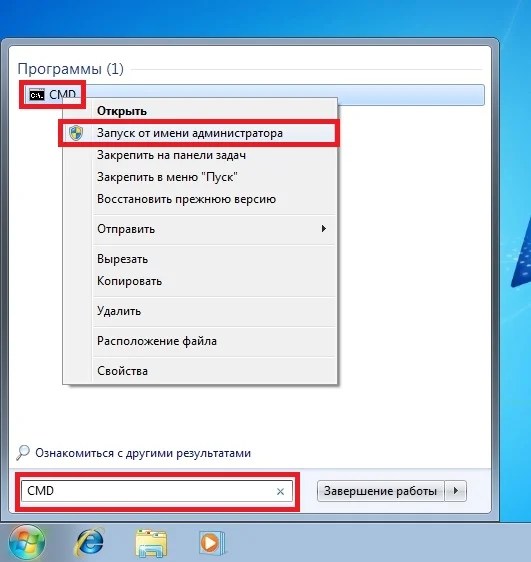
There is another way to access the utility. Let's go to "Start". To open the command line, click "Run" and enter the CMD command. We click on the found CMD.exe file and wait for it to launch. Next, enter rstrui.exe in the command line and confirm the action with the Enter key on the keyboard.
It is not always possible to play it safe and create OS restore points in advance. Problems may arise that block the option of such “reanimation” of the PC. Then you can use another, no less effective and easy option - restoring the Windows system using the system itself.
We rely on the diagram:
- Icon "My computer"- right mouse button "Properties";
- "System protection";
- In the new window click "System protection", recovery button;
- "Further";
- Select a restore point according to the date;
- Specify the system disks to be restored;
- We confirm the operations and reboot the system.
Restoring Windows 7 using Safe Mode
This method is preferred if the usual system boot is impossible. Then after pressing the PC power button on the system unit, hold down the F8 key to call "Start Menu". One of the "Menu" options is "Safe mode". Select it and press Enter on the keyboard. As soon as Windows boots, we carry out the algorithm of actions that we described earlier.
System recovery Windows 8/8.1
If you managed to start the OS, you can resume Windows 8 via "Options". Hover over the top right corner and enter them. Click on "Change computer settings" – . Chapter "Recovery" will offer several options:
- “Regular recovery with information preservation”.
- “Deleting data and reinstalling the OS”.
- "Special option".
Decide what exactly needs to be done. Next, follow the menu prompts.
If you choose the latter method, in the window that opens, click on the diagnostics item. You will be offered the following options:
- "Restore";
- "Return to original state";
- "Extra options". This item includes the ability to roll back to the desired resume point.

To resume Windows 8.1, press Win+R and call sysdm.cpl. In the system properties window in the tab "Protection" specify the required system drive. Click "Restore". Clicking "Further", you will be able to see a list of rollback points. Select the one you want and click "Search for affected programs". Changes that have been made to the PC since the selected moment will be deleted. Complete the process by clicking "Ready".
If you work with Windows 8, problems may occur, the Internet may not work correctly, etc. To fix this, you can use the classic recovery method through restore points.
Another option is a system rollback. To do this, open the menu "Start" - "Control Panel" - "Windows Update". Select an item "Removing updates". The same can be done using the command line.
So, in the list of updates that opens, we delete those from the moment of installation of which (we look by date) problems and malfunctions began. We delete unnecessary files and reboot.
You can perform a factory reset on Windows 8.1. Important files will not be affected during this operation. The method is effective, but to implement it, the OS needs to boot without problems. We use the algorithm:
- Right side of the monitor - "Options";
- "Change settings";
- "Update and Recovery" - "Recovery";
- "Recovery without deleting files".
If you cannot log into the system in the usual way, you must use the disk with the system. Load the installation disk, select "System Restore". Press the button "Diagnostics", And "Restore".
Windows 10 System Restore
If you have problems with Windows 10, press Windows + Pause. Go to "System protection" and press "Restore" – "Further". Select the desired indicator and click again "Further". When finished, click "Ready". The computer will automatically restart and the changes will take effect.
One of the advantages of the “ten” is the ability to return the settings to factory settings. This helps avoid having to install the system all over again. To reset your data go to "Computer Settings" – "Update and Security" – "Recovery" – "Return the computer to its original state". Click "Begin".
You can take care of the possibility of a rollback in case of failure in advance. You can create resume points yourself or configure their automatic creation at the desired frequency. To do this, in the settings, in the Update and security item, select Backup service. Specify where to save copies, click Add disk. After selecting the device, the function will be activated.
You can restore your Windows 10 system again by using restore points. In this case, the system will be rolled back to the moment when it loaded smoothly and worked without failures. This recovery method is described at the beginning of the article.
If the OS does not boot, a warning table with a key appears on the screen "Additional recovery options". Click it and select "Diagnostics" - "System Restore". We select a Windows restore point, wait for the system to roll back and reboot.
If such operations do not help and the computer continues to work incorrectly, you can roll back to the basic settings. Some programs and utilities, personal PC settings will be reset, and personal data will be deleted.
This technique is used extremely rarely if the other options described above do not help. The algorithm of actions is as follows:
- "Start" - "Selecting parameters"- tab "Updates and Security";
- Paragraph "Recovery"- button "Begin";
- We choose to delete all files or keep some of them.
Recovering the system after this will take 40-90 minutes.
Resuming using the installation disc
One of the radical methods of fixing the error involves using an installation disk. After launching it in BIOS, click System Restore. In the Troubleshooting section, specify the desired action. Next, follow the system prompts to complete the process.
Related Posts
The debate continues about which is better than Windows 10 or Windows 7. This phenomenon is not accidental. Developers from Microsoft claim that there is nothing better than Windows 10, but experienced users say the opposite, they say the system is more reliable than Windows 7 now...
Computer freezing is a rather annoying problem. This can happen both at the stage of system startup and in the middle of its operation. Let's figure out why this can happen and what to do about it? Why does my computer freeze...
Sometimes, when installing programs or applications, a message appears on the computer screen stating that Windows 10 error 5 has occurred. This means that the user is denied access. This happens if there are several accounts in the system...
Like any latest generation OS, Windows 10 has the ability to resume information in case of critical errors. This can be done using the following methods: rolling back changes, using an image with a backup copy. Which method is most effective, and how to restore Windows 10 as quickly as possible? Let's try to figure it out.
Few users know all the ways to restore the OS
Most often we are talking about a regular flash drive. In previous versions of the system, such a disk contained only programs, using which one could try to restore an incorrectly working system. In this variation, the disk may contain the OS image itself. This means that by using this tool, you can launch a rollback by reinstalling Windows without user intervention.
To burn the drive, use a flash drive, select “Recovery” in the control panel. Click on “Create a recovery disk”.
When creating a flash drive, you can copy system files to it. The created drive can also be used to quickly reinstall the OS on the “machine”.

If problems arise with the operation of the system, use the rollback disk (the boot menu or changing the priority will help). The menu will have a “Diagnostics” section, which consists of sub-items:
- run automatic recovery at boot;
- restore the system from an image;
- return the PC to its original state using the files on the drive;
- go to the command line;
- go to BIOS;
- restore the system using a rollback point.
Armed with such a flash drive, you can solve any problem with your computer, spending a minimum of time. Experts praise this method and recommend it if other manipulations have not helped the matter.
The easiest way
To understand how to restore Windows 10, you should first explore this option. Just click on the notifications icon, and then get to the “All settings” item. Now you need to go to “Update and Security”, “Recovery”. If the OS does not start, then the procedure must be performed using a recovery drive (this option is described above).
Go to “Restore to original state”, here you will be offered to reinstall the system, save personal files or completely clean the PC. If you choose option #1, Windows will use the files that are already on your computer, so you won't need a drive. By choosing option No. 2, you will be able to save videos, photos, etc., but the settings and utilities that you manually installed after installing the OS will be lost.

Windows also offers this rollback method - you need to press the power key before entering Windows, and then click on “Restart” while holding down “Shift”. As you can see, there is no need to log in. A new scenario will appear, where after going to the “Diagnostics” section you can return to the working version of the software.
The OS discussed here is the newest, and manufacturers are just starting to release devices with Windows 10 pre-installed, but most likely, if you roll back in this way, the developer utilities and drivers will be reinstalled automatically.

Advantages: there is no need to search for a distribution; in addition, automatic reinstallation reduces the risk of errors by inexperienced users.
Flaws: If files are critically damaged or the hard drive is damaged, Windows will not be able to resume. If the method does not help, use image or drive.
Restore point
Such points will help you roll back to the desired date, when there have not yet been any problems with the system.
The points contain data about system files that are problematic for the operation of the OS, which have changed due to user actions (installing a program, changing settings, etc.), but they do not contain a complete image.

First, it is important to study the settings. After going to “Recovery” you need to find the “Settings” option. You can get here faster by opening the command line (Win+R) and typing systempropertiesprotection.
Rollback points are formed for partitions with protection enabled. There is information about this in the parameters; the option to create points can be enabled. There you can also specify the size that will be allocated for rollback points. Old points will be “overwritten” automatically as the space is filled.
Creating a point
Click on the “Create” item in the “System Protection” section (Start - System). Now set a name for the point to navigate the list and confirm your decision.

You can use the point in different ways - you can use diagnostic tools, the system interface or the command line.
The elementary method is to go to “Run recovery” in the “Recovery” section. It is advisable to select the point required by date and begin the procedure.
An alternative method is to run from the command line. It will help if you can only log into Windows using safe mode with DOS line support. Here you should enter rstrui.exe and press the enter button. Again you will need to select a specific item and click on start.
There is a third option, the path looks like this: Settings - Update and Recovery.

System image: how to use it
- you need to go to the “Backup image” item in the “File history” section;
- further, “Creating an image”;
- then select the folder where the image will be stored and the partitions that will be added to it.

A rollback from the image is done using a special drive. You can also select the “Image recovery” tab (it is located in the “Advanced options” item in the diagnostics section).
And so, you spend a pleasant evening at the computer - play, chat, surf the Internet, and Windows promptly carries out your commands. Everything is fine! Idyll! However, you should not think that this will always be the case. Know: the insidious Windows is preparing a dirty trick for you. She is just waiting for the moment when some urgent matters overtake you in order to... show you nothing. More precisely, it won’t boot.
Windows boot failure is an ordinary occurrence, but according to the law of meanness, it usually happens when the computer is really needed. So that the situation does not take you by surprise, it is important to prepare for it in advance. Let's talk about what to do if Windows 10 won't boot, why this happens, and what every user should have to solve this problem as quickly as possible.
Why won't it load?
The reasons for the “dozens” being unbootable can be software or hardware. Software problems are associated with the deletion (damage) of boot and system files and/or registry sections responsible for launching. They are usually to blame for:- Installing another operating system on another partition of the drive (the new OS replaces the old bootloader with its own).
- Experiments with disk partitions - compression, merging, partitioning, formatting, etc. A typical error, which is precisely a consequence of this, is “ ” (the system bootloader is compressed).

- Unskilled manual editing of the system registry.
- Using various “tweak cleaners” to speed up and decorate the system, which “accidentally” change the registry keys responsible for startup, patch files, etc.
- Windows updates installed incorrectly or the PC shuts down during the installation of updates.
- Viruses and antiviruses. Don't be surprised, the latter can cause no less harm than the former if used thoughtlessly. It's like swallowing pills indiscriminately, hoping that the right one will be among them.
- Faulty hardware drivers. Booting in such cases is usually interrupted by a blue screen of death, sometimes indicating the name of the driver that caused the problem.
- "Clumsy" applications in autostart. The failure occurs in the late stages of loading - shortly before the desktop appears.
Hardware reasons for Windows 10 not starting:
- Changing the order in which bootable media is polled in the BIOS (the computer searches for the Windows boot loader not on the system disk, but, for example, on flash drives).
- Connecting the drive to a port on the motherboard that is different from the one on which it worked before - if the failure occurred after removing and reinstalling the hard drive into the computer. It appears as an INACCESSIBLE_BOOT_DEVICE error on the blue screen of death.

- Faulty or poor connection of the system drive. Often appears with the message “ ” (bootloader unavailable) on a black screen. Sometimes - stops, restarts, BSoDs at any stage of loading.

- RAM malfunction. As with disk problems, it manifests itself with reboots and blue screens at any stage of startup.
- Failure of video subsystem elements. Windows may boot, but you won't see it because the screen will remain black. Sometimes you can tell that the system has booted only by a characteristic sound.
- Other hardware problems, such as motherboard, peripherals, etc.
It's better to prepare for the worst in advance
Since 80-90% of cases of Windows 10 not starting are due to software failures, today’s article is devoted to methods of dealing with them.So, to restore normal Windows startup, the computer needs to be booted into the recovery environment. If you have previously used Windows 7, then you know that this very environment is installed on the disk along with the main system. And to enter it, you need to open the menu of additional boot methods (by pressing F8 after turning on the computer) and go to the “ Troubleshooting».
The “top ten” also has a recovery environment, but since its loading time has significantly decreased compared to Windows 7, the interval when you can call the boot menu has also become much shorter. There is only one chance left at this time to press the desired key (more precisely, the combination of F8 and Shift): if the system is installed on an MBR hard drive and the fast startup option is disabled in the power settings of the PC or laptop. If the system is on an SSD or GPT hard drive, you will need bootable media.
For emergency recovery of Windows 10, it is optimal to keep its official distribution on a DVD or flash drive, and of the same bit size as installed on the PC. As an alternative, you can use the downloadable utility package MS DaRT 10 (Microsoft Diagnostic and Recovery Toolset for Windows 10 ).
MS DaRT distributions (formerly called “ERD Commander”) are officially distributed only through a paid subscription, but they are easy to find on the Internet. For example, on torrent trackers. Windows 10 images are available for download from .
As an example, I will use the home edition of Ten, recorded on a bootable USB flash drive, since it has everything you need.
Booting into the Windows 10 recovery environment
If the download fails, the “ten”, as a rule, tries to self-repair. When she succeeds, the user does not receive any notifications; it just takes longer to start the computer than usual. If unsuccessful, a message may appear on the screen, as in the screenshot below, but more often it will just be a “Malevich square” with or without a cursor, or a blue screen of death with a sad emoticon.
The failure option shown in the screenshot can be considered relatively favorable. By clicking, " Extra options"You will be taken to the recovery environment installed on your hard drive, and you will not have to boot into it from external media. But we will consider a more severe case, when the system does not show any signs of life.
Connect the media to your computer, reboot, and make it the first boot device.
The window that you will see first after booting from a flash drive (DVD) will prompt you to select the system language. If Russian is selected, click " Further».

You will then be prompted to proceed to install or restore Windows. Click " System Restore».

On the screen " Action selection» click « Troubleshooting" Here you are.

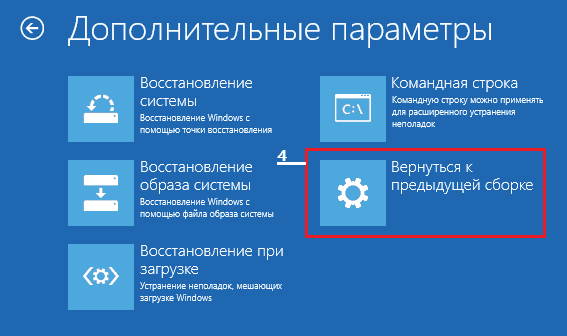
Tens launch recovery options
In the recovery options section (screen " Extra options") there are 5 subsections:- System Restore. When you select this option, a standard Windows utility is launched. rstrui.exe, the purpose of which is to roll back the system to one of the saved checkpoints.
- Restoring the system image. Launches the Windows Deployment Wizard from a backup created by the OS's own tools.
- Boot recovery. Corrects errors in boot files and partitions.
- Command line. Allows you to run various system utilities.
- Return to the previous build. Rolls back to a previously installed version of the OS if it was upgraded to Windows 10.
Rollback to a checkpoint
Returning to a newly created checkpoint is the best first aid remedy for all types of system failures, including when you do not know their cause.
Clicking on the first item most likely launches the recovery utility you are already familiar with. All you have to do is select the date and time you want to rollback to and follow the on-screen instructions.

To use this option, you must have at least one saved checkpoint and a properly working system restore function. If the latter was disabled before the failure, skip this step and try other methods.
Startup Recovery
This option effectively helps in case of damage or deletion of boot files, for example, when installing an additional OS on another disk partition after Windows 10. And also in case of accidental formatting or other manipulations with the “System Reserved” partition.
Command line
The command line itself does not restore anything, but it makes it possible to launch other tools. So, with its help we can open Windows Explorer to see the installation location (partition letters in the recovery environment and during normal system booting usually do not match), run the system file error fixer, registry editor and bootloader recovery utilities.
If rollback to a checkpoint and auto-recovery at startup (the first and second options) did not give the desired result, a console utility often helps to raise the “tens” load BCDBoot. It recreates the hidden “System Reserved” partition and copies boot files from the Windows directory to it.
For BCDBoot to work correctly, you must specify the location of the Windows folder on your hard drive. To find out, you can use the utility Diskpart, but I think it’s more convenient to do this through Explorer.
So, to get into Explorer, open the command line and run Notepad in it ( notepad).

While in notepad, go to the menu “ File", select " Open" and go to the folder " This computer" Next, let's go through the disk partitions and determine which of them contains the system directory. In my example this is drive D.

Next we return to the command line and execute the instruction:
BCDboot D:\Windows

Please note that your path to the system folder may be different.
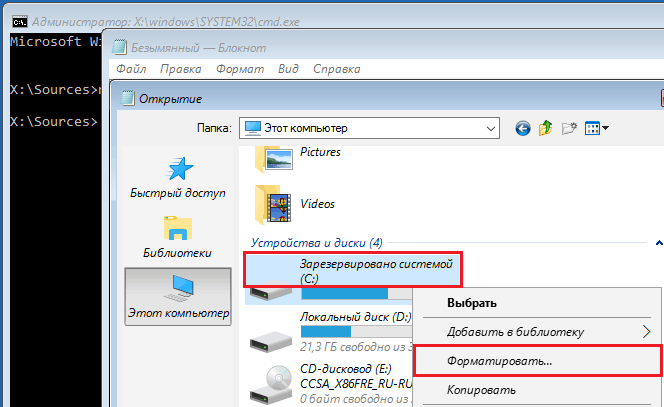
In 80% of cases, this is enough for the “ten” to start normally. But in about 20% of cases the command does not work correctly - it does not restore all boot files. To help the utility a little, before executing the instructions on the command line, you need to format the reserved boot partition (in my example, drive C) in FAT32. This can also be done using diskpart, but I find it more convenient through Explorer.
The following two console commands recreate the boot records of the entire drive (MBR) and the system partition (VBR). They are used to solve problems with running Windows on MBR disks.
Execute commands one after another in this order:
bootrec/fixmbr
bootrec/fixboot

If you accidentally run them on a GPT disk, nothing bad will happen.
In some cases, startup problems arise due to damage not to boot files, but to the main system files, for example, after a virus attack. As you may know, there is a special utility in Windows to fix them Sfc.exe. So, thanks to the command line, you can also run it in the recovery environment.
The command to find and fix errors in protected system files in the recovery environment looks like this:
sfc /scannow /offbootdir=D:\ /offwindir=D:\
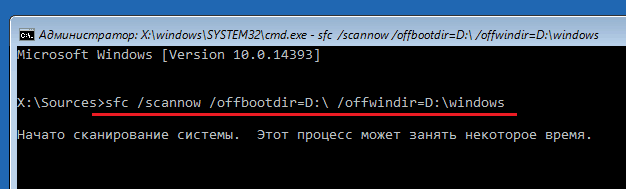
Parameter offbootdir determines the location of the main boot partition (in my example, as you remember, this is drive D), and offwindir– path to the system folder.
Using the command line, you can also fix registry errors on an unbootable system. But, unlike previous instructions, this requires certain experience and qualifications, because the user needs to know exactly what to correct and what erroneous entries should look like normally.
I will not dwell on registry errors that lead to Windows 10 boot failure, since this is the topic of a separate large article. I will only describe the method for launching the editor RegEdit.exe in the recovery environment and open the registry files in it so that you have the opportunity to fix the errors that you are aware of.
So, to launch the editor, write the word on the command line regedit and press Enter.

You will see that in the utility window that opens there is already some kind of registry, but not the one you need. Before us is our own registry of the recovery environment, and we are interested in the main system.
To load Windows 10 registry files into RegEdit, select the section in the left half of the editor window HKEY_LOCAL_MACHINE or HKEY_USERS, open the menu “ File" and click on the item " Load bush».
In the Explorer window that opens after this, go to the folder D:\Windows\System32\Config(your drive letter may be different) and select the desired file.
Files without an extension in the \System32\Config folder are the components (hives) of the Windows 10 registry. The main ones are circled.
Give the hive any meaningful name (it will be temporary until you unload it) and click OK.

Next, we will open the section into which we loaded the bush, and here it is - in front of us, available for editing. In my example this is the registry file software, which I temporarily renamed to soft_win_10.

After making the edits, go back to the editor menu “ File" and click " Unload bush».
Return to previous build
When reverting to a previously installed build, the user's personal files will remain intact, but everything done since the update will be undone.
Restoring a system image
Restoring an image from a backup helps to restore the system to functionality in case of any problems, but the problem is that almost no one creates these images.If you are an exception to the rule and the happy owner of a relatively recent backup copy, select the item marked in the screenshot from the list of parameters,

Tell the recovery program where to store the image and follow its instructions.

All data from the inoperative OS will be replaced with working copies from the archive. If it contains user files, this will also affect them.
Happy recovery!
Also on the site:
Windows 10 won't boot: why this happens and how to restore startup updated: April 23, 2017 by: Johnny Mnemonic
All Microsoft operating systems provide various system recovery tools. In its new operating system, the company has provided more options for restoring Windows 10. When deleting system files by an inexperienced user, a system restore may be required, as well as in many other cases when the OS is unstable or does not start at all. In this material we will describe all the available recovery tools for the Windows 10 operating system, and also describe how to use them and on what operating principles they operate.
Recovering Windows 10 using new operating system features
As many PC users with the Windows 10 operating system know, it implements two control panels computer. The first one is familiar to everyone “ Control Panel" and the second is new " Options" In this example we will use the new panel " Options" You can get to the new panel through the menu “ Start", clicking on the item " Options"or through the notification area by clicking on the button " All parameters».
Once in the panel " Options", the next step is to go to the tabs " UPDATE AND SECURITY» - « Recovery».

Now in the window that opens we are interested in the only button Start. By clicking on this button, a window with a choice will open in front of you.

This selection menu offers the user two options: saving or deleting personal data. First option completely saves all the user’s personal files and completely cleans the system. Second option deletes all data on the computer, including user files, OS settings and all applications. In our case, we will choose the first option " Save my files" After this action, Windows will display a message indicating which programs will be removed from the PC.

The message also mentions that if your apps are installed from the Windows 10 Store, then you can quickly restore them, including their settings. In the last window, the wizard will warn you what actions will be taken. To confirm resetting Windows 10 to its original state, click the corresponding Reset button.


This method is very convenient when you need to reinstall Windows 10 without an installation DVD or when you don’t have a bootable USB flash drive at hand. Judge for yourself, at the end of this reset, your personal computer will have a clean top ten, including only personal data.
Recovering Windows 10 using a recovery disc
Now let's look at an example creating an optical recovery disc dozens. To make this disc we will need a blank DVD and a PC with a DVD drive. Now let's go to the regular Windows control panel to create it. You can find and open the control panel by clicking on the menu “ Start» right-click and select the option we need.

In the panel itself, you need to follow the following links: “ system and safety» - «».


The wizard has only one button Create disk. Therefore, after pressing it, disc recording will begin immediately.

Now let's try to boot from the newly created disk. To do this, insert it into the drive and, when loading, select it through BIOS BOOT MENU.

If in the menu that appears, select “ Diagnostics", then we will get to the menu " Extra options» recovery. In this menu you can restore the bootloader or OS image. In addition, you can open the Command Prompt in administrator mode, which has many commands for system recovery. You can also call the Checkpoint Recovery Wizard. Particularly interesting is using the command line in administrator mode. Using the command line in special privilege mode, you can run, for example, a console program BOOTREC. On the command line, the BOOTREC utility can write new boot sector. Also on the command line BOOTREC can fix MBR record, and look for lost Windows installations, which the BIOS does not see when the computer boots.
Complete recovery of dozens via image
For this example, we will use the tips from the previous one and go to “ Control Panel» using the same links. Now, on the right side of the panel window, click on the “” link. This action will be launched by a wizard in which we will create an image of the entire operating system.

As in the previous example, we will use optical disks to save information. In our case, this is one Blu-Ray blank. You can also save the image to a regular flash drive. Saving to a flash drive is especially important for computers that do not have an optical drive, especially since the price of a large flash drive is now very low. Now let's continue the master's work.

In the wizard window that appears, a message appears that archiving the entire system into an image may require 46 gigabytes. By clicking the Archive button, preparation will begin for archiving the OS into an image and burning it to a DVD.

The saved image can be launched either in the control panel add-in we opened, or directly from the DVD when the computer boots.
This example will be of particular interest to system administrators who need to quickly restore jobs and not bother installing drivers and various programs.
It is worth noting that you can configure automatic backup creation of archives.
Configuration is carried out in the same control window where you launched the wizard using the link “ Set up backup" Setup is very simple. After choosing a location to save the archives, be it an external drive or a network resource, the system will automatically make backup copies. Automatic creation of archives prevents you from losing data if the hard drive breaks, so it's worth paying attention to.
Checkpoints
Restore Windows using a checkpoint It was possible in Windows XP. In the top ten, the implementation of these points is the same as in Windows 7 and 8. The developers did not even change the interface of the point recovery wizard. It is also worth noting that the developers have disabled the automatic creation of control points (in the seven it is enabled by default). To enable automatic creation of restore points, just go to “ Properties of the system" to the tab " System protection" You can quickly move there using the systempropertiesprotection command in the standard program "".

Once on the desired tab, you need to click on the Configure... button. This action will open a window in which you need to enable system protection, as well as indicate how many gigabytes on the screw can be used for all points in the OS.

As you can see, enabling protection is quite simple. Immediately after this, the system will begin to automatically create control points.
The Windows 10 operating system does not create restore points spontaneously, but only when some event occurs.
For example, you installed a sound card driver in the OS or installed a heavy software product. Also, in addition to automatic creation, you can make points manually. To do this, on the same system protection tab we will find a button named Create.... By clicking on this button, we will launch the wizard for creating restore points. First of all, enter the name of the point and click the Create button.

The time it takes to create each point manually depends on the amount of installed programs and OS settings on the computer. A rollback to the previous point is carried out by calling the wizard using the Restore... button.

In the next wizard window, you can find all the created control points, both automatically and manually.

By selecting one of the points, you will restore the state of your OS at the moment when the point was created. This type of recovery is especially convenient to use when the operating system is unstable, there are constant freezes, screens of death and spontaneous reboots. In addition to recovery using the wizard from Windows 10, you can use a recovery disk if the OS does not want to start.
Advanced PC users will also be interested in ways to create points using PowerShell in administrator mode. Below is a demonstration of the PowerShell console running in administrator mode, where the following command is executed: Checkpoint-Computer -Description “InstallBetaMicrosoftOffice”

This command creates a restore point named "InstallBetaMicrosoftOffice". When creating breakpoints using PowerShell, you should wait until the console has fully executed the command, but if you don't, the breakpoint will not be created. And running PowerShell in administrator mode is quite easy. Just find it in a search engine and right-click “ Run as administrator" You can also immediately launch PowerShell through the command line, which is running in administrator mode. To do this, in the command line just enter the command “ PowerShell».

It is worth noting that in Windows 10 you cannot delete a specific checkpoint, but only delete everything at once.
Such a popular utility as CCleaner. CCleaner can remove unnecessary control points, thereby freeing up a lot of hard drive space.
Finally
From the examples discussed, it is clear that the developers of the new Windows 10 decided to leave most of the built-in recovery functions that were in previous OSes, and also added new ones to the system. In addition to standard recovery methods, we advise our readers to also pay attention to such a program as Acronis True Image 2017.
>> Download Acronis True Image 2017
This program can quickly make backup copies of the entire OS, and also quickly restore it. A distinctive feature of the utility, in addition to rich functionality, is cloud data storage. That is, you will not need to save backups to an external drive. You can also use Acronis True Image 2017 encrypt all archives with a 256-bit key, which provides increased security for data storage.
Video on the topic


