Windows 10 users are well aware that Microsoft is slowly dragging elements of the classic Control Panel into a new app (as new as a three-year-old app can be called) Settings. Traditionally, the Software giant races horses - the speed with which the control panel is buried in the wilds of the operating system does not correspond to the speed with which the elements of this control panel are moved to Settings. That is why users often have to search the Internet for paths along which they can get to old interfaces that have not yet been rewritten in the new application. The Network and Sharing Center in Windows 10 is one of them. This article will tell you how to open the Network and Sharing Center in Windows 10 on the latest builds at the beginning of 2018.
Network and Sharing Center.
In previous versions of Windows 10, the user could get to the Network and Sharing Center by right-clicking on the network connection icon in the notification area. Unfortunately, this method no longer works because instead of a link to the classic interface, there is now a button that launches the regular Settings app in the network connections section. This does not mean that the system does not have the ability to open the old interface. Here we have collected all the methods by which you can open Network and Sharing Center in Windows 10.
How to open Network and Sharing Center using the Run command
This method is a double-edged sword. On the one hand, it is simple because it only requires you to press Win + R and enter a command. On the other hand, you need to learn a complex command and not make a mistake in the name. Since this method involves a minimum of steps, let's start from there.
For reference: Almost every section of the control panel has its own corresponding command that you can use to quickly open the section you need. A list of these commands can be easily found on the Internet.

Launching Network and Sharing Center through Control Panel
If you know how to open the Control Panel in Windows 10, then finding the section with network settings will not be difficult for you.

Opening Network and Sharing Center through Settings
The principle is the same as in previous versions of Windows 10, but there are a few additional steps. Links to the classic interface are still in Settings - you just need to find them.

How to create a Network and Sharing Center shortcut
If you have to launch this section often, it makes sense to create a shortcut on the desktop or taskbar.

How to open Change adapter settings Windows 10
If you are looking specifically for a list of network connections on your computer (changing adapter settings), you can cut a little and get straight to the interface you need. This is done as follows, by analogy with the previous steps: click Win+R and enter ncpa.cpl.

There is another option:

No one excludes the fact that in Windows 10 1803 and newer Microsoft will bury the control panel even deeper and some of the methods described above will stop working. If this happens, we will update this article accordingly.
The Network and Sharing Center, as the name suggests, is needed to configure the Internet and protect content.
It is located in Windows 7 and Windows 8 (8.1, 10) in the same place, so there is no point in describing it separately.
To find it, just press start and enter the line in the search: “Network and Sharing Center.”
Immediately after this, you will see this section at the very top - after clicking it will open.
There are other ways in Windows 7 and Windows 8 to find it and start managing access and networks.
Find Network and Sharing Center through Control Panel
To use this method first.
Then find the line: “Network and Sharing Center” and click on it.
This is all. There you can, in addition to what the name implies, change the settings of the adapters: bluetooth, Wi-Fi and network cable.

However, this section is most often used for diagnostics - determining why the Internet has disappeared.
Another way to find out where the Network and Sharing Center is located
This is the method I use most often. Right-click on the network icon in the tray and click on the line that appears - Network and Sharing Center.

After this, you will be immediately transferred to this section or you can start diagnosing directly from there.
You can also create a new Internet connection - if you have cable, then you don’t need to create anything, just install the driver.
At the very bottom you can launch a utility to automatically fix problems. It is worth noting that standard Windows tools are not very functional.
In general, if you are an administrator, then this is for admin work. Good luck.
Microsoft continues to actively improve Windows 10, introduce new features and change the interface. One focus of these changes is the move away from the classic Control Panel, which was previously used to customize Windows, and towards a more modern Settings menu.
For example, previously, in order to open the Network and Sharing Center, you had to right-click on the network connection icon on the taskbar. Until recently, this method worked in Windows 10, but for the latest versions it is no longer relevant. In this regard, many users have a question about how to open the “Network and Sharing Center” in new versions of Windows 10.
In fact, the “Network and Sharing Center” opens almost the same as before, but now you just need to make one extra click. To do this, right-click on the network connection icon on the taskbar and select “Open Network and Internet Settings” from the menu that opens.
As a result, the “Settings” menu will appear in front of you with the “Network and Internet - Status” section open. Here you need to scroll to the very end of the page. Almost at the very bottom there will be a link “Network and Sharing Center”. By clicking on this link you will have access to the “” section you need.

In addition, the “Network and Sharing Center” can be opened using the command “control /name Microsoft.NetworkAndSharingCenter”. To do this, press the Windows-R key combination and execute the specified command in the window that opens.

If you wish, you can even make a shortcut that will execute the command “control /name Microsoft.NetworkAndSharingCenter” and thereby open the network control center. To do this, right-click on the desktop, select “Create – Shortcut”, enter the command and save.
The Network and Sharing Center not only organizes network connections, but also allows you to perform a number of other actions:
- Adapter management;
- Change settings;
- Homegroup selection;
- Creating new connections and more.
How to access Network and Sharing Center in Windows XP
In Windows XP, the necessary information and details for connecting via the network are obtained automatically. Naturally, a built-in network card or presented as an expansion element must be integrated into the hardware component.
To reconfigure or debug existing network connections or create new ones, you need to log into the Network and Sharing Center. In this operating system, login is through the control panel. Here you need to find the “Network Connections” icon.
Editing the network connection parameters is done through the context menu item by right-clicking “Properties”.

Typically, the TCP/IP protocol property parameters are edited.

To set an IP address automatically, just select the “Obtain DNS server address automatically” option.

If there are no available network connections, you need to check the presence of a network card, the quality of the wire connections and the relevance of the installed drivers.
How to access Network and Sharing Center in Windows 7
In Windows 7, the easiest way to enter network management is through the Internet icon in the connections menu.

The window that opens shows all available connections, network characteristics and tools for managing connection parameters.

However, after updating the OS, there is a possibility that this item will not be in the context menu. In this case, you can access network management through the control panel by selecting the “Network and Internet” item.

In the window that opens, there are several control parameters; you need to select “Network and Sharing Center...”. Further actions do not differ from the previous login method.
Manage connection settings
While in the control center, special attention should be paid to two points:
- Change adapter settings;
- Select homegroup and sharing options.
Using the RMB context menu on the active connection, you can debug the operation of the active connection and the network card driver itself.
A home group organizes the work of several computers as part of a single network. In order to ensure the security of using your home network and access control, the corresponding parameters are configured.
Today, there is an Internet connection in almost every home. Some people limit themselves to one computer. Others buy routers and create a home local network for several devices (including smartphones). In any case, in order to do everything correctly, you need to know how to properly configure a local network in Windows 7. This is the topic that is discussed in this article.
Network and Sharing Center
This menu is the heart of all network connection settings in Windows. Set up a local network, change the IP address, find out the MAC address of your network card, create a new PPPoE connection - all this can be done here. Of course, all actions can be performed through the Windows command line, but for most users this method will be very inconvenient.
To bring up Control Center in Windows 7, you can go in several ways:

Connecting to new network equipment
Let's assume you connected to a provider and bought yourself a new router. The router setup itself is not covered in this article - there is too much variety. When the device is fully configured and ready to use, you need to connect your personal computer to it.
You connect the router and PC using a patch cord, and the network connection icon in the Windows tray changes its appearance. This means that everything is fine with the network card and cable. If your router is in DHCP mode, i.e. independently assigns IP addresses to new devices - most likely, you will not need any additional settings.
The operating system will ask you to select a connection type: “Public”, “Home” or “Work” network. For the average Windows user, this step has no meaning. Select, for example, home and click “Ok”. Try going online - if everything works, you don’t need to do anything else. 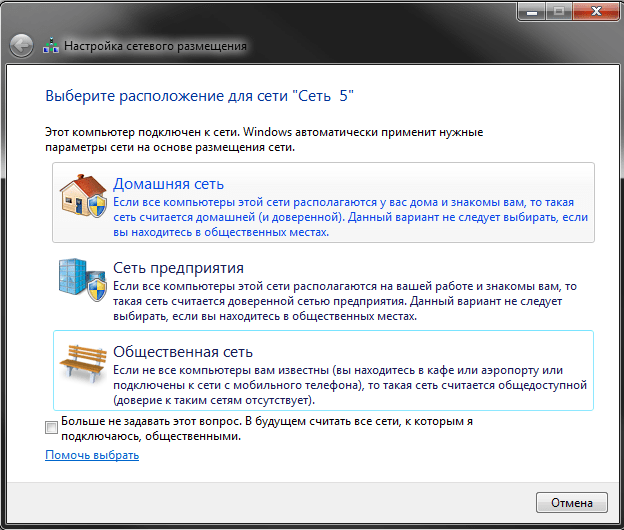
If not, you need to configure the adapter, which is discussed below.
Note! If you don't have a router and you connect a cable from your ISP to your computer, it probably won't work. Modern providers rarely use DHCP technology, preferring PPPoE or Static IP. In this case, follow the further instructions.
Configuring adapter settings
This section of the manual is intended for those users who need to configure the properties of the adapter (network card). If, according to the agreement with the provider, you need to assign a specific IP or mask, or specify a specific gateway, proceed according to the instructions. If the contract specifies a login and password for connection, skip this step and go to the section dedicated to PPPoE.

New home connection
If you connect directly to your provider by cable, bypassing the router, most likely you will need to do the following.


