When installing the operating system, as well as when changing files or redistributing space between partitions, it is necessary to format the hard drive. This is a fairly common operation performed by PC users. If you haven’t done anything like this before, then let’s look at the theoretical part of the question.
What is the formatting process?
Marking areas for storing information, in which some of it is deleted, is called formatting. It creates a system for accessing stored information.
Typically done for:
- changing one file system to another;
- deleting files from your hard drive.
At the moment there are a large number of different file systems. They are used on various equipment, including not only computers, but also mobile devices. The latest versions of Windows use the NTFS file system.
Video: How to format a hard drive
Why format your hard drive?
Formatting is performed to delete files from the hard drive, as well as to change one file system to another.
In most cases they resort to it:
- before installing a new operating system;
- to create a Windows installation image, for example, on a flash drive;
- due to the need to clear the disk of files if they are not needed.
Formatting with Windows tools
Despite the large number of various programs for working with a hard drive, the Windows operating system has its own set of utilities.
Let's look at the process of formatting disks using Windows:
- select the disk that needs to be formatted;
- press the right mouse button;
- select Format;
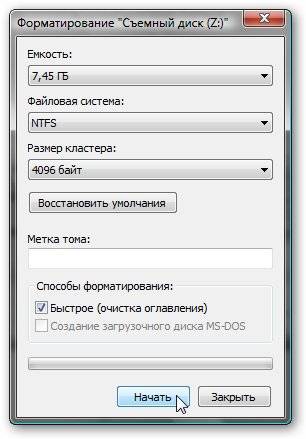
- in the window that appears, select the file system, cluster size, and formatting method;
- It is recommended to set NTFS as a file system, and leave the cluster size at the default – 4096;
- After setting the necessary parameters, click Start.

Windows also includes a more comprehensive service for working with hard drives.
To open this menu, do the following:
- right-click on My Computer;
- select Management;
- open Disk Management;
- In this menu, the user can perform various operations on the hard drive, including formatting.

Formatting via the command line
You can also perform this operation using the command line:
- Press the key combination Win+R;
- enter cmd and press Enter;
- in the command line we write the command format y:, where y is the letter of your drive, maybe, for example, c or d;
- the system will ask you to confirm the operation by pressing the Y key;
- after confirmation, the system will begin the formatting process;
- When finished, this message will appear


Formatting HDD in BIOS
If you need to format a hard drive partition from the BIOS, you will have to tinker a little. Unfortunately, the BIOS does not have tools for formatting a hard drive, so you should use third-party programs to perform these operations.
One of the most common is Acronis Disk Director. To work with it, you need to create bootable media in the operating system with the files of this program. But before you start creating bootable media, you should consider another option - formatting using Windows Installer. This solution is a simpler option compared to Acronis Disk Director.

For this method, you only need a disk or flash drive with a recorded operating system installation package.
To format, you must perform the following steps:

Attention! The drive partition letters may not match. To more accurately determine the required disk, use the wmic logicaldisk get deviceid, volumename, size, description command.
Creating a bootable USB flash drive for Acronis Disk Director
To create a bootable flash drive you will need:

Algorithm of actions:
- insert the flash drive;
- install and open the program;
- in the application, open the Tools section and select Acronis Bootable Media Builder;
- click next;
- select the Windows PE boot media type;
- in the next menu you should mark the necessary components for recording to a flash drive;
- After selection, you must select the media on which to record and click Next. The flash drive should be formatted in FAT 32 format using the Windows utility;
- you can also create an image for later burning to a flash device or disk using the Ultra ISO program.
Working with a bootable USB flash drive Acronis Disk Director
To load a flash drive you need:

How to format an external hard drive to NTFS
The most convenient formatting method is to perform all actions using standard operating system utilities. This solution does not involve installing additional programs or creating additional boot disks.
If you do not have an operating system installed, then in this case you should use special programs, such as Acronis.
Steps describing how to format a hard drive as ntfs:

Utilities
In addition to the standard Windows program, there are various utilities used for the same purpose.
The most common options include the following:

What is the best program to format drives in ntfs?
Each program has its own characteristics, but the main direction for all utilities remains the same - working with disks, including creating partitions, forming into other file systems, etc. Therefore, choosing a program is a purely personal question for each user, which depends on his preferences .
Problems and solutions when formatting
How to quickly format a disk without losing data?
Unfortunately this is not possible. All stored information will be deleted. Only part of the data can be recovered.
Which drive is better: external or external?
Formatting external drives is performed in the same way as for a regular hard drive. During this process, all information will be deleted, including windows, after execution the disk will be like new without windows.

Unable to format hard drive
If you did everything according to the instructions, but did not achieve results, do not sound the alarm. This doesn't always mean something bad.
- format command - cannot be used for a system disk if it is in its environment;
- if the operating system is located in another partition of the HDD, it cannot be deleted;
- Anti-virus program settings can block access to different partitions of the hard drive;
- various applications and viruses can block access.
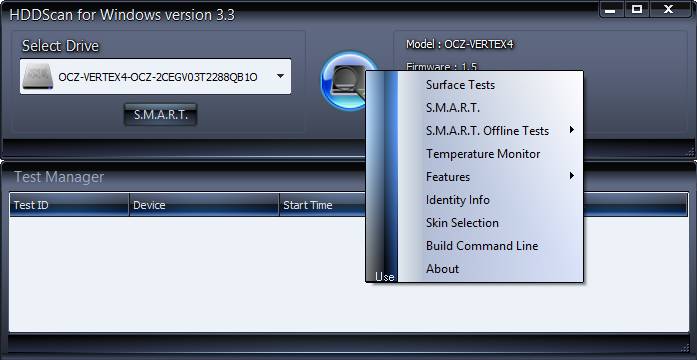
If you have removed the factors described above, but still cannot format your hard drive, you will have to resort to special programs. The most popular tool is HDDscan, which is easy to install and also free.
Algorithm of actions:
- download the utility;
- open and install;
- run as administrator;
- click on the icon in the form of a sphere located in the center of the interface;
- select Surface tests;
- check the box next to Erase;
- go to the Add test tab;
- click on Scan;
- in the lower right corner, write down the error data;
- set the EraseWAITs option to ON and select Scan again;
- repeat until the error is cleared.
You can also use Acronis Disk Director. If it is impossible to format a portable hard drive using this program, most likely the hard drive is partially damaged. And the entire procedure can sometimes be performed only from bootable media, that is, not in the operating system.
How to force format a flash drive?
To format flash drives you can use the program HP USB Disk Storage Format Tool.

How to format a write-protected drive?
- open command line;
- enter the following commands:
- diskpart;
- list disk;
- select disk Z. Z - flash drive number, execution of the previous command is shown;
- attributes disk clear readonly;
- clean;
- create partition primary;
- format fs=ntfs;
- exit.
The operating system includes utilities that:
- provide the necessary set of functions;
- They have a fairly simple interface that will be easy for novice users to work with.
When installing the operating system, as well as when changing files or redistributing space between partitions, it is necessary to format the hard drive. This is a fairly common operation performed by PC users. If you haven’t done anything like this before, then let’s look at the theoretical part of the question.
What is the formatting process?
Marking areas for storing information, in which some of it is deleted, is called formatting. It creates a system for accessing stored information.
Typically done for:
- changing one file system to another;
- deleting files from your hard drive.
At the moment there are a large number of different file systems. They are used on various equipment, including not only computers, but also mobile devices. The latest versions of Windows use the NTFS file system.
Video: How to format a hard drive
Why format your hard drive?
Formatting is performed to delete files from the hard drive, as well as to change one file system to another.
In most cases they resort to it:
- before installing a new operating system;
- to create a Windows installation image, for example, on a flash drive;
- due to the need to clear the disk of files if they are not needed.
Formatting with Windows tools
Despite the large number of various programs for working with a hard drive, the Windows operating system has its own set of utilities.
Let's look at the process of formatting disks using Windows:
- select the disk that needs to be formatted;
- press the right mouse button;
- select Format;
- in the window that appears, select the file system, cluster size, and formatting method;
- It is recommended to set NTFS as a file system, and leave the cluster size at the default – 4096;
- After setting the necessary parameters, click Start.

Windows also includes a more comprehensive service for working with hard drives.
To open this menu, do the following:
- right-click on My Computer;
- select Management;
- open Disk Management;
- In this menu, the user can perform various operations on the hard drive, including formatting.

Formatting via the command line
You can also perform this operation using the command line:
- Press the key combination Win+R;
- enter cmd and press Enter;
- in the command line we write the command format y:, where y is the letter of your drive, maybe, for example, c or d;
- the system will ask you to confirm the operation by pressing the Y key;
- after confirmation, the system will begin the formatting process;
- When finished, this message will appear


Formatting HDD in BIOS
If you need to format a hard drive partition from the BIOS, you will have to tinker a little. Unfortunately, the BIOS does not have tools for formatting a hard drive, so you should use third-party programs to perform these operations.
One of the most common is Acronis Disk Director. To work with it, you need to create bootable media in the operating system with the files of this program. But before you start creating bootable media, you should consider another option - formatting using Windows Installer. This solution is a simpler option compared to Acronis Disk Director.

For this method, you only need a disk or flash drive with a recorded operating system installation package.
To format, you must perform the following steps:

Attention! The drive partition letters may not match. To more accurately determine the required disk, use the wmic logicaldisk get deviceid, volumename, size, description command.
Creating a bootable USB flash drive for Acronis Disk Director
To create a bootable flash drive you will need:

Algorithm of actions:
- insert the flash drive;
- install and open the program;
- in the application, open the Tools section and select Acronis Bootable Media Builder;
- click next;
- select the Windows PE boot media type;
- in the next menu you should mark the necessary components for recording to a flash drive;
- After selection, you must select the media on which to record and click Next. The flash drive should be formatted in FAT 32 format using the Windows utility;
- you can also create an image for later burning to a flash device or disk using the Ultra ISO program.
Working with a bootable USB flash drive Acronis Disk Director
To load a flash drive you need:

How to format an external hard drive to NTFS
The most convenient formatting method is to perform all actions using standard operating system utilities. This solution does not involve installing additional programs or creating additional boot disks.
If you do not have an operating system installed, then in this case you should use special programs, such as Acronis.
Steps describing how to format a hard drive as ntfs:

Utilities
In addition to the standard Windows program, there are various utilities used for the same purpose.
The most common options include the following:

What is the best program to format drives in ntfs?
Each program has its own characteristics, but the main direction for all utilities remains the same - working with disks, including creating partitions, forming into other file systems, etc. Therefore, choosing a program is a purely personal question for each user, which depends on his preferences .

Problems and solutions when formatting
How to quickly format a disk without losing data?
Unfortunately this is not possible. All stored information will be deleted. Only part of the data can be recovered.
Which drive is better: external or external?
Formatting external drives is performed in the same way as for a regular hard drive. During this process, all information will be deleted, including windows, after execution the disk will be like new without windows.

Unable to format hard drive
If you did everything according to the instructions, but did not achieve results, do not sound the alarm. This doesn't always mean something bad.
- format command - cannot be used for a system disk if it is in its environment;
- if the operating system is located in another partition of the HDD, it cannot be deleted;
- Anti-virus program settings can block access to different partitions of the hard drive;
- various applications and viruses can block access.
If you have removed the factors described above, but still cannot format your hard drive, you will have to resort to special programs. The most popular tool is HDDscan, which is easy to install and also free.

Algorithm of actions:
- download the utility;
- open and install;
- run as administrator;
- click on the icon in the form of a sphere located in the center of the interface;
- select Surface tests;
- check the box next to Erase;
- go to the Add test tab;
- click on Scan;
- in the lower right corner, write down the error data;
- set the EraseWAITs option to ON and select Scan again;
- repeat until the error is cleared.
You can also use Acronis Disk Director. If it is impossible to format a portable hard drive using this program, most likely the hard drive is partially damaged. And the entire procedure can sometimes be performed only from bootable media, that is, not in the operating system.
How to force format a flash drive?
To format flash drives you can use the program HP USB Disk Storage Format Tool
- provide the necessary set of functions;
- They have a fairly simple interface that will be easy for novice users to work with.
List of popular free programs for various types of formatting hard drives (HDD, SSD, RAID) and removable media (USB, Firewire, SD). In this article, you will learn how to properly format a hard drive and learn about various types of HDD formatting, including low-level. We will also choose a good program for partitioning the hard drive.
Methods for formatting HDD - from simple to complex
Formatting is a simple operation that can be performed by inexperienced users. Next, I will tell you how to format a HDD yourself - from simple to complex, depending on your skills and level of PC proficiency.
Using standard Windows tools when formatting
The Windows XP-10 operating system has built-in tools to perform this operation. Formatting a hard drive is done like this:
- Open “Explorer” (or another file manager),
- Go to the “My Computer” section
- Click on the desired drive
- Select “Format”
- Next, click on the “Start” button
This is the easiest way to format your computer without additional tools. Despite its simplicity, however, all stages must be performed consciously, clearly understanding why you are doing it. Before giving your consent to formatting, carefully check whether the drive you have selected is correct.
Perhaps the video instructions show more clearly how to format a disk.
An alternative formatting method in Windows 7/8/10
- Different systems have their own path to Disk Management - the easiest way is to open the search for programs and enter “management”. When the system displays a search result, find “Computer Management” and open it
- In the menu on the left, go to "Disk Management"
- Right-click on the desired partition and select Format. Since the process occurs inside a running OS, the “Format” menu item will be inactive on the system partition
- Next, select the label for the new partition, the type of future file system and the required cluster size (if you don’t know what size you need, leave “default”)
- For high-level formatting, you can leave the “Quick Format” checkbox active. If you need to deep clean the partition contents, uncheck this box.
- After clicking the “OK” button, the system will ask for confirmation - click “OK” again
Formatting a hard drive via the Windows command line
To start formatting, open a command line (console) on your computer. To do this, use the key combination WIN + R, in the “Run” window that appears, enter the CMD command, press ENTER.
Note. To format a disk via the command line, you will need administrator rights. Start - CMD - open the context menu by clicking on the application icon "Command Line" - Run as administrator. If you try to format the disk without administrator rights, you will not succeed: access will be denied. Anyway, watch the video where I show you how to format as an administrator.
To format via the console, use the following commands:
Format drive letter
Press Enter. We carefully read what is written in the console and perform further actions with the hard drive depending on the situation.
Full hard drive formatting via HDD Low Level Format Tool
Low-level formatting will optimize the HDD structure. This is useful when preparing to reinstall the operating system. At the same time, you can solve problems with bad sectors of the hard drive.
HDD Low Level Format Tool is suitable for low-level formatting. The utility will help you format your computer's hard drive, external HDD, tablet SD card and other storage devices.
In addition to the basic functions, HDD Low Level Format Tool can be used to read SMART indicators, check read errors, disk uptime, etc.
How fully format the hard drive:
- After installation, run the HDD Low Level Format program
- In the Drive selection window, select the hard drive (if several HDDs are connected to the PC). The easiest way to distinguish one hard drive from another is by capacity. Click Continue
- Go to the LOW-LEVEL Format tab
- To quickly format (delete partitions and MBR records), select the Perform quick wipe option.
- To completely format the hard drive, the above option should be ignored
- Before completely formatting your hard drive, make sure you have selected the correct drive. Only then click the Format this device button.
AOMEI Partition Assistant
AOMEI Partition AssistantThe program offers a number of useful functions, including low-level formatting of hard drives and most types of removable media. The interface resembles standard Windows tools, so it won’t be difficult to understand:
- The main window automatically displays the disk with the installed OS. If you need to format another device, select it by clicking “Disk” in the top menu
- In the bottom block of the left menu, select “Erase Hard Drive”
- When you click this button, you will be prompted for the number of passes for the operation. If you intend to restore destroyed data in the future, then select a value from 1 to 7. If you specify a parameter of 8 or more, it will be almost impossible to recover information from the device
- Confirm your choice by clicking "Yes"
- To start formatting, you will need to reboot the system - once you click the “Reboot Now” button, there is no turning back, so make sure you have selected the correct disk and the desired operation settings
After restarting the computer, the program will perform all the specified actions and you will have a clean hard drive at your disposal.
DiskWipe
DiskWipe is an excellent solution for situations when data on storage media needs to be destroyed beyond recovery. The program uses several proven algorithms (Dod 5220-22.M, US Army, Peter Guttman), and advanced settings allow you to select the formatting depth. According to the developers, the program does not contain hidden viruses, etc., and also does not transmit user data.
DiskWipe
It’s extremely easy to format the desired device using DiskWipe:
- Launch the program. In the block on the left you will see all devices available for formatting
- Select the desired device and click "Wipe Disk" in the top menu
- Advanced settings will open with preset standard values. For complete and irrevocable formatting, you can check all available fields and indicate “Highest” in the right block
- After selecting settings and clicking “OK”, formatting of the selected device will begin
Paragon Partition Manager
A test period of 30 days allows you to evaluate the capabilities of the program and format the desired devices in various modes. Since Paragon Partition Manager has several options for working with partitions (partitioning, recovery, and others), it is distributed shareware.
Paragon Partition Manager
The formatting process is intuitive:
- In the main window, click "Partition Manager" in the menu on the left, then select "Launch Partition Manager"
- From the proposed list of devices, select the one you need, open the context menu with the right mouse button, and click “Format partition”
- Specify the type of future file system and volume name, then click “Format”
- The procedure will be queued - to apply the changes, you must click on the green checkmark in the top menu
- After confirming the operation (the “Yes” button), it will no longer be possible to stop its execution.
Separately, it is worth noting the fact that Paragon Partition Manager not only formats the device, but also creates a new partition with the specified file system, so after the system boots, the disk can be used without additional actions.
reference Information
What is formatting?
Disk formatting is the procedure of applying marks to a data storage device - a hard drive (HDD), memory card, CD/DVD or other storage medium. The formatting operation is equally useful for new and “worn” HDDs that have served their life.
A disk that has no partitions is absolutely useless. In addition to the fact that you mark up the disk, formatting deletes all data almost irrevocably (although there are many programs for recovering after formatting). Therefore, you need to be careful and prepare in advance to format your hard drive.
Over the years of operation of the operating system (Windows, Mac OS, Linux), the hard drive turns into a “garbage dump”, since many programs leave their files on the disk, and after uninstallation their “roots” still remain on the HDD. As a result, the system is slow and unstable. Various freezes and slowdowns occur, the disk clicks, makes noise, and behaves inappropriately. After reformatting, the hard drive is optimized and begins to work better. Many devices last a long time without this procedure. I advise you to be on the safe side and format your hard drive at least once a year.
Sooner or later, formatting the disk is inevitable. However, before doing this, it is very important to update or reinstall the operating system on your computer. Along with removing unnecessary files, you get a completely clean environment without defects, harmful viruses, unused programs, and data that lead to conflicts. Thus, before reformatting the hard drive, we reinstall the OS.
Before formatting, back up all important data to another drive. As already mentioned, during this procedure, various service information and marks are written to the disk, which allow information to be written to the HDD in the future without hindrance.
Steps to format a hard drive
Low level– at this stage, basic markings are applied to the disk at a low level. Typically, this is done by the hardware developer. In this case, special tracks and service data are written to the disk. This information remains on the hard drive almost forever - it can only be overwritten using proprietary utilities. These programs can only replace service data. By the way, if you perform low-level formatting of the hard drive, then you will no longer be able to recover data later, unfortunately or fortunately. Therefore, if your goal is to destroy information, then you can use this format. Read about low-level formatting
Section breakdown. It is clear that storing data on a disk without partitions is quite inconvenient. For some logical organization, the HDD is divided into special zones, disks - drive C:, drive D: and so on. For these purposes, both utility utilities built into the OS and external programs for formatting the hard drive, which I have already written about more than once, can be used.
High level. During this type of reformatting, boot sectors and file tables are created.
Types of disk formatting
You may know that standard system tools provide 2 methods by which you can format a hard drive - external or internal:
quick formatting: takes less time, allows you to carry out the procedure as is. The point is that with this type of computer formatting, the files in the file table are overwritten with zeros, while the data is stored as if nothing had happened, and you can later restore it. Also, with this method you do not optimize the file structure, and if there were defects on the hard drive, you will not fix them with the quick method
normal formatting: Longer and deeper formatting of the hard drive. The data on the internal or external drive is completely destroyed, the file system is checked for possible errors and damage. bad sectors, bad blocks. Thus, with the usual reformatting method, you kill two birds with one stone, although you lose a little more time.
Formatting a hard drive is a software process of applying marks to elements of the memory area of magnetic plates and creating a new file structure of the media. Without labels and file system structure, a hard drive is a useless device; you cannot write information to it due to the physical and software features of the processes of recording, storing and reading information.
Physically, nothing happens to it when formatting a hard drive, but at the software level, its logical structure is organized on the media - a certain order necessary for recording, storing, editing and deleting data. Otherwise, the logical structure of the disk is called a file system. Depending on the selected file system, the speed of access to information, the maximum length of a file name, the number of files in one directory, the efficiency of the drive, search methods, recording information, etc. will differ.
Formatting a hard drive is divided into two types. These are low-level and high-level formatting.
Low-level formatting is a process by which special electronic marks called servo marks are applied to the magnetic surface of the polished platters of your HDD. They contain service information about the positioning of the read heads and the position of sectors and tracks of the disk, which determine the physical format of the drive. This procedure is performed on special factory equipment, since before this the media does not contain any information about the sectors and tracks of the plate(s), due to the absence of which, working with the media is impossible. Due to the coefficient of volumetric expansion of the materials (as many know from school physics lessons) from which HDD platters were made in the past and the stepper motors that control the positioning of the heads, sectors and tracks were displaced relative to the read heads. Thus, when, according to the controller, the head was in the desired sector, it could physically be on the adjacent track. Because of this, the hard drive malfunctioned and bad (inoperative) sectors appeared (if the controller thinks that the head is in the first sector, but in reality it is positioned, for example, above the 5th, then the first four sectors are inaccessible to it). Such hard drives required repeated low-level formatting throughout their entire service life, which required the complete and repeated destruction of all data on the hard disk platter(s).
In new HDDs, this problem was solved by using a voice coil in the read head mechanism, due to which the influence of thermal expansion was compensated by recalibrating the operating parameters of the disk heads (to put it simply, everything was solved at the software level by simple redirection).
Low-level formatting is necessary to solve several problems and is performed in such cases:
- at the manufacturing facility to create the physical structure of the manufactured hard drive before testing and delivery to the end user;
- on old hard drives to reset the file system (due to the coefficient of linear expansion of materials when heated during long-term operation of the HDD, the head moves slightly in relation to the formed grid of tracks and sectors);
- complete, reliable and irrevocable erasure of all information stored on the hard drive, for example, before selling your own computer or the hard drive itself.
High-level HDD formatting is the process of forming the file structure of a hard drive, which consists of creating a master boot record, a file table, a file system structure and, depending on the formatting option, checking the surface of the hard drive platters for damaged sectors and then replacing or deactivating them. High-level formatting prepares the hard drive for use by the operating system to store data on it.
High-level formatting is divided into two types: quick and full. During the fast process, the file table is updated, which stores file names and paths to them, attributes, etc. After this, its new structure is formed, and a master boot record of the disk or its logical partition is created. Upon completion of the process, the operating system will recognize the hard or logical drive as clean, although physically all the information on it will remain intact, with the exception of the file table - all data in it will be marked as non-existent and will be overwritten with new bits of information during operation.
Full formatting is a procedure for clearing the file table, as during quick formatting, but with subsequent rewriting of each sector with zero bits of information. Also, during full formatting, all sectors of the hard drive will be checked for functionality. If a bad sector is detected, it will be replaced with a functional one that is in reserve, or simply excluded, as a result of which the usable volume of the HDD will slightly decrease.
High-level formatting of hard drives and their partitions must be performed in the following cases:
- during reinstallation of the operating system to reset all data located on them and form a new disk structure;
- when dividing the drive into logical drives;
- for high-quality checking of magnetic plates for the presence of damaged sectors;
- immediately after low-level formatting to form the file structure of the disk by the manufacturer or user (mandatory procedure);
- deleting all information on the hard drive.
2. Formatting a non-system hard drive
Any operating system of the Windows family is located on a disk or partition thereof, which is designated as system. It contains the master boot record and Windows system files, thanks to which the software interacts with the hardware. There may be several such partitions, but, as a rule, the user has one operating system installed, which implies the presence of a single system partition. All other partitions and hard drives connected to the computer are not system drives. The second and subsequent hard drives are non-system, so the procedure for formatting them is no different from formatting removable USB drives.
Let's consider methods for forming the file structure of non-system hard drives using tools built into the operating system and using third-party software products designed to work with hard drives.
2.1. Formatting using BIOS
One way to format a hard drive is to use a bootable flash drive or CD with an installation distribution of the Windows operating system, the so-called LiveCD or bootable media with one of the programs for formatting storage media. There are versions of programs, such as AcronisDiskDirector, that can boot directly from a flash drive, which means they work without an operating system. The latest versions of Acronis have a bootable media creation wizard. Such a flash drive will allow the AcronisDiskDirector program to boot from the BIOS and format the hard drive.
In addition to third-party programs, formatting a hard drive with BIOS can be done by booting from the installation disk with the Windows distribution using the command line or the operating system installer. All these options will be discussed in more detail below.
2.2. Formatting using Windows
The Windows operating system contains all the tools necessary to format hard drives. In this section, we will consider all the methods to format a hard drive using the tools provided by the Windows operating system.
2.2.1. Through properties
The simplest way to prepare a hard drive for work, clear it of unnecessary information and form a new system is to format it through the context menu.
2.2.2. Through “Creating and formatting hard disk partitions”
The second method to format a hard drive using the Windows operating system tools is the Disk Management snap-in, located in the Computer Management system console.
“Disk Management” is a Windows system service designed to manage flash drives, hard drives and their partitions. This program allows you to format hard drives connected to your computer in one of three file systems and create new partitions on them. Almost all actions are performed without rebooting the operating system, which will not distract the user from his main work.
You can start Disk Management using one of the following methods.
Via the Start menu

Via "My Computer"

Via "Control Panel"

We have launched the Computer Management service. Next, you need to go to its subsection called “Disk Management”, which, in turn, is located in the “Storage Devices” section.

During formatting, you will not see any windows with the progress of the operation, except for the inscription “Formatting” in the “Status” line (see screenshot).

Our hard drive is formatted in the selected file system and is ready for further use. You will be notified of this by a dialog box and a system signal.
2.2.3. Command line
In addition to formatting hard drives through graphical interfaces, the operating system, since the days of console MS-DOS, allows the formation of a new file system of the hard drive with the deletion of all files and, with full formatting, checking its surface for integrity, using system commands entered into the command line console, also called the Windows command interpreter.
The command line allows the user to interact with the computer directly, without any intermediaries in the form of third-party software. It is a window for entering text commands understandable to the operating system with many parameters for direct control of the operating system or computer hardware. Naturally, using the command line, you can quickly format the hard drive. To do this, launch the system console using any of the listed methods or a more convenient method for you.
Through the Run window

Via the Start menu

Using Windows Explorer
The command line is launched by calling the file “cmd.exe” located in the “System32” folder of the system directory of the Windows operating system. To launch the command line, you can go to c:\Windows\System32\cmd.exe or use the shortcut to launch the command interpreter.
Having launched the command line, we will see a black window on the screen where you can enter text commands that are understandable for the Windows operating system, starting with its first versions.

If you did not enter a label, the operating system will ask you to enter it before formatting or leave the hard drive without a name by pressing “Enter” (see screenshot).
The process of formatting a hard drive, depending on the specified parameters and storage capacity, can last from several seconds to several tens of minutes. Formatting is accompanied by the inscription: “Creating file system structures.”

At the end of the process, the console window will display the message: “Format completed” and the results of the operation will appear.

Now our hard drive is formatted using the system console and is ready for further use.
2.3 Formatting a disk using the HDD Low Level Format Tool
The HDD Low Level Format Tool utility, or HDDLLFT for short, is designed for low-level formatting of hard drives and digital storage media based on memory chips. It copes with the task perfectly even in cases where the magnetic surface of the plate is severely damaged.
Carrying out the procedure for formatting a hard drive through the utility does not require any special user knowledge.

Keep in mind that in the free version of the HDD Low Level Format Tool, the format speed is limited to 50 Mb/s, which, with significant volumes of modern hard drives, during a full format and checking the drive for bad sectors, can result in several hours of work. The second drawback of the program is the inability to specify the cluster size.
3. Formatting the system hard drive
A system hard drive is, as a rule, a high-speed (with a platter rotation speed of 10,000 rpm, although it can be with a standard 7200 rpm) hard drive on which the operating system is installed. Based on this, it will not be possible to format it using Windows. Formatting a system hard drive is carried out using a different method, the essence of which is no different from forming a new file system for a regular hard drive. The only difference is that the utility for creating a new file system will have to be launched from the installation disk or flash drive.
3.1. Formatting using a bootable USB flash drive or disk
3.1.1. Through the Windows operating system installer
One of the most common methods to format a hard drive used as a system drive is to use removable media or a CD and a Windows OS installation distribution.
We will not consider how to create bootable media; many articles have been written on this subject on the Russian-language segment of the Internet. Let's get straight to the point.
- We insert the bootable flash drive into the USB socket of your computer or laptop (or the CD into its drive).
- Reboot or turn on the computer.
- We select our media as the device to which control of the system will be transferred (in our case, it is a 4 GB USB flash drive for booting from UEFI).

- Depending on the build of Windows, we select the operating system installation option (with a different bootloader interface, using third-party assemblies, the essence of the process will remain the same).
- Select the installation language. Naturally, it will be Russian, as will the keyboard layout, time format, etc.
- Click “Full installation...”.

- Click “Ok” to confirm your intentions.

Immediately after loading the basic I/O system and initializing it and testing the equipment, we begin to click on the quick selection key for boot media.
This key can be "F9" or "F11" (see the manual for your motherboard or laptop for instructions), and this data is also displayed during BIOS boot.
When a similar black screen with an inscription appears, press any button on the keyboard.

Information will be read from the bootloader program to which the BIOS has transferred control.
In the next window, simply click “Install ->”.

We accept the terms of use of the operating system, preferably after reading them.

We stop at the second option so that we can get into the hard drive settings menu.
Using the keyboard and mouse, select the required hard drive if there are several of them connected to the computer, and click “Disk Setup”.

The toolbar will change slightly.
Click on the “Format” button.

A standard window will appear warning that all files and programs on the disk will be destroyed.
After clearing the table of contents, the hard drive will be formatted and ready to install the operating system.
This method is reasonable to use in cases where the Windows operating system cannot format the hard drive, for example, because it is used by some application or is a system partition.

3.1.2. Formatting the system hard drive via the command line by booting from the installation disk/flash drive
Another simple option to format the disk on which the operating system is located is to use the command line by booting from a disk or flash drive with installation files for the Windows operating system.
3.2. Acronis Disk Director
- To launch the bootable media creation wizard, go to the “Backup and Restore” tab on the program control panel, which is designed in a ribbon style, like Microsoft Office, starting with the 2007 edition.
- Click on the “Create bootable media” item.

- Depending on the version of the program, a window may appear asking you to select the type of boot media. It is recommended to select a bootloader based on Windows PE. Click “Next”.

Select the type of Acronis bootable media to be created.

- Then we confirm our intentions to write the program files to the flash drive, having first destroyed all the files on it, and wait for the end of the writing process.
We boot from the created drive.
To do this, restart the computer and select our flash drive as boot media. This is done by changing the priority in the list of boot devices (the “Boot” menu item) in your BIOS or by using the boot device selection hotkey.

In most cases, during the initialization procedure, which occurs before loading the operating system, you must press the F11, F9 or other key to bring up the boot menu. In it, select the USB drive and click “Enter”.

We are waiting for the program to load.
Typically, this procedure takes little longer than loading Acronis Disk Director in Windows.
- We select our hard drive and call the formatting procedure using any method:

- In the dialog box that appears, select the hard drive formatting options:
- file system – it is recommended to use NTFS, due to support for files larger than 4 GB, which is not available for FAT and FAT32;
- Leave the cluster size at “Auto” if you have no idea what this value is. However, to store a huge number of small files, it is recommended to select a cluster size of less than 4 KB;
- volume label – enter the name of the hard drive or leave the field blank.
- If you are confident in the actions you are performing, check the correctness of the specified parameters and click on the “Continue” button.
We select the necessary components on the basis of which the wizard will create a bootable USB flash drive.
To format a hard drive, the AcronisDiskDirector program is sufficient. If you want to have a tool for creating backup copies of partitions, also select AcronisTrueImage.

Having set all the parameters, we turn our attention to the toolbar located at the top of the screen. Click on the button called “Apply pending operations (1)”.

After a short loading of the list of operations, a small window will appear with their detailed description and parameters.

After a few seconds of fixing the operation, the hard drive formatting procedure will start.

Be careful, the program will not display a warning window asking you to confirm the operation and will not notify you that all data on the hard drive has been destroyed.
Formatting will occur within a few seconds, since the utility uses a quick formatting algorithm. At the end of the procedure, the window will close automatically, and the hard drive with a cleared file table and a new file system will be ready for further use.

3.3. Paragon Partition Manager
Paragon Partition Manager is the most powerful free software product for working with hard drives. Naturally, you can use it to format any hard drive or partition. In addition, the utility can work with backups, change and create logical partitions, install several operating systems on a disk, and so on.
- Load the LiveCD or installation distribution of the Windows operating system, which includes the Paragon Partition Manager program.
- We write the image to removable media and boot from it, specifying the highest boot priority from a flash drive in the BIOS or selecting the drive with the Paragon Partition Manager distribution as the boot device.
- We select our program using the mouse cursor or cursor keys and the “Enter” button, depending on the graphical menu and the bootloader used to create the LiveCD.
- The main menu of the utility will appear, where we select “Partition Manager” in the list on the left, and then in its right frame.

In the next window, in the list of your hard drives, select the one you want to format.
This can be done both in the “Disk Panel” tab and in the lower frame called “Partition List”.

- Call up the context menu of the magnetic drive and select the “Format” command in it, which is located in one of the first places.

- Specify the file system and the new hard drive label.

- Click “Advanced options” if you want to change the number of sectors in one cluster. You can also specify here whether to perform formatting using the built-in Windows “format” command, which we became familiar with when formatting a disk from the Shell, or use the developers’ own algorithm.

Click “Format”.
The program will not ask for confirmation of the operation, but it will not start executing the command specified to it.
To do this, click on the “Apply intended changes” button, which is located in the toolbar under the main menu.

To view planned changes, use the magnifying glass button.
- In the dialogue, we agree to make changes by clicking “Yes”.

- We are waiting for a notification that the program has completed its operation.

The same is done through the main menu of the program.

4. Possible errors and ways to solve them
One of the many problems that users face when formatting a hard drive is the use of outdated software. This happens because the user has not updated the disk management program that he trusts for several years. Also, using queries like “download hacked acronis” often leads to the most popular sites, which have been at the top of search engines for many months and contain outdated versions of the software.
Make sure your hard drive software is up to date, especially if you are using one of the latest versions of Windows.
The second problem is an error when trying to format the disk being used, especially for system partitions. Also, some application can use the hard drive or its partition, even in read mode, while the user is trying to format it. The way out of this situation is to use bootable LiveCDs or media with a Windows distribution.
An error in the process of formatting a hard drive due to a huge number of damaged sectors occurs when trying to fully format a hard drive, the surface of which is replete with damaged memory cells. Run a HDD scan, for example, with the Victoria utility, with reassignment of damaged areas or their exclusion from the area used for storing information.
Today we want to talk about one interesting situation. I have a computer with Windows XP. The hard drive is divided into two sections: C - system and D - data. When trying to format drive D, the system gives an error:
Windows can't complete formatting
Why does this problem arise?
Such a pun with partitions and the location of the boot sector arises in the following situation. When reinstalling Windows, the system partition is deleted and then recreated in an unallocated area that is located in front of another partition:

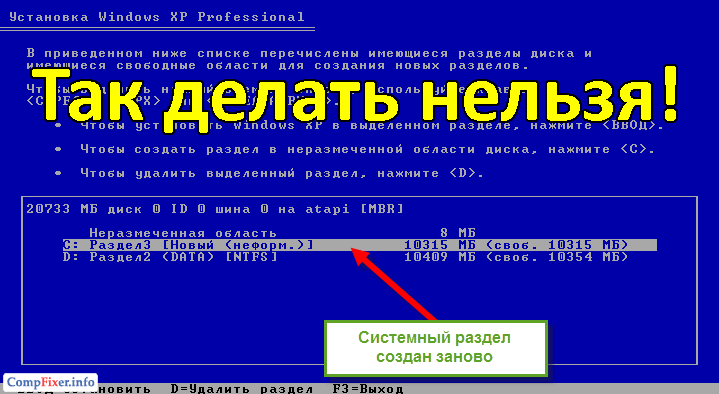
As you can see from the second picture, the newly created section is named “Section3” for a reason.
What happens in this case?
As a result:
- the second partition on the disk is the primary one
- the partition that is physically located first is the logical one
- The first one is system, however, the second disk is bootable.
The picture below shows that:
- drive D is active and bootable, because is the only main section, and drive C contains the system and is logical, which occupies the entire additional partition;
- The additional partition is physically located in front of the main one - where the other main partition was previously located:

Attention! At Microsoft, for some reason, the “Boot” label means the disk containing the Windows and Program Files folders, and the “System” label means the active partition. Although, it would be logical to swap the names.
Let's look at the contents of drive C - indeed, there are folders here Windows, Program Files And Documents and Settings:

However, on drive D we see boot.ini, ntldr and other boot-related files. Therefore, neither C nor D can be formatted:

How to avoid this situation when installing the system
- If during reinstallation you do not need to save any data on the SSD/HDD, delete all partitions (D key), then create them again and install Windows on the very first one.
- If you do not want to format the hard drive completely because of the data you need, then under no circumstances delete any partitions in the installer! Just select the first one to install the system, then quickly format it and install Windows on it.
How to fix the situation
Method 1. The easiest way for the user: save all important data to an external hard drive or SSD and reinstall Windows, taking into account the recommendations from the previous paragraph:
- save all important data to an external drive;
- reinstall Windows, during which:
- delete ALL partitions from the hard drive;
- create the first partition for the system;
- create another or several for the data;
- install Windows on the first one.
Method 2- complex: make the first partition bootable, active, edit the boot.ini file.
Install the MiniTool Partition Wizard Home Edition program. (You can download the program from here: http://www.partitionwizard.com/free-partition-manager.html)
1 Convert partition C from logical to main.

Click the button Apply up:

Click Yes:

Click Restart Now:

The computer will restart and convert the logical drive to basic (primary). Expect:

After reboot you will receive an error message:
Windows can't start because the hal.dll file is corrupted or missing

Now we boot from ERD Commander (or DaRT 5).
2 Copy all system files from D to C.
Attention! When you boot into DaRT or ERD Commander, the primary and logical drive letters will swap places! Be guided by the volume of partitions and their contents! Simply put, all system files should be in the root directory of the volume containing the Windows and Program Files folders.

3 Open the boot.ini file and correct the boot partition number. Usually instead (2) needs to be registered (1) .

4 Launch the command line and make the desired partition active:

Let's reboot. The system should boot from the first disk and now the other (non-system) disk can be formatted.


")


