Watermark is a way to protect your copyrights to photo content. This could be a company logo, the author's name, a link to a website, or any other unique word or image that indicates your authorship.
The mark is called a watermark due to the fact that according to the standard it must be made translucent. After all, the content itself is important in the image, and the sign should not attract the main attention. A proper watermark is a faint, translucent mark near the edge of the image.
When is it useful to use a watermark?
- To protect from copying your photo content that you post on the Internet, for example, on social networks or a personal website. Images with someone else's watermarks are reluctant to be copied by users. Even if someone, for example, reposted such an image to their public group, then a second case of the usefulness of such signs follows...
- PR. Users who, despite your watermark, copy it onto their websites or public pages, create free advertising for you. The logic is simple - a person who sees your image will also pay attention to the watermark. And then, if he is interested in your work, he will receive the necessary information on how to find you, because anyone understands that this is the primary source of this content.
- Let's not forget about the banal brand promotion. People who copy your content distribute it to all mental and non-mental sources. And the constant flashing of a brand leaves a certain trace in the memory, which will later serve benefits, including commercial success.
- If the photo content is quite specific, as, for example, on this site, where I post educational screenshots so that discourage competitors from copying content, a watermark helps with this like nothing else. Actually, competitors are unlikely to want to build their own similar site with pictures that contain a direct link to my project. Even if they do, I won't be upset because, as stated in point 2, this is an advertisement and an additional source of targeted traffic.
How to make a watermark
First, decide what it will be: a logo, a link, a word or something else. For example, on my website I use a link stylized as the main site logo as a watermark. If the picture flickers somewhere, then the interested user knows how to find the original source.
The watermark needs to be small. It's better to stick to your own style. In my opinion, a sign of quality is stability, so you shouldn’t pull the sign in different places on each photo. It’s better to always let it be the same place. IMHO.
Make the sign translucent and dim the brightness of the colors. It should not be flashy or catch your eye. What's important in an image is the content itself, not your eye-watering watermark.
Using the tips above, let's first make a sketch.
Open any image and place your future watermark in it.
In this article, we will not learn how to make logos or beautiful inscriptions. This is a completely different story and everyone has their own...
It is assumed that you already have a blank from which you intend to make a watermark.
As a result, you should have two layers on your palette with the main image and the image/text you just added.

After that, set the desired size of the watermark so that it is not too small or large.
To do this, make sure that the image with the logo is selected (as in the screenshot above - the selected layer is marked in blue), select the Ctrl+T tool. A bounding box will appear around the unfinished watermark. Move it around the corners to reduce/enlarge the picture.
To change the picture proportionally, hold down the key Shift, when pulling the corners.
![]()
When finished with the size, press the Enter key or the checkmark button on the tool.
Now you need to move the watermark to an inconspicuous place. The classic option is the lower right corner.
Since we now have the task of getting rid of a lot of tedious work, using an action is ideal for this.
This action will work like this:
Open the photo in Photoshop and click play on the action with the watermark. We repeat these steps for each photo.
There is nothing complicated here, the main thing is that there are as few actions as possible and that they are all clear and understandable to the program.
Step 1
We will create the action on a previously opened photograph. Therefore, select and open any one in Photoshop.
Step 2
I'm looking at an example on my pre-made logo. This file must be saved on your computer. Choose a folder where it will lie. This location can no longer be changed/renamed, including other folders preceding the final one. Simply put, placing a picture, for example, along this path: “C:\Users\Username\Desktop\Pictures\logo.png”, none of the folders can no longer be renamed, moved, etc. Otherwise the action will stop working.
Step 3 Open the palette.
Open the palette with actions/operations: Window - Operations or keys Alt+F9.

This is what it should look like:

Step 3 Start recording.
Create a new folder for your actions. Click on the third button from the right. A window will appear in which you can come up with a name for the folder.

Now let's create a new operation. Click on the second button from the right Creates a new operation. Give her a name.

After pressing the button Write down, you will see that the record button (red icon) has become active on the palette, like on a video camera. This means that the recording of our actions in the program has begun.

Step 4
First of all, we execute the command to open the image with the future watermark: File - Open or Ctrl+O . Next, find the picture on your computer.
The picture should open in a new independent tab ().

Step 5
The next task is to copy the logo and transfer it to the original photo.
To do this, press Ctrl+A. We have made a complete selection of the contents of the picture, “marching ants” should appear around the perimeter.
Let's make a copy Ctrl+C . So the picture was copied to the clipboard.

Go to the previous tab with the open photo and paste the copied logo there - Ctrl + V.

Step 6
Just drag the logo to the desired location it is forbidden. Photoshop may remember the coordinates, but when you open photos of other sizes, the watermark may end up almost in the middle of the photo. This is bullshit. You need to make sure that Photoshop always determines where the edges of the photo are and aligns the logo relative to their location.
To do this, select the layer with the photo itself in the layers palette and press Ctrl+A to select it all.

So we've just pressed the watermark into the very bottom right corner. But it's not pretty so close to the edges. You need to make small indentations from the edges.
To do this, with the selected tool Moving, holding down the Shift key, click once on the left and top arrows on the keyboard. The image will shift by 10 pixels in the specified directions. If there is a lot of this, click on the arrows without Shift, then the shift will be 1 pixel.
The final chord is to change the opacity of the logo in the layers palette. I set it to 60%.

Step 8
Close the logo tab that was created in step 4. She should be the second in a row.
To do this, you MUST first click on this tab so that it becomes active (the active tab is highlighted in a brighter color), then click on the cross. Otherwise, Photoshop will record the closing of our main photo tab in the action.

As a result, the action file should look like this:

Don't forget to click on the button Stop to finish recording the action.
Functionality check
Reopen any photo. On the operations palette, by clicking on the arrow next to the action name, you can hide/display a detailed list of actions. To avoid clutter, it is better to hide it.
To activate an action, select it in the palette and click the button Play.

Result

If you notice an error in the text, select it and press Ctrl + Enter. Thank you!
Surely you have come across photographs, images or videos that had special translucent symbols displaying the name of the site, studio, or video channel. Often, watermarks serve to emphasize the style of sites or video channels, to distinguish them from the crowd, and also to prevent content theft. These could also be almost transparent initials located in the middle of the image, which will indicate the owner of the photo. You can easily create your own watermark on your photo right in your browser online. To do this, just go to the service address, upload an image and put a distinctive mark on your photo. I’ll tell you about such services today.
The Picmarkr.com service allows you to create a watermark on a photo very easily and simply. To do this, you must go through only 3 steps - downloading, editing, saving the finished image. The site allows you to use any links, text or images as a watermark. The service interface is in English, but everything is simple here, and you will definitely figure it out on your own.
The first thing we need to do is upload the images that need to be watermarked. To do this, follow the link http://picmarkr.com/index.php.

Watermark.ws creates images with your text
Watermark.ws is also an English-language service that makes it as easy as possible to create a watermark online in a few simple steps. There is no need to know the language if you follow my tips. Go to the main page of the service https://www.watermark.ws/ and click the big green “Get Started” button.
 Click "Get Started" to begin creating your watermark
Watermark.rf will protect your photos with a special inscription
The Watermark.rf service is a completely Russian-language service that can also easily cope with the task at hand, creating a watermark on a photo, in just 3 steps. You can add any element to your images online and completely free. You can upload an image here in any format up to 1 MB in size.
In order to use the service, open the page http://watermark.rf/.

Amezzo.ru - make a quality brand sign
The Amezzo.ru website was not intended to be a full-fledged tool for creating watermarks. It has a different theme. Therefore, creating a watermark on this online service does not have any additional settings or tools. Everything here is as easy and simple as possible.
To add a custom caption to your photo, go to https://amezzo.ru/realestate/watermark/.

The service is perfect for those who want to make a watermark on their image online without spending any time getting to know the settings, tools, etc. of full-fledged services. If this option for a finished image suits you, then this tool is especially for you.
In the modern world, many people create visual content, uploading tons of pictures to the Internet every day. If you are one of them - you have your own website, blog, or like to share photos on social networks - you may have already wondered what the purpose of a watermark is and whether you should add one to your images.
A photo watermark is a visible, translucent mark: a logo, brand name, or name applied over the original image. Ideally, it should not draw all the attention to itself and distract from the photograph itself.
The second advantage of a watermark is branding and promotion of your brand, because in essence it is free advertising. Having seen your photos or images of your product on the Internet, potential customers will be able to quickly find your website or social media page thanks to a watermark by typing your name or company name into the search bar. This is much easier than playing detective, trying to identify the author yourself. For example, clothing brands attach a tag to each item with their name on it so you know who the manufacturer is. Watermarks are name tags for your images. Additionally, people will begin to associate your brand with a certain style and type of photography.
In ancient times, great creators often marked their works by placing their name inside the painting. This was done both to develop a “client base” and to preserve their copyrights, although at that time it was far from important to forge the works of outstanding masters. Unfortunately, in the modern world, you can steal an image with a couple of mouse clicks. If you want to avoid this situation and still grow your brand, increase sales and increase website traffic, you need to brand your images.
Reusing watermarks
The next time you open the application, Visual Watermark will automatically load the last used watermark. If you do not want to use the previous watermark, click the Remove Watermark button on the right.

If you want to use the previous mark, click the Next Step button to move on.
If your watermark is empty, the app will prompt you to use one of the previous watermarks.

Visual Watermark saves the last 10 watermarks you used. To load the previous stamp, simply click on it.
Step 3 – Specify Output Settings and Mark on Photo
How to add a watermark to a jpeg image?
JPG is the most common image format. Most of the photos you see online are JPG. To apply a watermark to a jpeg image, you need to select a photo, decide what type of watermark you want (text, logo or group), change the appearance of the watermark, set the output settings and click on the “Apply watermark” button.
How to put a watermark on a photo for free?
You can use the trial version of Visual Watermark to add a watermark for free. However, on all photos, another watermark will be added to your watermark saying “Trial Version”.
Alternatively, you can add a watermark using the online application - Watermarkly. It's fast, easy to use, and you don't need to install anything.
How to put a logo on a photo?
- Launch Visual Watermark.
- Click “Select Images” or drag and drop photos into the program.
- Select one or more images to apply a watermark.
- Click “Next”.
- Select “Add Logo”. You can upload your own logo template or choose from 60 built-in ones.
- Use the editing tools and change the appearance of your watermark. You can change the font, size, color, transparency and rotation angle, add an effect or two, make your watermark fill the entire photo, or remove the background from your logo.
- Click “Next” to go to the output settings.
- Specify output settings and select a folder to save the photo.
- Click “Preview” to see what the finished photo will look like. Change size and/or position if desired.
- Click “Apply Watermark” to begin the watermarking process.
The Internet has become an excellent tool for photographers to showcase their work and communicate with like-minded people. A photograph posted on special services immediately becomes available to the widest audience, including many professional photographers who will immediately point out the strengths and weaknesses of your work. But this advantage also turns into a significant disadvantage. A photograph can be easily stolen by using it in the future without the consent of the author. For security purposes, photographs and graphics are watermarked to prevent unauthorized copying.
The same technique is used by bloggers who illustrate their articles with original images. Making a watermark in Photoshop is easy. To do this, it is enough to include a text inscription indicating the author of this photo. But to ensure that the watermark minimally interferes with viewing the photo, does not spoil the overall composition, and at the same time provides maximum protection, you need to try.
- Launch Photoshop and create a new image by selecting “New” from the main “File” menu or do the same with the keyboard shortcut Ctrl + N. Select a transparent background for the created layer. Set the height and width within the average values. In this example, we will create a layer with a length of 300 and a height of 150 pixels.

- Activate the Horizontal Text tool from the Tools panel.
- Add a caption to the image that will identify you as the author of the image.

- Select the required font and its size for the created inscription in the font settings control panel.
- To ensure that the inscription does not stand out from the overall composition of the photo when it is added to it, you need to edit its style by making the inscription transparent and adding embossing for it so that it appears in the photo.
To do this, follow the following path from the main menu “Layers” - “Layer Style” - “Blending Options”.

- Make the watermark transparent by lowering its fill opacity to 0% in the window that opens. The inscription will become completely transparent and disappear from view.

- Activate the “Emboss” style in the same window on the left, setting the style settings as in the image below. The inscription will remain transparent, but will appear due to embossing, without significantly spoiling the overall appearance of the photo.

- Many people like the text to be placed not horizontally, but at some angle or diagonally. To do this, the created inscription must be rotated through “Editing” - “Transforming” - “Rotate” in the main menu.

- A layer with a watermark created in Photoshop can be saved in psd format by selecting “File” - “Save” from the menu and giving it a name, for example, watermark (in English it means water mark). Saving in psd format will allow you to make the necessary changes to the watermark at any time. You can close an open edit with a watermark in Photoshop.
- To add the created watermark to a photo, open it in Photoshop and also open the created psd file with the watermark.
- In the watermark layer management window, right-click on the only text layer and select “Convert to smart object” from the menu that appears. With this action we place the layer in a special container, which will allow us to subsequently move the layer along with its styles.

- Select the entire area of the watermarked image from the main menu via "Select" - "All" or simply press Ctrl + A to do this. Copy the created container via "Edit" - "Copy" from the main menu or simply press the keyboard shortcut Ctrl + C to do this.
- Go to the tab with the open photo and click the create a new layer button in the layers panel, or press the keyboard shortcut Ctrl + N.
- Copy the watermark to the created layer by going through the main menu to “Edit” - “Copy”, or press the keyboard shortcut Ctrl + V to achieve the same effect. The watermark will be inserted into the center of the photo. You can edit its location or size using the Transform tool.

- If you want to protect the image as much as possible, then add a watermark to it in the form of a grid. To do this, on the tab of the watermark converted in step 11 into a smart object, you need to define the pattern by selecting the “Editing” section in the main menu and the “Define pattern” item in the list that opens. In the window that appears, click the “Ok” button to assign a pattern.

- Go to the masonry with an open photo, on which a watermark in the form of a network will be superimposed, and in the main menu, go to the following path “Layers” - “New Fill Layer” - “Pattern”. In the window that opens, click the “Ok” button. A grid of watermarks will be superimposed on the photo.

High-quality protection of photographs with a watermark will create maximum inconvenience for those who want to appropriate this image and hide its authorship.
Good day to everyone, my dear friends and guests of my blog. Are you in the mood to photoshop? I just often come across situations where people are afraid for the images on their blog (that they will be used somewhere else), or they need to send a sample of some image and be sure that that person will not use it.
Especially for this purpose, special so-called watermarks are placed on the images. They are usually not very noticeable, but are designed to protect your property from illegal use. Well, by the way, not only for this, since many people are hesitant to use pictures with watermarks. In this case, at least let the name of your brand appear, which is also very good. OK. I won’t tell you about the principle, but rather I’ll show you with an example how to make a watermark on a photo using Photoshop and without it.
Using Photoshop
If I need it, then in such cases I turn to my favorite Photoshop. So open this friend and upload some picture that you want to protect.
Option 1
So how? I think it's quite good. But just in case, I have prepared a second option on how to do this.

Option 2


Without Photoshop
In general, you don’t even have to use Photoshop to install such a protection tool. There are many programs and services that will help you bring all this to life without any problems. Moreover, not everyone will download Photoshop to do this. In general, I will show you how to create a watermark using the example of one good service.
- Go to the site watermark.ws and go through a simple registration, or log in using Facebook, which is what I actually did. The service is, of course, in English, but nevertheless, absolutely everything in it is clear, and even more so, I’ll tell you everything now.
- To begin, you will need to create a folder for your imported photos. To do this, click on “Add folder”, after which you will need to set any name for your folder. Although by default you will already have one folder created, so you most likely won't even have to create anything.

- Next, you will need to select the source of your photo, i.e. either from your computer or from external sources, such as social networks or cloud services. Select "Select from computer". Now select your images. By the way, you can upload several images at once and use all your signs for all of them at once, which makes working in this service even more convenient.
- When you have uploaded a photo (or several photos), you need to hover over it and select the only button that appears “Edit Selected”.

- Now that the picture has opened, we will begin to protect it. Do you see tools for work appearing below? These are the ones we will need, but not all of them. Click on the "Text" button to start creating the inscription.

- After this, you will have other editing tools available. But first, we write the text itself, for example, the website address.
- As you can see, two functions have appeared in the text block, namely resizing the image and rotating it. You can play around with all this to achieve the desired result. For example, you can again put the text diagonally and make it larger. And of course, to move this inscription, you just need to hold down the left mouse button in its center and drag it anywhere.

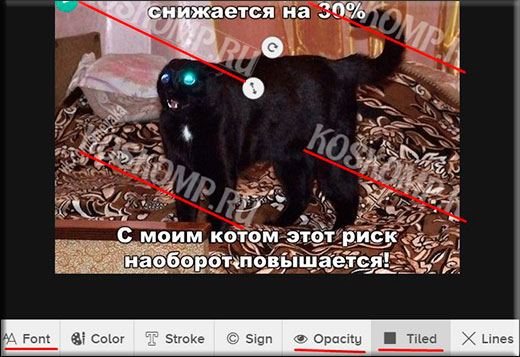
- Now let's go to the menu below the picture. With it we will edit everything we need. For example, click on "Opacity" and set this percentage to 35. This will make the text more transparent.
- And by clicking on “Single” and selecting “Tiled”, your inscription will multiply throughout the image. Many people make this move.
- Well, you can also do many other great functions, such as choosing a font (Font), or putting copyright icons (Sign), etc. See all the features for yourself.
- Well, after you have finished everything, click on the “Finish” button. And after completion, click on “Download” to download the image.

These are the interesting ways I presented to you today. It's up to you to decide which ones to use, or maybe you can come up with something of your own. By the way, what do you think is more convenient to use, third-party services or Photoshop? Please answer in the comments.
But if you are not very strong in Photoshop, or don’t understand it at all, then I strongly recommend that you just study awesome course on learning photoshop from scratch. Everything is described here in great detail, and most importantly, in interesting and understandable human language. I highly recommend checking it out for anyone starting out. In addition, I have it especially for you.
Best regards, Dmitry Kostin.


