Hello blog visitors.
Sometimes users of computers with Microsoft operating systems encounter a situation where their device refuses to boot. At the same time, all sorts of errors appear on the monitor: “ OS wasn't found», « Insert boot disk" and others. This usually happens after installing a second OS on the device, changing hidden hard drive partitions, experimenting with EasyBCD. Most likely, this option will require restoring the Windows 10 bootloader. Later in the article I will tell you how this is done in various ways.
It’s worth saying right away that, in general, restoration actions for various modifications will be the same. Even regardless of whether a GPT or MBR disk is used, BIOS is installed or the modern version is UEFI.
It should be noted that the above errors do not always appear as a result of problems with the system bootloader. Sometimes the cause may well be a CD forgotten in the DVD drive, a connected USB flash drive, or an additional hard drive.
Automatic recovery( )
The developers of Windows 10 have provided a convenient function in their OS “ resuscitation" while loading. It is worth noting that this section works well. In most cases, this is enough to return the device to working condition. If, after installing Windows XP, you decide to upgrade to the latest version of the operating system and are experiencing problems at startup, you need to perform several steps:
Afterwards the process can go in several ways. So, a message about the impossibility of recovery will appear before your eyes. Or we will see the desktop (of course, first in the BIOS you need to return the launch from the hard drive).
But sometimes this method does not solve the existing problem. In this case, we’ll try to carry out the procedure manually using the utilities built into Win. This usually works better.
In manual mode( )
For the procedure, we again need bootable portable memory - without the distribution kit we will not be able to accomplish our plans. If this is not the case, use another computer to create it. It is important that the system is of the same build and capacity.
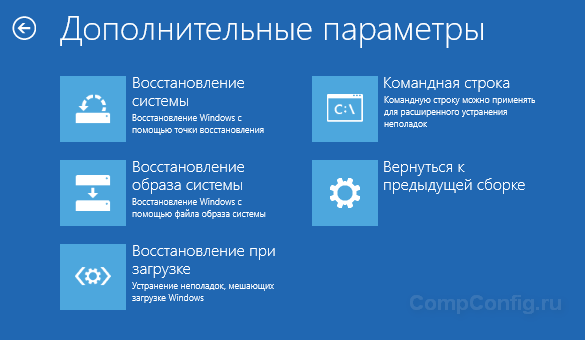
If you are using a boot disk, select “ Diagnostics", Further " Add. options"and the necessary tool.
In any case, a black window will appear in which you need to specify three lines, and after each click “ Enter»:
diskpart
list volume
exit
After the second command, a list of all mounted volumes will appear. We remember the letter of the one on which the system files are located. The fact is that during recovery it may not be a partition at all WITH:\, but any other. So it is important to define it accurately.


Most often, only one operating system is used on a computer. There is only one section MBR or EFI. So to restore the bootloader after installing Windows 7 and then using the tenth version, just run the following command:
bcdboot c:\windows
Important! Instead of “c:\” you will most likely have to specify another letter.
Interesting to know! If the computer uses two operating systems at once, the above command is executed twice. The main thing is to indicate the path correctly. However, this move will not work for XP and Linux.


After this, a message will appear that all the necessary files have been created. Next, remove the flash drive or disk and restart the device. Let's try to boot in normal mode.
Important! In some cases, the normal launch of the operating system does not occur immediately. You must first check the hard drive. And only with the next reboot everything will return to its place. So, as you can see, without the command line you won’t be able to accomplish your plans.
Another manual method( )
If the methods described above did not help, return to the command line. It's worth noting that if you do this from safe mode, then the bootloader has nothing to do with it. You can simply restore as usual.
So, in the appropriate program we write:
diskpart
list volume
After that, we need to study the information received. If you are using a system with , the list should contain a hidden FAT32 partition, the size of which does not exceed 300 MB. In the case when on a computer MBR and BIOS, look for the section NTFS 500 MB or a little less.


In any case, users need to write down the partition number N and remember the letter where the system files are located.
Next, enter a number of commands and after each one, confirm your intentions by pressing “ Enter»:
select volume N
format fs=fat32(or ntfs - it all depends on the file system used)
assign letter=Q(this section is assigned a new letter " Q»)
bcdboot c:\Windows /s Q: /f all(assuming system data is on disk C:\)
After that, we close the environment and boot not from a portable device, but from a hard drive.
Recovery from third-party OS( )
In some cases, after Linux is installed on the computer as a second system, Win 10 stops starting. This is usually due to the corresponding sector being overwritten.


To restore the area we need after Linux, we do the following:
We insert a boot disk or flash drive (as you can see, we can’t do without this).
Select " System Restore" And " Diagnostics».
We are interested in " Extra options", and then " Command line».
A new window will open in which we indicate only two lines and after each click “ Enter»:
bootrec.exe /FixMbr
bootrec.exe /FixBoot
As a result, the functionality of the Microsoft operating system will be restored.
It's worth noting that this same method can be used when you need to locate a new bootloader in place of GRUB.
As always, you can watch a helpful video regarding this topic. It is described in detail here, and most importantly, it is shown how and what needs to be done.
I hope the above information will help you resolve issues on your device. Subscribe and tell your friends so you always know how to fix errors on your computer!
Windows 10, like previous versions of this operating system, is not completely protected from failures, the effects of computer viruses, hardware failure and other problems. Therefore, if you have problems operating or loading the OS, you can use the built-in tools to return the operating system to a working state.
There are several ways to restore Windows 10.
If the computer boots:
- Using a restore point.
- File history.
If your computer won't boot:
- Using a recovery disk.
- Using the installation disk.
Now let's look at these recovery options in more detail.
Method 1 – Using a System Restore Point
Windows periodically stores information about programs, system settings, drivers, the registry, and drivers in system restore points. This occurs before significant changes to the OS, such as installing programs, drivers, or system updates. You can also create a restore point manually. You can read how to do this in.
It is worth noting that after recovery, your data will remain intact, and drivers, programs and updates installed after creating the restore point will be deleted.
1. Launch the system properties window (keyboard shortcut Windows + Pause) and open the item "".
2. Click the button Restore", and then "Next". In the list of available recovery points, select the desired item and click “Next” again.

3. Check the selected parameters again, click the " Ready" and then "Yes" in the warning window. The recovery process will begin and the computer will restart.
Method 2 - Reset to factory settings
Windows 10 has the ability to return system settings to their original state. In this case, you can do a complete reset or save user files. The advantage of this method is that if you want to reinstall the system, you do not need to install Windows from scratch, just perform a reset.
To use this function, you need to go to the following section: “ Computer Settings -> Update and Security -> Recovery -> Restore your computer to its original state" and click the "Start" button.

We discussed the factory reset process in more detail in this article:
Method 3 – File History
This method is not directly related to system recovery, but in combination with other methods it can also be useful.
File History allows you to back up your files automatically and manually. You just need to activate this function and specify which folders you want to save. The system will automatically backup your documents at a frequency that can be configured. If necessary, you can easily restore files to the version you need.

You can read how to enable, configure and use this tool in this article:
Method 4 – Using a recovery disk
If Windows 10 won't boot, you can try resuscitating the system using a recovery disc, which will allow you to access additional startup options.
If you don't have a recovery disk yet, use these instructions:
After booting from the USB recovery drive, go to the " Diagnostics -> Advanced options».
Here you can use several options for resuscitating your computer:
- Restoring Windows using a restore point. We have already discussed this option above. Its meaning is the same, only it is launched in a different way.
- Restoring the system image. This method has been known since Windows 7. If you previously created a system image in Windows, you can easily restore it using a recovery disk. How to create a system image in Windows 10 can be read here:
- Using the following point, you can try to automatically fix boot errors.
- For more advanced users, it is possible to launch the command line for system recovery or other purposes.
- Well, the last option is to return Windows to the previous build.
It should also be noted that if, when creating a system repair disk, you burned system files to the disk, then you will have the opportunity to reinstall Windows from this disk. But if you bought a computer with Window 8 (8.1) pre-installed with a hidden recovery partition, then the version of the system that originally came with the computer will be restored.
Method 5 – Using the installation disk
If Windows won't boot and you don't have a recovery disk, you can use the installation disk to resuscitate your computer.
You can burn the installation disc to a USB drive or DVD using the media creation tool that you can download.
After booting from the installation media, you will see a window in which you need to select language options and click the “Next” button.


- Restore the computer to its original state. A factory reset will be performed with or without saving user files. We have already discussed this tool above (method 2).
- Extra options. Just like on the system repair disk, a list of tools will open that can help you restore Windows functionality using restore points, a system image, etc.

We looked at the main methods of restoring Windows 10. Usually they are quite enough to return the system to a working state. It was also possible to add a clean installation of Windows here, but this is already an extreme measure and is indirectly related to system recovery.
It is reliably known that Linux Ubuntu does not want to become close to the top ten. The most unpleasant thing is that the reason is unclear. Before this, there was a failure when copying download files at a certain stage of the installation, and when a dozen settled on the hard drive, Linux was completely offended. Now the Linux boot package warns in advance that it will not stand next to Billy Gates' brainchild. We decided to find out what’s going on here, and at the same time we’ll describe how to restore the Windows 10 OS bootloader.
If your PC does not want to boot, do not rush to restore the system. Practice shows that this occurs when someone forgot the SD card from the camera in the Card-Reader. There's just a black screen and that's it. The BIOS boot loader takes this media as a disk with the system and gives control to it. As if there was an installation flash drive. No system restore is required. Turn off the PC, remove the removable media, and restart.
Via bootable media
If you know for sure that the boot is coming from the desired Windows system media, but something goes wrong, obviously, you still have to tinker.
Damaged hard drive
Not long ago, a virus appeared, undetectable in the standard way, which erases the system area. It overwrites files over and over again until it completely erases everything. This leads to the formation of poorly readable sectors. The access period for which is from 1500 ms and above. As a result, the boot time of Windows 10 increases greatly and can reach half an hour. It's almost useless to fight. Such cases are described on forums. Attempts are made to move the system partition, but they lead nowhere.
The worst thing is when the same situation is observed when exiting hibernation. Because some were saved by this particular mode (the difference in loading speed is up to 10 times). Noteworthy is the fact that the “five rotating points” of the window can slow down or behave normally. In both cases it takes a long time to load. So, there is only one way out - to use the hard drive only for storing information.
Bootable media
Windows OS has a built-in boot file control tool. It’s logical to start bootloader recovery from here. The next section will show you how to enter the command line, but for now we assume that readers can do it themselves:
If the first method does not help, then the system partition (500 MB) is formatted, then the copying procedure is performed again (find details of working with Diskpart below). In this case, you need to explicitly specify the drive letter using the key. The screenshot shows an example from the official Microsoft website (technet.microsoft.com/ru-ru/library/dd744347(v=ws.10).aspx), writing all data to section S.

We don't really need the /l parameter to set the language, and we can throw that part out. The partition is formatted for reasons that the system could be damaged by a virus. After all the manipulations have been completed, the ten usually starts to load.
How to open the recovery tool
In the top ten, the developers devoted a lot of effort to creating a recovery environment. In this case, you will have to start from the media (although Microsoft TP writes that the same can be done using three consecutive emergency power outages). But in our case it is assumed that the hard drive is completely useless. Therefore, we are looking for a flash drive or DVD to start operations. To transfer control to the desired media at the very beginning (immediately after turning on the PC), patiently press F12. From the menu that appears, select the desired line.

Please note that USB drives often end up in the hard drive partition. Start loading and wait for the first meaningful window to appear. Here you will be asked to select a language, leave the default Russian. We are interested in the recovery tool.

How to label a volume
You have seen that it is very difficult to find the partition with the operating system through the command line in order to perform a boot restore. The process looks much easier when the volume has a label. Meanwhile, creating it takes a matter of seconds. To do this, go to Explorer and right-click on the desired section. In Properties there is the required field.

Fill it out and click apply. After this, the system disk can be found without problems from the Diskpart utility.
Working with Diskpart
The Diskpart utility is part of Windows, and in this case it is the only way to find out more about our hard drive.


The shrink command reduces the size, and create creates a new partition in this place. In our case, we should not delete the old one, allocated by the regular wizard, so as not to inadvertently create a new one in the same place.
How to create a new boot partition
We decided to reveal a little example of creating a new boot partition. The unnecessary logical disk was removed, after which the process started. See what it looks like.

All! You can get overloaded. In addition, we erased C as unnecessary. Ten managed to load a little faster. This disk is erased by a virus and cannot be used as a working disk. But it was the easiest way to demonstrate bootloader recovery in the Windows 10 operating system. Everything works. The system booted successfully.
If, after installing a second OS, trying to use free space on hidden disk partitions or formatting them, in case of system failures, when experimenting with EasyBCD and in other cases, you are faced with the fact that Windows 10 does not boot, reporting “An operating system wasn't found", "No bootable device found. Insert boot disk and press any key", then you may need to restore the Windows 10 bootloader, which will be discussed below.
Regardless of whether you have UEFI or BIOS, whether the system is installed on a GPT disk with a hidden FAT32 EFI boot partition or on an MBR with a “System Reserved” partition, the recovery steps will be the same for most situations. If none of the below helps, try (the third method).
To restore the bootloader, you will need either a Windows 10 distribution (bootable flash drive or disk) or a Windows 10 recovery disk. If you do not have them, you will have to use another computer to create them. You can read more about how to make a recovery disk in the article.
The next step is to boot from the specified media, or using the Boot Menu. After downloading, if this is an installation flash drive or disk, on the language selection screen, press Shift + F10 (the command line will open). If this is a recovery disk, select Diagnostics - Advanced Options - Command Prompt from the menu.
At the command line, enter three commands in order (press Enter after each):
- diskpart
- list volume
- exit

As a result of executing the command list volume, you will see a list of mounted volumes. Remember the letter of the volume on which the Windows 10 files are located (during the recovery process, this may not be partition C, but a partition under some other letter).
In most cases (the computer has only one Windows 10 OS, a hidden EFI or MBR partition is present), in order to restore the bootloader, it is enough to then run one command:
bcdboot c:\windows(where instead of C you may need to specify another letter, as mentioned above).
Note: if your computer has several operating systems, for example, Windows 10 and 8.1, you can run this command twice, in the first case specifying the path to the files of one OS, in the second - another (will not work for Linux and XP. For 7 it depends on configuration).

After running this command, you will see a message indicating that the download files have been successfully created. You can try to restart the computer in normal mode (by removing the bootable USB flash drive or disk) and check whether the system boots (after some failures, loading does not occur immediately after restoring the bootloader, but after checking the HDD or SSD and rebooting, error 0xc0000001 may also appear, which in this This case is also usually fixed by a simple reboot).
The second way to restore the Windows 10 bootloader
If the above method did not work, then return to the command line in the same way as we did before. Enter the commands diskpart, and then - list volume. And we study the connected disk partitions.
If you have a system with UEFI and GPT, in the list you should see a hidden partition with the FAT32 file system and a size of 99-300 MB. If the BIOS is MBR, then a partition of 500 MB in size (after a clean installation of Windows 10) or less with the NTFS file system should be detected. You need this section number N (Volume 0, Volume 1, etc.). Also note the letter corresponding to the partition where Windows files are stored.

Enter the following commands in order:
- select volume N
- format fs=fat32 or format fs=ntfs(depending on what file system is on the partition).
- assign letter=Z(we assign the letter Z to this section).
- exit(exit Diskpart)
- bcdboot C:\Windows /s Z: /f ALL(where C: is the drive with Windows files, Z: is the letter that we assigned to the hidden partition).
- If you have multiple Windows operating systems, repeat the command for a second copy (with a new file location).
- diskpart
- list volume
- select volume N(number of the hidden volume to which we assigned a letter)
- remove letter=Z(we remove the letter so that the volume does not appear in the system when we reboot).
- exit
Upon completion, close the command line and reboot the computer, no longer from an external boot drive, check whether Windows 10 boots.
I hope the information presented can help you. By the way, you can also try “Startup Repair” in the advanced boot options or from the Windows 10 recovery disk. Unfortunately, everything does not always go smoothly, and the problem is easily solved: often (if there is no damage to the HDD, which can also be the case) you have to resort to to reinstall the OS.
Update (came in the comments, but I forgot to write something about the method in the article): you can also try a simple command bootrec.exe /fixboot(cm. ).
And so, you spend a pleasant evening at the computer - play, chat, surf the Internet, and Windows promptly carries out your commands. Everything is fine! Idyll! However, you should not think that this will always be the case. Know: the insidious Windows is preparing a dirty trick for you. She is just waiting for the moment when some urgent matters overtake you in order to... show you nothing. More precisely, it won’t boot.
Windows boot failure is an ordinary occurrence, but according to the law of meanness, it usually happens when the computer is really needed. So that the situation does not take you by surprise, it is important to prepare for it in advance. Let's talk about what to do if Windows 10 won't boot, why this happens, and what every user should have to solve this problem as quickly as possible.
Why won't it load?
The reasons for the “dozens” being unbootable can be software or hardware. Software related to the deletion (damage) of boot and system files and/or registry sections responsible for launching. They are usually to blame for:- Installing another operating system on another partition of the drive (the new OS replaces the old bootloader with its own).
- Experiments with disk partitions - compression, merging, partitioning, formatting, etc. A typical error, which is precisely a consequence of this, is “ ” (the system boot loader is compressed).

- Unskilled manual editing of the system registry.
- Using various “tweak cleaners” to speed up and decorate the system, which “accidentally” change the registry keys responsible for startup, patch files, etc.
- Windows updates installed incorrectly or the PC shuts down during the installation of updates.
- Viruses and antiviruses. Don't be surprised, the latter can cause no less harm than the former if used thoughtlessly. It's like swallowing pills indiscriminately, hoping that the right one will be among them.
- Faulty hardware drivers. Booting in such cases is usually interrupted by a blue screen of death, sometimes indicating the name of the driver that caused the problem.
- "Clumsy" applications in autostart. The failure occurs in the late stages of loading - shortly before the desktop appears.
Hardware reasons for Windows 10 not starting:
- Changing the order in which bootable media is polled in the BIOS (the computer searches for the Windows boot loader not on the system disk, but, for example, on flash drives).
- Connecting the drive to a port on the motherboard that is different from the one on which it worked before - if the failure occurred after removing and reinstalling the hard drive into the computer. It appears as an INACCESSIBLE_BOOT_DEVICE error on the blue screen of death.

- Faulty or poor connection of the system drive. Often appears with the message “ ” (bootloader unavailable) on a black screen. Sometimes - stops, restarts, BSoDs at any stage of loading.

- RAM malfunction. As with disk problems, it manifests itself with reboots and blue screens at any stage of startup.
- Failure of video subsystem elements. Windows may boot, but you won't see it because the screen will remain black. Sometimes you can tell that the system has booted only by a characteristic sound.
- Other hardware problems, such as motherboard, peripherals, etc.
It's better to prepare for the worst in advance
Since 80-90% of cases of Windows 10 not starting are due to software failures, today’s article is devoted to methods of dealing with them.So, to restore normal Windows startup, the computer needs to be booted into the recovery environment. If you have previously used Windows 7, then you know that this very environment is installed on the disk along with the main system. And to enter it, you need to open the menu of additional boot methods (by pressing F8 after turning on the computer) and go to the “ Troubleshooting».
The “top ten” also has a recovery environment, but since its loading time has significantly decreased compared to Windows 7, the interval when you can call the boot menu has also become much shorter. There is only one chance left at this time to press the desired key (more precisely, the combination of F8 and Shift): if the system is installed on an MBR hard drive and the fast startup option is disabled in the power settings of the PC or laptop. If the system is on an SSD or GPT hard drive, you will need bootable media.
For emergency recovery of Windows 10, it is optimal to keep its official distribution on a DVD or flash drive, and of the same bit size as installed on the PC. As an alternative, you can use the downloadable utility package MS DaRT 10 (Microsoft Diagnostic and Recovery Toolset for Windows 10 ).
MS DaRT distributions (formerly called “ERD Commander”) are officially distributed only through a paid subscription, but they are easy to find on the Internet. For example, on torrent trackers. Windows 10 images are available for download from .
As an example, I will use the home edition of Ten, recorded on a bootable USB flash drive, since it has everything you need.
Booting into the Windows 10 recovery environment
If the download fails, the “ten”, as a rule, tries to self-repair. When she succeeds, the user does not receive any notifications; it just takes longer to start the computer than usual. If unsuccessful, a message may appear on the screen, as in the screenshot below, but more often it will just be a “Malevich square” with or without a cursor, or a blue screen of death with a sad emoticon.
The failure option shown in the screenshot can be considered relatively favorable. By clicking, " Extra options"You will be taken to the recovery environment installed on your hard drive, and you will not have to boot into it from external media. But we will consider a more severe case, when the system does not show any signs of life.
Connect the media to your computer, reboot, and make it the first boot device.
The window that you will see first after booting from a flash drive (DVD) will prompt you to select the system language. If Russian is selected, click " Further».

You will then be prompted to proceed to install or restore Windows. Click " System Restore».

On the screen " Action selection» click « Troubleshooting" Here you are.

Tens launch recovery options
In the recovery options section (screen " Extra options") there are 5 subsections:- System Restore. When you select this option, a standard Windows utility is launched. rstrui.exe, the purpose of which is to roll back the system to one of the saved checkpoints.
- Restoring the system image. Launches the Windows Deployment Wizard from a backup created by the OS's own tools.
- Boot recovery. Corrects errors in boot files and partitions.
- Command line. Allows you to run various system utilities.
- Return to the previous build. Rolls back to a previously installed version of the OS if it was upgraded to Windows 10.
Rollback to a checkpoint
Returning to a newly created checkpoint is the best first aid remedy for all types of system failures, including when you do not know their cause.
Clicking on the first item most likely launches the recovery utility you are already familiar with. All you have to do is select the date and time you want to rollback to and follow the on-screen instructions.

To use this option, you must have at least one saved checkpoint and a properly working system restore function. If the latter was disabled before the failure, skip this step and try other methods.
Startup Recovery
This option effectively helps in case of damage or deletion of boot files, for example, when installing an additional OS on another disk partition after Windows 10. And also in case of accidental formatting or other manipulations with the “System Reserved” partition.
Command line
The command line itself does not restore anything, but it makes it possible to launch other tools. So, with its help we can open Windows Explorer to see the installation location (partition letters in the recovery environment and during normal system booting usually do not match), run the system file error fixer, registry editor and bootloader recovery utilities.
If rollback to a checkpoint and auto-recovery at startup (the first and second options) did not give the desired result, a console utility often helps to raise the “tens” load BCDBoot. It recreates the hidden “System Reserved” partition and copies boot files from the Windows directory to it.
For BCDBoot to work correctly, you must specify the location of the Windows folder on your hard drive. To find out, you can use the utility Diskpart, but I think it’s more convenient to do this through Explorer.
So, to get into Explorer, open the command line and run Notepad in it ( notepad).

While in notepad, go to the menu “ File", select " Open" and go to the folder " This computer" Next, let's go through the disk partitions and determine which of them contains the system directory. In my example this is drive D.

Next we return to the command line and execute the instruction:
BCDboot D:\Windows

Please note that your path to the system folder may be different.
In 80% of cases, this is enough for the “ten” to start normally. But in about 20% of cases the command does not work correctly - it does not restore all boot files. To help the utility a little, before executing the instructions on the command line, you need to format the reserved boot partition (in my example, drive C) in FAT32. This can also be done using diskpart, but I find it more convenient through Explorer.

The following two console commands recreate the boot records of the entire drive (MBR) and the system partition (VBR). They are used to solve problems with running Windows on MBR disks.
Execute commands one after another in this order:
bootrec/fixmbr
bootrec/fixboot
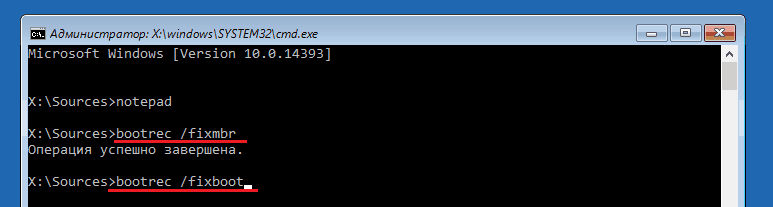
If you accidentally run them on a GPT disk, nothing bad will happen.
In some cases, startup problems arise due to damage not to boot files, but to the main system files, for example, after a virus attack. As you may know, there is a special utility in Windows to fix them Sfc.exe. So, thanks to the command line, you can also run it in the recovery environment.
The command to find and fix errors in protected system files in the recovery environment looks like this:
sfc /scannow /offbootdir=D:\ /offwindir=D:\

Parameter offbootdir determines the location of the main boot partition (in my example, as you remember, this is drive D), and offwindir– path to the system folder.
Using the command line, you can also fix registry errors on an unbootable system. But, unlike previous instructions, this requires certain experience and qualifications, because the user needs to know exactly what to correct and what erroneous entries should look like normally.
I will not dwell on registry errors that lead to Windows 10 boot failure, since this is the topic of a separate large article. I will only describe the method for launching the editor RegEdit.exe in the recovery environment and open the registry files in it so that you have the opportunity to fix the errors that you are aware of.
So, to launch the editor, write the word on the command line regedit and press Enter.

You will see that in the utility window that opens there is already some kind of registry, but not the one you need. Before us is our own registry of the recovery environment, and we are interested in the main system.
To load Windows 10 registry files into RegEdit, select the section in the left half of the editor window HKEY_LOCAL_MACHINE or HKEY_USERS, open the menu “ File" and click on the item " Load bush».
In the Explorer window that opens after this, go to the folder D:\Windows\System32\Config(your drive letter may be different) and select the desired file.
Files without an extension in the \System32\Config folder are the components (hives) of the Windows 10 registry. The main ones are circled.
Give the hive any meaningful name (it will be temporary until you unload it) and click OK.

Next, we will open the section into which we loaded the bush, and here it is - in front of us, available for editing. In my example this is the registry file software, which I temporarily renamed to soft_win_10.

After making the edits, go back to the editor menu “ File" and click " Unload bush».
Return to previous build

When reverting to a previously installed build, the user's personal files will remain intact, but everything done since the update will be undone.
Restoring a system image
Restoring an image from a backup helps to restore the system to functionality in case of any problems, but the problem is that almost no one creates these images.If you are an exception to the rule and the happy owner of a relatively recent backup copy, select the item marked in the screenshot from the list of parameters,


 Key Specifications")


")


")
