- Tutorial
Hello, dear ones.
In this article I would like to introduce you to the new product “FBA Toolkit”, which significantly simplifies the process of developing a corporate mobile application on 1C + Android.
“FBA Toolkit” is:
- development of a “native” Android application in a native IDE in Java;
- 1C: Enterprise 8.1 (8.2) as a data source, corporate information system.
First of all, the framework will be useful to 1C programmers who would like to develop business applications for Android, but have difficulty mastering a new platform for them. To start development, a basic knowledge of Java will be enough. Next, I will show you how to create a working prototype of a client-server application in just a couple of hours.
Preparing the workplace Before starting the development process itself, it is necessary to prepare the developer's workplace. Required:1. Install and configure:
- Java SDK + Eclipse + Android SDK;
- Web server (IIS or Apache);
- 1C: Enterprise 8.1 (8.2)
2. For Eclipse, import two library projects: ActionBarSherlock and ru_profu1c_fba from the SVN repository.
3. Install the “FBA” configuration distribution and combine it with your 1C-based application solution.
The entire pre-configuration process is described in detail in the articles:
Preparing the developer's workplace
Installing the “FBA” configuration distribution
Combining the “FBA” configuration with an application solution and publishing it on a web server
Setup should not take much time, and most likely, you already have some of the necessary software installed.
Description of the application We will create a mobile application “Report to the Manager”, designed to regularly inform the manager about the state of affairs at the enterprise. The application will consist of 3 screens:


The application will implement 2 options for receiving data from the 1C server:
Create a new element in the “Mobile Applications” directory with the name “Report to the Manager” and the identifier SAMPLE_REPORT_HEAD.
Select the “External Data” group in the “Metadata” list and click the “Add” button on the toolbar. Fill in the parameters of the new table as shown in the figure:

“Indicator” - test representation of the report indicator, line (250)
“Value” - the numeric value of the indicator, number (15.2)
The names of the columns and the table itself here, as a rule, are specified in Russian; they will be used to fill the table with data using the built-in 1C language. Click OK, the table will be added to the metadata tree, for the mobile application the names are automatically translated into Latin.
Thus, we have prepared the structure of the table of values (in terms of 1C) in which we will transfer data for the “Financial Indicators” report. For the second report “Goods in warehouses”, the data will be transferred as an external file.
On the “Exchange Scheme” tab, check that the “Upload” flag is checked. The “Loading” flag is not important, because We are not going to process the received changes to this table from the mobile application in 1C.

Save your changes. Click on the “Mobile Application Template” button on the toolbar, set the parameters of your mobile application

“Template directory” - path to the directory in which the generated mobile application template files will be saved.
On the “Basic” tab, specify the name of the package; this must be a unique identifier. If you have a website, use it to generate the prefix. In this example I specified ru.profi1c.samples.report.head
On the “Web service” tab, the IP address is 10.0.2.2; by default, this is the address of your computer when accessed from an Android emulator. In the “Web service name” and “Application subdirectory” fields, enter the data that was specified when publishing the web service.

Please note that for 1C 8.2, most likely, you will have an application subdirectory with an additional /ws subdirectory, i.e. demoFba/ws, see for more details.
Click Create, the Android project template will be generated.
If AbbrLP(MobileApp.Code) = "SAMPLE_REPORT_HEAD" Then If TableName = "Report to the Manager" Then // fictitious report data ListTemp = fbaTotal.FromLineWithSeparators("Cash, Accounts payable, Total accounts receivable, Goods balances, Accounts payable, Volume sales"); RNG = NewRandomNumberGenerator(123456789); For each ListElement From ListTemp Cycle NewRow = ExternalTable.Add(); NewRow.Indicator = ListElement.Value; NewRow.Value = RNG.RandomNumber(0.999999) + Sin(RNG.RandomNumber(0.999)); EndCycle; endIf; EndIf
In this example, the table is filled with fictitious data; in a real application, you can pass an arbitrary number of report indicators here.
We've sorted out the data for the first report, all that remains is to prepare it for the second. In the same fbaEvent Subscription module, add the following code to the Prepare Binary Data for Sending procedure:
DD = Undefined; If AbbrLP(MobileApp.Code) = "SAMPLE_REPORT_HEAD" Then If Identifier = "REPORT_PRODUCTS_IN_STOK" Then FileName = GetTemporaryFileName("html"); Report = Reports.ProductsInWarehouses.Create(); If Report.SaveReportInHTML(FileName) Then DD = New BinaryData(FileName); DeleteFiles(FileName); endIf; endIf; endIf; Return DD;
I'll comment on the code. When a mobile application requests arbitrary data (in the form of a file) with the identifier “REPORT_PRODUCTS_IN_STOK”, a report is executed in 1C and its result is saved to a temporary file. This temporary file is then read as binary data and transferred to the mobile application. The temporary file is deleted.
How the html file is generated in this case is not important to us. You can use the standard 1C mechanism for saving a spreadsheet document as HTML or generate HTML manually. You can see an example of the output in the “FBA demo” configuration, “Products in warehouses” report.
That's it with 1C, let's move on to developing a mobile application on Android.
Designing an Android application We import the Android project template created in 1C into the Eclipse workspace.Launch Eclipse and import the project: File > Import... In the Android group, select the item “Exists Android Code Into Workspace”, click Next, specify the path to the Android project template directory and click Finish, the new project will be added to the workspace. If any difficulties arise, see, the process is described in pictures.
1. Create a “Financial Indicators” report, the data source for which is the table of values received from 1C. To do this, add a new class ToChiefReport.java, here is the full source code:
Show
/** * An example of building a report using data from a local sqlite database. The * data source is the external table “Report to the Manager” * */ public class ToChiefReport extends SimpleMapHtmlReport ( @Override public int getResIdIcon() ( return R.drawable.report_01; ) @Override public int getResIdTitle() ( return R.string.report_name_to_chief; ) @Override public void build(Context context, IReportBuilderResult builderResult) ( try ( makeReport(context); ) catch (SQLException e) ( e.printStackTrace(); setHeader1("Oops, report not created!"); ) super.build (context, builderResult); ) private void makeReport(Context context) throws SQLException ( DBHelper helper = new DBHelper(context); // Heading of the report and table setHeader2("Financial indicators"); setTableHeader("Name", "Amount, rub ."); // The table rows will be in the order they were added Map mapData = new LinkedHashMap(); // Selecting data from a local sqlite database, external table // “Report to the manager” ExTableRaportRukovoditelyuDao dao = helper .getDao(ExTableRaportRukovoditelyu.class); List rows = dao.select(); for (ExTableRaportRukovoditelyu row: rows) ( mapData.put(row.pokazatel, row.znachenie); ) setTableData(mapData); ) )
I'll comment on the code. The abstract class SimpleMapHtmlReport, from which it is inherited, is intended for building a simple HTML report with a table of two columns.
The first 2 methods getResIdIcon() and getResIdTitle() return the icon and title of our report to be displayed in the list. In the “build” event handler, the makeReport method is called, which is our implementation of report compilation.
When building a report, the report and table title are first set, then all records from the local sqlite table are read as report table rows. And finally, in the setTableData() method we set the data for the report table. Ugh, how difficult it is to comment on obvious things.
2.Create a second report, everything is even simpler here:
Show
/** * An example of a compiled report, simply outputs an Html file. In this example * the data file was generated in 1C and transferred to the mobile client during the exchange * */ public class ProductsInStokReport extends SimpleCompiledHtmlReport ( // The name under which the received file from 1C is saved (see the exchange procedure // MyExchangeTask) public static final String REPORT_FILE_NAME = "products_in_stok.html"; public ProductsInStokReport(File file) ( super(file); ) @Override public int getResIdIcon() ( return R.drawable.report_02; ) @Override public int getResIdTitle() ( return R.string.report_name_products_in_stok ; ) )
3. Let’s expand the predefined exchange procedure with the 1C server, i.e. Let's add one more step to it - obtaining data for our second report in the form of a compiled file. Let's add the MyExchangeTask class, a descendant of ExchangeTask:
Show
/** * Standard exchange procedure supplemented with custom rules. * Additionally, one compiled file is obtained - a report. * */ public class MyExchangeTask extends ExchangeTask ( // Report ID as defined in 1C private static final String ID_REPORT_PRODUCTS_IN_STOK = "REPORT_PRODUCTS_IN_STOK"; public MyExchangeTask(ExchangeVariant exchangeVariant, WSHelper wsrvHelper, DBOpenHelper dbOpenHelper) ( super(exchangeVariant, wsr vHelper, dbOpenHelper); ) @Override protected boolean doExecute() throws Exception ( // Execute exchange steps according to predefined rules boolean success = super.doExecute(); if (success) ( // Receive arbitrary data - our 2nd report onStepInfo("Receiving reports... "); String fPath = appSettings.getCacheDir().getAbsolutePath() + "/" + ProductsInStokReport.REPORT_FILE_NAME; File f = wsHelper.getLargeData(ID_REPORT_PRODUCTS_IN_STOK, null, "", fPath); success = (f != null); ) return success; ) )
To obtain report data, the getLargeData web service method is used, which, if successful, saves the result to a file at the specified path. Pay attention to the identifier ID_REPORT_PRODUCTS_IN_STOK, it should be the same as in 1C in the Prepare Binary Data for Sending method.
4. Display a list of reports on the main form. Open the res\activity_main.xml file and add a listView that will display a list of reports:
In MainActtiviy.java we add:
A) a local variable for the list
private ListView list;
b) initialization method
private void init() ( list = (ListView) findViewById(android.R.id.list); // Create an adapter to display a list of reports ReportListAdapter adapter = new ReportListAdapter(this,createReportList()); list.setAdapter(adapter); list.setOnItemClickListener(new OnItemClickListener() ( @Override public void onItemClick(AdapterView parent, View view, int position, long id) ( // Show the report in the dialog when you click on it IReport report = (IReport) list.getItemAtPosition(position) ; report.onShow(MainActivity.this); ) )); )
and calling it in onCreate() after setting the form layout
setContentView(R.layout.activity_main); init();
c) method for initializing the list of reports
/* * Prepare a list of reports */ private List createReportList() ( List lst = new ArrayList(); // Create the first report, the temporary directory where the file is saved is taken from // IReport settings report = new ProductsInStokReport(new File(getAppSettings() .getCacheDir(), ProductsInStokReport.REPORT_FILE_NAME)); lst.add(report); // Create and add other reports to the list lst.add(new ToChiefReport()); )
d) the procedure for launching an exchange according to your rules
/* * Starting an exchange according to my rules. Please note that in the scheduler * (if installed) the exchange remained according to the standard rules */ private void startExchangeMyRules(ExchangeVariant variant,boolean cancelable) ( // helper for calling web service methods WSHelper wsHelper = new WSHelper(getExchangeSettings()); MyExchangeTask task = new MyExchangeTask(variant, wsHelper, getHelper()); startExchange(task, cancelable); )
And change the call to the exchange procedure startExchange(ExchangeVariant.FULL, true) in the onOptionsItemSelected handler to startExchangeMyRules(ExchangeVariant.FULL, true).
The application is ready, authorization forms and program settings will be created automatically, we will not change them.
Let's test it on an emulator. If you made no mistakes anywhere, the application will launch. However, instead of the authorization window, the settings window will be displayed immediately, since authorization data (username and password) are not specified.
Please enter your username: ivanov
And password: 123456
Launch the 1C database and open the “Mobile Employees” directory. As a mobile device, specify the predefined element “Device Emulator”, add the “Report to Manager” application to the “Mobile Applications” tabular section and set an identical user name and password.

Start the exchange procedure on the emulator (button with the “Up” arrow on the right panel) 
The result of the exchange is displayed in the notification: 
Click on it to launch your application (or to view error details if the exchange was unsuccessful).
Let's check what happened. Click on the report in the list:
Show


Great! Reports are displayed, you can change the scale using a button or gestures.
The application is ready, it turned out to be quite functional and easily expandable. Adding other reports will not be difficult.
You can transfer documents in various formats, such as *.doc or *.pdf, and use external applications to view them. See the example source code, there are 3 more reports:
- chart using Google Chart Tools
- plot using jQuery Plot plugin
- output of a PDF report by an external application (PdfReport.java)
Show


You can download the full example code at https://xp-dev.com/svn/fba_toolkit_public/samples/fbaSample4ReportHead/
Using HTML to build reports allows you to create a wide variety of reports, incl. and with interactive elements. For example, in one of our projects the following report is used:
Show

- for the “Debt” field, a conditional color scheme is used depending on the amount;
- the full list of unpaid invoices opens only when you click on the “All” marker; by default, only the last 4 are displayed.
And of course, you are not limited by anything, you can use third-party libraries to display reports and charts, for example achartengine, or create your own graph/diagram (there are plenty of examples, including those in the Android SDK).
That's all, you can find other examples on the website http://profi1c.ru.
In the near future, it is planned to add lessons on interactive elements and adapters of the FBA library, as well as show how to work with off-line mapsforge maps.
Restrictions:
- the program stops working after the demo license expires, i.e. after 12/31/13;
- When starting, a notification is displayed:

In the near future (no more than a month) there will be a commercial version; information about the cost and licensing procedure will be added to our website.
Thank you for reading to the end. I’m ready to answer your questions in the comments regarding both 1C and Android.
Tags: Add tags
Using the example of the mobile application “1C: Managing Our Company” (abbreviated UNF), I want to show the evolution of a mobile business application from its origins and the release of the very first version to the present day. The app currently has over 220,000 downloads; The application is free, but it has paid options (implemented through in-app purchases).
The first version of the mobile UNF was made on one of the first versions of the 1C:Enterprise mobile platform in 2012. At that time, there was already a client-server configuration “1C: Management of a small company” (then the name was that), a program for automating the activities of a small company - sales, procurement, customer and supplier base, warehouse management, production, etc.
Like most mobile applications written on the cross-platform mobile platform 1C:Enterprise, mobile UNF is available on iOS, Android and Windows.
The task was posed as follows: to create a mobile application that supports part of the work scenarios of the “big” UNF. The application must be able to work both autonomously and synchronize data with the “large” UNF (hereinafter I will write the word “large” in relation to the client-server version of the UNF without quotes so as not to overload the text). In the case of working with a large CNF, scenarios of “mobile” employees - sales representative, service engineer, salesperson - must be supported.
The first version was created in 1 man-month. When creating a mobile application, some metadata objects (directories, documents) were implemented on the basis of objects of the large UNF. But some of the functionality had to be programmed from scratch, for example, the process of exchanging data with a large UNF. True, in relation to data exchange, we actually had to do a little programming - we used standard platform mechanisms (in particular, exchange plans), which reduce coding to a minimum.

In addition to simplifying the work with data synchronization, the 1C platform significantly facilitates the work of constructing a full-featured mobile application, providing the developer with such interface components as lists (tabular and hierarchical) with the ability to search for them, input fields with search, tables for reports, a wide range of charts, the ability printing on WiFi and Bluetooth printers, etc.
Features of the mobile version There are two main strategies for choosing the functionality of a mobile application. The first is “one application - one function”. For example, a mobile application for receiving goods at a warehouse, which can only scan the barcode of a product with a built-in camera and send information about the received product to the server. The second strategy is to create a mobile application with broad “all-in-one” functionality. Both approaches are valid; When writing a mobile UNF, we chose the second approach - our application covers many tasks in its subject area and can work completely autonomously, serving the needs of a small organization. Another advantage of this approach is that the user can work with several interrelated functions from one application.Mobile UNF widely uses the functionality of a mobile device, in particular:
- The built-in camera of the device can be used to photograph the product when filling out the product card, to read barcodes and QR codes
- An invoice for payment can be sent to the client by email or SMS
- The counterparty can be selected from the address book of the mobile device
- If the counterparty has a telephone number, you can call the counterparty or send an SMS with one touch; if an email is specified, send a letter; if an address is specified, show it on the map
- You can print documents to printers via WiFi and Bluetooth
The configuration of the mobile UNF looks quite spartan (see screenshot below):
- 8 reference books (in the large UNF there are 273 reference books)
- 7 documents (in the large UNF - 125)
- 3 document journals (in the large UNF - 24)
- 3 information registers (in the large UNF - 357)
- 4 accumulation registers (in the large UNF - 64)

Main objects of mobile UNF
But, despite such a small number of application objects, the product turned out to be quite functional.
An interesting feature of the mobile UNF is that it is often started to be used by people who have never heard of 1C before (yes, there are such in our country), those who need a mobile application to keep records of their small business (for example, home crafting). They simply found it by searching on Google Play or the AppStore, read the reviews, and started working.
Offline operation This work scenario is intended for very small organizations, when all accounting is carried out exclusively on a mobile device. This could be, for example, a “home” business - making jewelry at home and selling it on the VKontakte page. Or maybe even a small store - I personally saw a case where a toy store specializing in the sale of Lego constructors kept records exclusively on the mobile version of the UNF. Considering that the mobile UNF can print on WiFi and Bluetooth printers, it can be used to solve a fairly large number of problems. Mobile UNF supports processing orders, entering invoices and invoices, accounting for receipts and expenditures of money. Work in synchronization mode with the server (first versions) In synchronization mode with the server in mobile UNF in earlier versions, accounting functionality became unavailable, and work in it was carried out in mainly with orders (receiving and fulfilling orders) and related activities (maintaining directories of counterparties, goods and services, etc.).Directories of goods and services, contractors, and orders were synchronized with the large UNF.

Data exchange between mobile and large UNF in the first versions
Orders entered from mobile devices ended up in a large UNF, and when synchronized, they ended up on the mobile devices of those responsible for the orders. Documents such as cash receipts, sales of goods, etc., entered on mobile devices, went to the large UNF, but were not synchronized between mobile devices. All work in the mobile application in synchronization mode was carried out mainly around orders - their acceptance and execution; full accounting was not carried out on the mobile device; for this it was necessary to use a large CNF on the computer.
This was the case in the first versions, but later we changed the situation and expanded the list of scenarios for using mobile CNF to make working with it more convenient for users.
A little about data synchronization Data exchange between mobile and large UNF occurs through web services; the mobile UNF calls web services deployed on the large UNF side. The data structures in large and mobile CNF are different; When designing the architecture, we considered 2 options for data exchange:The data exchange mechanisms implemented in the platform take on most of the work of creating packages for data synchronization, allowing you to reduce coding to a minimum. During the exchange process, the standard mechanism of the 1C:Enterprise platform is used - the data exchange mechanism; for each mobile UNF, a data exchange node is created in the large UNF; in the large and mobile UNF, a change registration service is used to track data changed since the last synchronization, etc.
The mobile application initiates data exchange, using the platform mechanisms, generates an exchange packet (containing the mobile application identifier and data updated on the mobile UNF since the last synchronization) and sends it to the large UNF. Based on the information in the start package, the large CNF prepares for the mobile CNF the data changed in the large CNF since the last synchronization and packages them into packages. Packages in XDTO format are 1C metadata objects serialized in XML; The size of each package is no more than 500 objects.

Mobile UNF collects this data packet by packet. After downloading the last package, the mobile UNF begins to process the received data - process documents, record directories, etc. In the event of a connection breakdown, resuming packets is supported; We wrote the resuming mechanism for CNF ourselves (it is not in the platform), but since mobile CNF is supplied in source code, developers can look at the implementation of the mechanism and borrow it for their applications.
During the initial synchronization of a mobile CNF with a large CNF, you cannot work in the mobile CNF - a modal window appears showing the progress of the process. All subsequent synchronizations are background and do not block the operation of the mobile UNF.
Full list of objects exchanged between mobile and large UNF:
- Directories:
- Nomenclature
- Counterparties
- a list of users
- Documentation:
- Customer orders
- Receipt at the cash desk
- Expense from the cash register
- Purchase Invoice
- Sales Invoice
- Production
- Registers (but not all prices, but only the main ones):
- PricesSuppliers
- Prices of Products
- Information about the organization:
- Name
- Tax information

Product card with product image
In the first versions of the mobile UNF, the moving scenario was quite straightforward - the data entered in the mobile UNF was copied into the database of the large UNF, and the user now had to keep records on the computer. In this case, the mobile UNF will work in the mode of working with orders, and it will no longer be possible to keep records (as on the standalone version of the mobile UNF).
This, of course, was not entirely convenient for the end user - he was already accustomed to keeping records from a mobile device, but here he was forced to sit at the computer keyboard. Not everyone will be happy with this.
Therefore, we have expanded the list of scenarios for the operation of mobile UNF. The emergence of our cloud service http://1cfresh.com, based on cloud technology 1cFresh, helped us with this. It is now possible to place large CNF in the cloud. We have described three scenarios for using a mobile application as the user’s business grows:

The Production functionality is a one-time purchase, and the ability to sync with additional mobile devices is packaged as a subscription that must be renewed every month. Interestingly, just 3 weeks after adding the shopping functionality, mobile UNF was in the top 15 on Google Play for sales of business applications. Conclusion Mobile UNF is a relatively small (in terms of source code volume), but quite popular product. We hope that the story about its evolution will be useful to the creators of mobile end-user products both using 1C technologies and other development tools.
It would be useful to remind you that on the 1C mobile platform you can make applications that interact not only with the 1C server backend; protocols used for data exchange in mobile applications on the 1C platform are platform-independent (web and HTTP services, support for XML and JSON, etc.). So if you need to quickly and dynamically develop a cross-platform (Android, iOS, Windows) mobile client, with the ability to work offline without a constant Internet connection for your business application, then the 1C mobile platform may well be the best choice for you.
Introduction
The new version of the 1C platform (8.3.5) has a lot of new functionality. By the way, for those who don’t know, there is a resource on which 1C developers describe emerging innovations in the platform. One of these is the mechanism. It caught my attention and I wanted to implement something for fun. The idea immediately came to me to make something similar to a website, but this idea would not have been understood even at the infostart, so I threw it out of my head. It seemed like it was thrown out, but the idea was transformed into something not so large-scale, something that could find real application in life - a mobile web application.
I believe that a low-load and simple mobile web application for a limited number of users, for example, employees, can be implemented in 1C using HTTP services.
Mobile web application "Contacts"
I'll start with the result. The mobile web application "Contacts" looks simple, and in fact it is. At the beginning, you only see a field to search for a contact.
Let's look for someone (in order for the search to start, you need to enter at least 3 characters). Someone has been found. 

Let's call Alexey. 

Let's write a letter to Timofey. 

That's all the mobile web application is.
By the way, it is very easy to adapt it to any configuration.
A little about implementation
Tools used:
- Mechanism of HTTP services of the 1C platform (starting from version 8.3.5)
- JavaScript library jQuery (http://jquery.com)
- JavaScript library jQuery mobile (http://jquerymobile.com)
- 1C:JSON ()
The "ContactsMVP" HTTP service accepts all requests and transfers them to "ContactsMVP" processing. All the logic of the mobile web application is concentrated in the processing of "ContactsMVP".
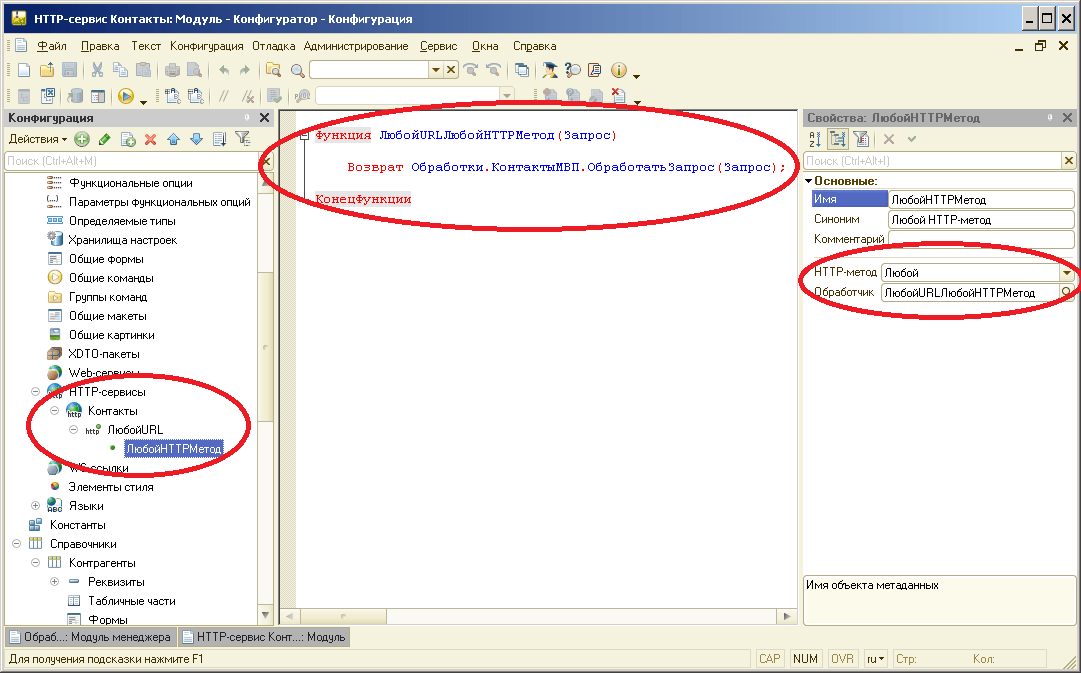
This is what request processing looks like.
Function ProcessRequest(Request) Export If MatchesResource(Request, "/index.html") Then Return GetResourceIndexHTML(); ElseIf MatchesResource(Request,"/application.js") Then Return GetResourceApplicationJS(); ElseIf MatchesResource(Request,"/contacts.json") Then Return GetResourceContactsJSON(Request); endIf; EndFunction
And this is, for example, what the return of the index.html page looks like.
Function GetResourceIndexHTML() Response = New HTTPServiceResponse(200); Text = GetLayout("IndexHTML").GetText(); Answer.SetBodyFromString(Text); Response.Headers.Insert("Content-Type", "text/html"); Return Reply; EndFunction
Nothing complicated. You can study the mechanism in more detail by downloading ContactsMVP.dt
Features of the publication
There were some minor difficulties when publishing the HTTP service, so to make it easier for you, I will outline some notes:
- There are quite detailed descriptions about the publication - read more carefully.
- Don’t forget to run the configurator as an administrator before publishing.
- It was possible to launch the HTTP service only with the file version; some error occurred with the client-server version.
- In order for the mobile web application to work without an authorization request, if there are registered users in the database, then after publication, in the default.vrd file, the Usr and Pwd parameters must be added to the connection string (point.ib).
Conclusion
I hope the article material will be useful to you.
Thank you for your attention.
This prototype was created using Moqups– a simple and convenient service for creating layouts and concepts. It is quite suitable for rapid prototyping of small Android applications. For prototyping more serious projects, it is better to use Photoshop and Android UI Design Kit!.
Application DescriptionThe application consists of 3 screens:
“Main screen of the application” – when launched, a list of tasks is displayed (due date, name of the task and indication of its completion). Once a task is completed, it is marked as completed in the list.
By clicking the “Data Exchange” button, an employee can start the procedure for receiving new tasks from the server immediately. Data exchange with the server is also carried out automatically once a day, according to the schedule specified in the settings.
“Program settings” - here you set the authorization parameters and the 1C server address, and also displays the unique identification number of this device. An automatic exchange schedule can also be set here.
The structure of the data exchanged between the mobile client and the 1C serverThe path will be a table of values (in 1C terms), which contains 3 columns:
Creating a mobile application template in 1CLaunch 1C and select the “Mobile Applications” directory, add a new element, where:
In the “Identifier” field, specify SAMPLE_APP_TASKS (or think of any other), this is a unique application identifier within your configuration. Needed to uniquely identify the application during the exchange process, because The same employee can use multiple applications on one mobile device.
In the “Name” field, enter the name of your mobile application, for example Tasks.
Write down the directory item using the Write button, then create a new version and specify it as a working version for your application.
Select the “External data” group in the “Metadata” list and click the “Add” button on the toolbar. Fill in the parameters of the new table as shown in the figure:
The names of the columns and the table itself here, as a rule, are specified in Russian; they will be used to fill the table with data using the built-in 1C language.
Each data table in a mobile application must have a primary key (PRIMARY KEY in terms of relational databases) of a string type. For all object tables (directories and documents), the key is the text representation of the link (a unique identifier) and is filled in automatically.
For non-object tables, such as an “information register” or an “external table”, the program must indicate how it should be filled. One option is to set the “Index” flag for one or more table columns, which is what was done in our example for the “Due Date” and “Task” columns. This means that the table cannot have two identical tasks for the same date.
Click OK, the table will be added to the metadata tree, for the mobile application the names are automatically translated into Latin.
[One of the FBA rules: in 1C we write the source code in Russian, in Java in Latin. The absence of Russian letters in identifiers, variable names and classes will avoid many problems when designing a mobile client]
Rename names from Latin to English. In principle, it was possible to leave the Latin alphabet, but we have already decided on the names (above in the table).
Save the changes and click on the “Mobile application template” button on the toolbar.
“Template directory” – specify the path to the directory in which the generated mobile application template files will be saved.
On the “Basic” tab, specify the name of the package; this must be a unique identifier. If you have a website, use it to generate the prefix. In our example, this is ru.profi1c.samples.tasks
On the “Web service” tab, the server address is indicated as 10.0.2.2; by default, this is the address of your computer when accessed from an Android emulator.
In the “Web service name” and “Application subdirectory” fields, enter the data that was specified when publishing the web service.
On the “About the program” tab, fill in the contact information and additional information about your application; leave the settings on the “Table Generator” tab unchanged.
Click Create, the Android project template will be generated. Close the template generation wizard window, save the changes and close the “Mobile applications” directory item


