Currently, the most popular operating systems are: Windows 7, Windows 8, Windows XP, Windows Vista, Linux, Mac OS. Linux and Mac OS users usually know the name on their computer. But the large army of Windows users are often at a loss as to how to recognize the operating system on their computer.
This may be necessary before subscribing to a course or, moreover, purchasing an information product or installing a new program or game.
Unfortunately, the authors of paid (and free) courses do not always indicate which operating system they use to teach computer literacy and similar things. And if you have Windows XP on your computer, then a course on Windows 7 or Windows 8 is unlikely to help you. In addition, many programs and games are designed for a specific operating system.
To find out the computer system there are at least three ways:
- win team,
- right-click (right mouse button) on the “Start” button or on the “Computer” icon,
- Microsoft to help us.
The second and third methods provide more complete information about the operating system on the computer, but let’s start with the first method.
1. How to find out the operating system of a computer using the Winver command
How to enter the winver command? A quick method (we will talk about another method):
1) press two keys simultaneously: with the Windows logo + R,
Rice. 1. Two keys are highlighted in red: the bottom one with the Windows logo and the top one with the letter R
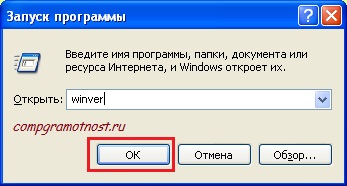
2) the “Run” window will appear, in which you should enter the “winver” command without errors and without quotes:

Rice. 2. The “Run” window in Windows 10 (the window looks the same in Win 7, 8.1, XP), where in the “Open” line we enter “winver”
3) then select OK (Fig. 2).
Don't have a Windows logo key on your keyboard? You can do without it; we will consider this separately for four different versions.
1.1.Windows 10 and the winver command
If the above option in Figures 1 and 2 is not suitable, for example, due to the absence of a key with the Windows logo, we will use the search system, which is available in all Windows systems.

Rice. 3. Search for the winver command in Windows 10
- 1 in Fig. 3 – click the magnifying glass icon, which opens Search on your computer,
- 2 – type in the search line that appears: winver,
- 3 in Fig. 3 – click on “winver Execute command”.
As a result, a window will appear describing the operating system on your device:

Rice. 4. Result of the Winver command: information about the operating system
The information provided in Fig. 4 is sometimes not enough. To learn more about the 10-ke system, see
1.2. winver for Windows 8 (8.1)
To use this command, you can use the Windows logo button + R, more details.
Another option that does not require commands is to use Windows 8 (8.1) search:

Rice. 5. Search for the winver command in Windows 8
- 1 in Fig. 5 – open Search,
- 2 – enter winver,
- 3 in Fig. 5 – click on winver.exe.
As a result, we get something like this:

Rice. 6. Winver execution summary - information about Windows 8
At one time, I updated Win 8 to 8.1 and everything was fine, until one unlucky day after the update, the tablet with 8.1 suddenly stopped working. Samsung was disappointing: only the native Win 8, which was originally installed by the manufacturer of the tablet computer, and no updates to 8.1. Therefore, in Fig. 6 the inscription is with 8, not 8.1.
How to find out more about your 8, read
1.3. Windows 7 and the winver command
1.4. Windows XP and the winver command
If the Start button looks like in Fig. 9, then you are probably running Windows XP.

Rice. 9. Where is the Run command for Windows XP?
- Click on .
- In the menu that appears after this, click on the Run command (Fig. 9).
The “Launch the program” window appears (Fig. 10).
Rice. 10. Entering the Winver command for Windows XP
Enter the winver command, as shown in Fig. 10, and click on the “OK” button.
The “About Windows” window appears (Fig. 11), where you can find out information about the operating system on your computer, including its version:

Rice. 11. Result of running the Winver command for Windows XP
You can also talk about the Windows XP system in the following way.
There is an easier way to find out more about your operating system, without entering any commands.
2. How to find out the operating system of your computer using RMB (right mouse button)
Briefly, the essence of this method is that you need to right-click (Right Mouse Button) on the “Computer” or “My Computer” or “Start” icon.
If the RMB method is not suitable, then enter “system” or “computer” into the Search bar without quotes. All that remains is to click on the option that will be found as a result of the search. Then a window will open with complete information on your computer’s operating system.
2.1. About Windows 10
To get more information about your operating system (RAM size, processor, 64 or 32 bit, etc.), you can
- right-click (right mouse button) on the “Start” button,
- or click on the magnifying glass icon (next to the Start button) and enter “system” in the search bar without quotes.

Rice. 12. Right-click on the Start icon
- 1 in Fig. 12 – click “Start” with the right mouse button,
- 2 in Fig. 12 – in the menu that appears, click the “System” option.
As a result, the “About System” window will open:

Rice. 13. Windows 10 system information
2.2. About Windows 8

Rice. 14. Search for the Computer application using Search
- 1 in Fig. 14 – click Search,
- 2 – enter “computer” into the search bar without quotes,
- 3 in Fig. 14 – click on the “Computer” application,
In the window that appears after this, click with the left (or right) mouse button on the “Properties” option. As a result, the “View basic information about your computer” window will open (Fig. 15):

Rice. 15 (click on the picture to enlarge it). Windows 8 Basics
2.3. About the system in Windows 7

Rice. 16. RMB (right mouse button) for the Computer option in Windows 7
If the Start button looks like in Fig. 16 (number 1), which means you have Windows 7.
- 1 in Fig. 16 – Click on the Start button.
- 2 – Then right-click (right mouse button) on the “Computer” icon.
- 3 in Fig. 16 – A context menu appears, in which we click on the “Properties” link.
The “View basic information about your computer” window will appear (Fig. 17), in which you can find out the operating system installed on your computer, as well as information about the processor, RAM, etc.

Rice. 17. Computer Basics for Windows 7
2.4. About the system in Windows XP
If there is a “My Computer” icon, as in Fig. 18, which means you have Windows XP operating system. Click on this RMB icon (right mouse button), and in the drop-down menu click on the “Properties” link (Fig. 18).

Rice. 18. Properties for the My Computer icon in Windows XP
The “System Properties” window appears (Fig. 19):

Rice. 19. System properties with Windows XP
In this window, on the “General” tab, you can find out the name of your operating system, as well as information about the processor and RAM (random access memory).
Microsoft to help us
1) To go to the official Microsoft website, click on the link
2) The window “How can I find out my version of the Windows operating system?” will open.

Rice. 20. Microsoft determines the version of Windows after going to the page on its official website
Here you will immediately see which Windows you have (if the system is licensed).
By clicking on the small triangle (framed in Fig. 20) and selecting the Windows version: 10, 8.1 or 7, you will see instructions from Microsoft on how to find out the computer’s operating system and get more information about it (how much RAM, what processor , 32 or 64 bit system).
Receive the latest computer literacy articles directly to your inbox.
Already more 3,000 subscribers
Greetings to everyone who doesn’t know the answer to the simplest question - how to find out what Windows is on the computer... it looks like a simple question, but at work it quite often confuses people, and it is absolutely necessary to find out this point. Actually, after these awkward situations, I decided to quickly write a note with the easiest ways to find out the version of the operating system that is currently in use.
I will not use such points as - what icon does you see when you boot or what does the start menu look like? Yes, you can understand from the interface which operating system you are using, but such leading questions can confuse you even more (and if various system modifications and third-party themes were used, then turn out the lights altogether)
Working on a computer and not knowing the version of Windows installed is not exactly a crime, but it can throw you into a couple of unpleasant moments. For example, you forcibly installed drivers that are not intended for your version of the system and you will receive, sign - ... Any application has system requirements and most new games may not work on Windows 7, perhaps you just need it and everything will work for you.
I have prepared for you several ways to find out what version of Windows is installed on your computer (those who read me know that I like to describe in as much detail as possible any aspect of using a computer)
Find out the version of Windows installed on your computer through system properties
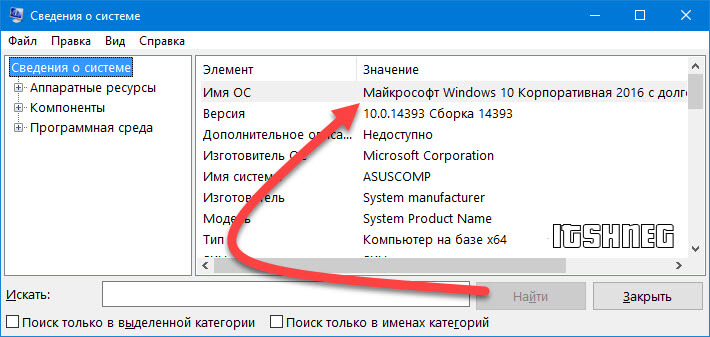
Probably the easiest way to answer our question is to go to the computer properties, for this you should have the “This PC” icon or similar (note that it is an icon, not a shortcut). Right-click on it and select “Properties”...

At the top of the “System” window that opens, we see what Windows is installed on our computer and its edition (in my case it's Windows 10 Enterprise 2016 with Long Term Servicing), and just below we can find the bit depth (system type), but this is a topic for a whole separate note.

As you can see, everything is elementary, but some users display the “My Computer” shortcut on the desktop; there will be properties of the shortcut, not your system. For such cases, there are alternative options.
Determine which Windows is installed using the winver command
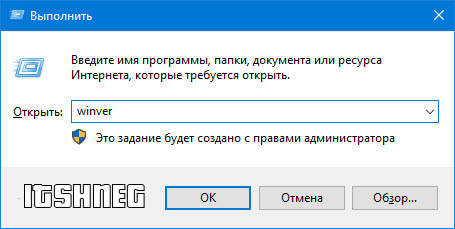
Let's move on to the next way to find out which Windows is on your computer. In this case, the winver command will help us, which must be entered into the Run application window. You can open this window by pressing the Win + R keys on your keyboard.
The “Windows: Details” window will open, where you can find out what Windows is installed on your computer (similarly, the build of your operating system is displayed here, which is very helpful when searching for errors on the Internet)

In my opinion, this method provides more complete information about the version of Windows installed on a computer or laptop... but not all that is possible - let’s move on to more interesting methods.
Determining Windows using the systeminfo command
Probably, this method can be called the most comprehensive... this option will not only allow you to find out what Windows is installed on your computer, but will also tell you about the build, installation date and other useful things. To use the systeminfo command we need to open the Windows command line (for those who don’t know how to do this, there is an excellent note “” - there you will certainly find an option that you like).
Once you have opened the command line, enter the command there systeminfo and wait until the end of collecting information about your computer. The second line in the report will indicate the version of Windows installed on the computer.
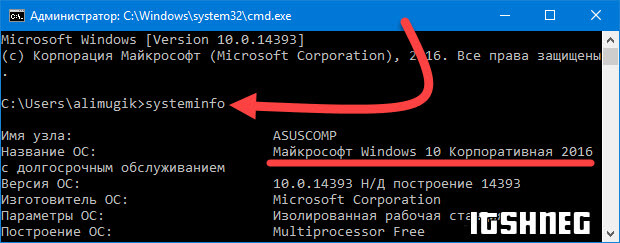
Or you can get confused and make a kind of sandwich of commands for the “Run” window. Enter the command cmd /k systeminfo and click OK. In this version, cmd launches the Windows command line, the /k key says that you need to execute the command when you start cmd, and systeminfo is the same command that will show the information that interests us.

These three ways to find out which Windows is installed on the computer are enough for any user, but as a bonus I’ll tell you one more option
Bonus. Find out your version of Windows through “System Information”
Well, the last method for today, everything is as usual, only the command is different - msinfo32. It is entered, as you already understood, into the “Run” command window.
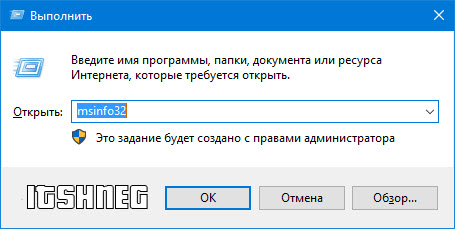
The “System Information” window will open, where you can find out what Windows is installed on the computer (in the “OS Name” line)
I did not focus on this option, since it almost completely repeats the ones described above - for general development it is simply useful to know them all.
Everything you need to know about which Windows is installed on your computer
As you can see, it won’t be difficult to find out which Windows is on the computer, but this is only if the system starts and works. I did not use the opportunity to find out the version of the killed system in this note. (for example, when you need to run recovery, but you don’t know the version) since this is not necessary for an untrained user, but a pro already knows how to do it. I'm not even talking about such indirect signs as the folder on the C:\ drive - “Document and Settings” is found only in Windows XP; there are dozens of such differences. Agree that entering a command and finding out the answer to your question is much easier than looking for signs of a particular operating system from Microsoft.
P.S. If the first method to find out which Windows is installed on your computer cannot be used due to the fact that instead of an icon you have a shortcut, this window can be opened with the combination Win + Pause/Break. Good mood to you all…
The most common reason why users are interested in this question is to determine software compatibility. For example, older versions of programs are not always able to work perfectly under a particular generation of Windows. Thus, knowing exactly which OS is currently running, all that remains is to compare it with the software requirements.
The second reason why interest arises is the need for repairs. Service centers almost always ask this question if the source of the problem is in the software part. The newer the OS version, the more you will have to pay. Because software complexity increases every year. New functions appear that have unique algorithms. Accordingly, it is more difficult to restore software.
Windows 10?
At the time of writing this material, the Windows 10 operating system is the newest. To find out if it really works at the moment, just follow the steps below.
- Go to menu "Start" .
- In the menu that opens, select the option "Options" .
- A section will open in front of you "Options" . It contains a tab "System" .
- By clicking on it, you need to select the option in the window "About the system" .
- The interface will display information about when Windows 10 was released, what version is currently running, what build code is installed on the computer, and what type of system is supported.
Windows 8?
As a rule, you can already determine the presence of Windows 8 through a unique visual interface. However, some users also need to know a number of other details. To view the full details, simply follow these steps:
1. Activate the panel. To do this, just hover the cursor on the right side of the interface, then click on the option "Options"
.
 2. Click on the option "Change computer settings"
.
2. Click on the option "Change computer settings"
.
 3. Select an option "Computer and Devices"
, as shown in the screenshot below.
3. Select an option "Computer and Devices"
, as shown in the screenshot below.
 4. A new window with sections will appear in front of you. In this case, we are interested in the very last of them - "Computer Information"
.
4. A new window with sections will appear in front of you. In this case, we are interested in the very last of them - "Computer Information"
.
 After all the steps have been completed, a new window will appear on the screen, which displays information about the type of operating system used. To obtain additional information, just use the points "System type"
And "Release"
.
After all the steps have been completed, a new window will appear on the screen, which displays information about the type of operating system used. To obtain additional information, just use the points "System type"
And "Release"
.

Windows 7?
Today, Windows 7 is the most popular version of the operating system in the world. The reason for this is the simplicity of the interface and minimal processor load. The simplest and most effective way to obtain information is to right-click on the icon "My computer" . It is usually located on the desktop. If for one reason or another it is missing, you can always find the shortcut in the menu "Start" . After clicking, just select the last option from the context menu.
 As you can see from the screenshot below, in the case of the menu "Start"
There are absolutely no differences. Of course, the result is similar, but it takes longer to complete.
As you can see from the screenshot below, in the case of the menu "Start"
There are absolutely no differences. Of course, the result is similar, but it takes longer to complete.

Current methods for all versions of Windows operating systems
Despite the emergence of new generations of Windows software, the commands still remain the same. Accordingly, if you remember them, in the future it will be possible to quickly execute them, regardless of the type of interface.
Teams
Regardless of the current version of Windows, just hold down two buttons on the keyboard - Win+R. A new window will open in the interface called "Run" . We need to write the command into it "winner" . Having entered it, press the button "OK" , or "Enter" on keyboard.
 The new window will contain all the relevant information regarding your build, bit depth, account name with administrator rights, and so on.

Advanced option via commands
Call the window again "Run" using the command we provided above. Enter the command in the input field msinfo32 .
 An expanded version of the system information will become available in a new window. As a rule, this information is used by programmers and service center employees who want to reinstall, restore or improve software.

Online service
It may seem that the operating system version is only available in offline mode. In fact, this is not true. There are specialized portals that you just need to go to to get basic information about the version of your software.
 In addition to the name of the operating system, using this service you can determine the type of browser, screen resolution and a number of other little things. The next question arises - in what cases can this be useful? The answer is obvious - for example, when, as a result of a virus attack on the device, icons "My computer"
disappeared everywhere, or when you right-click on them, the pop-up menu does not open. Although such situations occur extremely rarely, they still occur.
In addition to the name of the operating system, using this service you can determine the type of browser, screen resolution and a number of other little things. The next question arises - in what cases can this be useful? The answer is obvious - for example, when, as a result of a virus attack on the device, icons "My computer"
disappeared everywhere, or when you right-click on them, the pop-up menu does not open. Although such situations occur extremely rarely, they still occur.
Through the registry
For untrained users, the registry is a rather dangerous thing, since changing any values here can lead to a complete failure of the operating system. To avoid encountering software problems in the future, you must strictly follow the instructions below.
- Call window "Run" and enter the command in the appropriate field regedit .

- Using the navigation available on the left side of the new window, you need to go through the following path: HKEY_LOCAL_MACHINE – SOFTWARE – Microsoft – Windows NT – CurrentVersion.
- Having accessed the directory above, the main window area will include all the required information. For example, file ProductName allows you to get acquainted with the name and version of the operating system, and CurrentBuild – with the current build.
 Based on the information above, if you know where to find the information in the registry, it will be very easy in the future to find the information you need about which OS is installed on a particular PC. Strictly adhere to the following rule - never change anything in it if you do not know what specific data is written for and how it works.
Via the console
A rather non-standard option for determining the operating system version. It is enough to execute just one command to obtain a huge package of information regarding your OS version. To use this method, just follow these steps:
- Open the window "Run" .
- In the text input line, write the command "cmd" and confirm the action.

- Enter the text in the console "systeminfo" and confirm your entry using the button "Enter" on keyboard.
 As you can see from the screenshot below, you have a huge amount of information available for review.
 A distinctive feature of using the presented method is that the user cannot make changes to the fields available in the open window. Thus, if you have never opened the registry, or are afraid of working with it, calling the command line will be an ideal option.
By key number
At official points of sale, the vast majority of laptops already have installed software that is completely ready for use. To ensure the possibility of warranty service within the established period, at the bottom of it there is a sticker with a unique serial code of the OS version. To use this method, just go to the official Microsoft website, and then find a special program called Volume Activation Management Tool. Please note that you can only download it from the official website.
Despite the fact that the presence of a Russian-language interface is not provided, it will be very easy to understand the main capabilities of the program. After starting, you need to turn the laptop over, write down the serial code on a piece of paper or take a photo of it, and then write it separately in the field "Product Key"
. After entering all the characters, click on the button "Verify"
.
 You will see information about the current version of the software running on your computer.

Note! The presented method is not relevant for the Windows 10 operating system.
How to find out the operating system using special programs?
The most complete list of information about a specific system, presented in one clear interface, is possible by downloading third-party programs. Some of them allow you not only to check the version, but also to obtain information about the current processor temperature, memory load indicators, analyze the hard drive for errors, and so on.
Aida
One of the most popular programs. Almost all information about the software and technical characteristics of the computer is available here. There is also the opportunity to test the computer using a number of parameters. Although the application is very functional, it is paid. On the other hand, thirty days is more than enough to obtain the required information one-time. Once you launch it, a window will open that looks very much like the usual one. "Device Manager" . But to increase convenience, all components are divided into several categories.

HWInfo
The utility in question is less comfortable from an interface point of view, but it is characterized by the presence of a number of features that may seem convenient to use. For example, near the section regarding driver updates, a current link to the official website of the manufacturer is displayed. You don't need to look for it yourself. To make using your computer safer, the block where the current processor temperature is indicated tells you the recommended maximum parameters specifically for your device. All that remains is to check from time to time whether the specified level is not exceeded. The program works quite quickly, but the interface is not translated into Russian.

conclusions
As you can see, there are a huge number of ways to determine the version of the operating system you are using. With the information above, you can brag to your friends, as well as quickly solve your own equipment problems.
Sometimes there is an urgent need to find out the characteristics of your computer. For example, in order to update drivers, upgrade some parts of the system unit, or simply show off to your peers, and in many cases you just need to find out the markings of a particular system component. There are only two ways to do this: and read the markings or check them using software.
The first method, although simple, in most cases may not be available due to a violation of the warranty (if the computer is under warranty). Therefore, let's take a closer look at the second method, how to find out the characteristics of your computer using programs, both built-in operating system tools and additional specialized software.
We look at the characteristics of the computer using the operating system
1. In order to find out the three main system parameters, just go to the “My Computer” tab in the “Start” menu. To do this, you need to hover the cursor over it and right-click on it; in the list that opens, select “Properties”.


This can also be done in one more way: from the “Control Panel” tab, select “System”. In the window that opens below, you can view the same parameters.
2. You can find out what equipment is installed on your computer, but without detailed characteristics, through the “Device Manager”.

To launch it, you can simply type the key combination “Win+Pause”. In Windows 7, in the window that opens, you will need to select the “Device Manager” tab. Now we can see what devices are installed on your computer and their names, for example, processor type and frequency, video card, sound card, network adapters, disks, etc. The Device Manager in XP can be launched using the key combination “Win+Pause” “, then at the top you need to click on the “Equipment” tab, and already launch “Device Manager” in it.
3. This method involves using the integrated “System Information” software. To launch it, you need to click on the “All Programs” drop-down list in the “Start” menu, then “Accessories”, open the “Utilities” tab and launch the “System Information” utility there. You can also do this faster by pressing the Win+R key combination. The program launch window will open. In the “Open” line you need to type “msinfo32.exe”. This is the same utility, only launched through the console.

Using this built-in software, you can obtain basic information about the system and components. But this utility is quite inconvenient due to the complexity of the branches of transitions along the tree. This software can be used in the absence of other software that is easier to understand and read.

4. You can also view system characteristics through the DirectX Diagnostic Tool. This utility is used mainly for testing both video and audio cards. The utility window displays general information about the system and, more specifically, about the video card.

5. You can find out the characteristics of your computer from the BIOS. To do this, when booting the computer, you must press the F1, F2, Del or Esc key. It all depends on the version of the BIOS itself. Further, some knowledge of English is required.
Programs for viewing computer characteristics
For more detailed system performance diagnostics, you can use special programs. For example, AIDA64, ASTRA32, PC-Wizard programs are excellent software both for diagnostics and for testing all components separately.

To begin with, let's say that the AIDA64 (formerly Everest) application belongs to the paid category. However, it is possible to take advantage of the free 30-day period provided by the developers so that the user can familiarize himself with the capabilities of the program. This is quite enough for us. In our case, we will use the AIDA64 Extreme Edition to familiarize ourselves with the basic parameters of the computer. There is, of course, a business version of this application, but for our purposes the Extreme version will suffice. This application must be downloaded from the developer's website (www.aida64.com) and installed on your computer.

AIDA is very simple and easy to use. The main application window is divided into two parts: the left side displays a tree of the main subsystems of the computer, and the right side displays detailed information about the subsystem selected on the left side. To view summary information on your computer, just expand the “Computer” section, and then select the “Summary Information” subsection.

Selecting this subsection will allow you to find out all the characteristics of your computer: the type of computer, information on the installed operating environment, information about the system board, available partitions, network, peripheral devices, etc.

You can view data on your computer's central processor by selecting the "CPU" subsection in the root "System Board" section. The right side of the application will display the parameters of all processors installed on the PC. This data will tell you about the type of processor installed, its model, clock speed, supported instructions, cache of different levels. You can also find information about the load on the microprocessor cores. If you need more detailed information about the functions supported by the system microprocessor, then feel free to click the “CPUID” subsection.

If you move a little further in your selection and select the “Motherboard” section, then detailed information on the motherboard will be displayed in the main application window. For a desktop PC, AIDA64 will display the properties of the board with its name, the properties of the system bus with its real and effective frequencies. Data on the properties of the memory bus with its width, frequencies, and bandwidth will also be demonstrated. Equally important technical information on the physical parameters of the board: supported CPU socket, installed connectors for expansion cards, the number of slots for RAM sticks, as well as the type of sticks themselves and the type of supported memory. In the same section, the application will show data about the form factor of the motherboard, its physical dimensions and the chipset.

Selecting the “Memory” subsection in the “Motherboard” section will display summary information about the computer’s RAM. Here you can find out information about the RAM and virtual memory available in the system: how much has already been used and how much is currently available for use by the system and applications. Also, this section shows the path to the system swap file.

You can easily find out about the properties of installed RAM modules by clicking the “SPD” subsection. This action will allow the application to show all memory modules installed on the PC, which are displayed at the top of the main window area. Selecting one of the displayed modules will allow you to obtain data that is shown in the lower part of the main area of the program window. By default, when you go to the “SPD” subsection, this part displays the data of the first module displayed in the list. Here you can find the following data about the properties of the module: its type, the amount of memory it provides, the type of this memory, its speed. Also, the width and voltage of the module, timing characteristics and functions supported by it are displayed here.
Video card

In order to view data on the characteristics of the video adapter, you need to go to the root section “Display”. Among its subsections you need to find “Graphics Processor”. Selecting this subsection will allow you to display data about the video adapter installed on the PC in the main area of the program. Among them is information about the type of video chip, its BIOS version, the memory of the graphics card (volume, frequency, type), some characteristics of the graphics processor (frequency, technical process).

The “Monitor” subsection of the same root partition will allow the user to become familiar with the main characteristics of the system monitor. These include model, resolution, aspect ratio, vertical and horizontal scan.

AIDA64 allows you to get a wide range of information about your computer's hard drives. To view information about the HDD, click on the “Windows Data Storage” subsection of the root “Data Storage” section. At the top of the main area of the application window, a list of all devices that are associated with data storage will be displayed. The hard drives will be displayed first, and information about the characteristics of the hard drive designated first in the list of devices will be displayed at the bottom of the main area of the window. Among the most useful characteristics: hard drive form factor, spindle rotation speed, read/write speed, etc.
Sensor data
It is necessary not only to be able to view data about the system, but also to analyze the current information provided about the system by its sensors. Data on sensors can be found by going to the “Sensors” subsection of the “Computer” section in the general subsystem tree.

The main sensor information window displays data on the temperature of the microprocessor, as well as its cores. The “CPU” designation shows the temperature of the processor under its cover. Traditionally, this indicator is lower than the temperature indicators of the processor cores, displayed as: “CPU1”, “CPU2”. This is due to the fact that the cover is in direct contact with the heat sink of the heat sink unit. Do not be afraid of the high parameters of the “AUX” indicator, since it means practically nothing. If its values never change, then it is not used by the system. The GPU Diode sensor shows the temperature on the GPU.

Using the ASTRA32 program you can also find out the characteristics of your computer. Like the previous program, ASTRA32 is paid, but the demo version is enough for us. Its interface is similar to AIDA64, also so simple and clear. Download the program from the official website: www.astra32.com and install. By clicking on the link you will see two versions - one for regular installation, and the other is portable, that is, it does not require installation. I will use the second version of the program.

I run the program file astra32.exe as administrator.

In the window that opens, all information about my computer is immediately displayed (the “General Information” tab), namely:
- what processor is installed, its operating frequency, cache levels;
- brief information about the motherboard;
- information about RAM;
- what disks are installed and their capacity;
- information about the video card and sound card;
- information about the operating system, etc.
You can stop there, but for those who want to study the components of their computer in detail, you can select the appropriate section in the left column and study the data that is displayed in the right column.

For example, you need to find out more detailed information about the processor: what Socket it has, how many cores, what power consumption, dimensions, etc. Go to the “Processor” tab and then “CPU”. In the Right window we look at detailed information about the processor.

Finally we come to free programs. PC-Wizard is one of the best utilities for determining the characteristics, configuration and testing of a computer. It can be downloaded by following the link - http://www.cpuid.com.

The program interface is similar to the previously discussed utilities. The only difference is that instead of boring lists, icons are displayed in the right column, and there are also tips for almost every action.
How to find out the OS
Sometimes you need to find out what operating system (OS) is installed on your computer or laptop. This may be required in several cases, for example, if you need to find drivers for a printer or MFP, and for this you need to know the type of operating system and its bitness (32 or 64 bit). Let's look at possible ways to determine the OS type.
Method for Windows XP, Vista, Windows 7
Step 1. Click on the “Start” button, which is located in the lower left corner of the screen, and then, with the right mouse button, click on the “Computer” or “My Computer” button.

You need to right-click on the “Computer” or “My Computer” button - depending on the operating system
Step 2. In the context menu, select the “Properties” command.

In the context menu, select the “Properties” command
Step 3. In the window that appears, we can get all the necessary information regarding the operating system. In this particular case, 64-bit Windows 7 Basic is installed on the computer.

Operating system type and bit depth
Please note that in addition to the type of operating system and its bitness, we received other useful information about our computer:
- Processor type;
- Service Pack version;
- Windows Experience Index;
- The amount of installed RAM.
Method for Windows 8
Windows 8 can be easily identified visually by the “tiles” on the screen.

Windows 8 is easy to distinguish by its interface, but you need to keep in mind that it can be either 32-bit or 64-bit
Let's use the Microsoft website help system:
- Swipe in from the right edge of the screen, then tap Search. Or, if you're using a mouse, move your pointer to the bottom right corner of the screen and click the Find button.
- In the search field, enter “system information.”
- Tap or click the System icon, tap System Information or click the button System Information.

Click the System Information button
You can now view detailed system information.

The laptop has 64-bit Windows 8 version 8.1 installed
A universal way to identify all types of operating systems
This method requires an Internet connection. All you have to do is go to http://bilet.pp.ru/calculator_rus/moya_os.php.

The service determined the operating system (Windows 7) and browsers used on the computer
We hope you can now recognize your operating system. If you have any questions, ask them in the comments.


