Calibration via Safe Mode
Quick battery calibration
Battery calibration must be performed on laptops where the actual battery charge level does not match the level displayed by the system. For example, the system writes that there is still 65% charge left, but the battery is dead, etc.
Calibrating the battery of an Acer laptop is not at all difficult, but if you do not want to bother with this procedure, entrust the work to Acer equipment setup specialists.
Quick calibration
Check your laptop's power plan. It should have a setting that allows the laptop to go into sleep mode after the battery runs out. You can check the value of the parameter and change it by going to “Control Panel” - “Power Options” - “Setting the power plan” - “Change additional power settings”.
Scroll the window that appears to the very bottom, open the “Battery” tab - “The effect of almost completely discharging the battery.” And in the value of the “On Battery” parameter, set it to “Sleep”, and click apply.
Now just continue working with the laptop (after disconnecting it from the network) until the battery level drops and the system puts the laptop into sleep mode. After sleep mode starts, connect the laptop to power and NECESSARILY Charge it to 100% without using it, or even turning it on.
Only after this will you calibrate your Acer laptop battery.
Calibration via Safe Mode
Disconnect the charger from the laptop and boot the OS in safe mode. After which, it is advisable to set the screen brightness to a minimum. Leave the laptop in this state until its battery is discharged and the laptop turns off.
After turning off the laptop, do not turn it on, but simply connect the charger and give the battery time to fully charge. After all procedures, start the laptop in normal mode. Your Acer Aspire laptop battery has been calibrated!
Some laptop manufacturers create a battery calibration program specifically for their inventions.
Here I offer two options for calibrating the battery of any laptop: asus, acer, msi, aspire, dell latitude, hp, msi, lenovo, batterymark, sony vaio, toshiba satellite, samsung, packard bell and so on. This is manual and automatic - using programs.
Why is calibration needed? It is needed if you notice incorrect displays in the indicator - over time, any laptop can come to this state.
Unfortunately, each battery has a lifespan and a certain number of charge/discharge cycles.
Calibrating the battery will not restore maximum factory power. is a natural process.
How to calibrate a laptop battery on Windows 7 - Windows 10

On Windows 7 - Windows 10, you can perform this operation using programs (if provided by the manufacturer) and manually.
If you use the manual option, then connect the charger and charge the laptop battery one hundred percent (to the maximum).
Then disconnect the laptop from the network and discharge the battery completely to “0” in any way.
Programs for calibrating laptop batteries
When using programs, please note that the same program will not be suitable for calibrating the battery of all laptops.
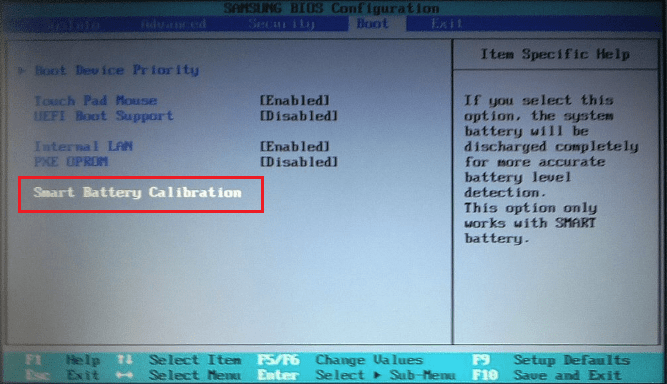
Thus, calibration in ASUS is carried out through the BIOS. Enter it and open the BOOT tab, and there find “Smart Battery Calibration” and start the process.
NOTE: sometimes this item may be located on other menu tabs and the name may differ, but the word Battery is always there.
For Samsung and Acer, the BatteryMark program is suitable, and for Lenovo, the Energy Management utility. For HP laptops, use the HP Support Assistant.
ATTENTION: if you do not use the battery, then charge it to 60-70 percent and you can take it out for three months. Good luck.
Mobile computer batteries love to surprise their owners. After working as expected for 1-2 years, they begin to do strange things: then, showing a full charge, they do not allow the laptop to turn on for even five minutes; then in a matter of seconds they are charged from 0 to 100% and at the same speed are “blown away” back to zero.
Sometimes such tricks are carried out by batteries that are far from old and still work. It’s just that over time they “forget” about their real capacity and display a percentage of charge that is not what it actually is. To “refresh your memory” a calibration procedure is shown for these capricious devices.
Today we’ll talk about what calibrating a laptop battery is and how it should be done. To make it clearer, let’s first get acquainted with the design of batteries and the functioning of their charging system.
Design and features of laptop batteries and their charging systems

All mobile computers, with the exception of rare long-lived ones, have rechargeable batteries of the lithium-ion (Li-ion) or lithium-polymer (Li-po) type. Why them? Here are 4 qualities that make manufacturers choose them:
- High charge density (capacity or amount of energy that a battery can hold) in a small size. This allows you to achieve good autonomy of the device without increasing its dimensions and weight.
- Possibility of charging and discharging with high currents. The charging speed depends on the current value, that is, lithium batteries can be charged quickly. They also transfer large currents to laptop devices without harm.
- Slight self-discharge (reduction of charge when disconnected from the load through internal resistance). If the battery is not used for some time, its charge level decreases slightly.
- No maintenance required. To ensure that the laptop battery does not fail before the deadline, which occurs after 2.5-5 years of use, the owner only needs to follow the rules of its operation and calibrate it from time to time.
The laptop battery consists of 6-8-12 batteries or “cans”, which externally resemble AA batteries. The nominal voltage of one element is 3.6 V (3.7 V for Li-po), the actual voltage is about 3.9-4.2 V. This voltage indicator is taken as 100% charge.
“Banks” of 2-3 pieces are connected in parallel into cells. With this type of connection, their capacities are summed up. The cells are connected to each other in series. When connected in series, their voltage is summed. By changing the number of elements and methods of connecting them, manufacturers create batteries of different output voltages and capacities.

The actual output voltage of a typical 3-cell mobile computer battery is 10.8–12.6 V, and a 4-cell battery is 14.8–17.2 V.
The same battery contains “cells” with the same nominal characteristics, but their physical properties, such as capacity and charging speed, usually differ. A special device, the battery controller, which is located inside the battery, ensures that the cells are charged strictly to the required level and do not “grab” too much.
Each cell is connected to the controller contacts by balancing wires, through which it receives voltage information. If one group of elements has already reached the upper threshold, but the rest have not, the controller turns it off from the energy supply. This is done not only to optimally fill the container, but also to protect the cells from overcharging, which can cause a fire or even explosion of the battery.

For lithium-ion and lithium-polymer batteries, too strong a discharge is harmful - below 0% or 3.3–2.7 V. Overdischarge can lead to a significant decrease in capacity, and in the worst case, to a complete impossibility of charging due to blocking of the controller . Locking is an emergency measure to prevent further discharge and complete failure of the battery, but removing the controller from it is very difficult. Especially at home.
In addition to the controller built into the battery, the laptop has another system that controls the charging process. The central link of this system is the charger microcircuit. It is located on the motherboard and is a PWM controller, which, receiving information about the state of the battery and power supply, opens and closes transistor switches that switch energy supply channels.

The tasks of the internal charge control system include:
- Determining whether the battery is connected to the computer.
- Recognizing the type and capacity of the battery, generating the current and voltage levels needed to charge it.
- Monitoring charging current and voltage levels.
- Stop charging the battery when it reaches 100%.
The ability to power the computer from the battery ensures the joint operation of all components - from “cans” to elements on the motherboard. Malfunctions of any link lead to early loss of battery capacity, making it impossible to charge it or power the device from it.
What is battery calibration and what is the benefit of it?

If you have ever used devices powered by nickel-based batteries, you may be aware of the memory effect - a temporary decrease in battery capacity due to recharging it before it is completely discharged. Such batteries remember the voltage threshold at which they were connected to the power source, and during the next operating cycle they take it as 0%. To eliminate this effect, the battery must be completely discharged and recharged to 100%. This process is called calibration.
Lithium power supplies do not have a memory effect, but they also require periodic calibration. The reason is desynchronization of charge level data on the internal and external controllers, which occurs after multiple cycles of incomplete charging and discharging. The calculation error is about 1% per cycle and accumulates over time. At the same time, the control system begins to “think” that the battery capacity is lower than it actually is.
Manufacturers of lithium batteries for mobile computers recommend calibration once every 3 months, but this is not a strict rule. You can do this more often or less often, depending on how you use the battery.
How to properly calibrate the battery
A full laptop battery calibration cycle takes several hours. In addition, to enhance the effect, it is carried out with a 5-8 hour break. During this time, the battery “rests” and is restored. Therefore, it is best to carry out the procedure before going to bed or leaving home, for example, to work.
To carry out calibration, the capabilities of the operating system are sufficient, but if desired, this can be done using programs, which will be discussed below, as well as a specialized utility built into some versions of BIOS.
The procedure for calibration using the operating system
- Charge the battery to 100% and let it hold the charge for 1-2 hours, that is, leave the power supply connected to the laptop. During this time, you can use the device as usual, but not too intensively so that the battery does not heat up.
- Disconnect the power supply cable from the laptop. Open the control panel section " Power supply" and click " Setting sleep mode».

- Then click “ Change advanced power settings».

- In the list of additional parameters, open the section " Battery" Assign " The effect of an almost completely discharged battery" when powered by battery, the value is " Hibernation", and in the section " Battery level is almost completely discharged» when powered by battery, set the lowest possible value, optimally up to 5%. After saving the setting, when the charge drops to the specified level, the laptop will automatically enter the hibernation state.

- Keep the computer turned on until the battery reaches its minimum level, then shuts down. During this time, you can continue to work, but not too intensely, so as not to heat the battery. After disconnection, at least 5 hours must pass before the battery is reconnected to the power source. If it is not possible to keep the laptop turned off, remove the battery from it.
- Connect the laptop to the mains and charge the battery to 100%, being careful not to interrupt this process. You can use the device while charging.
After calibration you will know the actual capacity of the battery. If it has not exhausted its resource too much, the capacity will be higher, sometimes by tens of percent. However, along with it, the level of battery wear will also increase (many monitoring utilities display this). Don’t be afraid of this phenomenon: calibration does not damage the battery or accelerate its wear, it’s just that after it all indicators come closer to the true values.
Calibration via BIOS
The battery calibration tool, which is built into certain BIOS versions, is called “ SmartBatteryCalibration"and is located in the Boot section. In some Russian-language versions of UEFI this function is also called " Testingbattery»
According to experts, calibration using BIOS is more effective and correct than in the operating system, since outside the OS the lower threshold for battery discharge approaches zero. However, this method is less convenient for the user, since during execution, which can last 3-5 hours, working on a laptop is impossible.
Why are they given so little attention in the article? Because they are mentioned more for reference. I don’t recommend installing, much less buying, them for this task, because they essentially automate something that can be done by hand, and the result of their work is not always satisfactory. It is easier and more reliable to use operating system tools or BIOS functions to calibrate batteries, where possible.
The development of the battery industry has introduced a new property into the world of technology - autonomy. The lower the device’s energy consumption and the larger the battery, the less tied it is to the charging location. This means the owner feels freer. Therefore, it is important that the system with which the gadget works correctly displays the charge level. To ensure this, sometimes you have to calibrate your laptop battery.
Reasons for the procedure
There is a very common situation in older models when the charge level shown by the operating system does not coincide with the real state of affairs. Moreover, the differences can be in both directions, which leads to multiple problems.
For example, if automatic sleep mode is configured, it will do so at a charge level of five percent. But at the same time, the real level is at around 30 or more, that is, the device could still be used without fear for some time. Or, conversely, the owner monitors the indicator, hopes to work for another hour or two, and at the 50 percent level the device simply turns off without having time to save important data.

This happens because the charge controller built into the battery is reading incorrect data from it. The reason for this may be:
- Memory effect. In modern lithium-ion models, its effect on the displayed charge level is quite insignificant, but in nickel-cadmium and nickel-metal hydride models it was very noticeable and caused a lot of inconvenience.
- Worn modules. Multiple charge-discharge cycles can distort the performance due to the loss of the original quality of the electrolyte and insulating gaskets.
- Working too long with the power supply connected. Older models are very sensitive to situations where, when fully charged, the external power cord was not disconnected from them. As a result, overcharging occurred, which increased the wear rate.
- Deep discharge. If the battery has been removed and not used for a long time, its charge level in this state may be below the permissible level, which may result in distortion of all indicators.
It is worth noting that one of the reasons may be errors in the design of the cooling system and overheating of the modules. In older VAIO models from Sony and some Toshiba Satellites, the heatsinks had almost direct contact with the battery, which increased its operating temperatures and accelerated its failure. To find out whether a laptop battery needs to be calibrated, you first need to find out the degree of degradation of its cells.
Methods for determining real capacity
In order to make a calibration decision, you must first understand how much the user-visible capacity differs from the real one. This is done in several ways, which may include using both standard operating system tools and third-party software. Some versions of such utilities are paid, so before downloading them, it is better to inquire about the conditions for providing full access to the functions.

Some of the most effective ones include:
- AIDA64- a comprehensive tool for viewing service information about a personal computer, laptop, tablet or mobile phone.
- - shows information about the battery, allows you to compare capacity values. Displays a graphical representation of the process of accumulating and wasting capacity by the battery, where the time during which the charge is produced is plotted along one axis, and its level is plotted along the other. Can perform fine tuning and software recalibration.
- Windows terminal. Its arsenal includes commands that allow you to generate a detailed report on the condition and characteristics of the battery and then save it to a separate file.
All of them can show discrepancies due to both improper operation of the controller and physical wear.
This is a universal program that was previously called Everest. Able to display information received from a variety of sensors and sensors. It stores data about all manufactured components in its database, reads DeviceID values and uses it to search for the exact models of all peripheral devices that are connected to a PC or laptop. Capable of testing components. There are benchmarks for processor temperature under load, memory for response speed and performance in read and write operations.

Among other things, it can display information about the battery connected to the device. In order to see them, you need to go to the “Computer” section on the left side of the program window and select the “Power Options” sub-item. Here you can find out:
- Battery model.
- Current maximum capacity in milliwatt-hours.
- The passport value of this value.
- Approximate operating time from full charge and remaining charge.
- The degree of wear, expressed as the ratio of the current capacity to the nameplate capacity.
Unfortunately, there is no Battery Calibration option for the laptop here. But you can indirectly understand whether it needs to be done. To determine the need for calibration, two capacitance values must be compared. If the current is higher, this operation definitely needs to be performed. If below, It's worth running one additional test:
- First, the battery is fully charged. The level should be exactly 100%.
- The external power cord is disconnected.
- In the menu bar, select “Tools” - “System stability test”.
- A new window opens to display the temperatures of the processor, memory and hard drive, as well as battery life.
- The test begins by clicking on the “Start” button.
To get correct results, you need to occasionally observe the behavior of the device. If it is urgently put into sleep mode when it reaches 10 or 5 percent, this may be simple wear and tear. In the case when there are still ten minutes or more left on the timer in the testing window, but the laptop simply turns off without attempting to go into sleep mode, you need.

The loading test used here is to calculate the decimal places of the infinite number Pi. The test works on the same principles as the previous one with one difference. The program reports when the device needs to be charged from the battery, and can thus carry out several charge-discharge cycles sequentially. A convenient graph shows how the rate of accumulation and waste of capacity changes over time, which allows you to understand what the user is dealing with.
The utility is universal and allows you to diagnose laptop batteries from different manufacturers - Acer, Dell, MSI, Lenovo and many others. In this case, each type uses its own method. Nickel ones are not discharged to a certain point, so that memory effects do not occur directly during testing; lithium-ion ones are not overcharged, this does not lead to premature degradation of the module.
To launch it, just press the Win+R key combination, enter CMD in the window that appears and press Enter. Or, in the search bar of the Start menu, start typing the word “Command” and left-click on the desired result. It is worth noting that to obtain the necessary information, you need to run the utility with elevated administrator rights.
In the window that appears, you need to make sure that the working folder is C:\Windows\system32. If this is not the case, you need to go to it, since that is where the executable file of the utility is located. This is done with the commands cd and a horizontal colon, which takes the user to a folder one level higher in the directory tree.

The command to collect diagnostic data is simple: powercfg. exe -energy. It will take a few minutes to generate the report, and then it will be saved as an HTML file in the system folder. Having opened it, the user will see:
- Code, manufacturer and serial number - useful when replacing with a new battery.
- Chemical composition.
- Number of cycles, capacity and last full charge.
It is from the last points that we should start. If the two values are very different, calibration is definitely needed.
There are ways to do this manually, using various software tools, or through the BIOS. They do not eliminate the fundamental shortcomings that the module has acquired over time, they only solve the problem with the charge controller.

Without using other means it's done like this:
- The battery is fully charged.
- Then all the charge is used up.
- And again full charge.
Sometimes this may not be possible because Windows automatically goes into sleep mode when it reaches a low threshold. You can avoid this situation by switching to the “High Performance” power plan and completely turning off hibernation in it.
Software solutions
Utilities that can do this are divided into proprietary ones, from the manufacturer itself, and unofficial ones, written by enthusiasts. For example, HP battery calibration is called Support Assistant. It allows you to conduct internal testing and correct all errors in the controller.
In the running program, just click Next on the welcome screen, and then select My Computer and HP Battery Check. This starts a test that helps determine whether a simple calibration will suffice or whether it is better to replace the battery. In the second case, the addresses of the nearest authorized service centers will be given.
There is no proprietary program for calibrating the battery of an Asus laptop, but you can use other means. For example, the same Imtec Battery Mark. It is perfect for such models, and even the latest laptops from the ROG Strix gaming series are on the list of supported ones.
Lenovo Ideapad series, in addition to drivers, are equipped with utilities for monitoring several components. One of these is Energy Management. It allows you to quickly see the health status of the module, reset the indicator and calibrate it. To do this, you need to click on the gear-shaped button and follow the instructions. This way you can pump up your battery and make it last a little longer.
If the user has already resorted to using programs such as BatteryCare, but the calibration was not possible, you can try another tool. It is suitable for any laptop models that use Phoenix BIOS as the basic I/O system.
To log in, you need to hold down a certain key when rebooting the device. It varies from manufacturer to manufacturer, but as a rule, you can recognize it by watching the loading screens with the company logo. For Lenovo it is F2 or Fn+F2, for HP it is F10, for Dell it is F12. Sometimes the Delete key is used.

In the BIOS you need to find the Smart Battery Calibration item. By default it is in the Boot tab, but other options are possible. The laptop BIOS is a simplified version of its counterparts on desktop motherboards, and therefore has much fewer items and submenus. This simplifies the search.
For the operation to be successful, the battery must be fully charged; if this condition is not met, an appropriate warning will be issued. The utility can only operate when the external power cable is disconnected.
The process of performing the operation is accompanied by a progress bar. You need to wait for it to complete and only then exit the BIOS. The operating system may need to be rebooted, so do not expect correct sensor readings to appear immediately upon first startup.
If this method was unsuccessful and it was not possible to restore normal operation of the battery, it is better to replace it. You should buy from official dealers so as not to run into a possible defect or a used copy.
Modern laptops are equipped with Li ion batteries of different capacities. Thanks to this, for each specific device the required battery volume is calculated to maintain long-term battery life. Autonomous operation is one of the reasons why users prefer laptops.
During the operation of the device, the battery loses its original capacity, charge/discharge cycles decrease, this is especially noticeable in demanding programs and games. If you follow all the requirements for proper operation of the device, then such a problem may not arise. To preserve the capacity and restore the functionality of the laptop battery, calibration will come to the rescue.
When is it necessary to calibrate a laptop battery?
Battery calibration is primarily necessary when problems are observed fast battery consumption in undemanding applications: browser, text editors, etc. In such situations, the charge may drop to 0 in a few minutes. It will also be useful when the system shows incorrect charge percentage or its level remains within one value, i.e. When connecting a charger, the percentage does not increase.
We also recommend that you perform calibration immediately after purchasing your laptop. This is necessary for the initial setup of the power controller, otherwise after a while failures may occur: The charge display is incorrect or the charging process starts after a while. Calibration will also help increase the battery life.
How to determine battery capacity
To determine the battery capacity we will use standard means Windows operating system. For this method you will need to use the command line:
 powercfg.exe -energy -output c:\report.html
Manual calibration
You can perform calibration and boost the battery manually, without resorting to additional software. In this case, we will use standard operating system tools.
Before you begin, you need to configure your energy saving settings:

The manual calibration process is as follows:
- First, put the laptop on charge and charge it to 100%;
- Further discharge to 0% by disconnecting it from the power supply;
Important! When the laptop is discharged to 0%, you should not use it or run any programs, otherwise you will not be able to reset the controller.
- After the charge level reaches the minimum value, put the computer on charge again and charge it to 100%. At the same time, it is not recommended to use a PC during the process; this will disrupt the battery reanimation process.
Important! Calibration cannot increase the battery capacity; it does not eliminate physical wear of the battery. Thanks to this operation, the controller begins to work correctly: failures are eliminated, the charge level is displayed correctly, charging proceeds without delay.
Calibration programs
Next, we’ll look at specialized utilities that will help you calibrate your laptop battery. It is best to use the software offered by the device manufacturer, because... they have a specification that allows you to work correctly with the battery.
For Lenovo laptops there is a special utility that allows you to find out the status, restore the battery and perform calibration. The utility is equipped with all Lenovo IdeaPad series laptops. 
Battery operation process:
- After launch, click on the “ gears» located at the bottom of the utility window;
- then a reset warning will appear in a new window, click “ Start» to start calibration. You must first close all running programs and connect the computer to the power supply;
- then click " Continue»;
- The battery optimization process will begin. It is worth saying that it will take quite a long time. The battery will be charged first and then discharged. The process cannot be interrupted; it is not advisable to use a laptop.
Smart Battery Calibration in Phoenix BIOS
This utility is built into the Phoenix BIOS on HP laptops and devices from other companies. The Smart Battery Calibration utility allows you to check the battery status, run diagnostics and calibrate it. 
- First, turn off the computer;
- then we start the laptop and on the start screen press the key combination to enter the BIOS. The most common combinations are “Delete”, “Esc” and “F2”. The required command to enter is usually displayed on the start screen;
- when entering the BIOS, use the arrow keys and the “Enter” key to navigate to open the desired section;
- move the pointer using the arrow keys to the " tab Boot»;
- Next in the list, look for the “Smart Battery Calibration” utility and click “ Enter»;
- in the window that appears, click “ Yes” and wait for completion, which may take quite some time.
Functional utility for HP laptops. With her help you can check the status all hardware and software elements of a computer. It also carries out a battery diagnostic process and calibrates it if malfunctions in the controller are detected. 
- launch the program from the desktop;
- After starting the utility, in the main window, select the section “ My Computer»;
- then we start testing the battery " BatteryTest»;
- After this, a window with test results will be displayed. The results may be as follows:
- « Passed» — battery replacement is not required.
- « Perform calibration"—automatic battery optimization starts.
Important! Battery calibration using HP Support Assistant may take several hours and is recommended during periods when the computer will not be used for an extended period of time.
A small program that will allow you to effectively diagnose the battery on any laptop, including Asus, Acer or Samsung. With its help, it is possible to optimize charge consumption, obtain detailed information about the state of the battery, quickly switch between power management schemes, set charge/discharge cycles, and find out the battery life. After installation, the utility is located in the system tray. BatteryCare can successfully replace the Battery Doctor or Battery Calibration utility for a laptop on Windows 7/8/10. 
Instructions for working with:
- go to “Settings” and to the “ Notifications»;
- in the block " Miscellaneous Event» check the “Recommend battery calibration after” checkbox and set the required charging cycle, in our case 25 cycles;
- After the recommended cycle has been exhausted, the application will offer to perform automatic calibration.
This utility will allow you to track the battery charge level, assess battery wear, find out the voltage, restore the battery and conduct tests. It will also allow you to find out the equipment manufacturer. During operation, the utility automatically generates a schedule of battery operation and charge/discharge cycles, saving it in a special folder on the hard drive. 
Important! The utility is paid, the trial version is available for 14 days. Calibration can only be performed if the program has been purchased.
Instructions:
- launch the program and in the main window click on the battery icon;
- then several blocks will appear in a new window “ Battery", which displays information about the current state of the battery and "Calibration";
- in this section you need to activate the parameter “ PerformCalibration" and "Battery Calibration" to start the process. The operation will be performed automatically.
How to save your battery
- for proper battery calibration it is best use special utilities, which are designed for specific device models;
- if autonomous operation is not expected, then it is best remove the battery from the device and work from the network. In this case, the battery must be charged at least half to prevent it from entering a deep discharge state. But you shouldn’t constantly use the power supply; you need to use the battery at least once every 5 days;
- to extend battery life, it is recommended to connect to the network when the charge level reaches 15-20%;
- frequent calibration may cause harm The battery has simply used up extra charge/discharge cycles. It is important to know that cycles are limited and cannot be restored;
- If the battery wear is more than 65%, then optimization is recommended to be carried out once a month. This will help extend the service life a little;
- In order to save the laptop battery, you need to control the temperature value. The optimal temperature is from +5 to +45, values higher may adversely affect the device.


