Rubbish, which is a pity to throw out, then this article is just for you. All the component materials went to the author of the homemade product for free, and for this reason, you will only win.
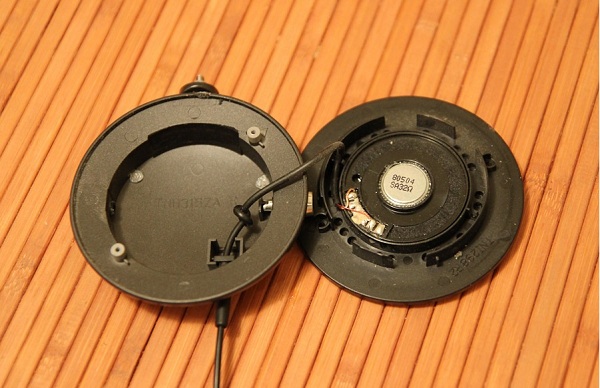
Once the author had headphones Explay and stereo Bluetooth headset Prolife BT55. In the picture you can see that the headphones do not have part of the wires, and the headset made wheezing sounds, that is, the speakers were completely faulty.
Let's figure it all out first. We didn’t even need a screwdriver for this operation, because all the fasteners are ordinary latches.

You need to remove the rest of the wires from the headphones, and unsolder the speakers from the headset and remove the battery for a while. We do this in order to be able to get the wiring, it is located in the headphone case.
As a result of the manipulations done from the headset, there is only a block with buttons and internal contents.

Next, we need to attach the block with buttons to the headphone case we have. This is done very easily.
After the overlay has been removed, you can see that the space under it is identical in diameter to the existing button block.
The last task at this stage is just to remove the wiring.


After the internal contents have been separated, we process the entire body so that it matches the size of the overlay.


We try on this case to the body of the existing headphones.
Next, you need to unsolder the mini-usb socket designed for charger and the author figured out how to make a small adapter from this socket to the socket that previously belonged to mobile phone nokia.
It so happened that the nest was wonderfully placed in that small hole that was previously intended for the wire.


Next, you need to make a small hole for the microphone with a drill.
After I put the board in place and secured it and related parts in place with hot glue, what you can see in the picture came out.

This photo is a front view. Here the author made a small mistake. Just when he drilled holes for the microphone, it turned out that he slightly touched the case with a cartridge.
As soon as the glue has hardened, we immediately attach the speaker itself with a soldering iron, and then close the case.
Well, finally everything is soldered and you can snap the case. Now we put the foam pads in place and put them on charge in order to check.
Checking shows us that the indicator lights up red, which means everything is working.
Subwoofer headphones are especially popular among professionals as well as music lovers. These headphones deliver clearer sound that lets you enjoy your favorite music. However, not everyone can buy subwoofer headphones, since they cost a lot of money. What if there is a great desire to acquire such headphones, but there are no appropriate funds? You will find the answer to this question in this material.
And first, we suggest that you familiarize yourself with the author's video
What do we need:
- round headphones;
- speakers;
- building tape;
- screws;
- cotton wool;
- glue gun.

Let's start right away with the shape of the headphones. It depends entirely on the shape of the speakers. The author uses round speakers, so his headphones have a round shape. As for the construction tape, we will not need it entirely: we need a cardboard tube, that is, its base. The speakers can be removed from the TV, as the author does.
First we need to disassemble the headphones. It needs to be disassembled almost completely. We throw out the old speakers from there, that is, plastics with wires and rubber elements remain.

We cut off the old wires and connect new ones with connectors for new speakers. If there are none, then you can leave the old wires, but in this case you will have to solder the new speakers with a soldering iron.

For more convenience, you can remove the plastic mounts of the new speakers and use them between the speakers and rubber elements.
We take a cardboard ring from an old adhesive tape and divide it in half.

For greater aesthetics, you can wrap the rings with red electrical tape, as the author does.
We begin to collect headphones. First, we fasten the speakers to the plastics.
We put rings on the speakers, connect the wires. Checking if everything is working as intended.

Apply a layer of hot melt adhesive to the plastic parts of the headphones.
Glue the first ring.

We put cotton in there.
We apply another layer of glue to the ring, after which we glue the speaker itself.

Repeat the same with the next speaker.
We put on rubber parts.
Headphones are one of the most popular devices in modern world. Like any device, they have an unpleasant tendency to break down at the most inopportune moment. The frustrated owner immediately goes to the store to buy a new headset to replace the lost one and does not even think about how to make headphones with his own hands. Although this procedure is not as complicated as it seems at first glance.
Making them from scratch yourself is a rather complicated and painstaking task, or whether it’s working with ready-made material. But be that as it may, the procedure will still consist of four steps:
- plug connection;
- cable processing;

- speaker assembly;
- packaging of parts in a case.
All elements will have to be bought in a specialized store or separated from failed headsets. The case will also have to be looked for separately or made by yourself. There are several original recipes for how to cast it from plastic at home. The process is long and painstaking, but if you are used to making something on your own, no one forbids experimenting.
Assembling new headphones from parts of the previous ones will not require you to have specific knowledge about the technique, the main thing is to stock up on tools. For work you will need:
- special wire cutters, a clerical knife or a sharp blade;
- soldering iron, some solder, rosin;
- insulating tape.
Required device components
Before starting the procedure, it will be useful to understand a little about the device of the headphones. The standard equipment includes such necessary elements.
Plug
This is a detail better known as mini— jack, with a diameter of three and a half millimeters, designed to connect headphones to the main device. Experts call it a TRS connector because of the three pins that can be easily found on the surface. These pins accept signals from the line-out on your music device or mobile phone. Depending on the manufacturer, there may be;
- two - this number is typical for monophonic headphones;
- three - for stereo devices;
- four - this configuration is used in the manufacture of headsets.
It is worth paying especially close attention to this detail, since the performance of the future product will depend on it.

Cable or main wire
It can be made in the form of a round cord or a flat black ribbon. Manufacturers make double and single cords- it depends on whether they are connected to one speaker or to both. Copper conductors are placed under the layer of insulating material and protective varnish - the left channel, the right channel and the ground wire. As a rule, the wires are marked with different colors - this allows you not to get confused in them during production, or, as in our case, during repairs. 
This is the main element of any headphones, on which reproduction and sound quality depend. The sound emitter can belong to any class - wide spectrum, low frequency or vice versa, focused on high frequency reproduction, dome or simple. However, most often used in headphones standard speaker the simplest type. It can not boast of high power or sensitivity, but it has reliability and unpretentiousness to conditions.
It is rather difficult to buy a speaker separately, it is even more difficult to assemble it without special tools, do not create unnecessary difficulties for yourself and simply cut off the necessary elements from old headphones.
Try to evenly bite the wire, avoiding splitting the copper core.

Thus, the headphone device is quite simple. It will not be possible to disassemble a failed device and use its parts to assemble a new one. challenging task. But before you start the procedure, you need to find out for what reason the old device failed.
Checking details
Headphone failure can occur for a variety of reasons. The first thing to do before disassembling for parts is to make sure they are inoperable. It is not uncommon for the problem to be hidden in the main device, but the owner, without understanding the situation, threw out perfectly serviceable headphones.
If you are sure that the reason is precisely in them, then before assembling new headphones, decide what details can be used. Common Problems similar devices consist in faulty plug contacts, a broken wire or malfunctions of sound emitters. How to make headphones in this case? Collect working parts from three different pairs.
Disassembly
Disassembling old headphones with your own hands is quite easy, the main thing is to choose the right tool. Feel free to cut the old headphones into pieces, carefully separating them from each other sharp knife. Remember to leave a small tail of wire for later soldering. Three centimeters of cable will be enough for the plug, the same length will be enough for the speakers.

If you could not find a working plug, you will have to tinker a little. Take any suitable part and completely clean it of rubber pads. After that, clean the surface of old contacts. For a new cable, you can use segments of different lengths, connect them together with a soldering iron - a matter of five minutes.

Assembly of new headphones
The first step is to deal with the plug. You can attach it to the cable in two ways:
- a fully serviceable part is simply soldered to the cord;
- the defective part will have to be completely cleaned and all contacts re-attached.
Let's consider the second situation in more detail. The main design of the plug is not prone to breakage, there is simply nothing to break. However, the contacts that carry out the transmission of signals can easily fail, and then they have to be replaced.
Depending on the class, the metal base of the part may have a different number of wires.. Stereo headphones have three - two transmitters for the left and right speakers and a ground wire. Grounding usually has the longest wire attached to the long part of the plug extending from the base.

Strip the main cable and find the necessary wires. Connect them to contacts, the sequence does not matter here. The main thing to remember is that the veins must be isolated from each other.
cable extension
This operation does not require detailed explanations, as it is carried out on a whim. Take the pieces of wire and twist them together. Fix the twisting point with a soldering iron and the required amount of solder. At the end of the procedure, wrap the wires with heat shrink tape.

Installation of sound emitters
Now let's take care of ourselves important detail headphones, namely the speakers. Disassemble the case of the parts you have chosen and look for contacts similar to those that have already been used on the plug. Attach to the first transmitting wire d, connect the ground to the second one. After that, apply solder to the contacts and carefully insulate the wiring. Assemble the body in reverse order.

How to make USB headphones
Now getting popular the new kind headphones, which, however, also often becomes unusable. How to make usb headphones with your own hands if their connector is broken? Everything is very simple. First, remove the damaged part with wire cutters or a sharp knife. Then take good connector and carefully solder it to the main cable.
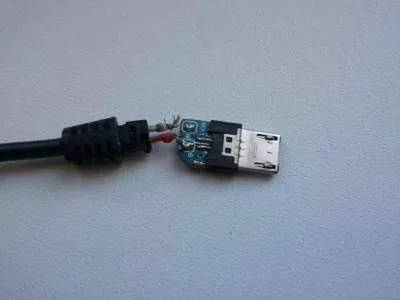
Remember that, as with the plug, you need to pay attention to the contacts and not overdo it with rosin. Otherwise, usb headphones are no different from ordinary ones, and the assembly process has no fundamental differences.
How can I make headphones with a microphone? Just solder the microphone contacts to the cable at the final stage, and you will have a full-fledged headset.
Cheap headphones quickly fail, and a branded headset is expensive. If there are several broken sets lying around in the closet, the find can be considered good luck. From individual parts it will turn out to assemble a good headset. First, the spare parts are checked for operability, then they proceed to the assembly. Now we will take a closer look at how to make headphones and what is needed for this.
Headset assembly basic steps

The headphone assembly process consists of four steps:
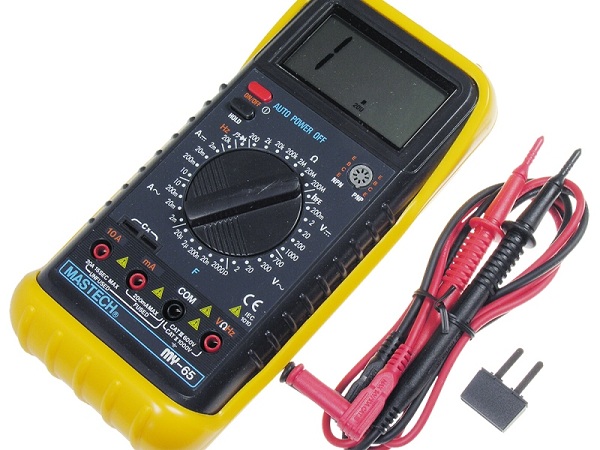
- checking the integrity of the cable and the performance of the speakers with a multimeter;
- soldering the wire to the plug;
- soldering bifurcated cores to speakers;
- installation of parts inside the case.
If it is decided to assemble a headset for a mobile phone, one more item is added to the assembly process - soldering a microphone. All parts are taken from old broken headphones or bought in a store. The second option is not profitable, since the costs will exceed the cost of a new headset, and it makes no sense to assemble it yourself.
Recommendations: How to properly warm up the headphones and whether to do it  , Headphone wiring
  , Do-it-yourself headphone repair
Parts required for assembly
What details you need can be seen on the old headphones. Let's take a look at each node individually.
Plug for connecting to the socket of an electronic device

Headphones are connected to a mobile phone, player or computer with a plug. Its diameter corresponds to the size of a 3.5 mm jack. Often there is another name for the plug - mini-jack. The detail is made in the form of a rod from typesetting elements. These are the contacts that separate the dielectric washers from each other. The number of contacts depends on the headset type:
- 2 pins has a mono headset plug;
- 3 pins on stereo headphone plug;
- 4 pins on stereo headset with microphone.
It is important to choose the right plug according to the number of contacts, otherwise one of the headset elements may remain unconnected.
Cable

Headphones require a multi-core cable. The length is determined at your discretion. The shape of the wire is suitable for any - round or flat. It is important to match the lived to the number of parts of the headset. For simple headphones, a cable with 3-4 cores is suitable. To assemble a headset with a microphone, you need a wire with 4-5 cores. It is not difficult to understand their connection. Each core is covered with multi-colored insulation. Usually, the yellow wire is allowed to ground, and the wires with a different coating color are considered signal.
Speakers

The sound quality depends on the quality of the speakers. According to the type of radiation, the part can be low-frequency or high-frequency. More speakers are divided into dome and simple. The latter option is most often used in inexpensive headphones. Simple speakers do not have great power and sensitivity, but they are reliable.
It's hard to buy the item separately. It's easier to take the speakers from a broken headset. It is important to consider their size. The speakers should fit inside the case of future headphones.
How to tell genuine Beats headphones from fakes
Microphone

When making a headset for a mobile phone, you will need a microphone. It is better to bite it off with wire cutters along with a piece of wire from old headphones. The microphone is located in a sealed plastic box. Additionally, there may be a call button or volume control. In order not to cut the boxes, a piece of wire 3–5 cm long is left on the input and output side. The main headset cable is soldered to these segments. The color of the cores must match.
Dismantling an old headset

To get all the necessary parts, they disassemble the old headphones. Care must be taken, otherwise parts may be damaged. Large headphones have many hidden fasteners in the form of screws and latches. Most of them are hidden under a soft lining. The ear cushion also happens to be snap-on, simply put on the rim of the cup or glued. Frame vacuum plugs you just have to cut it.
The old wire from the speakers is soldered with a soldering iron. At the entrance to the housing, the integrity of the cores is broken due to frequent kinks. If the cable will be used for a new headset, then the ends 5 cm long are bitten off, and then the wires are re-soldered to the speaker contacts.
A similar action is performed with the plug. If the mini-jack is non-separable, the casing is cut with a knife, and a new one is made from the cap of a ballpoint pen.
Diagnostics of parts for performance
When assembling headphones from old parts, they are checked for performance. It is better not to ignore the procedure, because on the assembled headset it will be more difficult to determine the non-working element. Diagnostics is performed with a multimeter. First, the passage of current through all the conductors of the cable is checked. On the plug, it does not hurt to check the closure of the contacts. If the dielectric ring is damaged, the headphones will not work.
Speakers are checked in the same way as a wire. The probes of the multimeter are leaned against the contacts. If the speaker of the working device beeps.
Assembly of new headphones
When all the details are selected and checked with a multimeter for operability, proceed to assemble the headset:
- Soldering starts with the plug. On the back of the mini-jack, the longest pin is reserved for the ground wire. The signal wires of the right and left channels are connected to the side contacts. If the headset has a microphone, then the plug is used with four pins to connect another signal wire.
- After soldering the plug, the wire with the contacts is called by the tester. If there is a signal, you can put on a casing. In a homemade design, the cap of a ballpoint pen is lubricated with epoxy resin and injected back mini jack.
- The branching of the cores at the second end of the cable is pulled through the inlets of the headphone housing. The insulation from the ends of the wire is peeled off, the copper wires are tin-plated, and then soldered to the speaker contacts.
- At this stage, the functionality of the headset is checked. The plug is connected to a mobile phone on which a music file is played. If both channels work, the speakers are immersed inside the headphone case.
- The headset is almost ready, but there is still a microphone. Just below the beginning of the bifurcation, the cable is cut. The braid of the wire is stripped to release the cores. A similar stripping action is performed at the ends of the cable protruding from the microphone box. A heat shrink tube is put on all the cores and soldered, observing the color of the insulation. The tubes are pushed onto the place of soldering, after which they are heated with a lighter fire.
- The extended wire looks ugly. If you try, then the microphone box will be cut with a knife along the solder line. Pieces of the cable are unsoldered from the board with contacts, and wires of new headphones are soldered in their place. After checking the performance, the halves of the microphone box are glued together.
The assembly of the headset is over, you can enjoy the music.
Nowadays, few people can be surprised with fashionable headphones, but it’s a completely different matter if they are made by hand. Such an accessory will become a distinctive feature and can also be an original gift. In addition, the problem of how to make an earpiece arises when one of these paired accessories breaks. In order not to buy new ones, you can simply dismantle the old ones and make new ones from the speakers that remained in working order.
How to assemble a headset from different kits
As a rule, it is rare when both headphones stop working at once, and only one of the pair always breaks. The remaining working musical accessory can be soldered to another speaker from another kit. How to make headphones at home from two old sets? To do this, remove the plastic part of the cable with a knife or thin scissors from the plug. Then the wires are soldered to other connectors from another pair (having the same color). Better headphones do not twist, namely solder, otherwise part of the signal will be lost.
Self-assembly of the headset
Fans of doing everything on their own will be interested to learn how to make headphones with their own hands.

To do this, you need three components: a plug, a cable and speakers. As a rule, these are some kind of already used accessories. For example, a broken cable, speakers from a non-working headset, etc. are suitable for assembly. The sequence is as follows: you need to take a plug that fits the headphone jack on the equipment. For example, ¼-inch is suitable for stationary equipment, 1/8-inch is suitable for portable equipment. A cable with four cores is attached to the plugs. The length of the wire can be different, but usually ranges from 80 to 120 cm. The cable is wrapped with electrical tape, then the plug is closed. After the speakers are attached. They can be either from old headphones or homemade. Having disassembled the old speakers, you need to find the same contacts in the emitters as on the plug. They are soldered to the wires on the cable.
If there is no ready-made headset for listening, you can assemble it yourself. How to make headphones with only two speakers of the same size? It is only necessary to place these devices in round casings, which even jars of shoe polish or cream are suitable for.

The main condition is that the devices must be of the same size. Resistors of 30 ohms each are installed in the speakers. It remains only to connect the wires.
Fancy glowing headphones
Those wishing to also “upgrade” their accessories can be advised to make them glowing. The so-called LED headset is currently popular on the market, but you can create it yourself if you know how to do it. on the market are quite expensive, since there is little competition among manufacturers. If you show a little perseverance, then you can make such headphones at home. In addition, a hand-made thing is always more pleasant to use. How to make an earpiece glow? To do this, you only need LED-light-emitting diodes, and a soldering apparatus. The tube is cut and the original headphones are inserted there. Then you need to fix it inside the silicone. Inside the tube, the LED itself should be, and the wires should go outside, since they provide the light bulbs with energy from the batteries. Batteries are attached to the body of the headphones, which are replaced as they are used up.
How to make DIY bullet headphones
It is very interesting if your favorite musical accessories look like shell casings. This will require, first of all, old headphones. It is also necessary to get old 40 caliber Smith and Wesson shells, which will be the main decoration of the product.

The screwdriver should be taken according to the size of the wire from the headphones. You will also need a screwdriver, a hacksaw, a vise (10 millimeters) and sandpaper. The sleeves are processed with a screwdriver (a wooden dowel wrapped with sandpaper should be put on it). You can use two grades of emery - 400 and 800. Since the sleeve is longer than the headphones in size, it must be reduced by 8 mm (from the open edge). Cut edges are best sanded with sandpaper and polished with felt to avoid further cuts. Old wires are inserted into the new earmuffs, the speakers are soldered, and the whole structure is neatly glued together.


