And for which it, in fact, is needed by an ordinary user. Recall the basic concepts of this lesson:
- - Local network is a system of computing devices connected to communication lines, intended for the transfer of information to the final number of subscribers;
- - there are three main types of local networks topology, based on which more complex local communication structures are being built;
- - By way of interacting computers, local networks are peer (when all PC connected to the PC network) and with a dedicated server.
In this article, we will look at how to create a local network with the same access to all of its users.
The advantages of such a network include simplicity of design (setting up the home network is quite "tooth" newcomer) and the economic availability of equipment, but the spectrum of the functionality of such a network is very limited.
So, to create a local network between computers we need:
Multiple computers (in this case, consider a network option that combines more than two PCs, but let's tell us separately), which will become nodes of our local network. Each PC must check for the availability of a network card (at least most of the modern devices and are equipped with a built-in "network", but "What the hell is not joking" ...).
- - Network hardware.To organize local networks, both controlled (customizable) and unmanaged network equipment can be used. To make a small home network, a simple unmanaged 4-6 port switch is quite suitable.
- - Network cable To connect each computer with network hardware. The total length of the cable directly depends on the final number of PCs, their remoteness from each other and the architecture of the room (buildings) in which the local network is created.
- - Connectors (RJ-45 connectors), the number of which also depends on the number of computers connected to the network. So that the cable for each PC will require a minimum of 2 connector;
- - Swage (Crimper) - Tool for termination of the cable. (In his absence, many craftsmen are by-screwdriver (for example, a screwdriver), but the newcomer to perform this focus will be quite difficult).
Create and configure your home network
1. Select the computer with which the local network will start, and connect it to the network equipment. For this on both sides crush cable And with the help of RJ-45 connectors, connect it to the ports of the Switch and the network card of our computer.
No additional settings unmanaged Switch does not require: we will only need to register the correct settings of the local network in the operating system of each PC
2. To do this, go to the settings of the computer's network card (read, Windows 8 and Windows XP) and prescribe there IP.-address This PC. As a rule, the following IP addresses 192.168.1 are used here., 192.168.0;
3. Repeat the 1-2 point for each computer connected to the network.
Important: The last digit of the IP address of each next PC should differ from the previous one (in the above range): So, if the first computer was assigned IP 192.168.1.1, the second PC it will be - 192.168.1.2, in the third - 192.168.1.3 and so on.
When all computers are connected, check our local network for performance.
You can do this in two ways:
Check the availability of other device connected to the network in the Network Surrounding tab of the control panel of this computer;
Putting any computer to this network with the IP address known to us. Pencing is as follows:
We go on "Start → Run", in the window that opens, you attribute the "CMD" command and click "ENTER";
In the command-line window that appears, we prescribe ping xxx.xxx. Xxx. Xxx, where xxx.xxx.xxxx. Xxx is the IP address of the computer you are being desirable.
If, after executing the command, we see a similar picture in the command line window, then the home local network created by us is quite efficient, if the computer issues a message about "exceeding the wait interval for a query" or that the "specified node is not available"
 - It is necessary to search and eliminate the technical malfunctions of this network.
Good afternoon friends! I am very pleased to welcome you on our learning Internet portal https: // Site. We continue to talk about configuring home network. The topic is extensive, but interesting and very important.
Today we will deal with network liberation or network settings. In order for the home network itself to configure the home network, you must obtain a minimum of ideas about how the local computer network works.
We will talk about the terminology of local networks, about setting up network adapters, as well as look at the connection of two or more computers into the network.

Refer to the network connection settings:
1. For Windows XP: Go to the "Start" menu -\u003e "Control Panel" -\u003e "Network Connections". If the computer has a network card, the network connection icon appears in the window that opens. Click on it right-click, and in the menu that opens, select "Properties".
2. For Windows 7: Go to the "Start" menu -\u003e "Control Panel" -\u003e "Network and Internet" -\u003e In the first paragraph "Network and Shared Access Center, select Subclause" View network status and tasks "-\u003e Click on link "Connection over Local Network" and then by the "Properties" button.

In the appeared window in the list, select "Internet Protocol (TCP / IP) (version 4, if specified)" and click on the "Properties" button.

The window will open, in which the main ones will be displayed.
network adapter settings
- Some kind of formal designation of your computer in the global or local information space. Most likely that the network being created by us will work on the TCP / IP protocol (Data Transmission Control Protocol / Firewall Protocol).
The protocol is a set of standard algorithms and rules, according to which data is exchanged on the network.
In accordance with the work of the TCP / IP protocol, each network device is assigned a unique IP address. It consists of 32 bits (or 4 bytes), which are written as four decimal numbers in the range of 0-255, separated by points, for example: 192.168.0.10.

Note that 0.0.0.0.0.0.0.0, 127.0.1 and addresses ending with 0 and 255 are reserved for service purposes and it is impossible to assign them to network devices.
When you configure the Internet connection, pay attention to the IP address entry field: if the provider specifies you to the IP address, then enter it into the appropriate field, if it was not provided to you, then simply select "Get an IP address automatically.
2. The subnet mask. As a rule, the large network is broken down on the subnet, each of which is assigned its own unique address as a separate computer. In the full IP address, which we viewed above contains information and about the address of a specific node, and about the subnet address.
To highlight these partitions from one IP address, you need to know the subnet mask. It also consists of 32 bits and takes a value of 0 or 1. If you impose a subnet mask to an IP address, then the numbers found under units will mean the address of the subnets, and under zeros - the address of a specific node. The subnet mask is also written as IP address, four digits, split points, for example: 255.255.255.0.
For reference, computers can be included in the network without the help of the router only if they are in the same subnet (or have the same subnet address). If the subnet addresses are different at least per unit, the information between them will not be transmitted.
3. Types of IP addresses and the main gateway. As you already understand, the number of unique IP addresses on the Internet is limited, and the number of computers wishing to access the World Wide Web is growing every day. It was decided to: divide addresses for private and public.
- Public IP addresses can be connected to the Internet directly. They are visible to each computer on the Internet. To get a public IP address, you need to pay money. The pleasure is not cheap. As a rule, such addresses are distributed to providers and allocated servers, sometimes customers.
- Private IP addresses are addresses that are not visible from the Internet. They are assigned to computers located in subnets connected to the Internet through the router. The router is a device connecting two subnets: local and global (Internet), and therefore has at least two network ports (IP addresses): public (for connecting to the Internet) and private (for operation within the local network). Because The subnets do not interact with each other, then the same addresses can repeatedly repeat in different subnets.
To create a home network, it is best to use private IP addresses. A common option is to use the address of type 192.168.x.x, where X is a number from 0 to 254.
 4. DNS servers. We looked at what the IP address is. But everything will probably agree to remember so many digits difficult. What is easier to remember 94.100.191.204 or Mail.ru? Of course it is easier to remember the letter's letter address (domain name). To replace IP addresses on understandable nominal values, special servers are invented - DNS servers. If the IP address is changing, then the DNS server is immediately reported, and for you access to the site remains on the same domain name.
To configure Internet access, you must specify the IP address of the DNS server (usually the provider is issued or it is assigned automatically). If this is not done (or the DNS server will stop working), you will have to specify their IP addresses to access sites.
home Network "For Two"
If you have a need to quickly connect two computers to the network (for example, to pump information, creating a backup or just to play), it is at all necessary to buy a router or switch. We'll consider two options for connectivity:

I will not consider configuring on wireless access in this article. At this option, let's stop later, when considering the settings of the routers.
By selecting the cable connection type, you can go to the network adapter settings.
First, make sure that computers are in one working group in one address range and with different network names. We look at how it is done:

Next, you must specify the IP addresses and the subnet mask (the subnet mask is automatically substituted with a given IP address) to each computer. How to choose IP addresses, we considered higher. We look at how to configure the IP address:

If you connect several computers to the network using a switch (network switch), you will repeat the above settings on each computer on the network.
troubleshooting network
1. The first to pay attention to how to troubleshoot the network, it is set to a network connection. Those. Is there a physical connection of computers (network cables are connected to network adapters and network devices like a router, whether the Wi-Fi wireless adapter is turned on, for example, on laptops it is turned off by a special key combination). Immediately it is necessary to determine the health of the network adapter. As a rule, for this sometimes it is enough to see whether the yellow-orange diodes of the network connector are blocked when the cable is connected.
2. It is necessary to verify that IP addresses are not repeated in this subnet. All computers must have different addresses so that there are no conflicts when exchanging data.
3. Make sure the subnet address is correct. Those. It is necessary to check the subnet mask on all network adapters installed the same.
4. Check that the same group be indicated in the computer properties (we talked above).
5. If a specific site has become unavailable, this does not mean that the network disappeared, the DNS server fails occurred. Check out other sites. To control the DNS server operation, enter the browser in the address bar instead of Mail.Ru - 94.100.191.204. If the site is loaded, then defective DNS.
The development of electronics led to the reduction of computer equipment, and, as a result, the second computers began to appear in the users' apartments, and after this question arose "How to set up a local network between two computers?".
Computer connection
The simplest way to connect two computers is a cable connection. Let's deal with how to configure a network cable between two computers.
Please note that the cable must be special. In fact, this is the same eight-housing twisted pair, but with the only difference that the ends of this cable are roasted unequal. The cable is also called crossover. If you look at the crossover cable connectors, then notice that the green and orange pairs of wires change in places. This cable is inserted into the network card slot of one and second computers.
Now let's see how to set up a network between two computers. After you have connected computers with each other, we will make the desired settings so that the computers see each other. First you need to give computers various names and place in the same workgroup in the same same.
Do you know that the first test of data transmission technology over the network occurred on October 29, 1969 in the United States?
Setting up a network in Windows XP
Setting up a network between two Windows XP computers is performed as follows: by clicking the right mouse button on the My Computer icon open the context menu and click "Properties", select the "Computer Name" tab, click the "Change" button. Set the computer a new name can be through "Start" (see image). In the "Computer Name" field, you write, for example, "comp1", and for the second computer - "comp2". We call a workgroup, for example, "Office" (this name will be the same for both computers). Click OK and restart the computer.

Now let's see how to configure the connection between the two computers. To do this, you need to set IP addresses to each computer. Press the Start button, select "Setting" and "Network Connections". Here on the connection icon, click on the right mouse button and open the item "Properties".


On the General tab, select the Internet Protocol (TCP \\ IP) "and click the" Properties "button. You select the "Use the following IP address" setting and fill the fields with the address and a mask for the first (for example, 192.268.100.240 and 255.255.255.0, respectively) for the second computer (for example, 192.268.100.245 and 255.255.255.0, respectively). Remember the settings by clicking OK. Local network between two Windows XP computers is ready.
We are convinced that everything works, running the command line (start, execute, type CMD) and from the first computer sending the Ping team 192.268.100.245. If everything is true, a message appears as an answer that 4 packages are sent and 4 packages received.
Provided that one of the PC is connected to the Internet (for example, via a USB modem), you can configure the network between two Windows XP computers, on which the Internet will be distributed to the second computer. To do this, in the network connection properties switch to the "Advanced" tab and put a check mark that allows other users to access the Internet. Now you know how to make a network between Windows XP computers.
Configuring the local network, you may need to configure the printer to print from computers in this network. Recommendations on this topic are given. About configuring Skype on Windows 7 laptop. Read.
Setting up a network in Windows 7/8
Let's see how the local network is configured from two Windows 7 computers. Press the Start button, click the right mouse button on the "Computer" line and click the item "Properties". In the "System" window, click the "Change Parameters" button. In the "Computer Name" tab, also click the "Edit" button and set the names of the computers and the name of the Working Group. Restart the computer.
If you want to play two PCs without using the Internet, instantly transmit files from different devices without USB media, then you need to know how to create a local network between two computers. This connection technology of two PCs is applied for quite a long time, even today did not lose their relevance.
Example of local network
The local network is called a group of connected devices: PCs, TVs, printers, located, usually, not further than one room. Devices use shared memory, servers thus complement each other. This connection allows you to create a game zone for several PCs, freely and pretty quickly transfer any data, print documents if one common printer is installed, and do a lot more. Combining devices today occurs with the router, but other connections can also be used, which you can read below.
Create a connection
Create connection is pretty easy, as well as in different ways: through a router or cable. The setting of devices in both methods is quite similar. The difference is mainly from the connection method: through the cable or via Wi-Fi.
Communication via Wi-Fi, which today uses much more often, can be much more convenient, but to connect two PCs cable will cost cheaper if you have not yet installed a router for any reason.
Connection via cable

The oldest type of communication of two cars. For it, it will only be necessary to connect the RJ45 network cable. The cable must be crossed, although ordinary direct cables can often be suitable for modern computers. Nevertheless, when buying it is better to clarify the type of cable from the seller. With the addition of the ends of the cross cable, the colors of the wires will vary - this is the main difference. Also, the connection requires network cards on both devices, but today they are already installed. It is worth noting that if the network card is already engaged in connecting to the Internet, it will not work.
Such a connection was just used earlier in order to play. But someone can be convenient today, especially if you still have a Windows XP operating system, which hardly supports wireless connections.
After connecting the cable itself, you need to know how to configure the local network between two computers:
- Control panel, select the network connections.
- Choose there we created, click on it by PKM, choose "Properties"
- Further depending on the "Windows": for Windows XP, select the Internet protocol (TCP / IP), for Windows 7/8 / 10-Internet version 4.

- Manually enter the IP address: 192.168.xxxxx. The last six digits can be entered independently, the main thing is that they do not repeat from different devices.

- On Windows 7, it will also be necessary to go to the network management center, it is used to select "Private" through the "Settings" item.
- Then in the control center, enable sharing files, network detection, and disable password access protection.
After that, you also need to configure sharing. This is done so that the PCs can exchange any files. Methods differ in different OS. On WindowsXP:
- Section Network Connections, go to "Service", select "Folder Properties".
- Tab "View", put the box next to "use simple sharing files".
- Next, go to the "System Properties" window: PCM by "My Computer" - select the name of the computer.
- Click "Change", choose "is a member" - working group. Invent the general name of the group for both PCs.
- My computer, we click on the PCM on hard disks (for example, Windows (C :)), in the "Access" tab, click on the link, set the permission of the overall access.
All, access to the files of the selected drives is completely open. With Windows 7/8/10 we do as follows:
- Control panel, then "folder parameters".
- We put a tick "Use a general access wizard".
- The following actions will be the same as for XP.
Connection through router

This is the most convenient way, as it allows you to connect not only two, and a greater number of computers or other devices that support Wi-Fi. You can play this connection without long settings.
IP addresses with this connection will be automatically set. To use shared files, you will only need to provide sharing files, and then add two computers to one working group, as described above.
Now, in order to transmit files, you just need to enter using the address bar of the computer name: \\\\ name \\. You can also do this through the Network Connections section. It is also worth protecting your personal or especially important files so that no one can get access to them from a neighboring computer. To do this, it is best to specify disks that do not contain important information for you. For example, a disk where user account data is contained, it is better not to do open for everyone, or using the file and folder settings menu, to restrict access to them: PCM on the desired folder, after selecting the sharing settings there.
Local Network game
So, we managed to connect two devices to one network without the Internet, allow them to exchange files. How to start playing on a local network?

For this, as the rules, no additional settings do not need. We only turn on the game and, if you can play on the local connection, select the appropriate item, and then play the already created by us.
For different games, the connection to the shared server may vary. Somewhere you need to enter the IP or PC name. For Minecraft, Counter Strike, for example, you will need to create a server. But as a rule, everything is done quite simple.
Hamachi.
This happens quite rarely, but sometimes any game does not allow you to play via the Internet, but allows on a local network. Do not despair, even if it happens that your friend lives away from you.
Hamachi allows you to emulate a local connection and thus connect a PC via the Internet. To do this, you only need to download the program, register, and then create a new connection, come up with a name and, if necessary, password. After that you can easily use this network to play.
As you can see, combining computers in the local network is a pretty light process. He will not take you a lot of time, and you can connect two PCs, then playing with friends, being both away from them, and being in the same room with them.
Methods for creating a connection are suitable for all Windows, starting with XP, ending with the "tenth".
So, you finally entered into an agreement with a new provider, and a cable with a plug was headed into your apartment - the present window into the world. It remains only to connect it to the computer - and the Internet is at your service. However, if it were enough to insert the plug in the connector, you would not need to read this article.
Consider how to connect the Internet to a computer through the cable, in the simplest case. Suppose you have only one computer, and you will use it as a router (if you suddenly need or tablet). Or (as an option) you are going subsequently, so you turn off the router to simplify remote access.
Suppose the network card on your computer is (no matter, separate or built into the maternal), and you just connected an Ethernet cable to its input. We proceed from the fact that you use the most relevant Windows 10. Although for the correct Windows 8 / 8.1 settings or even 7, these instructions will also fit: the principle is the same.
Of course, you can always call the masters to make all the necessary work for you. But experts are not always free. In addition, you will not only save money on a call, but also learn how to configure the Internet on the computer through the cable. In our world, such knowledge can be useful at any time.
Dynamics VS. Statics
Now check with a provider, what connection it offers on your tariff plan: dynamic or static.
With dynamic connection Your IP address may vary depending on the provider settings (and if you intend to subsequently connect to your workplace remotely, it may endure you). But manipulation with entering parameters is reduced to a minimum: the provider exhibits the IP address, the subnet mask and the main gateway alone. In this case, it is enough to insert a cable into a computer and all, internet access will appear.
Static connection Provides a static IP address assigned to your computer (or a router if you decide to connect via such). In this case, you will need to register the IP address itself, the subnet mask and the main gateway in the connection settings. Usually all these incomprehensible diquses and beaks fit into an accessory on the provision of access or to the application to it. If you need, you can clarify them in the service of the support, calling your data.
In some cases, the access also requires a login, and a password (not to confuse Internet access as such with access to the personal account on the provider's website - for a personal account data is required).
How to connect
Consider the procedure in stages.
- Insert the Ethernet cable plug by the apartment to the corresponding port of the computer. Even if you have never done this before, it is not possible to confuse this type of connectivity and the plug.

- Make the right click on the "Start" button and find the section "Control Panel - Network and Internet Network Management Center and Shared Access". In the left column, select the "Change Adapter Settings" tab. The main window will appear a list of your adapters (more precisely, in our case one "Connection over Local Network" adapter). Apply the crown reception "Right click" and select the item "Properties".

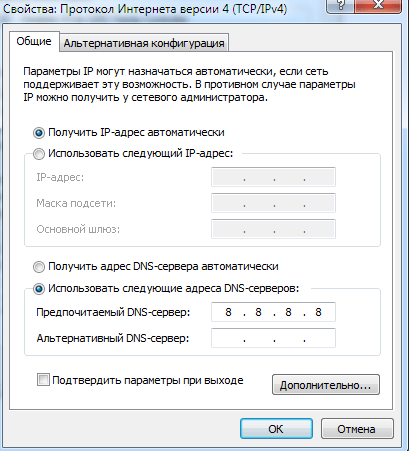
- In a small pop-up window contains a whole column of various rows with properties. Select the "IP version 4 (TCP / IPv4) string". While it is highlighted, click the "Properties" button below the window with the list.
Now our instruction is branched. You clarified the provider, which IP are you provided? If not, specify right now.
- If dynamic, then trust in the settings of the IP address and the DNS server automatic selection.
- If static, then you will have to enter the values \u200b\u200bmanually. As a rule, it is necessary to specify the "IP address", the "subnet mask", the "main gateway" and "DNS server". After completing data entry, click OK to save the selection.
Important moments:
- If a modem is required to connect, enter the default address as an IP address; This is usually 192.168.1.1. If the modem has a different IP (which is rare), it is indicated at the bottom of the modem itself or in its instructions.
- Usually the provider provides the DNS server data, but sometimes it goes. Then you can use universal:
1) Public DNS from Google: 8.8.8.8.8 or 8.8.4.4 - a universal decision, as a rule, suitable for all computers
2) OpenDns - 208.67.220.220 and 208.67.222.222
3) Yandex DNS with its own anti-virus filter - 77.88.88.88 or 77.88.88.88 or 77.88.8.2 - If you trust Yandex anti-virus policy (although sometimes it can consider an unreliable and quite a decent site)
4) Yandex DNS with a filter of pornography and other obscene content - 77.88.8.7 or 77.88.8.3 - although it depends that you, in fact, you need from the Internet, hehe.
- Repeat: if remote access is important for you, make sure the provider is supported that your IP will not change.
If your provider offers access via the L2TP protocol, it may require some additional actions on your part. Typically, the provider provides instructions for setting up such a specific type of connection, but on our side it will also not interfere with duplicate.

So to configure L2TP, you need:
- Go to the "Network and Shared Access Center" section already known to us and select the creation of a new connection.
- Unlike previous options, you should go to "Connecting to Workstation"
- When the system prompts you to create a new connection, select this item.
- Select "Use My Connection"
- Enter the server address provided by the provider. The immediate connection option should not be chosen. Name Assigns this that you like.
- In the next window, enter the login and password provided to you. Do not forget to mark the checkbox "Remember Password"
- Connect now when the system suggests you
- Return to the "Adapter Properties" (as discussed above) and select the Safety section.
- In the "VPN Type" drop-down options, select "L2TP IPSEC VPN". Below is the line "Data Encryption", here you need to choose "optional",
- Under the VPN type string, click the "Advanced Settings" button
- Enter the key in the "key" field. He should have from the provider.
- Everything can with a calm soul press "OK" and use the connection.
This manual works for Windows 7 and more recent versions.
Why are all these difficulties? - you ask. Such a solution has advantages: for you - increased security of the connection (compared to the usual LAN), for the provider - simplification of the billing system.
PPPOE Setup
Before you configure the Internet on your computer, check the type of access that it offers from the provider. PPPOE access requires not only the right settings, but also authorization using the login and password. Such a connection method will be needed if you do not use a modem or router, and insert the cable from the provider directly to the connector on the computer, without intermediaries.
To do this, you go to the "Network Management Center" again and choose there, create a new connection with it.
In the started wizard, you choose the first point - "Internet connection" - and click "Next". Then in the window that appears, you must select "high-speed (with PPPoE)".
The final step remained. In the final window you need to come up with a name for connecting and enter the login and password issued by the provider. If your computer enjoys a few people (for example, family members), each under his account, and you want to give them all access, then check the box in the "Allow use this connection to other accounts".
Now make sure the Internet connection works. And if so, hello, the world!


 in Photoshop How to make a grid in photoshop CS6")


