Hi friends! Today we will consider connecting the drive to the computer. There are not so many existing ways, however, they can cause difficulties from an unprepared performer, especially if he is with compi-"you".
Built-in drive
Such a device, regardless of the data tire, is mounted in a special pocket, 5.25 inches. Such a compartment is located on the front panel and usually several of them are at least two.
It is installed horizontally, but not always. Slim type housings, do not have enough width for mounting such a drive. For them, you need a special drive with support for vertical disc boot. It differs from the usual the fact that there is a special disk holder on the tray.
At the same time, it is important to establish a device correctly - so that the disc does not fall out when the tray is closed.
On the chassis, the device is fixed with fastening screws. Usually, threaded holes are four, but it is enough to screw and two screws. On the back cover there are slots for power supply and data bus. I want to immediately note that when buying new components, you will most likely get a DVD drive SATA.
These slots although they are similar, but to confuse the data loop and the power cable is difficult, and it is impossible to connect incorrectly, due to the difference in size.
If there is no suitable connector on the power supply, you can use Molex adapter to SATA (read more about it in publications about all PC power connectors you find here).  The data loop should be inserted into the appropriate slot on the motherboard (I also advise you to read about all the connectors on the motherboard).
In general, the installation procedure is simple and even with consciously tightening the process, will take no more than 10-15 minutes. The same connection scheme is also used in outdated IDE format drives, just a loop for data transfer there has a much greater width.
If you do not connect the power, the device simply will not work and determine the computer. If you do not connect the data bus, the tray will open, but the BIOS will not see the device.
I also want to note that the optical drive from the laptop to the computer is suitable if it is SATA: the connectors on it are the same.
However, the installation may arise, as it is difficult to fix it on the chassis, due to the lack of appropriate fasteners. Extra "crutches" will be required if you want to install the device stationary.
Exterior drive
In this case, everything is much simpler: as a rule, such a device does not require installation inside the case, since it is designed for regular transportation, and has a self-sufficient design. And the data and power are transmitted via USB, which are abundant on a modern computer.  If the ports are missing, you can purchase a special hub - a kind of splitter with one plug and several "nests". In addition, the external drive, as a rule, does not require the installation of drivers. Also simply, you can disconnect this drive from one computer and connect it to another.
Possible problems
Frequent phenomenon - when when the drive is connected, the computer does not load, but in the absence of the device, it works fine.
The problem is most likely in the load priority: the drive is indicated as the first in the device queue. In the absence of a disc in a tray or disk with different contents, the computer is not loaded.
It is easy to get rid of such a problem - it is enough to go to the BIOS and install the Winchester or the SSD drive priority.
Everything is much more serious if, after installing the device, the computer does not turn on. In this case, the problem lies, most likely, in the power supply: Although the drive consumes little power, there is no longer enough at the BP.
There are cases when the optical drive of the laptop fails. To warranty repair or replacement can leave for some time, and on a laptop it is necessary to open the disk on the laptop. Final, allowed to go to friends, make an imaginary disk image, copy it to a USB flash drive, download the program for mounting virtual images and with its support to open the disk. But it is allowed to do and in a different way. Take drive from a home computer and temporarily connect it to laptop . The 2nd method will be much rapid and more comfortable.
You will need
- Laptop, USB-interface drive either with SATA interface, USB-IDE / SATA adapter
Instruction
1. The method of connecting the drive to the laptop depends on the interface of your drive. If you have a disk drive with a USB interface, connect it to any USB port and turn on the laptop. Wait until the system finds new connected equipment and installs drivers. Later the appearance of the window "The device is connected and ready to work" to go to My Computer. The connected drive icon will be there. Now they are allowed to use.
2. If you have a drive with a SATA interface, to connect it to a laptop will have to purchase a special USB-IDE / SATA adapter. In addition, via this adapter is allowed to connect not only optical drives, but also harsh discs and other equipment that supports these interfaces.
3. Connect the USB IDE / SATA adapter to the USB port on your laptop. Now connect your optical drive to the USB IDE / SATA adapter. Included with such adapters there are additional power supplies. Connect the drive to the power adapter, and enable the adapter into the power grid.
4. Turn on the laptop. Wait until the operating system starts. Must work a wizard for connecting and setting up new equipment, as in the case of a USB drive. Further the procedure is the same.
5. If the device was not found mechanically, click on the "My Computer" icon with the right mouse button and select "Properties". Next to select the Device Manager tab. A list of equipment will appear. Upon top row, right-click and select "Update Equipment Configuration.
6. If the "unrecognized device" appears in the list, click on it with the right mouse button and select "Update Drivers". In the following window, select "Mechanical Search Drivers". If you have an internet connection, you can set a tick on the contrary to the "Apply Internet" strings.
The drive is used to read information from hard drives. If everything is in order with him, it is quite easily opened, but it happens that he primitfully encourages. Remove the disk from the drive is allowed by an ordinary or forced method.

Instruction
1. If you have jammed a drive, first try to disable the computer. After this, turn off its button, which is located on the rear panel of the system unit, wait a few seconds. Click on the button and start the computer. Suppose to open the drive by the ordinary method. Prefer the "My Computer" folder, after that "DVD-RW drive (D)" and click right key, detect the "Extract" string and press the left mouse button. The method does not help in all cases, but only in those when the computer Hang.
2. If the drive does not open voluntarily, try the forced way. Use the toothpick or a needle. Discover a small hole under the drive. Insert the needle to the stop, the click should happen. Later he will open.
3. If the drive has not been opened, then only an expert will be able to cheat you.
A particularly well-known PC improvement method is to install and connect to a drive to it. This operation does not require access to the service center, because it is not difficult to connect the drive, and all that you need is a small screwdriver, suitable for the small screws of the system unit housing.

Instruction
1. Disconnect the computer and de-energize it. Remove the side cover of the system unit housing. At the top with the front of the housing, remove the plastic plug located on the site of installing a new drive.
2. Obly, look back the wires and connectors on the motherboard. Sigor discs and actuators are usually connected to the connectors with an identical interface: ATA or SATA. Accordingly, the loops with which they are connected to the motherboard will also be identical. Decide the sequence of the disk drive. Depending on this, set the jumper to the Location "Master" or "Slave".
3. If there is a free connector on the corresponding loops in the system unit, then by setting the drive to the pre-prepared place at the top of the case from the outside, connect it to the appropriate drive jack. If there is no free connector on the free connector loops, connect the newest cable from the drive set to the motherboard. In the future, other drives and harsh discs will be connected to this cable. In the appropriate socket, connect the wire supplying the power supply voltage.
4. Secure the drive with locking screws. Insert and close the side cover of the system unit housing. Turn on the computer. If the installation has been made positively, the drive mechanically will be found in the BIOS and will be available for operation in the operating system.
Modern laptops and netbooks are directed earlier than each on convenient operation and mobility: they are allowed to carry with them in a traditional bag, they will work without additional devices. However, for many users, the management of a laptop with a touchpad and keyboard support becomes a real torture. In this case, you need a mouse.

Instruction
1. Modern optical mice are wired and wireless. In order to connect a wired mouse to a computer, select the Mouse in the store with the USB input. Insert the device into the USB port of your computer and proceed to work. Wired mouses do not require installing special programs.
2. Wireless mice are much more mobile with wired: apply them allowed at a distance of several meters from the computer, while not being fed in the wires. However, these devices have small disadvantages. Wireless mice run from batteries or batteries inserted into the mouse. Due to the smaller energy consumption, the susceptibility of the mouse is reduced. In addition, it is necessary to continuously monitor the tier of the battery in the mouse: the power can aby the most inappropriate moment.
3. Before you start working with a wireless mouse, you must install special drivers in the laptop system. Insert the installation disk into the computer drive. Driver disc is sold together with the mouse.
4. Later, how the system recognizes the disk, it will offer the installation of programs. Considerate all the requirements of the system and install the drivers, without changing anything in the settings. Press "Set" and "OK" when querying the system.
5. When the drivers for the mouse are installed, insert the USB transmitter for the mouse to the computer port. Wait until the system recognizes the external device.
6. Turn on the "ON" button on your mouse. It lightly connects with the transmitter and helps you lead the laptop.
7. If you have a Bluetooth installed on your computer, you can apply Wireless Bluetooth mushka . It will work as well as from its own battery, but the connection to the laptop will be carried out through the Bluetooth connection.
Helpful advice
Adjust the operation and susceptibility of the mouse at your own request. To do this, go to the Start menu, select the Control Panel tab. In the window that opens, click on the "Mouse" label. Install your own computer mouse settings.
To connect a laptop to internet At home, it is allowed to apply two basic methods: direct cable connections and connection via Wi-Fi wireless channel. We usually choose the 2nd option, as it allows you to save the laptop mobility.

You will need
- - Wi-Fi router.
Instruction
1. If you have a closer at home, there is an intact computer connected to internet , smarter than everyone to apply Wi-Fi router. This network equipment will allow synchronously to use access to the Internet to both computers. Purchase a Wi-Fi router and connect this equipment to an AC network. Install it near the stationary computer. This will allow you to avoid the need to acquire an extension network cable.
2. Disconnect the connection cable from the stationary computer and connect it to the WAN port of the router. Now combine using a network cable that is included with wireless hardware, a router LAN-port and a computer network card. Open the Internet browser and execute the login procedure to the Wi-Fi router web interface.
3. Open the WAN menu. Execute the connection setting to internet . To do this, specify the same parameters that you used when configuring directly connecting a fixed computer. In probabilities, include the NAT and DHCP features. To increase the safety of your computers, enable the Firewall feature. Note that it can be a hindrance to access some sources on the Internet.
4. Now open the Wireless Settings menu. Configure Wi-Fi Wireless Network Options. Strictly select a particularly correct encryption type (WPA2-PSK) if it is permissible. Install a rather difficult password. Now fulfill the Wi-Fi router to the software or mechanical method (power off).
5. Wait until the router is entirely loaded and connects to the server. Check the presence of access to internet Stationary PC. Connect the laptop to the Wi-Fi network and make sure that the mobile computer has gained Internet access.
6. If you need to connect to internet Only a laptop, disconnect the network cable that runs from the stationary computer to the router.
The SATA interface is currently the most comfortable method for connecting media to a computer that provides high data transfer rate. Also connectors occupy a smaller area that much extends the service life of the device. Connecting a drive through SATA takes a much smaller time, rather than installing media by the familiar scenario.

You will need
- - screwdriver either screwdriver.
Instruction
1. Disconnect the computer and disconnect it from the power source. With a screwdriver or screwdriver, unscrew the fasteners of the side walls of the system unit. If you open the computer cover first, pay attention to the presence of warranty stickers: if the tower time has not yet come out, it can deprive you of the seller's swirl or manufacturer of the device.
2. Choose the optimal location of the drive so in order to be in the ventilation zone, from the fact that the drive has the quality to heat up, which affects the universal temperature indicator. Do so, so that the loops did not interfere with the work of the computer, contacting the motherboard and other devices; Also, they are in no case obliged to cover the cooler. If you have a lot of information carrier device installed in your computer, permanently delivering an additional cooling system.
3. Install the optical drive to the selected position, while correctly fixing it with special screws, they can go bundled with a drive or sold in a computer store, many of them even differ from the type of device. Everyone does not use ordinary bolts when installing computer equipment.
4. Connect the SATA loop to the connector with the corresponding name on the motherboard. When you connect devices through this interface, it is ideally important, which kind of media information is connected to it. Connect the other end of the loop to the connector on the drive. Determine the unused wire that comes from the power supply, connect it to the drive and place all the wires in a positive manner.
5. Turn on the computer. Installing the drive via SATA does not require additional actions when the computer is turned on. When loading the presence of a new drive should be detected in mechanical mode.
Video on the topic
Note!
Do not allow the installation of disk devices too close to each other, so that they heated smallerly.
This happens with all users of computers or laptops: after a while later the purchase of the device is found that each of its power is somewhat a little, the minutes go to the launch, all applications hang from every user attempt at least do something. And the exceptional method is to close the fogging programs - turn off the computer from the network. Then it is worth performing the following steps.
Instruction
1. Delete unused programs. It is necessary to analyze the programs that are installed by the manufacturer. So, let's say, Asus has consistently many applications, many of which ordinary user are not required. Many programs work in the background (let's say, in order to continuously monitor the updates on the Internet). It is necessary to see all applications that run mechanically with a computer loading - and for some cancel autorun.
2. For Windows it is worth making disk defragmentation (in Start\u003e All Programs\u003e Standard\u003e Service). In addition to the built-in operating system utilities, other tools are allowed. CCleaner program - cleans the registry well, deletes uncomfortable files and cache. It is only worth a positively configure the deleted data for programs (let's say, do not delete the passwords saved in browsers, etc.)
3. Mac users can use the free ONYX application. This is not only comfortable (in the difference from the option of launching cleaning with the profile of special console scenarios), but also suitable: the application will help optimize the software.
4. For Linux, it is permitted to apply Kleansweep: it removes uncomfortable files that can occupy computer sources.
5. It is also worth thinking about replacing too capable applications by easier programs. For example, home users rarely apply all the probabilities of Microsoft Office and even Open Office. Delivered to completely delete these applications and use online services (as it were Google Drive).
6. Nearby during work on a computer, it is not necessary to continuously open a lot of programs and load them with tasks. Web browsers occupy a lot of RAM, therefore should not be held open the luncture of the tabs at the same time.
7. Cleaning from large amounts of data. Close-up photo-video audio archives that are not needed for regular use, it is worthwhile in any other place: external harsh discs, online services.
8. Antivirus software. The fact that antiviruses load the system power than all other applications are the prejudice of the 2000s. Modern programs work quietly, but right. In addition to the protection against loss and damage to data, protective programs will save from the "dings" sources - Trojanov, worms and spy utilities.
9. Increase memory. This in the thesis will never hurt. If PC or laptop has a probability for stretching RAM - it's worth applying it.
Video on the topic
Video on the topic
Visual tutorial of work on netbook SENKEVICH G. E.
How to connect a DVD drive to netbook?
Let's try to open the network access to the DVD drive installed in the home computer. Total access to entire disks opens a little differently than to separate folders.
1. Right-click on the laser drive icon.
2. The context menu will open. Select Team Sharing | Extended sharing setup.
3. The disk properties dialog on the tab opens. Access. Press the button Extended setting.
4. Dialog opens Extended setting shared access. Check the box Open sharing this folder.
5. Click the button Permissions.
6. A dialog opens in which permissions are set. Click it on the group Everything.
7. Check the flags in the column Allow.
8. Press the button OK.
The dialog closes. Press the button OK. in dialogue Extended sharing setup and button Close In the disk properties dialog.
This text is a familiarization fragment. From the book Record CD and DVD: Professional Approach by Bakhur VictorCD / DVD drive CD drives can be internal or external. They can be connected using the SCSI device, and this connection method is most efficient, reliable and qualitative for the following reasons: allows you to work in the background during
From book Work on a laptop Author Sadovsky AlekseyThe optical drive of the CD player (usually presented in the form of a music center) has long become the same household device as a vacuum cleaner or microwave. Today the CD player can be found in the room of any teenager. However for a long time ago
From the book we collect the computer with your own hands Author Vatamannyuk Alexander IvanovichCD / DVD-drive The performance of any CD / DVD drive depends on the state of its optical components. If optics begins to fill up, then the actuator behaves accordingly. In the home, only cosmetic repair of CD / DVD drives can be performed - wipe optics,
From the book Tutorial work on the computer Author Kolisnichenko Denis Nikolaevich3.2. How to connect the monitor first you need to connect the stand to the monitor. Do not rush, take the instruction, everything is drawn there. Then you need to connect the monitor to the computer. If you have a regular CRT monitor, it connects to the VGA-connector of the video card. If you have an LCD monitor, then
From the book a visual tutorial work on a netbook The author Senkevich G. E.3.3. How to connect the keyboard and mouse connectors for connecting the keyboard and mouse (the so-called PS / 2 connectors) are similar in size and form, so they are easy to confuse. To avoid confusion, all manufacturers of input devices hold color marking: to
From the book first steps with Windows 7. Guide for beginners Author Kolisnichenko Denis N.3.4. How to connect the speaker acoustic system, the main component of your speaker system is connected to a green socket. The microphone must be connected through the red socket! A blue socket is used as a linear entrance. With it, you can connect to a computer
From the book laptop for beginners. Mobile, accessible, convenient Author Kovalevsky Anatoly Yuryevich3.5. How to connect a printer and scanner All modern printers can be connected to a USB port. True, some modern printers work through the LPT port (in the old manner). If your printer can be connected to the LPT port, and you have a little USB connectors, better connect to LTP.A.
From the book Laptop [Secrets of Effective Use] Author Ptashinsky Vladimir3.6. How to connect an ADSL modem ADSL modems connect to the network adapter socket, it is usually located next to
From the book of the authorHow to connect an external monitor? Almost any netbook is equipped with a VGA port for connecting an external monitor. Not only a computer monitor, but also a projector or a modern television panel, equipped with a standard "Computer", can be connected to this port.
From the book of the authorHow to connect a network printer? If, when creating or configuring the home group, the printers are installed, printers connected to this computer become available over the network. The networks of the network typically detect and connect the available printers
From the book of the authorHow to connect and configure a USB modem? The USB modem has a drive with a driver and utility settings. On any computer equipped with a DVD drive, copy the files from this disk to the flash drive. Connect the USB flash drive to the netbook. If the installation program is not
From the book of the authorHow to connect the phone to a netbook? As an example, you can connect the Nokia phone number 6003. It has a memory card on which the manufacturer recorded the OVI Suite Program distribution. Complete with the phone there is a corporate cable USB. Cable Phone with
From the book of the authorHow to connect a Bluetooth mouse? By Bluetooth, you can connect various devices with support for this technology to a netbook: mouse, headphones, printer, etc. You only need to make a device detectable and perform a pairing. In a set with a Bluetooth mouse, the USB adapter can go. If a
From the book of the author6.4. Windows 7 does not recognize my DVD drive if you installed Windows 7, and it does not recognize your DVD drive, and the DVD-actuator is marked with a yellow triangle in the device manager list, this means that Windows cannot control the DVD drive driver digital signatures. The problem is possible
From the book of the authorOptical drive Optical drive is a device for working with optical information carriers. Can be located outside the laptop, connecting to it directly by usb (if the drive simply does not fit because of the modest sizes of the mobile computer, in the BIOS there are options
From the book of the authorCD-DISC drives and DVDs today in most laptops set universal drives that can work with CDs and with DVDs
The market filled netbooks - devices in which the CD or DVD drive is not provided. Even Apple refuses these bulky and outdated devices, but the company at least applies USB-Flash to reinstall the system or launch auxiliary utilities. And ordinary users get a chance of the already installed system.
All instructions for installing or reinstalling Windows on a netbook without using a DVD drive (from flash drive) are so overloaded and intricate that it is not easy to understand them. It used to be easier: drive into the drive and drove. Now it is also possible, only the drive is needed external.
External DVDRW drives for laptops with connecting through a regular USB are expensive expensive. Today the price begins from 1650 rubles, and the upper threshold comes to three thousand. Considerable money for the thing that will be needed a couple of times a year.
Therefore, today we gather an external USB-DVD drive from matches and an acorns that will be much cheaper. As far as significantly - depends on your ingenuity and resourcefulness.
The drive itself I purchased in the DNS store in the DNS store - one laptop drive cost me only 35 rubles. Yes, yes, thirty five rubles for a DVD cutter! Here are the models that are right at the time of writing:
It became a bit more expensive, but you can always buy any laptop drive on a flea market or with hands. If only he worked and had an SATA connection interface. The presence or absence of the front panel of the role does not play - this is an exclusively decorative element.
The second item that will surely need us - USB box for HDD. We need a laptop disk box with SATA connected. The new box is from 400 rubles, but you can find and cheaper, if you search this product with hands.
 It is more profitable (at the price) Boxing is not in the store, but on the flea market, with hands. Shopping guarantee still do not need - we will analyze the box to the screw and a little improve the design.
Why do we choose SATA? This is a more relevant, more speedy and less expensive connection method (for the retro IDE format it is necessary to overpay). In addition, the IDE connector on the DVD drive is completely non-standard, and unnecessary problems for nothing. In general, SATA!
In addition, two pieces of wire are needed (MGTF will go), stationery knife, (nice), one fine crosswater, toothpick, nippers, pliers, soldering iron and necessary accessories for soldering.
Baister!
First you need to pick up the disk box and remove from there an adapter card with USB on SATA. Each model disassembled in different ways, the general tips here will not be lad. We need only a fee, the rest can be thrown away.
The main problem in power connectors. In Sidyukov, for some reason they did shorter and with another pinout. Although in laptop disks of the line in 12V and 3B are not used. In general, we will make food ourselves. Here is the diagram of power connector for optical drive and hard disk.
 Now we will deal with the refinement of the drive. It must be disassembled to access the board. There is nothing difficult in the disassembly: unscrew the screws (three) on the top cover and remove it.
 The fee to which we need to get access is reliably hidden under the disk tray. But, as in conventional large drives, the tray can be pulled out mechanically. To do this on a laptop drive without a muzzle, you need to push the toothpick into the hole slightly right from the emission button. If the decorative muzzle is on the drive, then there is a hole where you need to poke. Although it is likely to be a little already, so instead of the toothpicks have to take a dispersed fine paper clip.
 When access to the board is obtained, we will make a refinement with a file. It is necessary to glue in the connector and in the lid a sufficiently large hole so that our adapter from boxing is freely entered. Depending on the accuracy and used tools (I gnawed by books, blindfold and pliers), it should be about it:
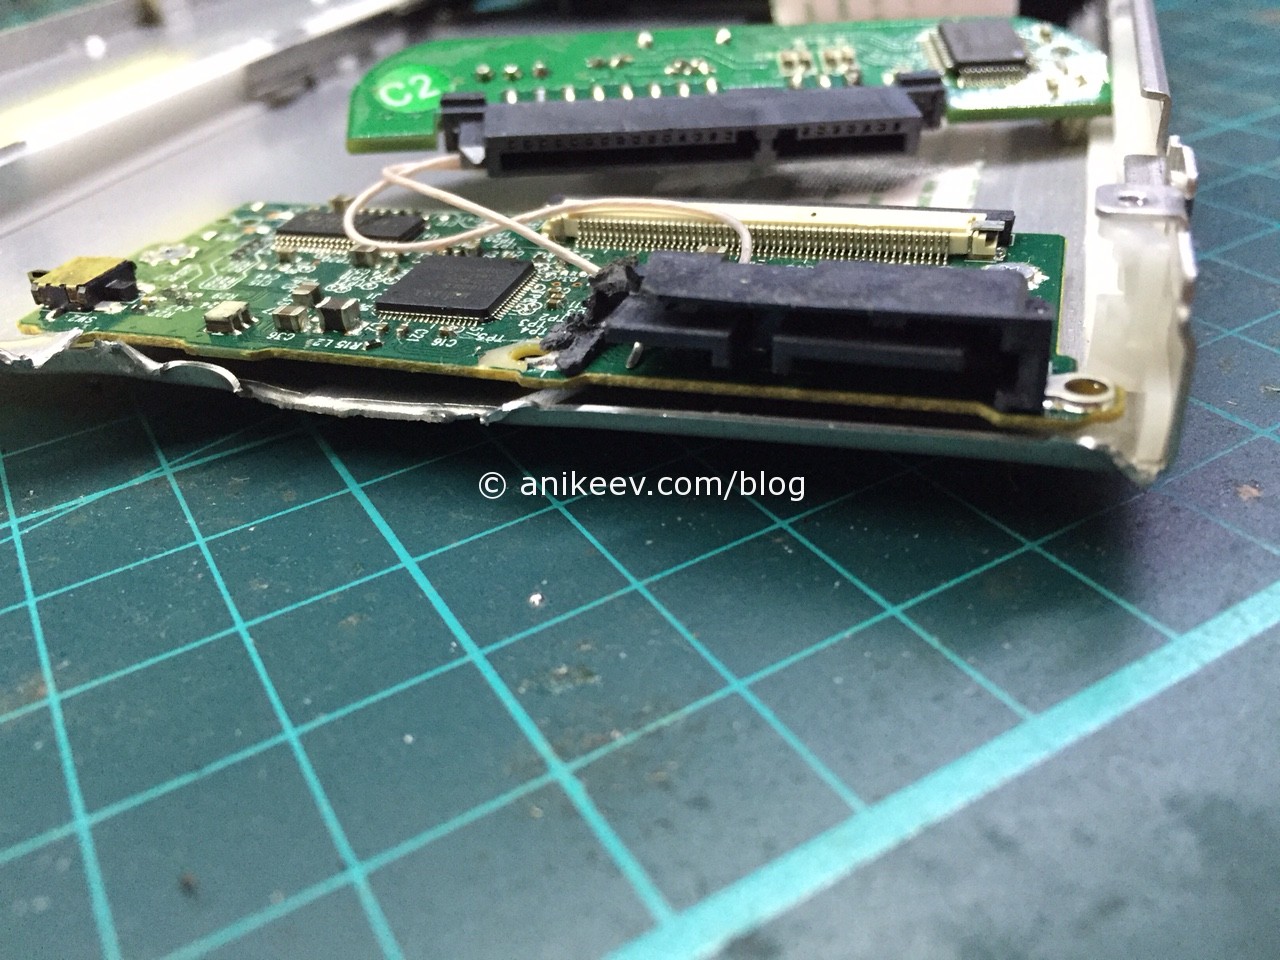 Now we take the stationery knife and cut the tracks from the back of the power connector on the drive. For reliability, you can make two cuts to cut a whole strip and probably get a contact. We do this because the pinout of the SATA-HDD power connector and SATA-DVD is different. Below is evident that the tracks are cut: Compare with the contacts of the SATA data connector (left)
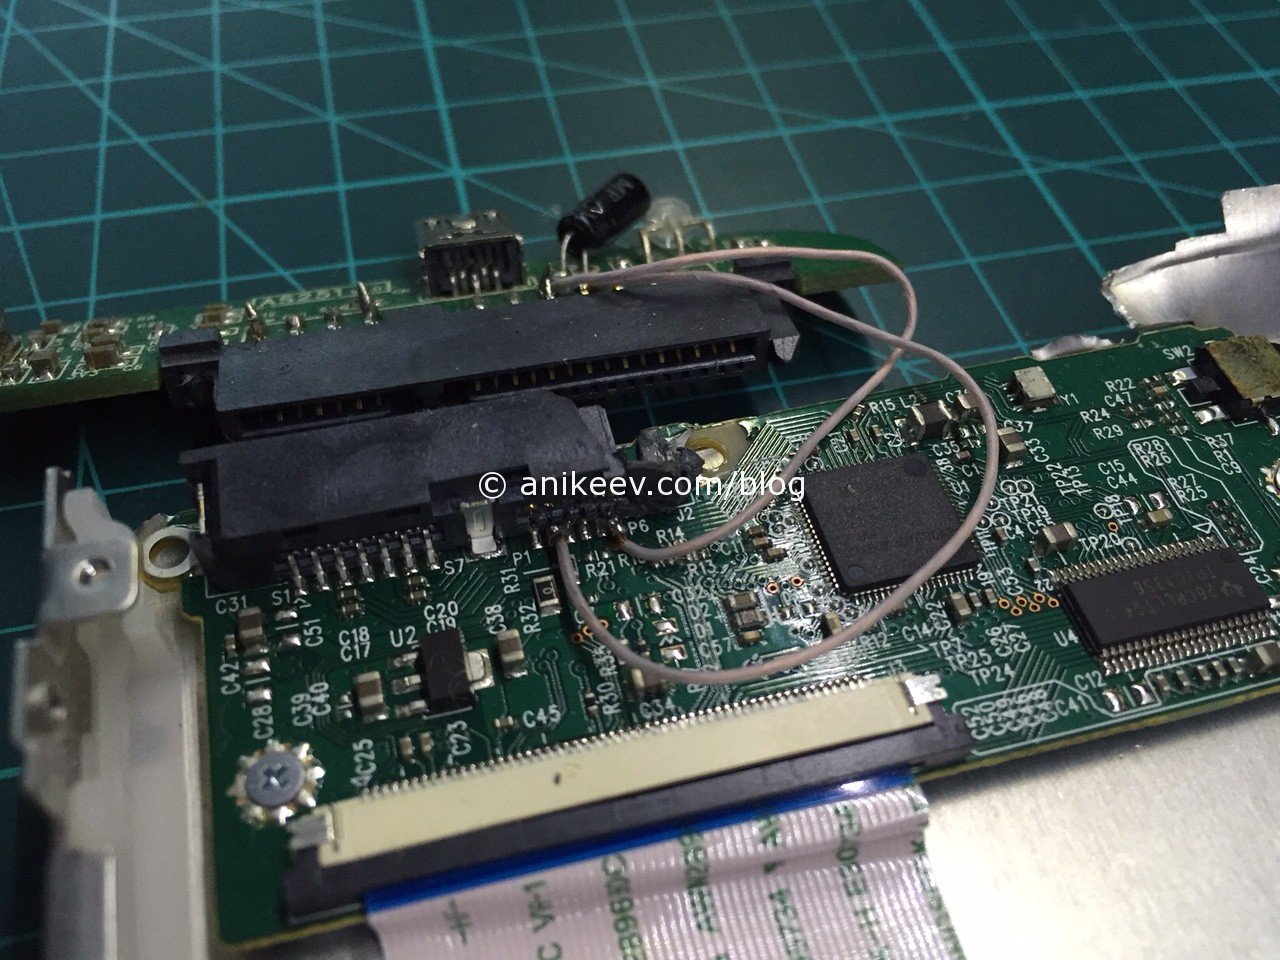
 Power We will give individual wires according to the pinout of both connectors (we need one GND and one + 5V). By the way, if you want, you can add a connector connection to the wires to turn off the drive from the board at all.
This is how the external DVD drive is obtained from which Windows can be installed in case of malfunctions. And no dancing with flash drives. True, the soldering iron in the hands should be able to keep. For whom it is not a problem, he saves.
 Need to make a USB-DVD drive even cheaper and without a soldering iron?
Thanks to the Chinese brothers! On Aliexpress you can buy
Probably, some more time ago, such a device, like external drives, it would be a lot of pushing the computer. After all, it is often the fact of the very presence of a CD disk drive inside the PC body automatically made this device "elite": not everyone could afford it.
However, time did not stand in place. Pretty soon drives for laser disks have become ordinary. And then appeared on the scene and external drives.
Exterior drive - what it is
Probably, without any definitions, many are clear that the external drive is a compact device designed to work (read and write) from all kinds of discs that connects to a computer through one of its ports.

The external device is called precisely because it is not inside the system unit, but outside. That is, an external drive can be simply taken and disconnect at any time, connect to another computer or disk drive, pick up on the road or somewhere else.
When the external drive may need
There is a lot of situations when such a drive may be needed, or even at all - without it can not do.
For example, for a netbook. In favor of compactness, netbook manufacturers did not put the drive for laser disks into the case. So the user has lost opportunities to work with such disks. And it would be quite bad if it were not for an external CD drive. It just connects to the device via USB port - and you can start working with laser disks. Therefore, the external drives are most often purchased in a pair with a netbook.

The external drive may also be needed in the event that the main drive on the device has failed. Or if you need to quickly rewrite information from one laser disk to another without pre-transferring data to the hard disk (many at the same time will certainly recall the common two-channel once).
In a word, all sorts of situations, when an external drive for a computer may need, simply not to count.
What are external drives
External drives can be classified differently: depending on the connection port, from the possibility or inability to record, by the method of nutrition, by type of readable discs and on other features.
However, most often external drives are divided into:
- CD drives - those that can read and record only CD-blanks (they are currently practically not found);
- DVD drives - the most common type of disc drives, which "sees" both CD and DVD;
- Blu-ray - respectively, other than CD and DVD, such devices can work with Blu-Ray disks;
- writing and not writing - those that can not only read, but also write information to the disk, or only read (the latter are also practically not used today);
- signable via USB and through an external power supply.

Are there any models for laptops or only for desktop PCs? No, there are no such. External drives are universal, they are equally successfully working on netbooks, and on laptops, and in a pair
Pluses of external drives
Of course, the external drive has a number of advantages both the independent device and in front of its built-in "colleague".
- External devices for working with discs can be simply disabled from the computer at any time and, for example, to give a friend. In order to make such a trick with a built-in drive, you will need to disassemble the system unit or the laptop housing.
- The external drive will help if the main drive broke on the device.
- It will help to work with disks even on those devices where such drives are simply not designable. For example, recently appeared disks external for tablets.
- External drives are compact and easy to connect, it is easy to replace them.
Cons external drives
But, as always, it was not without minus:
- Speed \u200b\u200bis the main weak place of any external drive. No matter how cool, and the USB port is still slower than internal system ports.
- Often an external drive for a laptop requires individual power supply. Moreover, it can be carried out both through USB and through a conventional outlet. The poor-quality food blocks are quickly burning, find the other exactly the same is practically not possible - it is easier to simply buy another drive.
- External drive is more expensive than its built-in fellow.
How to connect external drive
Fortunately, there is nothing complicated in how to connect an external drive. Usually, everything that is required is to insert the USB cord into the appropriate connector on the computer, and the power supply plug is in the outlet.

If necessary, you can still install additional software and drivers. But often it can not be done - the system simply recognizes the device as a new drive and it works well with it using regular means.
How to choose a removable drive
When choosing an external drive, you need to take into account the following points:
- If the computer has a USB port 2.0, then you need to acquire such a drive. The reading and recording process will go much cheerful.
- If there is an opportunity, then you need to prefer a power model from both USB and outlet. If the power supply unit is burning, the device can be fed directly from the computer. In addition, such external drives will allow and offline. For example, on the road with a netbook.
- If possible, the drive must read the majority of common disk formats and record them. In the please of universality, you can neglect other secondary functions, which most often use only a couple of times for all the time and then only from curiosity.
- The appearance of the drive also has a certain role. The beautiful device stylishly looks on the table and will attract a lot of curious looks.
- As for speed, there is no need to purchase the highest-speed. Standard 52 speeds are enough "for the eyes" for all occasions. Especially since the record at high speeds is incorrectly incorrect. Yes, and the motor motor itself can quickly fail if it is abused too often work on increased revs.

Regarding the manufacturer - there are no unequivocal recommendations. In principle, all companies today produce well-free external drives. Each company has both successful and not too models. But frankly bad today will not meet.


 in Photoshop How to make a grid in photoshop CS6")


