The time has come when one hard drive in the computer is no longer enough. More and more users decide to connect a second HDD to their PC, but not everyone knows how to do it correctly themselves in order to avoid mistakes. In fact, the procedure for adding a second disc is simple and does not require special skills. It is not even necessary to mount a hard drive - it can be connected as an external device if there is a free USB port.
Connecting a second HDD to a PC or laptop
The options for connecting a second hard drive are as simple as possible:
- Connecting the HDD to the computer system unit. Suitable for owners of ordinary stationary PCs who do not want to have external connected devices.
- Connecting the hard drive as an external drive. The easiest way to connect the HDD, and the only one possible for the laptop owner.
Option 1. Installation in the system unit
Determining the type of HDD
Before connecting, you need to determine the type of interface with which the hard drive works - SATA or IDE. Almost all modern computers are equipped with a SATA interface, respectively, it is best if the hard drive is of the same type. The IDE bus is considered obsolete and may simply not be present on the motherboard. Therefore, with the connection of such a disk, some difficulties may arise.
The easiest way to recognize a standard is by its contacts. This is how they look for SATA drives:

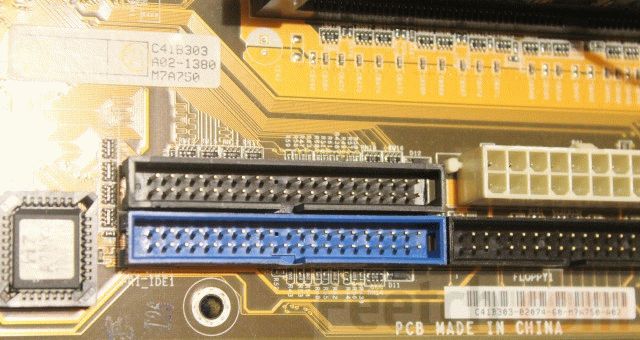
And like this for the IDE:

Connecting a second SATA drive in the system unit
The process of connecting the disk itself is very easy and goes through several stages:

Boot Priority for SATA Drives
The motherboard usually has 4 connectors for connecting SATA drives. They are designated as SATA0 - the first, SATA1 - the second, etc. The priority of the hard drive is directly related to the numbering of the connector. If you need to manually set the priority, you will need to enter the BIOS. Depending on the type of BIOS, the interface and control will be different.
In older versions, go to the Advanced BIOS Features section and work with the First Boot Device and Second Boot Device parameters. In newer BIOS versions, look for the Boot or Boot Sequence section and the 1st / 2nd Boot Priority setting.
Connecting a second IDE drive
In rare cases, there is a need to install a disc with an outdated IDE interface. In this case, the connection process will be slightly different.

Connecting a second IDE drive to the first SATA drive
When you need to connect an IDE drive to an already working SATA HDD, use a special IDE-SATA adapter.

The connection diagram is as follows:
- The jumper on the adapter is set to Master mode.
- The IDE plug connects to the hard drive itself.
- The red SATA cable connects one side to the adapter and the other to the motherboard.
- The power cable connects one side to the adapter and the other to the power supply.
You may need to purchase a 4-pin (4 pin) power to SATA adapter.
Disk initialization in OS
In both cases, after connecting, the system may not see the connected drive. This does not mean that you did something wrong, on the contrary, it is normal when the new HDD is not visible in the system. To use it, the hard disk must be initialized. Read about how this is done in our other article.
Read more: Why the computer does not see the hard drive
Option 2. Connecting an external hard drive
Often, users choose to connect an external HDD. It is much easier and more convenient if some of the files stored on the disk are sometimes needed outside the home. And in the situation with laptops, this method will be especially relevant, since there is no separate slot for the second HDD there.
An external hard drive is connected via USB in exactly the same way as another device with the same interface (flash drive, mouse, keyboard).

The hard drive intended for installation in the system unit can also be connected via USB. To do this, you need to use either an adapter / adapter, or a special external case for the hard drive. The essence of the operation of such devices is similar - the required voltage is supplied to the HDD through the adapter, and the connection to the PC is carried out via USB. Hard drives of different form factors have their own cables, so when buying, you should always pay attention to the standard that sets the overall dimensions of your HDD.


If you decide to connect the disk using the second method, then follow literally 2 rules: do not neglect the safe removal of the device and do not disconnect the disk while working with a PC to avoid errors.
We talked about ways to connect a second hard drive to a computer or laptop. As you can see, there is nothing complicated in this procedure and it is absolutely not necessary to use the services of computer masters.
We are glad that we were able to help you solve the problem.
Poll: Did this article help you?
Not reallylumpics.ru
How to connect a second hard drive
Even a large disk space may run out if you use your computer for a long time. You can delete files and programs, freeing up some space, but this is a temporary way out of the situation. You can replace the hard drive, then you will have to reinstall the OS and configure the computer. It is easier to connect a second drive, which will significantly increase the storage space for photos, games and movies.
Buy a hard drive with sufficient capacity and a SATA data cable to connect it from a hardware store. The volume of the disk depends on the user's desire, but it is better not to save money and buy a disk of at least a terabyte so that you do not have to think about increasing memory again soon. The hard drive of a modern computer is most often connected using the SATA interface. The IDE format was used on computers until 2000. To be sure that the drive and the motherboard are compatible, consult your dealer or read the instructions for your computer.

Disconnect the computer and any optional devices from their power source completely. Lay the system unit on its side and remove its side panel. Consider the motherboard. Modern motherboards can have several SATA controllers, up to 6 pieces. The IDE connector may be missing or used to connect a CD / DVD drive. The computer board diagram will help you in finding the right controllers.

Place the new hard drive in a special basket at a sufficient distance from the other so that they do not touch or overheat. If the case has three "slots" for the hard drive, then put in 1 and 3, and 2 between them for ventilation. Secure the drive with four screws. Connect one end of the SATA cable (it doesn't matter which one) to the hard drive, and the other to the found SATA controller on the motherboard. The second hard drive is connected.

If the power supply does not have a SATA connector, then you need to buy an IDE-SATA adapter. Connect the new hard drive to the power supply: among the several wires of the power supply, find the SATA wire. It is impossible to confuse it, since only it will fit the hard drive, or install an IDE-SATA adapter. Connect it to the connector on the new device. The second hard drive is now fully installed.

If the RAM bar interferes with installing the second hard drive in a special basket and you removed it, then put it back. Secure the side wall of the system unit with the mounting screws. Turn on your computer and all peripheral devices.

Wait until the operating system is fully loaded. It will automatically detect the new external storage device and offer to format the disk to NTFS format. If this did not happen - open the "Computer" folder in the "Explorer", right-click on the new disk and select the "Format" command from the menu. If the new local disk does not appear, then find it using the "Control Panel" section of the "Main Menu", which opens with the "Start" button.

Higher temperatures can cause rapid wear on the hard disk surface. If there is no way to divide the hard drives by space, then there is one way out - to install a second fan to cool the drives. If all the SATA controllers on the board are busy, then buy a PCI controller with SATA connectors to connect a second drive.
SovetClub.ru
Connecting a primary and secondary hard drive
 Modern hard drives are distinguished by their capacity, sufficient to meet the needs of almost any user. However, the system requirements of programs and games grow with the size of the disks, so sometimes there is a problem of insufficient space. If nothing can be removed, you can connect a second hard drive.
Equipment connection
First, let's figure out how to connect a hard drive to a computer.
Modern hard drives for computers have a 3.5-inch format. They are connected using the SATA interface, which replaced the outdated IDE connector.
Look at your hard drive - there should be two connectors on it. One is short, designed to transfer data from the motherboard. The second one is long, it is needed to connect to the power supply unit and get energy for the hard work.
SATA plugs can look different: straight, latched, L-shaped, etc. However, this does not matter - with all your desire, you will not be able to connect the hard drive incorrectly.
Install one end of the SATA cable into the corresponding connector on the hard drive. Then connect the hard drive to the power supply. If the power supply is old, you may need to use a special Molex to SATA adapter to connect the devices, which can be purchased at any computer store.
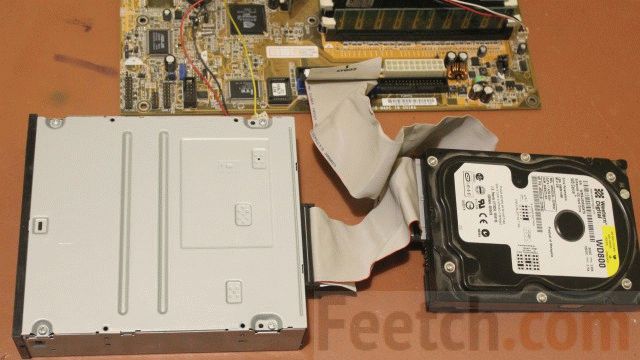
The connected hard drive looks like this:
The other end of the SATA cable plugs into the corresponding port on the motherboard. These ports are usually colored blue or red so you can easily spot them. Naturally, in this case, it is necessary to observe the main rule for connecting any equipment - "red to red, blue to blue, etc.".
If there are no SATA connectors or they are all occupied, you can purchase a special PCI controller. If you know how to connect a network card, then you won't have any problems installing this controller; the main thing is to have a free slot on the motherboard.
Do not forget to secure the hard drive with screws!
After turning on the computer, a new disk should appear in the system. If this does not happen, perform the initialization procedure.
Right-click on "My Computer" and select "Manage". 
Go to the "Disk Management" section.  The initialization wizard should appear on the screen. Click "OK" to launch it and complete the hard drive installation.
Second disc
The second hard drive is connected in the same way. The main thing here is to keep the distance between the "hards" so that they do not overheat.
Install the hard drive only in a special basket. In no way leaves it in limbo.
When you turn on the computer, the new disk is automatically detected. All you have to do is format it to NTFS. If formatting does not start automatically:

After the end of formatting, you can work with the new "hard".
While you're on the hunt for improving the functionality of your computer, try connecting USB by increasing the number of available ports. You can also connect a video card to your computer if the old one doesn't meet your visual needs.
Old Winchesters
If you are the proud owner of two vintage IDE hard drives and want to install them in one computer, then you will have to perform several additional steps for the equipment to work correctly.
- Connect the hard drive to the first hard drive to the motherboard and power supply.
- Connect the second hard drive to the remaining connector on the ribbon cable.
Now you need to manually set the configuration of the "hard" operating modes. For this, a special jumper is used - a jumper.
- On the hard disk, which will be the main one, it must be set to the “Master” position.
- On the second hard drive, the "Slave" mode is set.
The mode diagram should be indicated on the hard drive itself.
Finally, you need to check that the devices are correctly defined in the BIOS. Go to the basic I / O system and make sure that on the initial page of the interface, the master disk is marked in the “Primary IDE Master” column, and the slave is in the “Primary IDE Slave” column. Subsequent configuration of hard drives is performed in the same way as when connecting hard drives via the SATA interface.
mysettings.ru
How to properly connect a second hard drive to your computer
When a new HDD is purchased, the question arises of how to connect the second hard drive to the computer. It is not difficult to do this, but before starting work, you need to make sure that your system unit is not under warranty. The fact is that in order to install a second hard drive, you need to remove the side cover of the computer. This will break the seal and therefore void the warranty. To avoid this situation, you should contact the service center.

Connecting an additional hard drive
If the warranty has expired or is missing, feel free to remove the side wall. It is secured with two screws on the back of the PC. Be sure to turn off your computer and unplug it. Installation of an additional hard drive is carried out only when the system is turned off. This is not a USB flash drive, and the HDD can simply fail.
You need to inspect the motherboard and the place where the hard drive is already located. Most modern computers have SATA connections. Trace where the cable of the existing HDD is connected to the motherboard. There must be at least one more similar connector next to this connector. This will depend on your motherboard type. Large ones have up to 5-6 connectors, small ones can only have 2.
If you are the owner of a standard type of motherboard, then you just need to choose a socket for connection. If you have a combo (that is, a small one), then slight difficulties may arise. The fact is that the first hard drive and an optical drive can already be connected to the slots. And it may turn out that there is simply no other place to connect an additional hard drive. These are budget motherboards, and sometimes they do not provide the ability to connect multiple hard drives. How do I install two hard drives in this case? You just have to unplug the DVD-ROM to free up the port.
If you have an old computer with an IDE connection type and there is only one slot left, you have the opportunity to install two equipment on one ribbon cable. It can be either 2 HDDs or a hard drive with an optical drive. When connecting on one loop, it is advisable to observe the sequence in which the system disk will be connected to the master connector, and an additional one to the slave. Master is the outermost connector on the loop, slave is in the middle. The instructions for the HDD should indicate in which position the jumpers should be set for this or that mode.
After we figured out where to connect the second hard drive to the computer so that it recognizes it, move on to the next step. This is powering the device with electricity. Take a close look at the wires that go from the power supply. In the old system units, the type of connections is IDE, in the new ones - SATA. Some PCs have both types at the same time. If the hard drive has a SATA port, and only IDE is free in the power supply, don't worry. You need to purchase an adapter from one type of connection to another.
We found out in which connectors the second hard drive is connected. Now you need to install and fix it. Find where the first hard drive is. Depending on the size of your enclosure, there may be anywhere from one to three disk slots nearby. If there are a lot of places, it is advisable to connect two HDDs so that they are far from each other. Winchesters can get very hot during operation and need ventilation. The more free space around them, the better ventilation will be.
In a small case, installing a second hard drive will mean that both drives will get very hot. Especially during the hot season. Therefore, it is advisable to purchase a cooling system for them. When connecting a second drive, do not forget to screw it to the case with screws. Unlike solid state drives, HDDs have a mechanical part that can be easily damaged. During transportation, the hard drive may fall out of the slot, and this will damage not only it, but, possibly, the motherboard.
Second hard drive on a laptop
Winchesters on laptop computers do not have the same large capacity as on stationary computers. And sometimes users want to increase the space, but the laptop does not have a slot for an additional hard drive. How do I connect a second hard drive to my laptop in this case? This can be done by installing an HDD instead of an optical drive.
There are special adapters for this. Without them, you will not be able to connect another hard drive, since the DVD-ROM and HDD have different connectors. First of all, you need to figure out the thickness of your drive. It may differ on different laptops. The most common are 12.7 mm and 9.5 mm. You can find out this way:
Use a program for diagnostics of equipment such as Everest or AIDA. View the model of the optical drive and find the specification on the Internet. The exact dimensions must be indicated on the manufacturer's website. Unscrew the drive and take a manual measurement.
After purchasing the adapter, you can start installing the hard drive. Unplug your computer and turn it off. It can only be untwisted when it is inoperative. Pull out the optical drive. In most cases it is secured with 2-4 screws.
Take the adapter and remove the stop, which is located on the opposite edge from the connectors. Some people try to turn on the second drive by attaching it to the adapter at a sharp angle. This can break the contacts. The stop is removable and is needed to fix the hard drive. Then press the hard drive firmly to the contacts. Sometimes it takes effort.
After installing and fixing with a stop, screw the bolts to make the adapter more rigidly connected to the disc. In order not to spoil the appearance of the laptop, you need to remove the front bezel from the optical drive and attach it to the hard drive adapter. Gently insert the device into the laptop and put back all the covers. If everything was done correctly, the BIOS will display the new hard drive.
System disk settings
You have learned how to install a second hard drive in a PC. But this is not enough for a full-fledged work with him. Now it needs to be configured for the system to recognize it. After all, if the disk is new, it has no marked areas and will not be displayed by the operating system. If you have windows installed, you can do this by going to the "Disk Management" section. You can get to this menu by right-clicking on the "My Computer" icon and selecting "Manage".
All connected drives and their volume will be displayed in the lower center part. The new disk will be labeled “Not Allocated”. You need to click on this area with the right mouse button and click "Create Simple Volume". The "Configuration Wizard" will appear, following the instructions of which you will determine the space of the future disk, the file system and assign a letter to it. Remember that two sections cannot be assigned the same letter. So that you do not have to face an OS freeze and a crash in the process, close all unnecessary programs. At the end of the procedure, a new hard drive will be displayed in the system.
We took a closer look at how to connect an additional hard drive to your computer. By watching the video below or above in the text, you can understand and consider in more detail the incomprehensible moments.
Comments powered by HyperComments
HDDiq.ru
Connecting a second hard drive to a computer
Computer equipment has long ceased to be a curiosity, almost everyone has it in stock. Only the nature of use differs: some users actively exploit equipment, uploading films, games and music to it, while others use an electronic computer when they want to view the latest news on the World Wide Web or do part of home work.

At a certain time, it is necessary to replace obsolete components
In this regard, the level of hard disk utilization is also different. If there is very little free space left, then you should not expect normal performance from a PC at all. Given these circumstances, many owners decide to purchase a second "screw", thereby increasing the disk space. However, it is very important to first find out how to connect the hard drive to the computer.
PC connection
Finding information on the Internet, how to connect a hard drive to a computer, is not difficult. It is only important to carefully read all the recommendations, and then no problems will arise if the user installs an additional hard drive on his own, while leaving the old one in the same place.
An old hard disk must be removed only if it has become completely unusable and cannot be restored. By installing a second hard drive along with the old one, the user gets expanded space, thanks to which all actions will be performed faster.
Installation in a PC case
Connecting a hard drive to a computer begins with the step when the user must initially place it in the case and securely fasten it.
To ensure the correct insertion of the "screw", you must first remove the cover from the case of the system unit. In the front, you can easily find special bays for drives and hard drives. The drives are located at the top, and the second hard drive should be identified at the bottom of these bays.

The Winchester is inserted into any free compartment, but preferably at a short distance from the existing one. This is very important, since during operation they both heat up, which will adversely affect the performance of the PC.

Then the second hard drive is inserted strictly along the guides so that the connectors are directed towards the inside of the system unit to ensure its comfortable connection in the future. When the new hard drive has taken its correct position, it should be securely fastened by tightening the screws on both sides, ensuring a tight connection with the compartment.

After fixing, check the strength by trying to loosen it. If the hard drive does not wobble, then all actions were performed correctly.
Connection using loops
After successfully connecting the second hard drive to the computer, you can proceed to the second part of such important steps. At this stage, you should connect the second hard drive directly to the motherboard, and also provide power to it.
To do this, you will need to purchase additional cables. By the way, it is advisable to note that the connectors through which the hard drive is directly connected may differ depending on the year of manufacture of the PC.

The old computer is equipped with IDE connectors, while the new one already has SATA connectors, which are characterized by amazing performance. Previously, users were guided when making a purchase to pay attention to the connectors and purchase only a hard drive with the desired look. Currently, it is problematic to find a hard drive with an IDE connector on the market, but this does not mean that there is no hope of installing a second drive. Simply in this case, the user is obliged to additionally purchase special adapters.

By connecting a second hard drive using SATA connectors and adapters, the owner of a smart machine not only ensures system performance, but also facilitates the installation process.
Installing an old hard drive with an IDE connector a few years ago, we had to manually configure the “screws” operating mode, which involved setting jumpers in certain positions.

Connecting with SATA connectors is much easier. All connectors on the new technology are equipped with special partitions, so it is a priori impossible to connect the second hard drive incorrectly.

USB connection
There is another alternative method that provides absolutely easy connection of new disk space, while completely eliminating the need to disassemble the case of the system unit.
In this regard, many want to know how to connect an additional hard drive to a computer without experiencing any additional difficulties. The answer is obvious, the second hard "screw" can be connected to an electronic computer using a USB device.

Such hard drives are powered through a USB connector to which it is directly connected. However, this is only true for drives with a size of 1.8 or 2.5 inches. More powerful ones, for example, starting from 3.5 inches, already need an additional power supply.
External devices are very easy to connect, so they are preferred by a large number of users.
Identifying devices in the BIOS
Having ensured the correct connection of the hard drive, you should make sure that it is displayed correctly in the BIOS, otherwise it will be simply stupid to dream of high-quality work.
To make the correct settings in the BIOS, you should also understand how to connect an old hard drive to a computer, how to connect a new hard drive, how to ensure the correct operation of these two drives.
The user understands that the operating system is installed on one of the disk spaces, in most cases it is the old hard drive that is the place where the operating system was once loaded.
In this regard, in the BIOS settings, the user must set the boot priority from the old hard drive. Incorrect priority setting will prevent the system from booting. It is quite easy to determine the priority in the BIOS, since SATA with the assigned number will be written in front of the existing hard drives. It is the number that indicates the priority. The hard drive with the operating system must be SATA 1.

If any hard disk is not displayed in the BIOS, you should double-check that the connection is correct, otherwise it will be impossible to use the installed disk space.
So, installing an additional hard drive is a predictable act, accompanied by actions that can easily be performed by any user, if he tries hard and shows increased attention.
Buy an internal SATA hard drive. Do this if you do not already have such a disk.
- Better to buy a hard drive made by the same company as your computer (eg HP).
- Some hard drives are not compatible with some computers. Before purchasing a hard drive, search for your computer model and hard drive model (for example, search for “HP Pavilion Compatible with L3M56AA SATA”) to see if they will work together.
Turn off your computer and unplug it. Do not work inside the computer while it is on, as this could damage components or result in injury.
- Some desktop computers shut down within a couple of minutes. In this case, wait for the computer fans to stop working.
Open the computer case. This process depends on the model of your computer, so read the instructions for your computer or find the relevant information on the Internet.
- In most cases, you will need a Phillips screwdriver.
Ground yourself . This will prevent accidental damage to sensitive internal components (such as the motherboard).
Find an empty hard drive bay. The main hard drive is installed in a special compartment of the computer case; next to this bay should be a similar empty bay in which you will install the second hard drive.
Insert the second hard drive into the bay. The bay is located under or above the primary hard drive bay. Insert the disc so that the side with the cable connectors is facing the inside of the computer case.
- In some cases, the drive needs to be secured with screws.
SPECIALIST'S ADVICE
Spike Baron is the owner of Spike's Computer Repair. His company has over 25 years of experience in technology and specializes in repairing PC and Mac computers, selling used computers, removing viruses, recovering data, and updating hardware and software. CompTIA A + certified and Microsoft Certified Solutions Expert.
Network Engineer and User Support Specialist
Our expert agrees:“After you open the case, insert the hard drive into the dedicated drive bay and secure it with the screws. Then connect the power cable to the hard drive, and then the SATA cable (connect one end of it to the hard drive, and the other to a free connector on the motherboard). "
Locate the hard drive connector. Run the cable over the primary hard drive to find out where the hard drive connectors are on the motherboard. (A motherboard is a large board that connects other boards and devices.)
- If your primary hard drive cable looks like a wide, thin tape, it is an IDE hard drive. In this case, you will need an adapter to connect the second hard drive to the motherboard.
Connect a second hard drive. Connect one end of the cable to the second hard drive and the other to the connector on the motherboard (this connector is located next to the connector to which the primary hard drive is connected).
- If your computer's motherboard has only IDE connectors (connectors a few centimeters long), buy a SATA-IDE adapter. In this case, connect the adapter to the motherboard, and the cable of the second hard drive to the adapter.
Connect the second hard drive to the power supply. Connect one end of the power cable to the power supply and the other to the second hard drive.
- Typically, the power supply is located at the top of the computer case.
- The power cable plug looks like a wider SATA cable plug.
Make sure all cables are securely and correctly connected. Otherwise, the operating system of the computer does not recognize the second disk.
Connect your computer to an electrical outlet and turn it on. Now you need to make Windows recognize the second hard drive.
Open the Disk Management window. Right click on the start menu
In the lower left corner of the screen and then from the menu select "Disk Management".
- You can also click ⊞ Win + X to open the menu.
Even a large disk space may run out if you use your computer for a long time. You can delete files and programs, freeing up some space, but this is a temporary way out of the situation. You can replace the hard drive, then you will have to reinstall the OS and configure the computer. It is easier to connect a second drive, which will significantly increase the storage space for photos, games and movies.
Buy a hard drive with sufficient capacity and a SATA data cable to connect it from a hardware store. The volume of the disk depends on the user's desire, but it is better not to save money and buy a disk of at least a terabyte so that you do not have to think about increasing memory again soon. The hard drive of a modern computer is most often connected using the SATA interface. The IDE format was used on computers until 2000. To be sure that the drive and the motherboard are compatible, consult your dealer or read the instructions for your computer. Disconnect the computer and any optional devices from their power source completely. Lay the system unit on its side and remove its side panel. Consider the motherboard. Modern motherboards can have several SATA controllers, up to 6 pieces. The IDE connector may be missing or used to connect a CD / DVD drive. The computer board diagram will help you in finding the right controllers.


Higher temperatures can cause rapid wear on the hard disk surface. If there is no way to divide the hard drives by space, then there is one way out - to install a second fan to cool the drives. If all the SATA controllers on the board are busy, then buy a PCI controller with SATA connectors to connect a second drive.
Hi friends! When assembling or upgrading a PC, it may turn out that one hard drive, even an impressive volume, is not enough, so you have to use two such parts. The connection, although it has some peculiarities, is not much different from the installation of a single hard drive.
Do not worry about breaking your computer if connected incorrectly. Not at all, however, even here some unpleasant surprises may lie in wait - for example, a slowdown in the device or a general refusal to start the user.
In today's post, I will tell you how to connect two hard drives to one computer at the same time - what to consider when doing this and how to do it right.
Installation of hard drives
As we have agreed with you earlier (didn’t forget?), We will assemble a PC from modern components, therefore all HDDs will be SATA.
Their installation in the appropriate pockets does not differ from the similar procedure when assembling a computer with one hard drive: we carefully put the parts on the seats, without impacts or shaking, and fix them with screws, screwing them into the slots intended for this.
The relative position of the disks does not affect anything: place them the way you like, but take into account the length of the data cables and the fact that they should reach the motherboard, namely, to the ports for connection.  I want to clarify that you can use both 3.5 "hard drives from a desktop PC, and 2.5" from a laptop. There may be problems with fixing if there is no pocket of the appropriate size, so I recommend purchasing a special slide for this purpose.
You will find everything you need and more in this popular online store, and prices will surprise you unexpectedly.
Connecting data interfaces
When connecting the data cables, you should take into account which of the hard drives the operating system will be installed on. It must be connected to the SATA port with the serial number 0 (or 1, if there is no zero), and all other devices are already in the ports with the serial numbers above.
In addition, when you first turn on the assembled system unit in the BIOS settings, the hard drive with Windows installed must be designated as the main boot device.
As a rule, ATX and Mini-ITX motherboards have no problems with the number of SATA ports - there are at least 4 of them, with the exception of the cheapest models, where there are fewer such slots. In "stripped-down" versions of mAtx, you can often see only two SATA ports. This is inconvenient already because we may need to connect an optical drive as well.  In this case, I recommend using a special adapter that plugs into the PCI ‑ E port. Depending on the model, it can have either a pair of additional SATA interfaces or a slot for connecting IDE devices.
This can be useful if you need to copy from an ancient non-working computer into a new, dear files: a family photo archive or a collection of German short films.
Please note that there are no splitters to connect a pair of SATA devices to the same port on the motherboard. Not because they are not in demand, it's just that the architecture of the computer does not allow data transfer in this way.
Connecting to PSU
When assembling a computer, if you did not carefully approach the choice of components, problems may arise with connecting all energy consumers to the power supply, namely, there may not be free SATA plugs.
In this case, I recommend using special Molex / SATA adapters, that is, their four-pin connector to a regular Satan one.  And even if there is no free Molex, then you can already use a splitter to power two devices from one connector. Directly with the connection, no problems should arise: on any satov device, there is only one connector for connection.
The second is the date interface, and due to the difference in size, it is difficult to confuse them.
As you can see, connecting two hard drives is only slightly more difficult than one. For further assembly (and we haven't finished yet?) I advise you to read and.
And that's all for today. If you have read up to this point, I would like to ask for one more courtesy: I would be very grateful to share this publication on social networks.
A hard disk is a solid-state drive, which is so called in contrast to a floppy disk - a floppy disk that has not been used by users for a long time. The operation of connecting a hard drive is not so difficult and in many cases the user can do everything on his own, without contacting computer specialists.
When do you have to connect hard drives?
- When upgrading, replacing the old drive with a more powerful and voluminous one.
- For expanding disk storage. For example, for placing computer games and some applications on a separate hard drive.
- When repairing, replacing a failed drive with an efficient one.
- To read a large amount of previously recorded information.
Basic Provisions
If there is more than one hard disk in the system unit with the IDE interface, then one of them on the bus is assigned as the main one, and the second - as the secondary one. The first is called Master, and the other is called Slave (Master - Slave). Such a subdivision is required so that when the operating system boots after turning on, the computer knows exactly which disk is bootable.
In all cases, using the settings in the BIOS, you can set the boot sequence from the drives. And in the IDE, this is done by setting jumpers on the disk cases according to the diagram shown on the case.
By the type of interface, hard drives differ in IDE - the old model and SATA - in all new computers. If you have an old model of the system unit, and you are going to connect a new hard disk with SATA interface, you will need to purchase a special adapter.
Old
It happens that you pick up this old thing and cannot figure out what and where to connect it. The old IDE (1986) fits over a parallel loop of wires. Usually there are either 2 or 4 connectors on the motherboard. Always an even number, because the Master / Slave rule works. Settings can be set with jumpers (example):
- Master - the presence of a jumper between the leftmost contacts (7 and 8) of the regulating connector.
- Slave - the absence of any jumpers.
The specified configuration may vary depending on the manufacturer, as well as the set of permissible functions specified by the connector. The IDE interface made it possible to conveniently connect a hard disk and a CD drive to a computer at the same time. This was enough for most users. The disadvantage of the parallel interface was the low transmission speed. In another way, IDE is referred to in the professional environment as parallel ATA or ATA-1. The transmission speed of such devices does not exceed 133 Mbps (for ATA-7). With the introduction in 2003 of the serial SATA interface, the obsolete information transfer protocol began to be called parallel PATA.
The IDE interface was named ATA-1 in 1994 when it was recognized by ANSI. Formally, this was an extension of the 16-bit ISA bus (PCI predecessor). It is curious that in the modern world there is a tendency to use video card interfaces to create ports for connecting hard drives. This was followed by accelerated ATA-2 and packet ATAPI. The IDE has not been officially supported since December 2013. It is possible to connect such a hard drive to a new motherboard only if you have an expansion card.

With the help of such devices, it is possible to perform the exact opposite function: to install hard drives of the previous generation on new motherboards. For example, the old A7N8X-X has only two IDE ports, but it has 5 PCI 2.2 slots for expansion cards. The universal adapter is just right for this situation. And you can put a modern hard drive up to SATA3, but its speed will, of course, be several times lower than the maximum.

Hard drives for standard IDE interfaces are probably already out of order for the most part. And there are not so many of them left in the world. It remains to add to this that the configuration of ATA devices is changed by jumpers, and the explanatory figure is located directly on the device case. Unscrupulous suppliers sometimes keep the jumpers for themselves, and not any configuration in this case can be carried out by the user. Jumpers are usually missing.
Today, there is a new fad: for some time, traditional PCIs are reappearing on motherboards, supplanted by PCI Express cards. This means that the "old" with the adapter can now be connected to a modern system unit.

SATA drives
Experts generally distinguish between three generations of SATA. Graduation is carried out according to the speed of information transfer:
- SATA - 1.5 Gb / s.
- SATA2 - 3Gb / s.
- SATA3 - 6 Gb / s.
A standard SATA drive has two connectors, one of which is used for power supply, and the other serves as a data transfer cable. It is not recommended to swap hard drives by connecting to different SATA ports. There are keys on the forks, thanks to which it is impossible to make an incorrect docking of the connector.

Sometimes useful information can be presented on the hard disk, understandable to any advanced user. But sometimes the designation tends to be so florid that only a real professional can comprehend it. As, for example, in this case.

There are data on the brand, serial number, technical data and even measures of the disk capacity. But its interface remains unknown. This is important when choosing hardware for a computer with a disability. If the disk had a SATA3 interface, then it is useless to put one in an old system unit. There are many other similar examples. Let's say in advance that this disk is SATA 2.6. Consequently, its information exchange rate within the limit is 3 Mbit / s.
If information about the type of HDD interface is available
How to tell? First, you can look at the case. Here is an image of an old drive that supports two speeds, therefore, it is a SATA2 device.

When removed from the system unit, it was equipped with a jumper that reduced the speed.

The jumper was immediately removed, therefore, now the device will function twice as fast. On the SATA 2.0 bus of the GA-H61M-D2-B3.

This once again suggests that it is not enough to buy a system unit, you still need to study its entire device in general and hard drives, in particular. The drives inside were paired with a special hinged frame.

This achieves the best maintainability of the structure. Both hard drives were quickly removed from the case. Alternatively, the bay installation is used, where the case is secured with screws on both sides, and two side covers have to be removed for disassembly. Which is not very convenient, given that each of them usually sticks. Rarely are the cases of system units, where the sidewalls are removed by simple methods.
If there is no HDD interface data
Sometimes there may be no information on the data transfer rate on the hard disk. In this case, you can, of course, stock up on AIDA, but it's even easier to look at the information on the Internet. The brand of the drive is determined by the price list or the appearance of the case.

Let's say we have WD5000AAJS in our hands. Only one thing is known - at lunch he will be a hundred years old. Therefore, you need to familiarize yourself with the historical information on the Internet. Since the models are constantly being updated, you need to enter a code that goes through a dash - 00YFA0. The search engine quickly gave an answer, and now there is every reason to assert that the channel bandwidth is 3 Gb / s (SATA 2.5 generation).

It has already been said above how to connect such equipment to an outdated motherboard that does not have a SATA interface. Therefore, let's move on to new products.
Connecting SATA to exSATA bus
When engineers approached the problem of increasing SATA speeds to 12 Gb / s and higher, it turned out that it was economically unprofitable. Energy efficiency drops sharply while prices rise. Someone noticed that the bus of PCI Express graphics cards works without problems at high speeds, and then it was decided to make a kind of hybrid between it and the outgoing SATA. For this, the connector was divided into two parts:
- Specific. Small port on the side.
- Standard. Two ports for connecting SATA0.

The figure shows a dual exSATA port. This includes 4 hard drives with SATA interface, or 2 exSATA, or 1 exSATA and 2 SATA. Below is an example of connecting two SATA drives to one exSATA port.

Due to its large size, covering three exSATA slots at once, the plug is called a hub among professionals. You need to start by checking the BIOS. It turned out that some motherboards can turn off support for SATA, completely switching to Express, which supports speeds up to 16 Gb / s.

At the same time, you can see the BIOS capabilities regarding RAID arrays. Recall that in the latter case, several hard drives can duplicate their information for reliability, or turn on alternately, which significantly increases the speed of work. The size of the article does not allow speaking in more detail on this topic.

The selected AHCI is the default mode for most systems. It provides maximum compatibility with older equipment in a transparent manner to the user. For safe "hot" connection of drives, it is recommended to set the appropriate option in the BIOS settings.

When installing a new operating system, the sequence for connecting bootable media is specified. The hard drive is not in the first place. Instead, the lead is given to a flash drive or DVD drive.
Before connecting

How to connect an IDE hard drive
On the motherboard, the IDE connector is visible from afar. You can recognize it by the characteristic slot with many contacts and a key located approximately in the center of the block.
A splitter cable is usually hung on each port, so that the master and the servant are on the channel at the same time.
Before connecting the disk on its case, you need to correctly configure the jumpers - Slave or Master. On the case there will definitely be a diagram of how to do this.

For drives from different manufacturers, the order of insertion of jumpers will be unique (they seem to be competing in this). The disk must be the master of the bus, otherwise it will not be possible to start the operating system from it (No IDE Master detected). Therefore, it is imperative to set the servant jumper on the CD drive.

After installing the jumpers, insert the hard drive into a suitable cage and secure it with four screws on both sides. Connect the single data cable connector to the corresponding connector on the motherboard. Connect the power cables. The order doesn't matter here.
Now you can close the lids of the system unit and connect the computer. The system itself must detect new connections and configure everything. The user only has to confirm the operations in the New Hardware Connection Wizard.
If the system is confused, where is Master, and where is Slave, then you need to make assignments in the BIOS. Immediately after turning on the power, press repeatedly the F2 key or Del (in different ways) to open the BIOS settings. Find the interface describing the order of boot devices, set the parameters. The first is the CD drive from which the system is installed. Save the settings with the F10 key. After that, the operating system will start loading.
How to connect a SATA hard drive to an old motherboard
A PCI adapter is used to connect a SATA hard drive. It can have one or another number of ports, respectively, several hard drives are installed.

Insert the card into the slot, plug in the hard drive, put it in the bay and fasten on both sides with screws - just two or four screws. It is advisable to choose the location of the modules inside the system unit in such a way that between them, if possible, there is enough free space to provide ventilation. Otherwise, if the computer overheats, it will automatically shut down.
Now connect the power cable to the hard drive. If the power supply is of the old model for IDE, you will need an adapter to connect the SATA. Now you can connect the data cable to the hard drive. After booting the system, you should install the driver from the supplied DVD, and the new drive will be visible through Explorer.
Sometimes there is no other drive other than SATA. And then you need to put Windows again through the PCI adapter. The bootloader will not see the drive, but will allow you to find it manually. This is where you will need to find the correct driver for the current operating system on the DVD. After that, the installer will notice the disk and it will be possible to create partitions for the new operating system. This is absolutely certain, because the authors put the "seven" in this way on an old system unit.
External hard drive to USB 3.0
The serial interface has become so fast (up to 5 Gbps) that USB 3.0 external hard drives are now available. The motherboard usually has 20-pin sockets, in addition, some of the ports are brought out to the rear wall. But if you plan to install an operating system on the hard disk, it makes sense to place it inside the system unit. Adapters from 20-pin to microUSB 3.0 typeB usually cannot be found, but intermediate adapters can be used for docking.
(5
estimates, average: 4,60
out of 5)


 new brushes in Photoshop?")


