18.11.2009, 13:21
Greetings to all !!! Guys, somebody help me. Something happened to my SKYON DSR2300 tuner. I plug it into the network and write boot on the display. I understand that the processor sigh. Please tell me how to reanimate the tuner. I try to flash it through the skyonlink-4.0 program, I click on the setup comm, and in response I see a connektion error, and no more shift, tell me what to do? I will be very grateful to you.
18.11.2009, 15:40
18.11.2009, 18:56
The firmware has flown, you need to restore the bootloader. Here are all the programs and software for recovery + the latest software 5.46.
I took the program for filling and software. I tried to flash it, everything was unchanged. I launch the bootloader, select the software and select the same port. and click on the record, writes the connection and that's it. on the tuner display, as it was written boot, it remains. I checked the port, connected another tuner globo and there the port sees, starts to write and here it is dull like in a tank. What else could you advise to restore the tuner, please help with advice.
18.11.2009, 19:45
I can't run the skyonlink-4.0 program, I click on the setup comm, and in response it gives a connektion error, And only boot is written on the display and that's it
Tell. Where is the place for connecting Jtag on the board, I will not find the inscription rst cnd tdo, etc. Obviously, the board shows the place for Jtag, but I cannot find it on this tuner.
18.11.2009, 20:52
18.11.2009, 21:15
Irakli, if you have already disassembled the receiver then check the supply voltage, maybe we should be muddying the water in vain?
The voltage at the power supply and at the output corresponds to the circuit. I checked this myself at the beginning. Only that the child admitted that he ate to flash. and uploaded some other software. Openbox software took. and went out into the king.
19.11.2009, 20:47
20.11.2009, 10:30
Irakli, Jtag himself "did not restore but changed this receiver, here's the info to make it clearer. The Jtag" connector is a standard 20-pin one.
Jtag pin number "a. Pin name. Cut leg. Resistor. LPT pin number.
19 - TRST - 109/5518 / - 100 R - 5
15 - TDO - 111/5518 / - 33 R - 13
13 - TDI - 112/5518 / - 100 R - 4
11 - TCK - 113/5518 / - 100 R - 3
9 - TMS - 110/5518 / - 100 R - 2
Jtag On my 74HC244 microcircuit I reanimated the globo-like ones. Now I will look for the legs on the processor. There is a 20-pin connector on the board, it has the A5 mark on it, and the report of the legs is not indicated. I took out the legs on the processor, I took the 109 leg of the processor, but I could not find leg 19 on the connector, I called the tester, but I could not find the circuit. maybe the processor has lost count. Thank you so much for helping me. I will try now.
25.11.2009, 17:59
Irakli Well that figured out there are no pictures that where or described in more detail.
25.11.2009, 20:46
There is an idea for Skyon-2300 users who watch Digi TV. We fill the receiver with firmware 5.46, reset it to factory settings and the emulator. We re-enable the emulator and Jtag "oh, remove the dump. Post it on the forum, I'll try to turn off the AU on the Digi TV. The edited dump with the same Jtag" is poured into the res. Balls of Rainbow and Pluses and Digi TV are working. Who will take the risk?
04.03.2010, 18:04
04.03.2010, 18:45
Hello. Prompt SKYON2300 no signal upper scale 1/3, middle swing, lower zero?
You write on which satellite and transpoder or which channel.
04.03.2010, 19:18
yurec, Opens 300 - 820 have similar problems. Check connections on the I2C bus between the process and the tuner. Skyon did not make out, but in Opens 8 pins. tuner - 194 pin. percent, 9 pin. tuner - 195 pin. percent Connected through resistances 22 Ohm x 2 pcs., 44 Ohm in total.
04.03.2010, 20:55
Thanks for your reply. The connection checked everything is fine, the problem persists. Any other ideas?
04.03.2010, 21:03
The problem is in the tuner, call all connections between the process and the tuner. What tuner is installed in Skyon?
Quote from another forum: In case of a problem with a square bus, the signal-to-noise scale is full, it is unlikely that it is. Check the 3.3V power supply of the SHARP input unit, if it is normal, try to change the tady.
They offer to change the entrance block.
04.03.2010, 21:27
The problem is not with the tuner, that's for sure. took off the tuner, the screen is the same. Maybe the flash drive is buggy?
04.03.2010, 21:30
Only in the tuner, there is no need for a flash.
05.03.2010, 03:00
Skyon did not understand
DSR-2300
05.03.2010, 17:22
Found on one forum: (... there were two versions of this tuner with different HF blocks. But when you fill in a flash drive from the wrong "assembly", the tuner does not see the signal at all, it also happens when you rewrite from tuner to tuner with different HF blocks. ..). If so, where can I get the required dump?
05.03.2010, 17:37
yurec, and in yours what tuner? Well, download a dump from Skyon which is on our forum, if not the one knocking to Bashir, he can tell me something. But I still don't understand, after which he stopped showing res?
05.03.2010, 18:12
10.03.2010, 07:26
As I was told, when the tuner was brought in, there was a power surge, the tuner went out ... People were smart, they disassembled the device, replaced the fuse. The tuner worked. I brought it to me. but did not connect to the antenna. I stitched 5.46, connected it to the antenna, does not see the signal.
In your words, if there was a voltage surge, then in the first turn change the kander 47Mkf 100v and secondly check the tuner voltage, everything is received.
HERE WE ARE NOT EXTRASENSES AND NOT CLAUDE.
16.03.2010, 19:12
That's the trick, I would not ask for advice, the voltage is normal, I checked it with an oscilloscope.
15.10.2011, 15:46
Rebuilding receivers with Jtag and Jkeys
There are two reasons for the failure of the receiver software:
1. Unsuccessful firmware;
2. A crude version of the software that disables the receiver.
In this case, "BOOT" lights up on the display and the receiver does not respond to anything, including the remote control.
Let's look at the receiver recovery procedure using the example of the unsuccessfully flashed SkyOn 2300.
Recovery takes place in 3 stages:
Clearing the receiver's flash memory;
Filling with factory software;
Re-flashing with the latest software version.
Clearing the receiver's flash memory
To clean the flash memory, you need to connect (solder) the Jtag cable (Jtag cable diagram)
22801
to the internal Jtag-connector of the receiver and to the LPT connector of the computer.
We turn on the receiver. Run the program fdddddddd22803 Select the size of the flash memory in accordance with the set in the receiver. In our case, 2 MB and press START.
This loads the trap.bin file.
If the ladder is normally loaded, then you can try to erase and write the flash memory.
If, when erasing, it writes an error, then turn off the receiver, turn it on and press START again. We no longer try to erase or write a Jtag Up flash, but run the fdddddddd22804 program in parallel with the Jtag Up program running.
Using the Jtag Up eliminates the 115 foot shorting of the STi5518 and makes it easier to work with Jkeys.
Jkeys should detect receiver processor without error box.
22805
Click on the Developement Panel:
download and install the unlock_28FxxxC3.bin trap at 80000140 (or 800002D0).
Then click Flash Programing and select the flash type 3900 or 4700 (or try some others to show the flash type 29LV160 or similar). flash memory should normally be erased and written.
22806
Fill in factory software
Press the "Program" button for Chip / Selector Programming, a window is displayed.
22807
Click Yes, after which the file overview window appears, select the native firmware. In our case - the file 2300.bin from the archive fdddddddd22802
After that, the programming of the receiver begins, which will last about 2-3 minutes.
After filling the indicator to 100%, click OK.
Close the program, turn off the receiver from the network.
Disconnect the Jtag cable.
We turn on the receiver, after loading the language selection menu should appear on the screen.
Flashing with the latest software version
To replace the factory software in the SkyOn 2300 receiver with new software, you need a null modem cable with pinouts as shown:
22808
1st stage
1. We connect the receiver to the computer with a null modem cable.
2.Launch the SkyonLink40 program from the .fdddddddd22809 archive
3. Turn on the receiver to the 220V network and put it into Standby mode.
press the Setup Com button in the SkyonLink40 program and select the computer port number to which the receiver is connected and press the OK button. if the connection between the computer and the receiver is successful, we will see the progress window in the program and a message about a successful connection.
5. Presses the Upgrade button in the SkyonLink40 program 3 - a window will open with a prompt to enter a password - enter 1234567 and Enter.
6. Next, a window will open asking you to select a file to download - select the file boot_2300
7.We observe the process of rewriting (d 001 - d 100, then F 001 - F 100), until the message Good appears on the display of the receiver.
8.Close the SkyonLink40 program and turn off the receiver.
Attention!!! The 1st stage is applied only once when replacing the factory software with new software !!!
2nd stage
1.Launch the Skyon 2300 Updater program from the archive.
2.Select the number of the comport of the computer to which the receiver is connected (the Com port button)
3.Select the file to be loaded into the receiver (file - open - path to the folder - SkyOn_2300 (Ver0510)
4. Press the record button in the Skyon 2300 Updater program and turn on the receiver to the 220V network.
5.We observe the process of downloading the software (dn 00-dn 99, then ch01-ch99), until the message of the program about the successful completion of the download, then done on the display of the receiver will light up and the receiver will reboot itself and turn on into operation mode.
6. Turn off the receiver from the 220V network.
7. Disconnect the receiver from the computer.
The receiver has been restored! The software has been updated!
and accidentally shorted LAN
I think the experts told you a lie. To a fried setevukha jetag is like a dead poultice. If you short-circuited the LAN, the answer to post No. 219 here is clearly suitable for your case: Please register to view this link to the page.
For the rest, maybe someone will come in handy.
Found instructions on newssat.ru:
Recovery flash dreamsky 9300
These receiver models do not have RS232 connectors, with which we could connect it to a computer and try to restore it. There is also no possibility to connect jtag to these models of the dreamsky 9300 receiver. So if you have problems with the receiver software, there are two ways to restore the software in these receiver models.
The first method is one of the most difficult but reliable methods that requires knowledge and skills in working with microcircuits - this is a way to restore the receiver software using a programmer. First, you need to remove the flash using a hair dryer, then download the dump for the dreamsky 9300 models, and fill this dump into the flash. Dump for dreamsky 9300 can be downloaded below.
The second method does not require special knowledge and skills that anyone can use. But in this way, it is possible to restore the wrong receivers that have problems with boot files or the inability to update the software via a usb flash drive. To begin with, we take a usb flash drive, it is advisable to use a flash drive with a volume of no more than 1 G. We format the USB flash drive on a computer in FAT32 format, then turn off the receiver from the network, connect the USB flash drive to the receiver and turn on the receiver to the network. When turned on, the receiver generates a boot file that is saved to the usb flash, then turn off the receiver, connect the usb flash drive back to the computer, and using the total commander program, mark the file sheet on the usb flash drive and press F4, in the opened text document we will see the line (upgrade boot error ???????????) then there is a problem with the boot file of the firmware. To solve this problem, we need software version v116, this software version contains a boot file with the ability to update the software automatically when the receiver is connected to the network. You can download the software for dreamsky 9300 receiver v116 below. After downloading, unzip the archive and transfer the upgrade folder to a usb flash drive. Do not rename the upgrade folder and transfer strictly the upgrade folder to the flash. Turn off the receiver from the network, connect the usb flash drive to the receiver and turn on the receiver to the network. If you followed the instructions described above, then on the display of the receiver you will see U- and the countdown of the software update, be sure to wait until the software update is finished, in no case unplug the receiver from the network until it reboots itself and turns on again.
With a good receiver, both you and your children will have a great time watching TV, review of the cartoon Puss in Boots on the Camera ... motor!
After that, take out the USB flash drive and enjoy watching your favorite channels. If you wish, you can then flash the receiver to a newer firmware version.
Attention in the Dreamsky 9300 it is not recommended to connect or disconnect the LAN cable to the network when the receiver is turned on, since there is no galvanic isolation over the LAN input. Which leads to an instant failure of the LAN chip, if when you turn on the receiver to the network you see the inscription boot, and nothing happens, try to unsolder the LAN chip located behind the LAN input, and turn on the receiver to the network. If your receiver turns on, then you should replace this microcircuit.
Although it is unpleasant, sometimes it happens and satellite receivers fail. Mostly when an unsuccessful attempt to flash the device.
Today we will try to help in such a situation, in particular if the outage of satellite receivers of the trademark U2C.
How to recover U2C satellite receiver after unsuccessful firmware?
It happens that during the firmware process the light went out or the child pulled the cord out of the socket, but the firmware file was simply “broken”. In short, the result is obvious (sometimes it can be done).
We have a "dead" satellite receiver.
The first and easiest method for recovering U2C is to try to reflash it from a USB flash drive in this way force_upgrade_rom.bin.
However, under this name there may be the firmware you need - just rename it and throw it into the root of the flash drive.
How to flash U2C from a USB stick?
Option 1: Oldest bootloader:
We insert the USB flash drive into the receiver, and connect it to the power supply (the process will start automatically).
Option 2: Second version of the bootloader:
We insert the USB flash drive into the receiver, press the OK button on the remote control, and connect the receiver to the power supply.
Option 3: Latest bootloader version:
We insert the USB flash drive into the receiver, hold down the button on the front panel (for receivers U2C MINI: button on the left; for receivers U2C MAXI button in the middle), and connect the receiver to power


After the end of the process - remove the USB flash drive.
If the receiver still does not respond, but you tried it with several flash drives and “clean” (without channels and keys) firmware.
Second U2C recovery option- go to preparation and firmware via COM Port. Why to prepare - yes, because the U2C res does not have a standard rs-232 connector, that is, COM. He has a minijack there.
We solder according to this scheme.

Then we move on to the firmware with the help of this U2C S + RS232 Restore or the old version of R estorU2C.zip.

Select the com port number, rename the firmware to a file rom.bin, and start the firmware process.
After that a window will appear such a window.

Don't touch anything. After the end of the process, you should receive a working device.
If not, and nothing succeeded, then the next stage will probably be beyond your power. Since the bootloader or even the flash drive has suffered in the receiver.
The subsequent procedure involves unsoldering the flash drive (possibly replacing) and flashing the bootloader or dump using the programmer.
And here, in order not to repeat the important points, I recommend that you first read the preface to the article:.
In this case, most often you will have to turn to two general options for set-top boxes on any processors - a universal remote control or a programmer, and proprietary options for ALi will have their own specifics.
So, if after an inappropriate firmware the set-top box still booted, but the remote control stopped working, then we buy a universal remote control, for example, considered in. After picking up the code and gaining control, we return the original firmware.
Or we leave someone else's, if everything works fine with her.
In addition, an essential function appears with it - learning from the old TV remote control, i.e. it will be possible to use only 1 remote control, not 2 (set-top boxes and TV).
Undoubtedly - the most versatile, but also the most radical option - to solder the flash memory, program it with the original firmware and solder it back in.
Of course, you can try without soldering, through a clothespin adapter, but in addition to its cost from 200 r, it is necessary to somehow resolve the issue with the power supply of the flash on the board, because not only it is connected to + 3.3V, but the programmer will not pull an extra load, therefore, for the reliability of programming, most often the flash has to be unsoldered. Well, then, of course, solder it back.
Before connecting to the set-top box, I recommend that you first check the work in any terminal program, for example, in (HyperTerminal), shorting TX and RX together.
If, when you press the keys, the characters will be repeated on the screen, then the connection is working.
And if something still doesn't work when connected to the set-top box, then try swapping TX and RX.
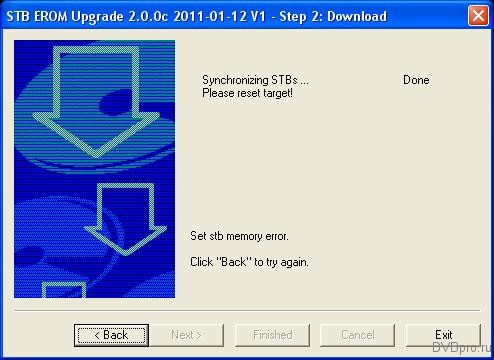
At off set-top box, run the program, specify the COM port, the firmware file and click Next:

Messages will appear Synchronizing STBs ... and Please reset target!
 At this moment it is necessary turn on prefix and download via UART.
For M38xx series processors, TX and RX pins are:
- ALi M3812 - 114, 115
- ALi M3821 - 8, 7
- ALi M3821 P — 8, 7
However, this utility when connected to M38xx after synchronization Done, gives an error message Set stb memory error:
 Perhaps a more modern utility is required specifically for the M38xx series, but so far this has not come across.
Of course, traditionally, ALi processors always have pins:
 or, at least, the corresponding breakpoints on the back of the board, going to the processor pins:
| ALi | M3812 | M3821 | M3821 P |
| 1 TRSTJ | 109 | 105 | 40 |
| 2 TDI | 110 | 106 | 41 |
| 3 TDO | 111 | 107 | 42 |
| 4 TMS | 112 | 108 | 43 |
| 5 TCLK | 113 | 110 | 44 |
| 6 GND | GND | GND | GND |
However, despite the simplicity of connecting to the EJTAG (for example, via the LPT port of a computer), the main problem is again the lack of proprietary programs (knowing the structure of M38xx processors).
If anyone knows of certain utilities for M38xx, please write in the Comments. Thanks!
And one more option for ALi processors, but not Emergency Recovery, but - Automatic update via USB- without even touching the remote control or front panel.
I will immediately stipulate the key condition and the main disadvantage of this method: it will be required new software version, i.e. the firmware that we will update the set-top box must be version above than it was installed.
In order to flash the receiver automatically, you need to rename the unpacked firmware file to auto.abs(or auto1.abs, auto2.abs), place it in the root directory of the USB drive and connect the drive to working receiver.
After the USB system recognizes the media, the update process will start automatically, and you just have to wait for it to finish and auto-reboot.
Update modes:
- for updating in the " ON"(" Main codes ") the file must have the name: auto.abs
- for updating in the " Software + channel list"(" All codes ") the file must have the name: auto1.abs
- for updating in the " Software + bootloader"(" All firmware ") the file must have the name: auto2.abs
Using World Vision Premium as an example, rename the new firmware version to auto2.abs and connect the USB stick to working receiver.
As usual, the flash drive will be detected first, and then automatically the standard flashing procedure starts:
 at this time there are messages on the console:
shugltest usbupg_item_sel_callback event: 1, bID: 1, param1: 16
shugltest usbupg_item_sel_callback event: 13, bID: 1, param1: 0
shugltest usbupg_item_sel_callback event: 2, bID: 1, param1: 16
shugltest usbupg_item_sel_callback event: 1, bID: 2, param1: 16
shugltest usbupg_item_sel_callback event: 13, bID: 2, param1: 4
shugltest win_usbfilename_remind tempstr_len: 19
shugltest usbupg_item_sel_callback event: 2, bID: 2, param1: 16
shugltest usbupg_item_sel_callback event: 1, bID: 3, param1: 16
shugltest usbupg_item_sel_callback event: 2, bID: 3, param1: 16
user_mem1.buf =
user_mem1.buf =
user_mem1.buf =
—Sys_watchdog_reboot-
and the console reboots itself.
If you then slip again auto2.abs, then there will be no more flashing, tk. there is already the same version.
So there are 4 options:
- Universal remote.
- Programmer.
- For M360x via UART.
- Automatic update via USB.
As already noted at the very beginning, most often you will have to use the first two universal ones. But nothing prevents you from trying the last two methods first.
Well, and, as usual, it is worth reminding again:
EVERYTHING YOU DO WITH YOUR BOX, YOU DO AT YOUR OWN RISK!
A little more than two years ago, the Sat-Integral company, in addition to new models of satellite receivers, presented to the world the terrestrial DVB-T2 receiver Sat-Integral 5050 T2. Today, when the hype for terrestrial receivers has subsided and there is time to think about what to buy for receiving terrestrial channels, we offer you our review of the new terrestrial receiver Sat-Integral 5052 T2.
If the previous model Sat-Integral 5050 T2 could boast of PVR capabilities, then the new product, according to the manufacturer, has a fairly rich multimedia functionality for this kind of devices.
Despite the fact that almost all the latest models of Sat-Integral satellite receivers operate on GUOXIN processors, the Sat-Integral 5052 T2 terrestrial receiver is built on the Sunplus 1509 processor.
Sat-Integral 5052 T2 specifications:
Metal case 148x98x36 mm
USB port: 2xUSB 2.0 (front and rear)
Support for WiFi adapters MT7601 / RT5370
PVR and TimeShift function using external USB sticks
Frequency range: 174-230MHz (VHF) 470-862MHz (UNF)
Signal level: -75 ~ -20dBm
Possibility to power an active antenna (short-circuit protected)
Video decoder: MPEG-1, MPEG-2, MPEG-4, HD, H.264, DivX (free version)
Video Resolution Support: 1080p, 1080i, 720p, 576p and 576i
Image format
In the fall of 2018, the Sat-integral team pleased the satellite receiver market with two new products at once, a combined satellite-terrestrial receiver Sat-Integral S-1311 HD Combo and a new version of the popular Sat-Integral S-1412 HD Rocket receiver. Today, we will try to introduce you to the latter.
Taking into account the fact that analogue television has already been disconnected in Ukraine, it is also worth paying attention to the combined model, which is slightly simpler in functionality and hardware, but also has the ability to receive DVB-T2 channels of the standard. But if you have a fairly new TV set that comes with a DVB-T2 tuner, then we advise you to pay attention to this model.
The Sat-Integral S-1412 HD Rocket receiver, despite its potential, belongs to the segment of budget receivers. Unlike its predecessor Sat-Integral S-1223 HD Rocket which ran on Ali3511, this model uses GUOXIN GX6621 processor with H.265 / HEVC codec support
The packing box is the same familiar receiver design in the starry sky. The front panel of the receiver is displayed in working state. Unfortunately, there is no remote control and rear panel. H.265 / HEVC codec logo next to Full HD icon. A short list of technical characteristics and capabilities on the sides of the package, available in Russian and English.
Sat-Integral USB 2.0 - LAN Ethernet adapter (RTL8152B)- ideal for work with S-12X8 / S12X7 / S1225 HD receivers. Compared to WiFi connection, wired communication allows you to work at higher speeds and provides a stable connection to the Internet. This ensures faster and more convenient operation with the receiver's network applications.
The presence of a USB2.0 port makes it easy to use the Sat-Integral USB-LAN adapter to connect a large number of devices to the network, such as: PCs, laptops, tablets, etc. running the popular Windows / Linux / Android / IOS operating systems.
Based on the USB2.0 standard, the adapter increases the data transfer speed up to 100 Mbps, which will be enough to complete any tasks assigned to it.
Specifications:
Type: USB - Ethernet (RJ45)
Interface: USB2.0
Chip: Realtek RTL8152B
Network speed: 10/100 Mbps
Cable length: 15cm
Size: 65x20x15mm
Net weight: 18g
White colour
After the appearance of a very successful model Sat-Integral S-1225 HD Able, which can rightfully be called the killer of SD receivers, many users wanted to see this functionality for little money, but in a metal case. Sat-integral has taken these wishes into account and has released the new Sat-Integral S-1227 HD Heavy Metal. The receiver has similar functionality, but differs in the input tuner and processor revision, which in turn increased the cache. So the processor in this model comes with the letter "C" at the end of the GUOXIN GX6605C-Dolby and also works with a clock frequency of 600 MHz. 64 megabytes of RAM and 4 megabytes of flash memory. Both models work with support for Dolby Digital sound, but only the Sat-Integral S-1227 HD Heavy Metal model has an S / PDIF connector for connecting to a multi-channel sound receiver.
You can visually compare the receivers in the catalog
The packaging box is in the same colors as its predecessor, but, logically, it is larger. On the front side, the receiver is in operating mode, demonstrates the possibility of display and indication. Unfortunately, the remote control and back panel are not shown on the packaging box. Below are the logos of the supported formats and capabilities of the receiver, including support for 3G modems and Wi-Fi adapters, which is logical, since this model does not have a LAN connector. On the sides there is a short description on
Along with the new satellite receivers, Sat-integral has launched the Sat-Integral 5050 T2 terrestrial DVB-T2 receiver with PVR capabilities. Considering that there is nothing much to expect from a terrestrial receiver, it is banal to receive 32 terrestrial channels in the national digital terrestrial broadcasting network, the ability to record the necessary programs with subsequent viewing, and, for a certain group of people, the ability to play video and audio content from a USB drive. The main market needs in Ukraine are a good picture and a low retail price.
For those who only need national channels, who do not want to spend more money on installing a satellite dish and are tired of the snow on analogue channels, you can buy this model and get a little closer to digital TV.
Small packing box. The front panel shows the front panel of the receiver with a working display. Below are the icons of the supported formats and receiver capabilities. For simplicity, a crossed out satellite dish is indicated and a terrestrial one is drawn. On one of the sides, there are drawn ways to connect to a TV. This is an unusual practice, but for people who do not really understand this, it can help visually determine the possibility of connecting, for example, to their old TV. On the other side of the box is a list of technical specifications for the Sat-Integral 5050 T2. Back


