BIOS (English) basic input/output system- "basic input-output system") - a piece of system software implemented in the form of firmware, which is intended to provide the operating system with an API for accessing computer hardware and devices connected to it
When you turn on the power of the computer, during the initial boot, using the programs recorded in the BIOS, a self-test of the computer hardware occurs - POST ( power-on self test). During POST, the BIOS checks the functionality of the controllers on the motherboard, sets low-level parameters for their operation (for example, the bus frequency and parameters of the central microprocessor, RAM controller, FSB, AGP, PCI, USB bus controllers)
During POST, a prompt appears at the bottom of the screen: Press DEL to run Setup, - DEl (Delete) is the most common key to enter BIOS Setup
BIOS entries allow the user to configure various settings: enable or disable devices or available ports, set device boot priority or device order. Some advanced settings also allow the user to adjust the performance of the computer, such as CPU clock multiplier and system bus (FSB) frequency for overclocking, DRAM memory settings, for flashing new BIOS versions, etc.
Keyboard Shortcuts
To enter the BIOS, the user must press a specific key or key combination during the initial BIOS boot screen. The following is a list of PC OEM manufacturers and the key or shortcuts to enter the BIOS. Note that some manufacturers may have multiple BIOS access methods depending on when the BIOS was released.
| Computer manufacturer | Keys |
| Acer(Aspire, Power, Veriton, Extensa, Ferrari, TravelMate, Altos) | Del or F1 |
| Acer(Altos 600 Server) | ctrl+alt+Esc or F1 |
| Acer(Old PC) | F1 or ctrl+alt+Esc |
| ABIT | Del |
| ASUS | Del |
| AMI(American Megatrends AMIBIOS, AMI BIOS) | Del |
| AMI(American Megatrends AMIBIOS, AMI BIOS) - old version | F1 or F2 |
| ASRock | Del or F2 |
| Award BIOS(AwardBIOS) | Del |
| Award BIOS(AwardBIOS) - old version | ctrl+alt+Esc |
| BIOSTAR | Del |
| Compaq(Presario, Prolinea, Deskpro, Systempro, Portable) | F10 |
| Compaq(Old Computers) | F1, F2, F10, or Del |
| chaintech | Del |
| cybermax | Esc |
| Dell(XPS, Dimension, Inspiron, Latitude. OptiPlex, Precision, Vostro) | F2 |
| Dell(Older 486 Models) | ctrl+alt+Enter |
| Dell Dimension L566cx System | Del |
| Dell(Older Laptop Models) | fn+Esc or fn+F1 |
| Dell(Some Models) | Twice reset |
| ECS(Elite group) | Del or F1 |
| eMachines(eMonster, eTower, eOne, S-Series, T-Series) | Del or Tab |
| eMachine(Some Older Computers) | F2 |
| Fujitsu(LifeBook, Esprimo, Amilo, Tablet, DeskPower) | F2 |
| Gateway Using Phoenix BIOS(DX, FX, One, GM, GT, GX, Profile, Astro) | F1 |
| GIGABYTE | Del |
| Hewlett-Parkard(HP Pavilion, TouchSmart, Vectra, OmniBook, Tablet) | F1 |
| Hewlett-Parkard(HP Alternative) | F2 or Esc |
| Hewlett-Parkard (HP) Tablet PC: | F10 or F12 |
| IBM ThinkPad using Phoenix BIOS | ctrl+alt+F11 |
| IBM(Older Computers or Notebooks) | F2 |
| Intel | F2 |
| Lenovo(ThinkPad, IdeaPad, 3000 Series, ThinkCentre, ThinkStation) | F1 or F2 |
| Lenovo(older products) | ctrl+alt+F3, ctrl+alt+Ins or fn+F1 |
| MSI(Micro Star) | Del |
| Micron(MPC Computers ClientPro, TransPort) | Del or F1, F2 |
| Microid Research MR BIOS | F1 |
| NEC(PowerMate, Versa, W-Series) | F2 |
| Packard Bell(8900 Series, 9000 Series, Pulsar, Platinum, EasyNote, imedia, iextreme) | Del or F1, F2 |
| Phoenix BIOS(Phoenix Award BIOS) | Del |
| Phoenix BIOS(Phoenix Award BIOS) - old version | ctrl+alt+S, ctrl+alt+Esc, ctrl+alt+Ins or ctrl+S |
| Sharp(Notebook Laptops, Actius UltraLite) | F2 |
| Samsung | F2 |
| Sony(VAIO, PCG-Series, VGN-Series) | F1,F2 or F3 |
| Sony Vaio 320 Series | F2 |
| Toshiba(Portégé, Satellite, Tecra) | Esc |
| Toshiba(Portégé, Satellite, Tecra with Phoenix BIOS) | F1 |
| Zenith, Phoenix | ctrl+alt+Ins |
MSI produces a variety of computer products, including full-fledged desktop PCs, all-in-ones, laptops, and motherboards. Owners of a particular device may need to enter the BIOS to change any settings. In this case, depending on the model of the motherboard, the key or their combination will differ, and therefore the well-known values may not be suitable.
The process of entering the BIOS or UEFI for MSI is practically no different from other devices. After you turn on your PC or laptop, the first thing you'll see is a splash screen with your company logo. At this point, you need to have time to press a key to enter the BIOS. It is best to make short quick presses in order to get into the settings for sure, however, holding the key for a long time is also effective until the BIOS main menu is displayed. If you miss the moment when the PC is responsive to the BIOS call, the boot will go further and you will have to reboot again to repeat the above steps.
The main keys to enter are as follows: Del(she is Delete) and F2. These values (mostly Del) apply to monoblocks and laptops of this brand, as well as to motherboards with UEFI. F2 turns out to be less relevant. The spread of values here is small, so there are no non-standard keys or their combinations.
MSI motherboards can be built into laptops from other manufacturers, for example, as it is now practiced with HP laptops. In this case, the login process usually changes to F1.
You can also check the key that is responsible for the input, through the user manual downloaded from the official MSI website.

Naturally, if the MSI motherboard is built into a laptop from another manufacturer, you will need to look for documentation on the website of that company. The search principle is similar and differs slightly.
Troubleshooting BIOS/UEFI Login Issues
It is not uncommon for situations when it is not possible to enter the BIOS by simply pressing the desired key. If there are no serious problems that require hardware intervention, but you still cannot get into the BIOS, it is possible that the option was enabled earlier in its settings. "Fast Boot"(fast loading). The main purpose of this option is to control the startup mode of the computer, allowing the user to manually speed up this process or make it standard.
To disable it, use a utility with the same name from MSI. In addition to the fast boot option switch, it has a function that automatically enters the BIOS the next time the PC is turned on.
The solution is designed for motherboards, so you need to search for the model installed in your PC / laptop. The MSI Fast Boot utility is not available for all motherboards from this manufacturer.

When the described instruction does not bring the desired result, most likely the problem is the result of incorrect user actions or failures that occurred for one reason or another. The most effective option would be to reset the settings, naturally, in ways that bypass the capabilities of the BIOS itself. Read about them in another article.
It will not be superfluous to familiarize yourself with the information that may affect the loss of BIOS performance.
Getting into the BIOS / UEFI can be problematic for owners of wireless or partially inoperative keyboards. In this case, there is a solution at the link below.
This concludes the article, if you still have difficulty entering BIOS or UEFI, write about your problem in the comments, and we will try to help.
I am glad to meet you again, my dear readers. I could not ignore the category of users who have equipment from the well-known Taiwanese company Micro-Star International.
And today, especially for them, we will analyze how to enter the BIOS on an msi laptop. I am sure that many have faced this task, but because of the fear of penetrating “the most important settings”, they abandoned this idea.

There are many settings and I will not describe them here. A lot of things can be configured there :) Maybe someday I will cover this in detail.
In addition, working with BIOS is sometimes the only way to bring back to life, for example, your favorite MSI GE gaming laptop or recover lost data.
"Delete" is your pass to system settings
When talking about computers for other manufacturers, I usually note that different buttons can be used to enter, and their choice depends on the configuration of the PC and a number of other parameters.
For MCI products, everything is extremely simple, because it is one of the few companies that provide their equipment with their own motherboards and video cards.
Therefore, no matter what level you have a laptop (heavy duty GT series, or designed for minimal tasks GL), the BIOS will be the same for them and the ways to enter it will also not differ.
However, let's not digress, but get down to business:
- Turn off your laptop (but not from the network if the battery is missing or empty);
- We launch it and carefully monitor the screen;
As soon as you see any image or symbols, start periodically (with a frequency of 1-2 times per second) to press the "Delete" key. If that doesn't work, try other key options or keyboard shortcuts (F1; F2; Fn+F2);

Having managed to do this before starting the operating system, you will find yourself in the BIOS settings mode.
Bah, familiar AMI BIOS!
Typically, laptops such as CX and gaming G and P series are familiar to many interface from American Megatrends Incorporated (AMI). Here, if you understand the general principle, it is quite easy to navigate:
- A tab with the main menu (Main) immediately opens, where technical data about the system and PC are presented;
- Next, you can explore advanced settings in Advanced;
- Check security settings in Security or power options in Power (depending on the version);
- The “Boot” section is most in demand, where boot devices are registered (if you are reinstalling the system, then you are here);

I will not dwell on a detailed description of all functions. But let me remind you that after each change to the BIOS, do not forget to save them.
Insidious UEFI
If you, my dear readers, are owners of the latest laptops from MSI. For example, GP 72 or other models supplied with licensed Windows installed. Then it is possible that, after performing the usual steps to enter the BIOS, a pleasant interface will open in front of you.

He, of course, is beautiful and can even be Russified. But the idea of changing the operating system can be extremely unfriendly. To switch to the familiar BIOS and get extended access to the desired system functions, you will need to disable the Secure Boot mode.
To do this, in the "Settings" menu we find the boot options. And for the “Boot Mode Select” item, set the “Legacy + UEFI” mode. Try again to enter the BIOS and you should be fine.

Now, my dear readers, I have everything about how to enter the BIOS on an msi laptop. It was a pleasure to help you with useful advice.
Good luck to everyone and see you on the pages of my blog.
You have bootable cd-dvd and you want to install an operating system on your computer, in order to do this you will need to tune accordingly BIOS and boot from disk. We can also use the device selection in the boot menu, but this function is not always present, for example. on older motherboards. There is also no universal button for entering BIOS or boot menu. Many motherboard manufacturers have assigned different keys.
The surest way to identify such keys is to read the documentation for this laptop or computer, but whatever key is, you must always press it at the very beginning of the download. As soon as you turn on your computer, it automatically starts the program located in the BIOS BOOT-ROUTINE, which in turn calls the subroutine POST(English) Power On Self Test), it checks the processor, random access memory (RAM), hard disk drive (HDD), motherboard elements and other main peripherals. one short signal indicates that such a self-test completed successfully. This is what the passage might look like. POST:
The most common key to enter the BIOS is DEL, other options are listed below. On the screen you will see the following prompt: Press DEL to run Setup", i.e. press the key DEL to log in to BIOS. Also during the passage POST a graphical splash screen may appear showing the name of the manufacturer of the computer or motherboard.
List of the most common keys to enter the boot menu:
Acer- Esc or F12 or F9; Asrock- F11; Asus- Esc or F8; Compaq- Esc or F9; Dell- F12; ECS-F11; Fujitsu-Siemens- F12; gigabyte- F12; HP- Esc or F9; Intel- F10; Lenovo- F12; MSI(Micro-Star) - F11; Packard Bell- F8; Samsung- Esc; Sony Vaio- F11; Toshiba- F12
The menu for selecting boot devices looks something like this:

You just need to select the desired device from the list and click Enter.
List of the most common keys to enter BIOS Setup : ABIT- Del; Acer(Aspire, Altos, Extensa, Ferrari, Power, Veriton, TravelMate) - F2 or Del; Acer(old models) - F1 or Ctrl+Alt+Esc; ASRock- F2 or Del; ASUS- Del; BIOSTAR- Del; chaintech- Del; Compaq(Deskpro, Portable, Presario, Prolinea, Systempro) - F10; Compaq(old models) - F1, F2, F10 or Del; Dell(Dimension, Inspiron, Latitude, OptiPlex, Precision, Vostro, XPS) - F2; Dell(old models) - Ctrl+Alt+, or Fn+Esc, or Fn+F1, or Del, or Reset twice; ECS (Elitegroup)- Del or F1; eMachines(eMonster, eTower, eOne, S-Series, T-Series) - Tab or Del; eMachines(some old models) - F2; foxconn- Del; Fujitsu(Amilo, DeskPower, Esprimo, LifeBook, Tablet) - F2; GIGABYTE- Del; Hewlett-Parkard(HP Alternative, Tablet PC) - F2 or Esc, or F10, or F12; Hewlett-Parkard(OmniBook, Pavilion, Tablet, TouchSmart, Vectra) - F1; Intel- F2; Lenovo(3000 Series, IdeaPad, ThinkCentre, ThinkPad, ThinkStation) - F1 or F2; Lenovo(old models) - Ctrl+Alt+F3, Ctrl+Alt+Ins or Fn+F1; MSI(Micro-Star) - Del; Pegatron- F2, F10 or Del; Samsung- F2; Sony(VAIO, PCG-Series, VGN-Series) - F1, F2 or F3; Toshiba(Portege, Satellite, Tecra) - F1 or Esc.
AMI BIOS - change device boot priority.
When changing settings and navigating the BIOS menu, use the Enter, +/-, and arrow keys on your keyboard. Move with the arrows to the tab Boot and select Boot Device Priority:

Here we will see boot sequence: floppy drive first ( floppy drive), then the hard disk ( hard drive), and the third device is turned off ( Disabled). If you want to boot from a disc, then you need the CD-DVD drive to be the first device on this list. Use the arrows to switch to the first device ( 1st boot device), press the key Enter and from the menu that appears select cdrom. Booting from a flash drive is done in the same way.

To exit the BIOS and save the settings made ( Save and Exit), press the key F10 and confirm ( Ok) key Enter.

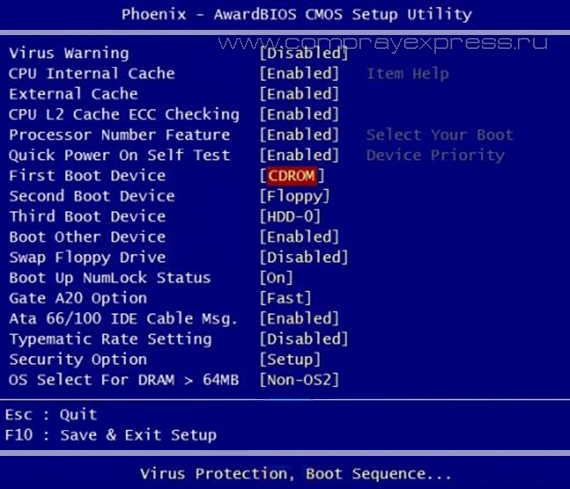
Phoenix-Award BIOS - change device boot priority
Choose from the menu Advanced BIOS Features and enter ( Enter).

Here, if we want to boot from the drive, we need to make this device was first on the list. Use the arrows to switch to the first boot device ( First boot device) and change to CDROM. Then exit with saving the settings made ( Save and Exit) by pressing F10.
Error beeps when passing Post
During the initial self-test of the system (pass post) errors may occur. If they are not critical, then after a certain message is displayed, the computer will continue to boot. If serious errors are found, the computer system will try to report them to the user, but it is often impossible to display such information on the screen.
In this case, you will need to follow sound signals(they are served by the system speaker, speaker, upon completion of the procedure post). With the help of them, the system reports the results of self-testing. Below is list of such signals for different BIOS versions ( BIOS). Therefore, if your computer "beeps", then you can easily determine the malfunction of the PC.
AWARD BIOS signals:
No signals
Continuous beep- Faulty power supply.
1 short- no errors found.
2 short- Minor bugs found.
3 long
1 long and 1 short- Problems with RAM.
1 long and 2 short- a problem with the video card.
1 long and 3 short- Keyboard initialization error occurred.
1 long and 9 short- an error occurred while reading data from the permanent memory chip.
1 long repeat- Memory modules are installed incorrectly.
1 short recurring- problems with the power supply.
AMI BIOS Signals:
No signals- the power supply is defective or not connected to the motherboard.
1 short- no errors found.
2 short- RAM parity error.
3 short- an error occurred during the operation of the first 64 KB of main memory.
4 short- the system timer is faulty.
5 short- Faulty CPU.
6 short- Faulty keyboard controller.
7 short
8 short- Faulty video memory.
9 short
10 short- Unable to write to CMOS memory.
11 short- external cache-memory (installed in slots on the motherboard) is faulty.
1 long and 2 short- Faulty video card.
1 long and 3 short- Faulty video card.
1 long and 8 short- problems with the video card or the monitor is not connected.
PHOENIX BIOS Signals:
1-1-3 - CMOS data write/read error.
1-1-4 - BIOS chip checksum error.
1-2-1 - Faulty motherboard.
1-2-2 - DMA controller initialization error.
1-2-3 - error when trying to read/write to one of the DMA channels.
1-3-1 - RAM regeneration error.
1-3-3
1-3-4 - error when testing the first 64 KB of RAM.
1-4-1 - Faulty motherboard.
1-4-2 - RAM test error.
1-4-3 - system timer error.
1-4-4 - error accessing the I / O port.
3-1-1 - Error initializing the second DMA channel.
3-1-2 - initialization error of the first DMA channel.
3-1-4 - Faulty motherboard.
3-2-4 - keyboard controller error.
3-3-4 - video memory test error.
4-2-1 - system timer error.
4-2-3 - A20 line error. The keyboard controller is faulty.
4-2-4 - error when working in protected mode. The CPU may be defective.
4-3-1 - error while testing RAM.
4-3-4 - real time clock error.
4-4-1 - serial port test error. The error may be caused by a device using this port.
4-4-2 - error while testing the parallel port. The error may be caused by a device using this port.


