So, the new Windows 10 operating system gives its users . And what about the old proven interfaces that make working with a computer much easier? For example, through the command line, you can do a lot of operations that are difficult to implement through windows. Naturally, a lot of work has been done on bugs in Windows 10. The wandering mayhem from previous versions of systems, like piling up tiles in the Start menu, has been stopped. Therefore, it was decided to leave the command line.
Of course, in itself, such an interface is unusual for a typical user. Nevertheless, it is very convenient to work through the command line, remembering primitive commands. No need to click the mouse, everything is done by hand. And with your hands you can do everything faster if you develop the skill. Now we will tell you how to find the command line in the latest Windows 10 and start working through it.
Instant start
For advanced computer users, hotkeys have long existed. These simple combinations open any applications that do not need to be searched for several minutes through the windows. The command line in this case is opened by pressing Win + X. You can also easily right-click on the Start menu in Windows 10. A context menu will pop up, in which you should select a special item.
Looking for search
To facilitate work in Windows 10, there is a special search. Yes, the developers have implemented such a function through the image of a magnifying glass on the taskbar. The hand wants to click on an attractive icon. Let's do it. A search bar will open, in which you need to type: cmd. If you want to run as administrator, which is very necessary almost always, then just right-click on the search results and select the appropriate launch.

Familiar windows
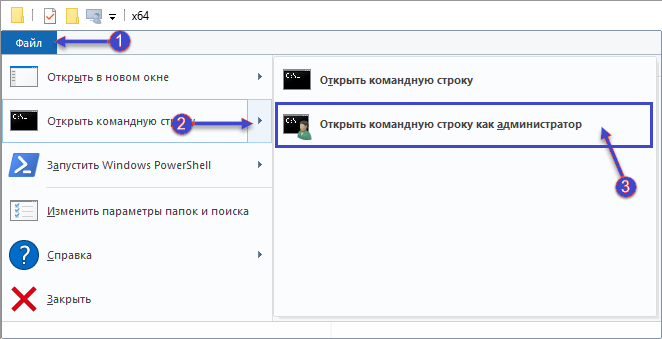
In Windows 10, there is no escape from the familiar windowed interface. Actually, the system is based on this principle. Therefore, there is an easy way to launch the command line through the standard explorer. In any folder there is a File menu, which opens with a mouse click. Naturally, an item with the desired name will appear, where you can open the command line even as an administrator with one click.
In such simple ways, you can open the command line so that it is easy to work through it later. And how to do it? It is enough to type typical commands on the network. Of course, you can't remember everything all at once. But if you train regularly, then after a while the hands themselves will write the necessary commands. After all, the graphical interface not only eats up a huge amount of computer resources, but also loads the human brain with additional information, which is often superfluous.
To begin with, let's remember what recovery of the operating system gives us through the command line and not necessarily windows 10, and why this particular method should be used. Given that until the last good configuration is done not for a good mood, but to restore the machine. It happens that when you start Windows, an endless reset and restart begins, or you have a banner on the whole screen asking you to pay a fine or tax, an update or driver installation failed - the list goes on and on. It is in the above situations that the “Safe_mode_with_command_line_support” is required through which we can. I would like to start not with the very process of returning our OS to life, but with the fact that there is something to revive from - a restore point.
Return point from recovery environment
Since we are talking about cmd, then we will talk about the possibilities of creating via the command line - this is not the only way. Before you start creating a complete copy of the system partition with all the contents - our working version of Windows, you need to restart the computer using a special method:
- "Start" → Hold and click on "Restart"

- In the window that appears, select "Troubleshooting"

- "Extra options"

If you have set a password when logging in and there are more than one accounts, an additional 1 to 2 screens will appear before loading cmd:
- Asking you to select an account
- Password input field, if one is set in the account
- "Command line"

Let's enter the commands in order to properly make a copy.

Windows 10 has a useful utility - "dism.exe", which creates an image of Windows and restores the system using the command line, follow the instructions:
Type:
dism /Capture-Image /ImageFile:D:\Win10refr.wim /CaptureDir:E:\ /Name:”Windows 10”

Be patient, here the backup will be ready.

This backup creation is complete, exit the system recovery mode.
Windows backup
You can also create a restore point from the command line in Windows 10 itself, for this we need to launch the console using hot keys, then follow the instructions:
- + [X] → "Command line (Administrator)" → OK

Now we will create a directory for a copy of Windows, enter:
- "mkdir C:\Imagen-Restaurar" and press [enter]

Nothing will happen after the input - the console will return the answer, only as a result of completion. Therefore, for 20 to 30 years, avoid any manipulation of the computer.
I would like to note, in order to avoid errors - do not put spaces between words, replace "-"; under no circumstances change the names of the directories so that there is no failure.
Here, "C:" - there will be a copy - choose your own recording path, be it an external screw, or another local disk. And "Imagen-Restaurar" is the name of the folder. After the message about successful completion appears, make sure that “CustomRefresh.wim” is in place, if it is not there, restart and try again.
Run system recovery from console
Through the command line - restore the Windows 10 system, there are two ways.
Important! If Windows crashed due to a virus attack, first go to "Safe_mode" (safety mode), conduct a deep analysis with an antivirus.
- If only safe_mode is available with the console, pressing .
- Type in: "rstrui.exe" → "System_Restore" → "Restore_to_an_older_computer_state".
Remember that after recovery, nothing can be changed, only after a full recovery, you can choose another version that is.
- Depending on where the copy of Windows was recorded, this media must be inserted into the computer and then step by step:
- Start" → Hold and left click "Restart"
- Next "Troubleshooting"
Hello! People, in this publication we will continue to talk about Windows 10 recovery via command line. I know that many users do not like to tinker with manually entering various combinations, but practice shows that these methods are the most effective.
Again, perhaps someone will think, they say, why bother so much, if you can just reinstall the damaged operating system and everything will be fine. I agree, but what to do in case of problems on the office computer?
Indeed, various departmental programs are often installed on such machines, the cost of which sometimes exceeds the price tag of the PC itself. Here you will involuntarily think, especially when the system, in general, refuses to start.
So, comrades, let's move on to a detailed description of another very effective method for restoring system files, which can help even in cases of a complete system crash, that is, when it does not start.
By the way, for a better understanding of some of the parameters below, I strongly recommend that you read some of the previous materials on this topic, since this will make it much easier to understand the essence. Here they are:
Well, let's get started. To do this, we need a bootable Windows 10 USB flash drive or an installation disk. We set the BIOS to the initial boot from this media and launch the operating system installation environment.
Then, at the stage with the choice of language, press the key combination "Shift + F10" on the keyboard to call the command line:

And open a regular notepad in it:

Why do we need it? Everything is simple. Look, now we need to find out the exact letter of the system partition on which the faulty Windows 10 is installed. The nuance is that in a running installation environment, its letter can shift, that is, it can not be « C « as is the case during normal operation. Therefore, we follow the path "File-Open":

Then we specify "All files" and go to the tab "This computer". In the window that opens, you need to view the contents of the logical partitions of the computer's hard drive and find the system folder in the corresponding folders. In our case, this « D « :

How did I get it? Here is its content:

After that, close notepad and enter a combination on the command line that will start checking and restoring the integrity of system files. This is :

sfc /scannow /offbootdir=D:\ /offwindir=D:\Windows
Where "offbootdir =D" is the disk partition on which the backup storage with operating system components is located. Let me remind you that in Win 10 the default directory is " C: Windows\WinSxS ".
And "offwindir \u003d D", the partition with the installed system. That is, in our case, this is the same letter. As you can see here the main thing understand the essence and there will be no problems in the future. Now the scanning process will begin, which will take some time.
And if the backup storage is not damaged, this operation will be successful. But if errors like “Windows Resource Protection could not perform the requested operation” appear, it means that the component store itself is also broken, which makes it impossible to restore using it.
But do not despair, in this case we have a backup plan. After all, what prevents us from specifying the path to the backup files that are on the bootable flash drive or installation disk? Do you get the gist?
To do this, you need to create a folder on any logical (main, not system) partition for temporary storage of Windows 10 components from the installation distribution. This can be done, again, using the same notepad. In my case, a folder was created with the name « wintemp « In chapter « E « :

Then manually enter the following command:

Dism /image: D:\ /Cleanup-Image /RestoreHealth /Source: F:\sources\install. esd /ScratchDir:E:\WinTemp
Where "D", the partition with the installed system (inoperative). "F", the letter under which is a bootable USB flash drive or a disk with a Windows image. "E", partition with newly created folder « wintemp « for temporary files.
If your installation image contains the install. wim" instead of "install. esd " , you need to change the corresponding fragment:
Dism /image: D:\ /Cleanup-Image /RestoreHealth /Source: F:\sources\install. wim /ScratchDir:E:\WinTemp
If someone does not understand what is at stake now, return to the beginning of this article and re-read the previous publications, links to which are given as recommended. Well, we seem to have a victory this time:

From the screenshot above, we can conclude that Windows 10 recovery via the command line using a USB drive or disk was successful. It remains only to run SFC. And here it is worth repeating that the method described in the article is recommended to be used in the most severe cases, when the system does not even boot.
At this point, the publication comes to an end. If you have any questions, ask them in the comments. Instead, we will discuss your problems and look for solutions. And in conclusion, as always, I suggest watching another interesting video.
Like its predecessors, it "flies" at the most inopportune moment, everyone knows. In theory, the built-in automated system rollback tool to the last working state should work. But the problem is that it doesn't always work. And in order not to reinstall the system, you have to use system restore via the command line (Windows 10 is used or another version, it doesn’t matter). Next, a step-by-step description of the entire process will be presented using several basic methods.
Issues with automatic and manual Windows recovery
So, to begin with, let's consider why the automatic rollback tool does not work on critical failures (we are not talking about starting recovery from a working system now).
The main problem that, after trying to automatically roll back Windows to a previous state that was recorded at one of the checkpoints, is that damage to the system boot loader at such points is not fixed. That is why the same Windows 10, at the end of the process, displays a message stating that the rollback failed and requires an immediate reboot, which, in general, does not give an effect and leads to the same result.
The same goes for installing the latest updates, which Microsoft turned out to be so unfinished that they "killed" many computers around the world, and some spontaneous reboots began to be observed. Thus, restoring the Windows 10 system through the command line is almost the latest and only solution that will allow the system to be reanimated. Many users know about the actions taken only by hearsay, and some are generally afraid to use the command console. This guide will help fill this gap.
Restoring the Windows system via the command line: what is needed for this?
But let's see what tools are needed to roll back. Since Windows does not boot in stationary mode, to access the command console, you need to start at least somehow. But how?
For this, removable media with recovery or installation distributions recorded on them (optical disks, flash drives, etc.) are used. Thus, it is necessary to have such media in stock. If it is not there, you can create a bootable USB flash drive or disk quite simply on another computer terminal, using the "Recovery Center" section in the standard "Control Panel" or a third-party software package for this.
Preliminary actions
Now, to restore through the command line of a Windows system - 7 or other modification - you need to enter the command console.

To do this, in the BIOS settings, the removable device is set first in boot priority, and after the boot menu appears, in order not to look for the command line start point for a long time, the Shift + F10 key combination is used.

Now the first step is to see which partition is the system partition. The fact is that when starting from removable media, drive and partition letters may not be displayed, but numbers are used instead. At the command prompt, type diskpart and list volume in sequence. After executing the second line, you should remember the system partition, and to exit, write the exit command.
How to run system restore via command line?
Now you can start the rollback procedure. As a rule, only one operating system is installed on user terminals, therefore, to activate the process, it is enough to enter the command bcdboot c:\windows.
If two systems are installed on the computer in different partitions, you can run the command twice, but do not forget to specify the volume in which each of the systems is installed.
Note: This command is not applicable for Windows XP and may not work on some builds of Windows 7.
Alternative recovery method
Windows 10 can be made through the command line in another, no less effective way, which, however, will take more time, but it almost always works.

Enter the system partition definition commands again and find the hidden FAT32 partition in the list (for primary UEFI systems and GPT partitions, its volume will be up to 300 MB, for MBR in combination with BIOS - about 500 MB). As before, memorize the letter or section number.
Now, to start system recovery via the command line, you must enter the following commands in a strictly defined sequence (we assume that our partition is marked with the letter N):
- select volume N (select a section);
- format fs=ntfs (we format the partition into the desired file system);
- assign letter=Z (set a new letter for the hidden section - you can specify it if you wish);
- exit;
- bcdboot C:\Windows /s Z: /f ALL (we set the boot from the system partition, taking into account the hidden one);
- diskpart;
- list volume;
- select volume N (select the previously renamed partition);
- remove letter=Z (we remove the volume so that it is not displayed in the system after the restart);
- exit (exit the console).
After that, you can remove the removable device and perform a hard reboot. In theory, the restart should go without problems.
Bootloader Recovery: System File Checker
However, this approach may not work if records and sectors are damaged. Restoring Windows 10 via the command line in such a situation will have to start a little differently.
In this case, the process involves checking system files and restoring boot records, and if not possible, completely overwriting them.

At the command line, after booting from removable media, as described above, the sfc /scannow command is entered.
Actions with boot records and sectors
After its complete execution, you should check the start of the system in normal mode. If the result is zero, you should use the bootrec.exe tool, for which the fixmbr and fixboot commands are entered first, separated by a space and a right slash.

Again, after completing them, you should check the boot in normal mode. In case of a null result, the rebuildbcd line is written for this tool. As a rule, after entering such a line, the loading of the operating system resumes. By the way, this is a universal method, and recovery via the command line of an XP system can also be done using this toolkit.
Recovery via DISM
Finally, there is another way to check and rollback, which uses recovery from an image. In this case, we are talking about the DISM tool (CheckHealth or RestoreHealth).

You can use it in two ways: you can simply run a check, after which a rollback will follow, or you can set the recovery right away. In the same way, you can use two commands in sequence if, for example, the first one did not give a result. However, it is worth considering here that this process of checking and restoring system files should only be used if the SFC tool did not work. If the process stops by about 20%, you can simply reboot the system and use SFC again, which will replace the damaged system files with new ones. In general, this toolkit is considered to be the most extreme remedy when nothing helps at all, although if Windows is very severely damaged, it may not give the desired effect.
A few last words
The only question that remains unresolved is which method to use to restore the Windows 10 system through the command line. In principle, there is not much difference between them, but you should start checking or restoring system files only if it is impossible to use the first two described options. But it also happens that with critical changes it is impossible to rollback. In such a situation, there is nothing left but a complete reinstallation of the OS.
The complete guide to installing Windows 10 from a bootable USB flash drive. One of the main advantages of installing the Windows operating system from a USB is the speed of installation, especially when compared to the traditional way of installing Windows from a DVD.
To create a bootable USB flash drive for Windows 10, we will use a previous version of the Windows operating system. This procedure should not take more than 10 minutes if done correctly.
What you will need:
- For Windows 10 ISO or DVD for Windows 10
- USB - with 4GB + size
- Working Windows 7/8/8.1 PC to create a bootable USB
Important: Before you start creating a Windows 10 boot disk or USB flash drive, check your Windows 7/8/8.1 version for 32 or 64 bit. In simple terms, you cannot use 32-bit Windows to create a bootable USB 64-bit Windows .
Read carefully:
- You can't create a 64-bit Windows 10 bootable USB on a PC running 32-bit Windows.
- You need a 64 bit version of Windows 7/8/8.1 to prepare a bootable USB in Windows 10 x64.
- You you can create x86 version of Windows 10 bootable USB on a computer running x86 version of Windows 7/8/8.1
Installing windows 10
Step 1: Connect your USB drive to your Windows 7 or Windows 8 PC and move all your important data to a safe location, as everything will be deleted from the drive during the process. We also suggest that you do not connect another external hard drive, or disconnect if you have one, to avoid selecting the wrong drive when choosing a drive.
Step 2: Open a command prompt. To do this, you can type CMD in the Start menu search or press Ctrl + Shift + Enter at the same time. Windows 7 users can also go to the Start menu, All Programs, Accessories, right-click Command Prompt, and select Run as administrator. Click the Yes button when you see the UAC prompt to continue.
note that it is important to open command prompt as administrator to avoid mistakes. Most users ignore this step and end up with errors when preparing a bootable USB stick. When you launch the command prompt, you will see a UAC prompt where you need to click on the Yes button.
Step 3: At the command line, type DISKPART, and then press enter.

Now enter LIST DISK command and press the Enter key again to see all mapped drives. This is an important step to assign a drive number to your internal hard drive and your connected USB drive.

If you only have one internal hard drive or SSD, 1 will be the drive number of your USB drive. As you can see in the picture above, the disk number for my USB stick is 1.
Step 4: Type all of the following commands one by one, and press the enter key after each command.
SELECT DISK 1
(IMP: In the above command, replace "1" with the disk number of your USB disk obtained in the previous step. Entering a wrong disk number will result in data loss. So please check the disk number before entering the disk number...)
(Press the enter key)
PURE
(Press the enter key)
CREATE primary partition
(Press the enter key)
SELECT SECTION 1
(Press the enter key)
ACTIVE
(Press the enter key)
FORMAT FS = NTFS FAST
Imp: If your computer supports UEFI, please format the drive with FORMAT FS=FAT32 Quick commands.
(Press the enter key)
(Press the enter key)
OUTPUT
(Press the enter key)

Since we are not finished yet, please do not close the command prompt window. Just roll up and follow the instructions for the next step.
Step 5: If you are on Windows 8/8.1 and have a Windows 10 ISO image, right click on the ISO image and then click the Mount option to mount the ISO file.

And if you're on Windows 7, you can use Virtual CloneDrive. Highlight the drive after installing the ISO.

In this guide, we assume "J" as the drive letter of the virtual drive where you mounted the Windows 10 ISO.
And if you have a DVD in Windows 10, just insert the DVD into the optical drive and take note of the optical drive letter. You can then use that drive letter as needed.
Step 6: Open a command prompt window and run the following commands.
(Press the enter key)
Here "J" is the drive letter of your virtual drive containing the Windows 10 ISO or DVD containing the installation files.
CD BOOT and press ENTER.
Step 7: Finally, enter the following command:
Bootsect.exe / NT60K:
In the above command, replace "K" with the drive letter of your USB drive that you are making bootable.

Once you see the "Bootcode has been successfully updated on all target volumes" message, just close the command prompt window. We're almost done!
Step 8: And finally, copy all the contents of your Windows 10 ISO image to the root directory of the USB drive. You can either extract the contents of the ISO file or copy files from a mapped drive. The same procedure applies even if you have a DVD in Windows 10. You just need to copy all the files in the root directory of the USB drive.
Step 9: Now that you have a bootable USB in Windows 10, turn on the computer where you want to install Windows 10, allow booting from USB, set the boot priority to boot from USB, and then restart the computer again to start installing Windows 10. Follow the very simple on-screen instructions to complete the installation.
Enjoy the latest Windows 10 operating system


