Today we will look at:
It doesn't matter if you are installing Windows 7 for the first time, or if you have already done it many times, sometimes there are situations when the system crashes, which prevents the installation process from continuing. So, for example, one day you may notice that when you select a disk partition on which you want to install "Windows", you will see ... nothing, not a single disk in the list. Such a mistake does not happen by chance and it can be corrected, of course, if you know how to do it.
Let's look at the reasons for the loss of disks during the installation of Windows 7 and consider the steps that will help fix everything.
Causes of the problem
The problem with missing partitions during the installation of Windows 7 is usually relevant for computers, laptops and ultrabooks with processors from Intel and AMD. The fact is that the build of Windows 7 you choose may not have an integrated driver for working with the Intel RST storage system (for Intel processors) or SATA/RAID (for AMD processors). Therefore, in this case, you have several options:
- booting a Windows 7 image with the necessary drivers;
- custom driver integration for Intel RST or SATA/RAID configuration.
Where to look for a working assembly of Windows 7, if you are an opponent of the official Microsoft website - your problems. We will not provide links to unofficial assemblies. But if you settled on the option of installing the missing drivers, then further you can read the instructions on how to do it correctly.
Driver download
If your PC or laptop has an Intel processor, then you need to follow this link and download the same driver.
For owners of devices with AMD processors, in any search engine, enter the key phrase "SATA / RAID driver * laptop or motherboard model *", then follow the appropriate link and download the driver.
Driver installation
After the driver has been successfully downloaded, you will need to unzip it into . If you use a disk to install Windows, then unzip the archive with the driver to a USB flash drive, which you then connect to the laptop (it is advisable to do this even before starting the device, otherwise there is a possibility that the flash drive will not be recognized).
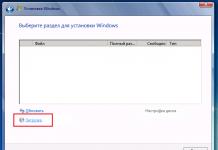
Start the installation of Windows 7 again and when you reach the partition selection window, click on the Download button.

In the Browse folder window, specify the path to the driver (you need to specify the path to the flash drive). After that click OK.

When the driver is installed, all existing partitions will reappear in the list, after which you can continue installing Windows 7.
Outcome
Summing up this topic, we can say that the process of fixing this problem is quite simple. The main thing here is to download the correct drivers, so be very careful at this stage. Otherwise, we are always ready to help you if you have any questions or problems. Feel free to ask for advice in the comments, and we will definitely help you.
When installing Windows 7 on a brand new laptop from my external hard drive Zalman ZM-VE200 with CD / DVD drive emulation running via USB, I encountered an error. The system refused to install, not finding the drivers needed for installation. No resets of BIOS settings, changing the order of boot disks, changing the installation disk / image to other editions, changing the 32-bit system to 64-bit did not help either.
The message popped up:
A required optical drive driver was not found. If you have a CD, DVD, or USB flash drive containing this driver, insert this media. No device drivers found. Verify that the media you installed has the correct drivers, and then click OK. Note: If the windows setup media is in the CD/DVD drive, you can remove it while you complete this step
Error installing Windows 7
The solution turned out to be simple: I switched the external hard drive to another USB and the download went through, the installation went through the steps, the problem was solved by itself
The problem lies in the new USB 3.0 interface, the ports are usually painted blue, be careful with them when installing Windows 7 from USB flash drives and USB hard drives
Possible causes and solutions:
- Insert the installation flash drive into a regular USB 2.0 connector, not into USB 3.0. They are easy to distinguish by the color of the contacts: in 2.0 it is black, in 3.0 it is blue. Just don't plug into the blue connector. see picture
Windows 7 does not support USB 3.0 out of the box. Therefore, when installing from a USB flash drive, connect it to a USB 1.x/2.0 port. If there are only USB 3.0, you will have to stock up on drivers. - Try resetting the BIOS to factory settings. If the previous paragraph did not help, try resetting the BIOS, it helped many
- Temporarily Disable USB 3.0 in BIOS Settings Some laptops and computers have an option to disable USB 3.0. through the BIOS, and then the connector will work like a regular USB 2.0. Try to do this, install the system, and then return it back.
- Don't use Windows builds. Only original images. Perhaps you are not installing the original Windows, but remade by incomprehensible “authors”. Many drivers and system programs could have been removed from it, and a bunch of unnecessary programs could have been added, so I advise you to find the original image: on torrents, on MSDN, on a licensed disk, and so on.
- Burn the installation disc at the lowest speed. If you have burned the image to a disc and cannot install it, then try re-burning the image on a “blank” at the minimum speed - 1x, 2x or 4x. Oddly enough, but it also helps.
- Download the USB 3.0 drivers separately to a flash drive and point to them during installation. If none of the items helped, then you still have to download the USB 3.0 drivers, put them on a USB flash drive or hard drive, and specify where they are during installation. Then the installation will go like clockwork.
Drivers for USB 3.0 can be downloaded from the USB 3.0 drivers link: Renasas Electronics* USB 3.0 Driver or from third party websites - Trying to install Windows from a different USB flash drive Unlikely to help, but for some readers this was the only thing that worked. Let's leave it on the conscience of flash drive manufacturers or users who initially incorrectly formatted flash drives.
The problem when, when installing Windows, the system does not see a single hard disk partition, can cause a lot of inconvenience. Today we will look at what causes this error, as well as how it can be solved.
As a rule, users of modern devices face the problem of reinstalling Windows when the installer does not see disk partitions.
Why does such an error occur?
Most often, users of modern laptops with installed SSD drives face a problem when reinstalling Windows. The fact is that by default, the Windows setup program does not have drivers for working with this type of disk, so partitions will not be displayed at all when installing the operating system.
We get the conclusion that in order to install Windows in this case, you will need to install drivers at the stage of the running setup program.
How to solve the problem?
Below we will look at several ways to solve the problem.
1. If you are a laptop user, you will need to download the necessary drivers from the official website of your laptop manufacturer. You need to search the manufacturer's website specifically for your device model, and then find the necessary drivers, which may contain words such as RAID, SATA, RST or INF.
2. After downloading the necessary drivers, you need to unpack the resulting archive, and then transfer the resulting drivers to a bootable USB flash drive with the Windows installer.
3. Next, turn off the computer completely, and then insert the USB flash drive into it. Start your computer and boot from the flash drive to launch Windows Setup.
4. Once in the menu where disk partitions should be displayed, click on the button, and then specify the path to the required driver.

5. Once the driver installation is complete, all partitions will be displayed in the disk management menu, which means you can continue installing Windows.
Method 2: Using an alternate build
For each version of Windows, you can find a fairly large number of assemblies, which may differ in the number of drivers preinstalled in it.
If the first solution does not suit you, we recommend that you try to find an alternative build of Windows that contains an extended list of drivers. According to statistics on the Internet, one of the most popular assemblies is called "Zver" and, as a rule, it contains drivers for most modern devices.
Method 3: Disable ACHI Mode
Your hard drive may be running in ACHI mode, causing Windows Setup to fail to detect any partitions in some cases. The solution to the problem is to switch the hard drive from ACHI to any other available one.
1. To perform this procedure, you first need to enter the BIOS. To do this, when turning on or restarting the computer, you must press the hot key responsible for entering it: as a rule, this is either the key F2, or Del, but there are others.
2. After entering the BIOS, you will need to open the section for changing the hard drive connection mode. It could be "SATA Mode", "Configure SATA As" and the like.
3. If you get to the right section, you see that the mark is near the “ACHI” item, change it to any other available one, save the changes and try to continue installing Windows. If after that the sections did not appear, return the previous settings.

And finally
It is impossible to exclude the possibility that the hard drive has completely failed, which is why the installation program, of course, cannot detect it.
Checking this probability is quite simple: for this you need to enter the BIOS, and then see if the hard drive is detected in the BIOS. To do this, go to the main boot device selection menu (as when installing Windows) and check if the HDD item is available. If not, your hard drive may have failed altogether.
There are cases in which a normally turned on computer, after a normal boot process, displays the inscription “ Operating system not found". This can only tell us that our OS could not detect the required system files for loading. If in your practice you are faced with this kind of problem, then thanks to this instruction you can get rid of this problem.
Reasons why Windows 7 won't be able to see the hard drive
There are several reasons why the system does not see the hard drive:
- The hard drive is damaged
- The Master Boot Record (MBR) of Sector O is corrupted or has errors.
- Incorrectly set priority of disks responsible for which disk the operating system will be loaded from.
- It also often happens that BIOS your computer has an error, and because of it it is not possible to detect the hard drive.
- Of the hardware reasons, one can name the following: the interface cable that connects the computer and the hard drive is damaged, then it needs to be replaced and checked. And for SATA it is best to choose a cable that will have metal latches.
- If you just installed a new hard drive, and did not have time to prepare it properly and create partitions, then Windows 7 definitely won't see it. To resolve this issue, simply download the program Acronis Disc Manager and quickly divide our disk into sections. Just don't mix up the discs!
Now let's try to solve the problem. First, we need to find the item "" by clicking on the icon " My computer» using the right button of your mouse.

Then in paragraph " Computer management", select the sub-item" ". Then boldly right-click on the required disk and here we already select an item such as " Change drive letter«.

You can't really go wrong further. In order to swap two disks, you will have to rename them several times. To begin with, you will need to replace the letter on any of the disks with an unoccupied one: for example, change the “D” disk to “X”, and the “E” disk to “D”, then you can already change the former “D” disk, and now "X" - to "E".
Windows 7 does not detect hard drive after system reinstall
Very often there are cases when, after reinstalling the OS, the hard drive ceases to be visible.Then help with this problemthis instruction.
- If you have the case where Windows 7 cannot detect the hard drive due to a conflict coming from the motherboard, first try downloading the necessarydrivers for your computer motherboard. Save them to disk and downloadthesedriver to the root folder of your OS. To do this, insert your driver disk into the drive and after restarting the computer, click the " F6«.
Another way to solve the problem. While the computer is booting, you need to go toBIOS (read how to do it), and in the settings of the system itself, find the parameter responsible for turning offAHCI, and only when you disable this setting, then immediately the hard drive will be found. How to do this you will see in the pictures below.

If this did not help you, then you need to do such a difficult task as integrating driversSATA, or even have to download entire driver packages. Also, it is likely that the integration of all driver packages along with their updates will help. And you need to integrate them into the OS distribution in any way from those presented below.
In order to select the necessary drivers and updates, you need to go to the website of your motherboard manufacturer (in order to quickly find out the motherboard model, read).
The solution to this problem is not as difficult as it seems at first glance. In most cases, users who are engaged in installing or reinstalling the operating system are faced with this problem. Do not immediately panic and call service centers to call a specialist at home, first try in BIOS turn off an option like AHCI, then try to integrate all motherboard drivers into your computer distribution.
If the above does not help, then try to determine how the connector is connected HDD and how correct. It is the device, thanks to which it is possible to connect a hard drive to the motherboard, that has only two connectors - black and blue, which must be connected to the hard drive, since it works more stably.
Programmers are known to be lazy people, like most people. When a program is being developed, exceptions must be worked out in it, for example, a file is accidentally deleted / damaged, there is no access to the Internet, the mouse, keyboard, encoding, new devices, connectors, Friday the 13th ... whatever.
And for each case, programmers need to write a window or in some other way somehow notify the user that something went unplanned, and even make sure that the error is correctly understood by the user (But with an explanation to users, there are already problems programmers).
We all understand perfectly well that such an occupation is very tiring and you can make a mistake, you can simply not take into account the likelihood of several events coinciding, the emergence of new devices.
Here is a mistake, if you can call it a mistake, that the developers of the Windows 7 installation process made.
What did they do and what did they forget?
They made an incorrect message for the user about what happened wrong. Instead of writing a message stating that there is no necessary driver for the device from which you are trying to install the Windows operating system. Whoever wrote the driver error message thought that everyone would only install Windows 7 from an optical disc. But what about the ability to install from a USB flash drive? But what about those users who install from a card reader and other external devices? What is the result? And in the end, here's what:
Error not found optical drive driver when installing windows 7 from a flash drive
But, starting with windows 8.1, the developers corrected themselves and this window with an error was slightly redone.

required driver for optical disc drive not found in windows 8.1 and windows 10
But again, in what form should this driver be? And where to get it?
If during the installation of Windows 7 and most likely in later versions, you encounter such a message during installation, then here is what you need to analyze first:
- What device is the installation from? Options CD\DVD, Flash, Usb-HDD (External HDD via USB)
- If it is a USB device, what USB port is it plugged into. Possible options . or USB 3.0. (More on USB 2.0\3.0 connectors below.)
What is the difference between USB 2.0/3.0 ?
To distinguish between these two USB connectors, just look at the picture below. We focus on the fact that USB 3.0 is usually highlighted in blue, in contrast to white USB 2.0.

Visual difference between USB 2.0 and USB 3.0
If your laptop or computer does not have USB 2.0 connectors (and if available, it is better to insert the installation flash drive into them), and all of the available ones are USB 3.0 connectors, then you need to download the driver for the latter, since at the time of the release of the Windows 7 operating system, driver support in there was no installation image.
To download the correct driver, you first need the motherboard. After that, go to the drivers section on the manufacturer's official website, find your board there and download the USB 3.0 driver and you may need an ACHI driver. (hard drive controller).

Selecting the official website of the motherboard to download the necessary drivers
You can, of course, try to download a more recent version of Windows 7 with the latest updates, perhaps they added support for USB 3.0 drivers to the installation image itself.
There is a driver what to do?
If you managed to find the drivers, then you need to unpack them, write them to any USB flash drive, insert them into USB and specify them in the "Load driver" window through the browse button. But here, too, can not do without adventure. You will most likely be greeted with a message like this:

Error loading driver during windows installation
Then click "OK" and then click the "Repeat search" button.

Specifying a USB 3.0 driver when installing windows
What to do if all of the above does not help?
If the above does not help, then you can:
- Try to use another device for installation, try to burn to another disc (It is recommended to use DVD-R, CD-R and it is better not to use rewritable RW discs for installing Windows at all), burn installation files from the image at minimum speed.
- When installing from a USB flash drive, try inserting it into all USB connectors. It is very likely that one of them will work.
- Check the integrity of the installation image, download again, take another image.
- Use verified operating system images. It is recommended to use official images downloaded from official sources.
- Format the flash drive according to the recommendations of the Windows installation.
- Use another program to write the image to the drive (For example, Novicorp WinToFlash or )
- For those who install the operating system via a DVD or CD drive, cleaning the drive's laser helps in some cases.
- You can try Ahci/IDE modes
- If you have a laptop manufactured in 2016 and later and you are trying to install windows 7 on it, then most likely you will not be able to do this in more than one of the ways described above simply because it is optimized to work only windows 10 and most likely versions.


