Today, PC users have two or more monitors in their arsenal. The smaller display is used for office applications, while the larger display is preferred by gamers for running colorful games. However, having only one system unit, users often wonder how to connect and configure a second monitor in Windows 10.
Preparations before setting up a second monitor in Windows 10
Before connecting the second screen to a Windows 10 PC, you need to make sure that the selected monitor contains VGA, HDMI, DVI standards, which are also available on the rear interface panel of the system unit itself (the video card must support the ability to connect two displays). Thus, by connecting 2 monitors, the user can use different connectors of the plugs. It is recommended to install the main screen with the one with the best characteristics.
The first step is to connect both monitors to your Windows 10 PC using the appropriate cables.
After connecting 2 displays, you can adjust the clarity (and other parameters) and the position of the desktops on the monitor.
Setting up a second monitor on a Windows 10 computer
Setting up a second monitor on Windows 10 is as follows:
- Press "Win + P" to bring up the "Projection" menu and choose how to use the second monitor. A small window will appear.

- Next, we select the option of using an additional display. In most cases, the options are "Extend" (create a second blank Windows 10 desktop) or "Duplicate" (completely duplicate the screen content on the second monitor).
IMPORTANT! If the installed monitor, for some reason, is not detected by the Windows 10 operating system, then you can try to manually force the system to recognize it. To do this, right-click on an empty space on the desktop and select the "Screen settings" item in the menu that opens.

A new window will open. Under the image of a small monitor, click on the "Detect" button.

Alternatively, you can open "Settings", "System", "Screen" and follow all the same actions.
If after this manipulation the image on the monitor does not appear, you should change the screen resolution and make sure that the cable is connected correctly.

In the case when the cable is connected correctly, but there is no image, we recommend installing or updating the video card driver. After updating the software in the additional parameters of the screen, you need to make the following settings:
- Select "Graphics adapter properties".
- A new window will open. The adapter type should contain the name of the video card, not the base adapter from Microsoft.

- If the video card is not set as the main device, you should click on the "Properties" button and change the settings.
It is important to note that installing a second monitor is a straightforward process. However, you need to be careful when connecting monitors and adjusting picture display parameters.
This guide shows the steps you can take to set up a second monitor in Windows 10
The operating system supports a variety of multi-monitor configurations by default, so you don't need to install third-party software to set up multiple displays.
The need to use a second monitor is needed primarily to expand the workspace, which in some cases simplifies the simultaneous execution of several tasks.
It is important to note that some video cards do not support multiple monitors, and that older displays may not always connect automatically.
To connect a second monitor, you need a computer (laptop) or with an additional video signal output to an external display using various connectors, such as HDMI, VGA, DVI port or DisplayPort, as well as an appropriate cable that connects the monitor to the connector (port).
CONTENT:Switching between display modes
By connecting monitors to your computer, you can select the appropriate display mode.
There are four display modes available in Windows 10.
PC screen only
The image will be displayed on the first computer monitor or on the main laptop screen. The second monitor will not be used and nothing is projected onto it.
Duplicate
The content of the main one is copied to the second monitor. This option is ideal for presentations.
Two monitors turn into one large virtual screen. This makes it possible to display one file on two monitors, for example, a large photo.
Second screen only
Only an additional monitor is used. This mode allows you to check the resolution of the second monitor. Accordingly, if you have a laptop with a presentation projected onto a large monitor, then choose this option for optimal results.
Depending on which device you are using, the appropriate display mode will automatically be selected.
When connecting a second monitor to a laptop, the display mode is set by default Repetitive
When connecting a second monitor to a desktop computer, the default display style is set to Expand
To quickly switch between modes, press the keyboard shortcut + P, this will bring up the PROJECT sidebar with four options.

You can also select the display mode using the screen parameters, to do this open sequentially: Screen options

Then on the right side of the window, click on the dropdown Multiple displays and select one of the items.

Then save the selected parameter.

Configuring display options
Setting up and managing your displays using Windows is very easy, to do this open one by one: Windows Settings ➯ System ➯ Display, or right-click in an empty area of the desktop and select the item Screen options

Each of the monitors is represented by a small rectangular miniature.
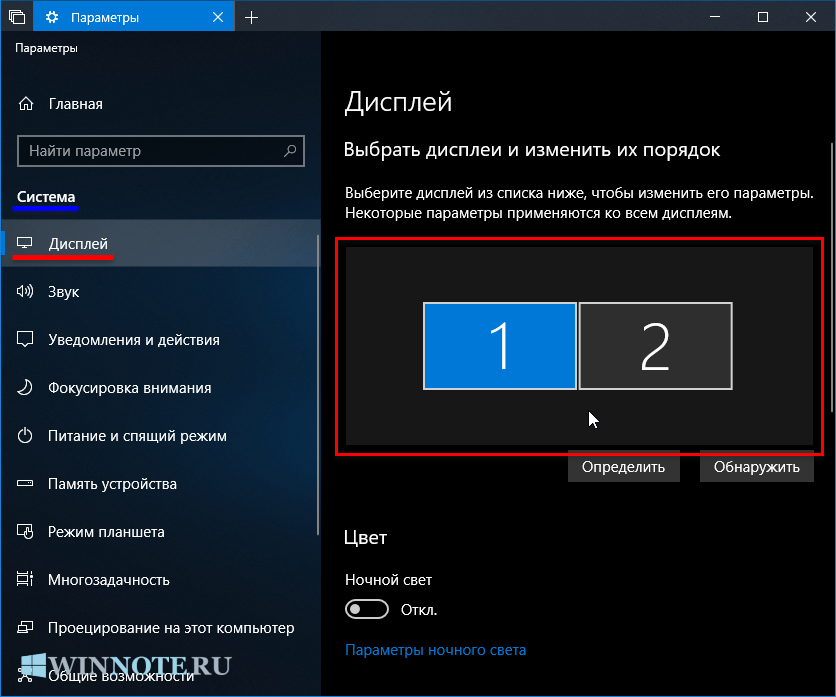
Drag the thumbnails on the screen so that their relative position matches the configuration of the monitors on your desk.


Use scaling to enlarge text and other content. (This is suitable for higher resolutions or people with vision problems).

Also you can change the resolution of the desktop.

Select landscape or portrait orientation to change the selected screen orientation.

The multiple displays option allows you to switch display modes (as described in the section above).

In the advanced display parameters, you can see general information about the connected displays, as well as the properties of the video adapter for the display by clicking on the corresponding link.

Taskbar settings
When a second monitor is connected, the taskbar is displayed by default on all displays. You can remove the taskbar from one of the monitors altogether or leave on each of the panels only the icons of the applications running on this monitor.
To customize the taskbar, open sequentially: Windows Settings ➯ Personalization ➯ Taskbar, or right-click in an empty area of the taskbar and select the item Taskbar options

To display the taskbar only on the primary monitor, under Multiple displays, set the switch Show taskbar on all displays to the Off position.

If you prefer the default configuration, where each monitor has its own taskbar, you can set the behavior of these panes using the drop-down list Show taskbar buttons:

All taskbars
The default suggested mode where the same panel is present on both monitors.
The main taskbar and the taskbar in which the window is open
In this case, the taskbar on the main monitor contains icons of all running applications, while on the second monitor only icons of applications that are launched on it appear on the second monitor. For example, on the primary monitor, you are running Microsoft Edge and Word, and on the second monitor, PowerPoint and Excel are displayed. The main monitor taskbar will contain Microsoft Edge, Word, PowerPoint and Excel icons. On the second monitor, there will be only PowerPoint and Excel icons.
The taskbar in which the window is open
In this mode, the taskbar on each of the monitors will contain only the icons of the applications running on this monitor. As a result, if you recall the above example again, only the Microsoft Edge and Word application icons will appear on the taskbar of the first monitor, and PowerPoint and Excel will appear on the taskbar of the second monitor.
Background settings on monitors
With a second monitor connected, you can personalize your desktops.
To customize the screen design options, open sequentially: Windows Settings ➯ Personalization ➯ Background, or right-click in an empty area of the desktop and select Personalization from the context menu that appears

Then, on the right side of the window, select the appropriate background and right-click on it, in the context menu that appears, select one of the menu items, for example Set for monitor 1

Select the background for the second monitor in the same way.

Also you can select the position of the background in the dropdown Select position
Installing a new monitor does not require opening the case, but you have to crawl on the floor to get to the cables. Here's how to make this process as easy as possible:
- Open Device Manager and remove the current monitor from the device list.
- Shut down the system and turn it off.
- Turn off your old monitor and unplug it from the power source.
- Disconnect the video cable at the back of the case.
- Remove the old monitor and replace it with a new one.
- Connect the video cable of the new monitor to the connector on the video card.
- Connect the power cable to the new monitor and then to an AC power source.
- Turn on the monitor and then the computer.
- After the system recognizes the new monitor and prompts you to insert the driver CD, insert it into your CD-ROM drive.
Attention!
My favorite way to deal with an old monitor is to use it as a second, secondary monitor! A video card that supports working with two monitors in Windows XP, Me and 98 will easily help you with this (In Windows 2000, it is not so pleasant to work with two monitors).
If you are short on space, and you already have two monitors, do not rush to throw away the old one. Find out if your nearest school or church needs a monitor.
Unless you are a specialist in repairing monitors, never try to take them apart yourself. After all, haven't you ever seen a lot of nearly identical parts at the same time? Even long after the monitor is turned off, static electricity remains on the contacts in the immediate vicinity of the cathode ray tube, which can be fatal. The cat, as you know, died of curiosity, and you shouldn't follow her example.
Setting up a new monitor
After connecting a new monitor, the operating system defaults to the resolution and refresh rate of the screen. Most likely, these values will turn out to be much less than you would like. Below is a discussion of how to set up your monitor in the best possible way.
Color depth and resolution
To change the color depth, expand the Colors menu. Table 1 lists the assignments of the basic color parameters.
Typically you should use 32-bit color sets if you have a 3D graphics card, 24-bit colors if 32-bit is not available, and 16-bit colors if more colors are not available.
Table 2 lists the main screen resolution settings, the minimum dimensions for CRT and LCD monitors, and the situations in which it is recommended to apply the corresponding setting.
In order to change the resolution and refresh rate of the screen according to your tastes, follow these instructions:
- Right-click on the desktop and select Properties from the menu that appears.
- Click the Settings tab. Here you can select the color depth and resolution as described earlier in this chapter.
- Click the Advanced button to see the monitor type and video chip information, as shown in Fig. one.
- To change the vertical refresh rate, monitor type and other parameters, click the Advanced button. By default, a fairly low refresh rate is used, which leads to flickering at a resolution of 800x600 and higher. To reduce flicker, set this parameter to 72-75 Hz.
Table 1.
| Color depth | Number of colors | Usage |
| 16 colors | 16 | Installed automatically in crash protection mode and standard VGA mode selected in Windows 9x / Me; not recommended for permanent use |
| 256 colors | 256 | Should be installed only if the program does not support modes with a large number of colors |
| 16 bit | 65 536 | The minimum required for the relative realism of computer games and viewing photos. The picture may appear grainy, but the speed of playing games increases. |
| 24 bit | 16.7 million | Allows normal photo editing, but for high-quality PC games it is better to use 32-bit mode |
| 32 bit | 16.7 million | Same color count as 24-bit, but recommended for enhanced digital photography and gaming |
Table 2.
Note
Video card and monitor manufacturers like to use the same hardware drivers for different models, so the name on the front of the monitor often does not match the name on the Settings tab of the Display Properties dialog box.
Is this fact a cause for concern? It is worth making changes only in cases where the monitor is listed as Unknown Display or Standard Display, because in this case the operating system simply will not allow you to select a higher refresh rate, since it thinks that the monitor may be damaged. Visit the website of your video card or monitor manufacturer to find the correct driver if you think Windows is using the wrong driver.
Features of laptop computers
The video capabilities of laptop computers are extremely limited compared to desktop computers:
- Unable to get rid of embedded video.
- Unable to connect a second monitor.
- Resolution and color depth are much more limited than desktops.
How do you get the most out of your laptop display? There are the following ways.
- Use an external projector or monitor that matches the native resolution of the LCD screen. The function of mirroring images on both monitors for many laptop computers only works if the projector and the internal monitor have the same resolution. If you want to see the same picture on the screen as is being transmitted to the wall, check the numbers on the projector before purchasing it. Most laptop screens currently have a resolution of 1024x768; accordingly, these are the numbers that should be on the projector.
- Use laptop computers that support the Dual View technology of the Windows XP operating system. The Dual View function allows a monitor connected to the external VGA port to be used like a real auxiliary monitor, usually connected to a dual-output graphics card. Of course, the monitor driver will need to be updated. However, not every laptop will allow you to use the Dual View function.
Answers to frequently asked questions
What should I do if the system does not boot after installing a new video card?
Let's list the possible reasons for this behavior.
- Check out the most obvious thing: Have you connected the monitor to the power supply and to the video card?
- If you previously had an embedded video on your system, did you forget to disable it?
- Make sure that no bare wires or screws are touching the motherboard or other components.
- Make sure all cables that you had to disconnect during the upgrade are connected correctly.
After installing a new graphics card, I get an error. What to do?
Most likely, the reason for this message is that you forgot to remove the old video card information from the device list in Windows Device Manager. Start the system in crash protection mode, remove all graphics cards from the list, and then boot the computer normally.
What if the system cannot find the video card or monitor driver?
During the driver installation process, use the Browse button to see the list of drivers in person. Check all the folders on the floppy disk or CD for updated drivers for your graphics card. As for the monitor, check if the standard driver is sufficient or if you need to find something special.
What if I cannot select a higher resolution and color depth despite having a lot of video memory?
This is most likely due to the fact that the operating system has installed the wrong video card driver. Click the Advanced button on the Settings tab of the Display Properties dialog box and select the correct driver from a bootable floppy disk or CD, or download the latest driver from the Internet.
What if the image on a CRT monitor looks strange after changing the resolution or refresh rate?
Use the monitor control buttons on the front panel to change the vertical and horizontal dimensions of the visible area of the screen, image position and remove distortion. Save the changes to the permanent memory of the monitor. The next time you switch to a problematic resolution, the image should remain unchanged.
Try the following.
It is much easier to configure a pair of video cards to work together if one of them works with the PCI interface, and the other - AGP. Since the computer must select one main video card from the two video cards, it can cause problems when installing two PCI video cards.
If you are using AGP and PCI graphics cards, then restart your computer, enter the BIOS setup menu and look for the Primary VGA BIOS option. If its value turns out to be AGP, as shown in Figure 2, then set the PCI value, save the changes and restart the computer again.
Make sure both graphics cards are using the latest drivers. If necessary, download them from the websites of the video card manufacturers.
Visit www.realtimesoft.com/ultramon for a database of information on installing pairs of graphics cards.
Consider purchasing a dual-monitor graphics card. Some models with AGP interface and VGA and DVI ports cost only about $ 100.
Should you spend extra money on a monitor with an extended warranty period?
I am not a supporter of extended warranties for computer components, as I believe it is preferable to upgrade them. Nevertheless, the monitor occupies a special position, since it does not allow user intervention: violation of safety rules is simply life-threatening. I consider it reasonable to purchase an extended warranty only under the following conditions:
- the manufacturer or supplier of the monitor will replace it if the monitor fails for at least one year after purchase;
- the cost of the extended warranty does not exceed 25% of the price of the monitor.
Sometimes the question arises connecting an external monitor, TV or projector to your computer... The reasons for this action may be different: not enough
working space of one monitor, there was a desire to watch a video or play on a new TV with a large diagonal, or you need to hold a presentation by connecting a projector to your computer.
Connecting a second monitor. Connector types
To implement one of the above tasks, or something similar, firstly, you need to acquire the necessary equipment.
To connect a second monitor or TV to a computer, you need a video card with at least two outputs (HDMI, DVI, VGA, etc.). Most modern video cards are equipped with two or three output connectors, so this should not be a problem.
Attention! Make all connections to the video card with the computer turned off.
If everything is connected correctly, then immediately after turning on the computer, the image will be displayed on both monitors, but after a few seconds, the additional screen will turn off. This is due to the fact that the video driver controls the display of images, and until it is loaded, two monitors will work.
Configuring Windows for Dual Monitors
Now it remains to configure the display on the primary and secondary monitors. The fact is that the computer identifies one monitor as the main one, and the other as an additional one. Tune dual monitor modes in Windows 7 in the Display Settings window. To do this, you need to follow the link Screen resolution from the desktop context menu 
In this window, you can assign a primary monitor and a secondary monitor, set the screen resolution, select the display orientation, and also select the display mode on two monitors.

In the settings it is possible to swap their roles and places. There are four options for displaying images when connecting a second monitor (projector, TV):

- Show desktop to 1 only
In this case, the image will only be displayed on the main monitor. - Show desktop only 2
The option is similar to the previous one, only the image is displayed on an additional monitor. - Duplicate these screens
When this mode is active, the image is duplicated on both monitors. - Expand these screens
When this mode is activated, the taskbar will be displayed only on the main monitor, and the second monitor expands the boundaries of the first. By default, opened programs will be displayed on the main monitor. They can be easily dragged onto an additional screen by grabbing the window title with the mouse.
Depending on the location of the primary and secondary monitors, the space may expand in different directions. The relative position of the two monitors can be adjusted by simply dragging the monitor icons in the display settings window

Button Define allows you to determine which monitor you are currently in. When you click on it, a large number appears on each of the monitors, indicating the monitor number in the windows settings.
It is very convenient to switch the modes of displaying images on monitors using the combination of hot keys Win + P. When you press win + P, all 4 options for displaying images on monitors are available. Switching between monitors is carried out as follows: simultaneously press Win + P and, without releasing Win, press P until the desired mode is selected

Also, the combination of hot keys Win + P may be needed in the following case. You used two monitors, and then removed one of them from the system, and at the same time the main one. The next time you turn on the computer with only one monitor, the screen may be black. This is where you need the Win + P combination to switch the mode.
If you have an ATI video card and when outputting to a TV or a projector the image does not occupy the entire screen, but you see black bars around the edges, then you need to turn off the scaling mode in the Catalyst Control Center video card driver settings by setting the slider to 0. The scaling mode is used in if the resolution of the additional monitor or TV is higher than the main one.
To make your computer screen settings as comfortable as possible for your eyes, you need to know how to change the screen resolution of a personal computer or laptop monitor.
Screen resolution is an indicator that determines the clarity of the display of all icons, pictures, that is, graphics in general. It is important to determine what is best for the monitor.
Modifying an Extension Using Built-in OS Functions
The higher the resolution, the better the clarity of the display. For example, a 22-inch display will have a standard one, which is 1680 * 1050, which is optimal and maximum for this screen.
All available sizes are available in the settings, it is advisable to choose the largest one offered.
Follow the instructions to change the image resolution of your display:
- Go to the desktop of the operating system. Click on it with the right mouse button and select the screen parameters item, as shown in the figure below;
- In the window that opens, you can adjust the size of text, icons and other system elements in real time. You can also adjust the screen orientation. To go to the selection tab, enter the word "permission" at the top of the search bar;
- Select the item "change the screen resolution";
- Click on the drop-down list, as shown in the picture, and select the standard recommended. Save the new settings.
Important! It happens that the recommended resolution is larger than the display. That is, the size of the final image does not correspond to the size of the screen, so some elements of the desktop may disappear from the user's field of view. Adjusting the monitor will fix this problem. In the selection options, choose not the recommended one, but the one that fully displays all the elements of the desktop. At the same time, all graphics should be clear.
Several common types of expansion and their corresponding display sizes:
- 1024 * 768 - perfect for screens that are 15 or 17 inches. In a display with a resolution of 1024 * 768 pixels, the color depth is 16 bits;
- 1280 * 1024 - intended for displays that are 19 inches;
- Types of monitors with a size of 24 inches most accurately reproduce the image at a resolution of 1920 * 1080. All displays with these parameters are FullHD.
Adjusting the refresh rate of the screen
The higher the refresh rate of the display, the correspondingly better the picture quality. That is why, in addition to size, you need to pay attention to this parameter. To change the refresh rate follow the instructions:
- Go to the control panel. In the search box, enter "Screen" (without quotes);
- In the proposed search result, select the item that is responsible for the screen refresh rate, as shown in the figure;
- Set the refresh rate as high as possible. This will eliminate possible intermittent flickering of the monitor.
NVIDIA software
How do you find the right resolution for your display? This can be done on the official website of the manufacturer or in the instructions that come with the device.
The boxes of monitors and laptops from Samsung have information on how to set the correct resolution and what to do if the real one does not match the declared one.
With the help of a special program, which is preinstalled on all computers equipped with a video card of the Nvidia family, you can also adjust the resolution of a custom monitor. Follow the instructions.


