Hello everyone! There is such an interesting tool in Photoshop - a mix brush. It has many different possibilities and uses, especially in drawing.
Post written by at
 Postcard for the holiday.
Hello dear subscribers and guests of the site
Today we have a conversation about how to make a postcard yourself for some holiday. And since on the threshold of March 8, we will make a postcard From March 8. I will show only the most basic, and you already turn on your imagination ...
It's a really simple job, no hassle, but this site is for beginners! I hope that you will learn at least something useful for yourself. And also under the video you will see links to download materials for creating postcards for the 3rd holidays: March 8, Valentine's Day and Defender of the Fatherland Day. 2 of them have already passed, but there will be next year as well.
Post written by at

Greetings to all Photoshop lovers!
This wonderful program has a lot of all sorts of filters with which you can make interesting and beautiful processing of our photos very quickly and easily. I suggest you get acquainted with two filters and see what effects you can use in Photoshop (a small part of them!). After watching the video and reading the text version, try experimenting and come up with your own options, it is very interesting and you will definitely succeed!
We've covered how to install Photopop and change the interface language. Today we will consider the main commands, without which full-fledged work with this program is impossible.
How do I get started with Adobe Photoshop?
Launch photoshop
To start working with Adobe Photoshop, like any other program, you must first start ( the launch icon is almost always on the desktop ).
Start Photoshop
Open Image
To change photos in Photoshop, you need to open them in it. To do this, go to the menu File -> Open (or press the key combination Ctrl + O) and in the window that opens, select the desired picture (in my case, this is the photo.jpg picture from the archive at the end of the article).

Open the picture
Changing the scale
Sometimes the photos are too big (they don't fit completely on the screen), and sometimes they are too small (you can't see anything).
In such cases, the tool and its "additional buttons" on the toolbar (under the main menu) help a lot. I think it's obvious which button is to zoom in and which to zoom out.
Zoom in on the photo several times and see how its quality has changed. You can see the "bricks" from which the bitmap images are built - pixels.

You can also enlarge (reduce) photos using View menu or keyboard shortcuts Ctrl + and Ctrl- respectively. These are just a few of the many ways to zoom in Photoshop.
Change the scale
When working with Adobe Photoshop, you also need to be able to quickly set the image real size... There are many ways to do this as well. Here are a few of them:
Resize the image to its actual size
How to ask an image size that will be printed, I think you yourself have already guessed. But, just in case, a couple of ways:
- Button "Print size" on the toolbar;
- Using the View menu 🙂
Set the image size to be printed
Customizing the Photoshop interface
When working with computer programs, each user customizes their interface for himself: removes (adds) toolbars, changes their location, etc. How to do it?
For this purpose there are Window and View menus
... Let's try to remove all the tools.
It's simple: in the Window menu, uncheck all the boxes.
Remove all panels and tools from the window
The window has become "bare" and now it is certainly not clear what can be done with the image.
Display:
- tools (a "strip" with various buttons - usually located at the left border of the window),
- parameters (a panel for setting up tools and changing their properties - located under the main menu),
- layers (all work in Photoshop is based on working with layers - in a couple of lessons we'll look at what it is and what it is eaten with),
- a navigator (this is to see a thumbnail of your image as it looks after the changes),
- and styles (and these are ready-made templates for changing the look of text or other objects in your creation).
These all settings can be found in the Window menu... Rulers can also be very helpful. You can find and display them in the View menu .Display the tools necessary for work and place them in places convenient for you
What are color models?
Consider now color models, that is, methods and principles of constructing color using quantitative characteristics.
I think everyone knows that you can make any other shade out of the three basic colors, for example, yellow + red = orange, red + blue = purple, etc.
The same principle is used to display colors in Photoshop. That is, figuratively speaking, several basic colors are taken and "mixed" in different proportions - this is how other colors and their shades are obtained.

The main color models in Photoshop are RGB and CMYK.
What does RGB mean?
RGB (Red-red, Green-green, Blue-blue) Is a color model that is used as the main one in all computer systems. All image editing functions are available for RGB mode in Photoshop. And if you are preparing an image for display on a computer (for a website, presentation, game, etc.), then this is the mode that you need to use.
What is CMYK?
CMYK (Cyan Cyan, Magenta Magenta, Yelloy Yellow, Key- "key") - this model describes real printing inks. Cyan, magenta and yellow inks make up the printing triad, but when they are mixed it is impossible to get the perfect black color, therefore, the main ink was added to the number of basic printing inks - black (I think those who have printers know that printing requires three colored and black paint 🙂). This model is used only in the printing industry, therefore, the transition to it must be made immediately before the print itself, and it is desirable to edit the image in RGB mode.
To change the mode in Adobe Photoshop, go to the menu Image → Mode → Select the desired mode .

Change display modes and see if the look of the photo changes.
How to make a photo in black and white?
In the same way as in the previous step, you can make a photo in black and white – Grayscale mode (but this, if you are already sure that you do not need color inks, or the printer has run out of a color cartridge - there are other ways to experiment with color, since this mode deletes color data and cannot be restored later, even if return RGB mode).
Change the display modes to Grayscale.
What is Image Resolution?
Another characteristic of the image is resolution - the number of dots (pixels) per inch.
Accordingly, the higher the resolution, the larger the file size. But does the picture quality improve as the resolution is increased?
This is not entirely true.
Depending on the purpose of preparing images, they can be divided into several groups:
- for displaying (presentation, web page, animation, video)- it is considered correct to prepare such images with a resolution of 72 ppi or 96 ppi;
- when printing on a printer its resolution is taken into account - the number of dots per inch that it can display (laser and inkjet printers have a resolution from 600 to 1200 dpi). The ratio between the technical resolution of the printer and the image resolution is 4 times different. That is, if the technical resolution of the printer is 800 dpi, then the image when printed will have a resolution of 200 ppi.
Accordingly, for printing on a printer, you need to prepare images with a resolution of 150-300 ppi. - for printing in a typography the image must have a resolution of 300 ppi.
That is, when creating an image (File -> New) you must specify the title, image dimensions, resolution, color mode and select a background color.

Create a new document for printing, standard photo size (portrait orientation) and with a transparent background
How to open two windows at the same time in Photoshop?
You now have two windows open... To see them at the same time, use the menu Window -> Arrange -> Mosaic. Tool "Moving" “Drag” the picture onto a new (empty) document and place it in the right place (for this you need to “grab” the picture with the mouse and drag it to the right place, and only then release the mouse).
Transfer the picture to your new file and place it in the right place.
Save the picture in Adobe Photoshop
To save the image, you need in the save window ( menu File → Save As ... or Ctrl + S ) specify the desired name, file type (.jpg, .png, .gif, etc.) and the save location. If you are going to edit this image again, then you need to save it in Photoshop format .psd.
Save your "new" picture in two formats .png and .psd under the name "Lesson 1" (two files)
Adobe Photoshop cs5 has a panel with which you can quickly customize the appearance of the window: scale, add / remove rulers, guides, arrange windows, etc. - I think it's very convenient.

This concludes the lesson. 🙂
In the next lesson, we'll look at how to select areas of images and work with selections.
When reading articles about Photoshop, I am often amazed at how many authors make it difficult to solve inherently simple processing tasks. Many "monumental" writers suffer from this, for example Dan Margulis. But this is forgivable to him - his task is to write about all the subtleties and nuances of the processing process, to consider it from all angles and sides. Although it is precisely this feature of the presentation of material in his books that repels many readers.
In fact, the roots of these "40-step sharpening" techniques have their roots in a very simple thing - the people who write these tutorials have never worked with a lot of photographs. That is, as a rule, they have a couple of photos and they are ready to kill an evening or two in the process of processing them. But when you have constant orders, and from each photo session you need to seriously process several dozen frames, you start thinking about simpler and more convenient ways of processing.
We will talk about them today. I'm going to tell you about five simple yet very effective Photoshop tools that I use all the time in my work.
Before editing photos in Photoshop, I always work with the frames in the RAW converter first. This is where I do the main color correction and primary processing of photos. Basically, I create a “skeleton” of processing, and in Photoshop I work with the details of the photo.
So, we have worked with the photo in the RAW converter and open it in Photoshop. Photoshop meets us with a huge number of processing tools for all occasions. But we'll talk about the simplest and most effective ones.
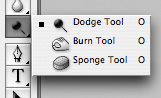
The main function of the Dodge Tool / Burn Tool is to lighten / darken individual areas of the image. Basically, you can "paint" the darkening, or vice versa - lighten the picture. It's very simple, give it a try: I am sure you will appreciate this tool. The Dodge / Burn Tool has only two, but very important settings.
Range - Select a field of application
You can use this tool on dark (Shadows), light (Highlights) or neutral (Midtones) areas of the photo. For example, you want to lighten the dark areas of the chin (when processing a portrait), and leave the light ones untouched. In this case, we set the Shadows mode to the Dodge Tool, and it will only lighten the dark areas of the places where we apply it.
Exposure - force of impact
It is very important to correctly set the strength of the impact. Many people experimenting with Photoshop try 100% Dodge / Burn. And, darkening the image, get black "holes", and lightening - solid overexposures. Of course, when they get such a result, they no longer come back to this tool. But Dodge / Burn is a subtle tool. If you are working with shadows or highlights, try the application strength of 7-10%, if with neutral areas - 10-20%. For each case, the strength of the impact is selected separately, but after working a little with this tool, you will begin to feel what kind of power is needed in each specific case.
Usage
Dodge / Burn has a ton of uses:
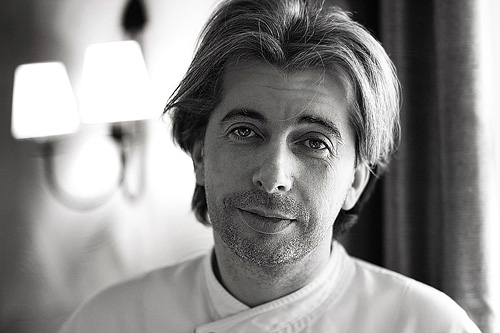
- Lighten the iris of the eyes
Just apply the Dodge Tool to the iris - this is the easiest way to lighten it. Thus, you focus the viewer's attention on the model's eyes.
In all these portraits, I brightened the iris of the eyes precisely in order to draw the viewer's attention to the eyes and add psychology to the frame.


- Darken the lines of the face in a male portrait
Cheekbones, jawline, nose line, eyebrows - any facial lines, if darkened a little, will acquire greater volume and contrast. The man in the photo will look more tough and strong-willed.
I use this technique when processing almost all male B / W portraits. For color, this technique is not always suitable, as it "destroys" colors, but it works just fine in B / W picture.
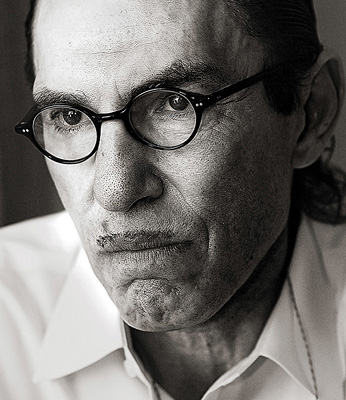
In a woman's portrait, this technique must be used very carefully, since a woman will only be adorned by the accentuation of those facial lines that give her femininity. Otherwise, you will receive a portrait of a masculine creature.
- Brighten backlight areas
Backlight is a wonderful thing in itself. But if you use the Dodge Tool to enhance its effect, the picture will become even better. It looks especially great in concert photographs when the musicians are illuminated by good backlighting.

- Whiten teeth for your models
It is using the Dodge Tool that it is easiest and most effective to whiten teeth in a photograph. A little later, I will definitely write a separate lesson on correct teeth whitening with the Dogde Tool.
2. Clone Stamp
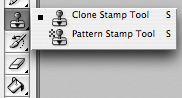
There are several tools for retouching images in Photoshop, and each of them is good in its own way. But "Stamp" is the most versatile tool to use.
Its function is to take a certain area of the image and copy it. Thus, we can, for example, retouch wrinkles - simply "replacing" them with areas of smooth skin. To do this, press Alt and select the area where the picture will be taken from, and then, simply by clicking on the necessary areas of the image, we will copy it to them.
It is important to pay attention to two parameters in the stamp settings:
Mode
These are the modes in which the stamp will work. For example, in Darken mode, the stamp will only "replace" areas that are lighter than the selected area. In fact, you can darken the light areas of the image, which is why the name of the mode is Darken. And, accordingly, in the Lighten mode, the stamp will work only on the darker areas of the image, lightening them.
Clone Stamp has many modes of operation - experiment with them, I'm sure you will get interesting results.
In my opinion, it makes no sense to describe the operation of each mode - in Photoshop for all tools, essentially the same principles of operation of the modes operate, only slightly changing for the specifics of a particular tool.
Opacity stands for opacity. Simply put, the lower you put the percentage in this setting, the more transparent the "work" of the stamp will be. For example, at 100% the stamp will completely replace the selected area, and at 50% it will be semi-transparent. For face retouching, as a rule, 10-30% is used, otherwise the stamp mark will be too clearly visible.
Using the Clone Stamp
- Retouch
Retouching in all its forms is the main purpose of the stamp. First of all, the stamp is used for skin retouching - to remove wrinkles, bruises under the eyes, swelling and other beautiful creations of Mother Nature.

You can also retouch, for example, an unwanted subject in the frame. Unless, of course, it takes up half of the photo.
It is very convenient to use a stamp to eliminate small overexposures. For example, your model has a small speck of overexposure on the tip of her nose. We take a stamp, set the Darken mode and darken this speck in a couple of clicks.
3. History Brush

History Brush is a time machine for photo processing. You can take any stage of processing and paint with a brush from it according to your image.
The History Brush is fraught with tremendous possibilities. I have already written in detail about the operation of this tool in a separate article. In it, you will find a detailed tutorial on the use of history brushes and learn how to sharpen only the areas of the image you need.
Sharpening is certainly not the only area of application. In future articles, I will tell you how to work with color in a photo using the History Brush.
4. Black & White
The Black & White tool is located in the Image-> Adjustments tab. Or you can just create an Adjustment layer on your photo.

The main function of the Black & White tool is the "correct" translation of a color image into b / w. Correct because you can change the black and white display of each color. Thus, you can get a beautiful and "tasty" b / w picture.
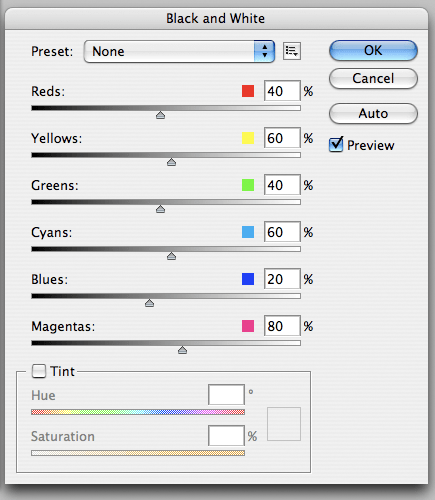
But the functionality of B&W is not limited to this.
With this tool, you can get a very interesting and colorful picture. Apply B&W to our image and then turn on the Overlay layer mode.
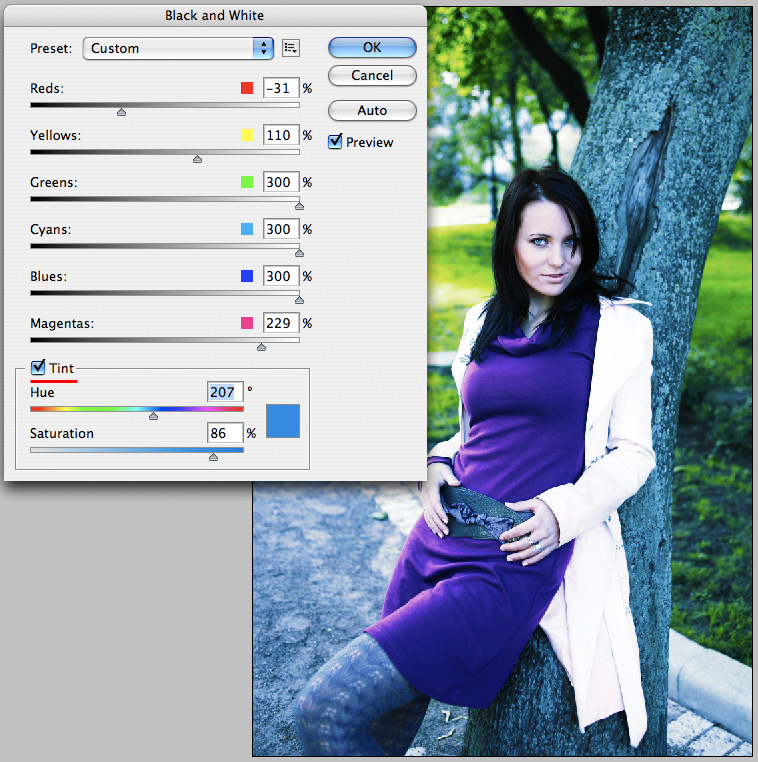
Now, by manipulating the B&W controls and layer transparency, we can get a very interesting picture. For better clarity, I set the Opacity of the B&W layer to quite high - 62% and turned the Greens, Cyans, Blues and Magentas controls to the maximum.
As we can see, the picture immediately became richer and more contrasting (click on the picture to enlarge).

Now let's pay attention to the check mark Tint... By enabling it, we will be able to tint the image in the color we need.
Usage
The options for using B&W in both color and B / W processing are a lot.
In one of the following articles, I, using the example of processing several photos, will tell you about all the main nuances of working with Black & White.
5. Shadow / Highlights

Shadow / Highlights is also located in the Image-> Adjustments tab (by the way, there are a lot of interesting tools there, I advise you to experiment with all of them)
This tool is designed to darken overexposed areas and draw highlights from shadows. Apart from the most obvious application of eliminating overexposures and under-highlights, S / H also works great for creating a sense of greater depth in a picture. We can add dark tones to the light areas, and light ones to the dark ones. Thus, the picture will become more voluminous and deeper.
For example, in this photo, using S / H, I added volume to the puppy's coat and the picture immediately became more interesting.

In fact, Shadow / Highlights are an absolutely indispensable tool for any serious editing. Almost any photo can be made better with the right S / H.
I would like to talk about all the S / H settings and its functionality, but this is really a topic for a separate article. In the future, I will definitely return to the Shadow / Highlights theme, but for now, just try experimenting - try different settings and see the result. In my experience, this is the most effective way to learn new things.
As we can see, all these tools are very easy to use, but at the same time they are amazingly effective. Try experimenting with them and you will feel how many possibilities they give when processing.
I think it's worth doing a series of articles on simple yet very effective tools in Photoshop. And in the next article I will talk about tools for seriously working with color in photography.
A professional image editor is usually used to work with photographs. Adobe photoshop... This is a rather complex program, and learning all the intricacies of working with it will take a long time, but for simple and effective processing of your photos, you will need to master only a few basic techniques. Let's take a look at the data tricks work with photos.
Dodge Tool / Burn Tool
The main function of this tool is to lighten or darken certain areas of the image. In other words, this tool "paints" darkening or lightening. There are only two main instrument settings.
Range
This tool can be applied to dark, light and neutral areas of your photo. If you want to lighten dark areas when processing a portrait, then set the mode « Shadows " v « DodgeTool " and apply the tool to the desired area, lightening only the dark areas. In this case, the light areas are not affected.
« Exposure "(Impact strength)
When processing photographs, the correct setting of the impact strength is important. Not worth applying « DodgeTool " 100% - Try applying 7-10% for shadows and 10-20% for neutral areas. In this case, the use of the force of impact is selected individually for each picture.
Application area Dodge / Burn very broad. With its help, you can lighten the iris of the eyes, focusing the viewer's attention on the eyes. The tool is also used to darken the line of the shape of the face, especially in male portraits, to add volume and contrast to the lines of the cheekbones and chin, which makes the male face more strong and rigid. To brighten backlight areas with Dodge Tool will make your photos look livelier and more contrast.
Clone stamp

This tool can be called the most effective image retouching tool. The main function of the tool is to copy a specific area of the image. It can be used to retouch wrinkles in a photo, replacing them with copies of areas with smooth skin. The main parameters of the tool include the following:
« Mode "(Mode)

The operating modes of the stamp are very diverse. For example, the mode "Lighten" will only replace the darker areas of the image, and the « Darken " vice versa. Several experiments should be carried out with them to determine how each mode works.
« Opacity "(Opacity)
This mode allows you to set the transparency or opacity of your retouching (100% - opaque, 0% - completely transparent). For photo retouching, use 10 - 30% to avoid obvious retouching.
This tool is actively used for retouching wrinkles, puffiness and bruises under the eyes. With it, you can even simply remove unwanted objects from your photo.
Black & White

You can find this wonderful tool by clicking « Image–>Adjustments ", or simply by creating an adjustment layer ( Adjustment layer).
The main function of this tool is to correctly convert a color image to black and white. At the same time, you can change the black and white image of each color, giving your photos originality and unforgettable beauty.

This tool also provides a unique opportunity to obtain a very interesting solution for color photography. After applying the mode " B&W", Just turn on layer mode "Overlay" and by controlling transparency and color modes “ B&W», Create your own unique photo. And the inclusion of a check mark "Tint" makes it possible to tint the image in the desired color.
Shadow /Highlights

This tool is also on the tab Image-> Adjustments and is designed to darken overexposed areas and draw light from shadows. It also does a great job of creating a sense of greater depth in the photo.
By the way, here's how it is created in!
1. Press Tab to hide the toolbar and palettes, Shift + Tab will hide only the palettes.
2. Double click on the gray background will open a dialog box for opening a file.
3. Press Alt + Ctrl + A to select all layers.
4. Caps Lock will change your cursor to a clearer cross.
5. Press the F key and you can select one of three different screen modes to make the work area larger.
6. To draw a straight line with a brush or pencil, make one click at the start point, then hold down Shift + Click at the end point.
7. Pressing Ctrl will turn any tool into a Move Tool (Move), while holding it.
8. Pressing Space (Space) will turn any tool into a Hand Tool (Hand), while holding it.
9. Pressing Ctrl and "+" or "-" increases and decreases the scale of the image.
10. If you use the Eyedropper Tool (Eyedropper) with pressed Alt - this will take a color swatch for the background color.
11. Use Ctrl + Alt + Z and Ctrl + Shift + Z to undo and redo a series of actions.
12. The size of the canvas can be easily enlarged using the Crop Tool, drag it outside the canvas and click OK.
13. Ctrl + J will create a copy of the current layer.
14. Ctrl + Shift + E will merge all visible layers into one, Ctrl + Shift + Alt + E will merge a copy of the visible layers into one new layer.
15. Ctrl + D to deselect, Ctrl + Shift + D to return the selection.
16. Shift and "+" or Shift and "-" will change the layer's blend mode to: Normal, Dissolve, Multiply, Screen, Overlay, etc.
17. If the Brush tool is selected, the transparency of the tool can be changed by clicking on the corresponding number on the keyboard.
18. Hold Alt and click on the eye icon next to the layer thumbnail on the layers palette to hide all other layers except the current one.
19. Select the layer, hold Alt and click on the border between the top and the current layer to create a Cliping Mask.
20. Hold Alt and click on the "Create a new layer" button on the layers panel to open a dialog box with settings for the new layer.
21. Hold Alt and click on the "Create a new channel" button in the channels panel to create an alpha channel.
22. The Move Tool has an option to auto-select the layer "Auto Select Layer" in the settings, depending on the place of the click.
23. Working with the Grid, drag the upper left corner where the scales for the Grid are located, and the origin for them will be at the point where you release the mouse button. Double click in the upper corner will reset the reference point to its original position.
24. Having created a path using the Pen Tool, you can hide / show it again using the Ctrl + Shift + H combination.
25. Ctrl + Tab will switch you between different image windows.
26. Holding Shift + Alt the object will be transformed proportionally from the center.
27. If you have the Move Tool selected and you want to copy something, just hold down Alt and drag the image. Holding Shift + Alt the object can be easily moved along the Grid lines.
28. If you want to align the horizon or uneven edges after scanning, then take the Ruler Tool (Ruler), draw a line along your curve, then go to Image> Image Rotation> Arbitrary, photoshop will substitute the rotation angle values by itself, it remains to click OK and the image rotated.
29. Press Ctrl + R to display the Rules panel.
30. Ctr + E will merge the current layer with the underlying one.
31. If the Brush Tool is selected, you can control the brush diameter using the buttons "[" and "]".
32. Double click on the Zoom Tool will return the image scale to 100%, and on the Hand Tool will stretch the image onto the screen area.
33. Change the active layer with Alt + [or].
34. Move the active layer up or down using Ctrl + [or].
35. To hide the Grid guides, press Ctrl + H.
36. Press X to switch the foreground and background colors in places.
37. Press D to reset the foreground and background colors to their default colors: black and white.
38. Press F5 to display the Brushes palette.
39. Ctrl + click on the layer thumbnail in the layers panel will create a selection of the layer's contents.
40. If you want to see the contents of the layer mask, then hold down Alt and click on the layer mask.
41. Alt + click on the layer mask creation icon will create a black mask.
42. For better organization of layers - group the selected ones by pressing Ctrl + G.
43. Ctrl + Shift + N will create a new file, displaying a dialog box; Ctrl + Shift + Alt + N will create a new layer in the working file.
44. When the Brush Tool is active, the [and] keys increase and decrease the diameter of the brush, and Shift + [or] change the hardness of the brush.
45. Press Alt to make the Burning Tool perform the function of the Dodge Tool, and vice versa.
46. When you create text, pressing Enter creates a new line, to finish writing press Ctrl + Enter or Enter on the numeric keypad.
47. You can move the layer to any other open image in Photoshop, thus. a copy of the layer will be created. Hold down Shift while dragging and the content of the layer will be pasted clearly in the center.
48. After applying the filter, its effect can be softened using the Fade function by pressing Shift + Ctrl + F.
49. You can copy the layer mask by dragging it with pressed Alt to another layer.
50. From the vertical Grid you can easily get the horizontal one by selecting the Move Tool, hold down Alt and click on the guide itself. And vice versa.


