An external hard drive is a portable storage device containing an information storage device (HDD or SSD) and a controller for interacting with a computer via USB. When connecting such devices to a PC, some problems are sometimes observed, in particular, the absence of a disk in the "Computer" folder. We will talk about this problem in this article.
There are several reasons for this problem. If a new disk is connected, then, perhaps, Windows "forgot" to inform about it and offer to install drivers, format the media. In the case of old drives, this can be the creation of partitions on another computer using programs, the presence of a blocking virus, as well as the usual malfunction of the controller, the disk itself, the cable or the port on the PC.
Another reason is lack of nutrition. Let's start with her.
Reason 1: Nutrition
Quite often, due to the shortage of USB ports, users connect several devices to one socket through a hub (splitter). If the connected devices require power from the USB connector, there may be a power shortage. Hence the problem: the hard disk may not start and, accordingly, may not appear in the system. The same situation can arise when ports are overloaded with power-hungry devices.
In this situation, you can do the following: try to free one of the ports for an external drive or, in extreme cases, purchase a hub with additional power. Some portable drives may also require additional power supply, as evidenced by the presence of not only the USB cable in the kit, but also the power cable. Such a cable can have two connectors for connecting to USB, or a completely separate power supply unit.

Reason 2: Unformatted disk
When connecting a new blank disk to the PC, the system usually reports that the media is not formatted and prompts you to do so. In some cases, this does not happen and it is sometimes necessary to do this procedure manually.
- Go to "Control Panel"... This can be done from the menu "Start" or press the keyboard shortcut Win + R and enter the command:

- Next we go to "Administration".

- Find a shortcut with the name "Computer Management".

- Go to the section "Disk Management".

- We are looking for our disk in the list. You can distinguish it from others by its size, as well as by the RAW file system.

- Clicking on the disk PKM and select the context menu item "Format".

- Next, select the label (name) and the file system. We put a daw opposite "Quick Format" and press OK... All that remains is to wait for the end of the process.

- The new disc appeared in the folder "A computer".

Reason 3: Drive letter
This problem can arise when performing disk operations - formatting, partitioning - on another computer using special software.
In such cases, you need to set the letter manually in the snap-in "Disk Management".
Reason 4: Drivers
The operating system is a very complex software and that is why various failures often occur in it. In normal mode, Windows itself installs standard drivers for new devices, but this is not always the case. If the system does not start the driver installation when the external drive is connected, then you can try to restart the computer. In most cases, this is sufficient. If the situation does not change, you will have to “work with pens”.

In the event that the software for the disk could not be installed, you need to check the branch "Disk devices"... If it has a drive with a yellow icon, it means that the OS does not have such a driver or it is damaged.

Force installation will help resolve the issue. You can find software for the device manually on the manufacturer's website (perhaps there was a driver disc in the kit) or try to download it automatically from the network.

Reason 5: Viruses
Virus programs, among other nasty things, can prevent the initialization of external drives in the system. Most often they are located on the removable disk itself, but they may also be present on your PC. First, check your system and, if any, second hard drive for viruses.
Using the tools given in the article above, it will not work to check the external drive, since it cannot be initialized. Only a bootable USB flash drive with an antivirus scanner, for example, Kaspersky Rescue Disk, will help here. With its help, you can scan a medium for viruses without loading system files and services, and therefore the subject of an attack.

Reason 6: Physical problems
Physical malfunctions include the breakdown of the disk itself or the controller, failure of ports on the computer, as well as the banal "breaking" of the USB or power cable.
To determine the malfunction, you can do the following:
- Replace cables with known good ones.
- Connect the disk to other USB ports, if it works, then the connector is faulty.
- Dismantle the device and connect the drive directly to the motherboard (do not forget to turn off your computer before doing this). If the media is detected, then there is a controller malfunction, if not, then the disk. You can try to restore a non-working HDD at a service center, otherwise it will go straight to the trash can.
In this article, we will show you how to make sure that USBflash drive or SDthe card was detected in the Windows system like a normal local hard drive... You are probably asking, why is this necessary? The fact is that Windows by default defines USB flash drives and memory cards as removable drives that cannot be divided into several partitions using Windows standards. And even if you split the flash drive into two or more partitions using third-party utilities (in the same Linux), then only the first of them will be available in the Windows operating system (by the way, a built-in one appeared in Windows 10 1703). Those. Windows supports normal work with multipartitions only for HDD disks, which are defined in the system as local (i.e. non-removable).
RMB bits and USB sticks
Windows operating systems recognize USB flash drives as removable / removable devices due to the presence of a special bit descriptor on each device RMB(removablemediabit) ... If, when polling a connected device via the StorageDeviceProperty function, the system determines that RMB = 1, it concludes that the connected device is a removable storage device. Thus, in order from the system's point of view to convert a USB-flex to a hard disk, it is enough to modify this descriptor. This can be done directly (which is quite risky due to differences in hardware implementations of specific devices, and it is not always possible), or indirectly, by replacing the USB device's response using a special driver that allows filtering information in the device's response.
Advice... Some manufacturers produce special utilities for flashing the controller of their flash drives. First of all, try to find such a utility and / or firmware on the manufacturer's website. This is the most correct way. If such a utility is not found, follow the recommendations from this article.
Connect a USB flash drive to any free port on your computer, then open the Disk Management Manager ( diskmgmt.msc) and make sure that its type is defined in the system as Removable(Removable device) .
Also, the device type can be viewed on the Volumes tab in the disk properties (as we can see here Type: Removable). 
Or using the diskpart command:
List volume

In this article, we will consider two ways to change the RMB bit on a USB flash drive - using the Hitachi filter driver (changes are made only at the driver level of a specific computer) and changing the bit in the controller firmware using the BootIt utility from Lexar (a more universal method, but there is a number of restrictions and does not apply to all models of flash drives and SD cards). Although both of these methods are quite old and I initially tested them on Windows 7, they continue to be relevant and work equally well on modern Windows 10.
Lexar BootIt Utility
Recently I came across a rather interesting utility - LexarBootIt... It is a free portable program that can change the RMB of a removable storage device to a fixed USB device (or vice versa). Despite the fact that the Lexar BootIt utility is designed for Lexar devices (Micron, Crucial), it can work with flash drives from other manufacturers. BootIt utility supports all versions of Windows from Windows XP to Windows 10.
Important... The utility is guaranteed to work for Lexar drives. Judging by the reviews, the "Flip removable bit" function does not work on fast USB 3.0 flash drives. In addition, when you reflash the controller, you void the warranty for the USB flash drive and can make it inoperable.
You can download BootIt on the Lexar website (lexar_usb_tool) or from our website ().
- Run BootIt.exe as administrator
- In the list of devices, select your USB flash drive
- Click on the button Flip Removable Bit
- Save your changes by clicking OK.

Reconnect the device and use Device Manager to verify that it has changed from Removable to Basic.

If the BootIt utility did not help to change the RMB bit on the removable drive, try the following method based on the Hitachi Microdrive filter driver
Filter driver for flash drives Hitachi Microdrive
In order for a USB flash drive or SD card to be recognized in the system as a hard drive, we need a special filter driver that allows us to modify the data passed through the system stack of the current device driver. We will use Hitachi's USB flash drive filter driver ( Hitachi Microdrive driver), which at the OS driver level allows you to change the type of flash drive from removable to fixed (USB-ZIP -> USB-HDD). By using this driver, you can hide from the system that the connected device is removable. As a result, the system will consider that it is working with a regular hard disk, which can be divided into partitions that will be simultaneously available in the system.
Hitachi Microdrive Driver Archives:
- 32 bit systems - (3.0 Kb)
- Hitachi Microdrive version for 64 bit systems - (3.8 Kb)
It is necessary to download the driver version for your system in accordance with its bitness. Both archives have the same structure and consist of two files:
- cfadisk.inf- installation file with driver settings
- cfadisk.sys- Hitachi driver file
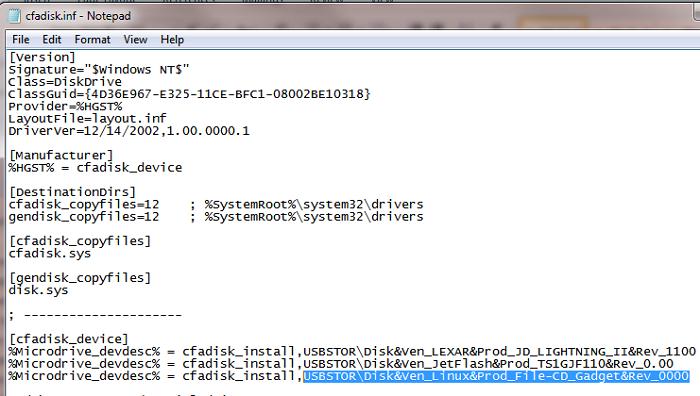
The next step is to identify the device code of our flash drive. To do this, in the properties of the disk on the tab Details in parameter Device Instance Path select and copy ( Ctrl + C) device instance code. 
In our example, this will be:
USBSTOR \ Disk & Ven_Linux & Prod_File-CD_Gadget & Rev_0000 \ 0123456789ABCDEF & 0
Suppose we are planning to install a driver on 64 bit system... Using any test editor, open the file for editing cfadisk.inf... We are interested in the sections cfadisk_device and cfadisk_device.NTamd64.
% Microdrive_devdesc% = cfadisk_install, IDE \ DiskTS64GCF400 ______________________________ 20101008% Microdrive_devdesc% = cfadisk_install, IDE \ DiskTS64GCF400 ______________________________ 20101008
We change the value of DiskTS64GCF400______________________________20101008 to the code of our device.
Important! In the code of the device instance, it is necessary to discard the part after the second "\" (in our example, discard 0123456789ABCDEF & 0).
We get:
% Microdrive_devdesc% = cfadisk_install, IDE \ USBSTOR \ Disk & Ven_Linux & Prod_File-CD_Gadget & Rev_0000% Microdrive_devdesc% = cfadisk_install, IDE \ USBSTOR \ Disk & Ven_Linux & Prod_File-CD_Gadget & Rev_0000
We save the file.
If the driver is installed on a 32 bit system, you need to download the recommended archive, unpack it and open the cfadisk.inf file for editing. Find the section :
% Microdrive_devdesc% = cfadisk_install, USBSTOR \ Disk & Ven_LEXAR & Prod_JD_LIGHTNING_II & Rev_1100% Microdrive_devdesc% = cfadisk_install, USBSTOR \ Disk & Ven_JetFlash & Prod_TS1GJF110 & cf.
Then we will change the data in the last line by specifying the code of the instance of our flash drive, i.e. in our example we get:
% Microdrive_devdesc% = cfadisk_install, USBSTOR \ Disk & Ven_LEXAR & Prod_JD_LIGHTNING_II & Rev_1100% Microdrive_devdesc% = cfadisk_install, USBSTOR \ Disk & Ven_JetFlash & Prod_TS1GJF110 & Rev_0dev% Microd_TS1GJF110 & Rev_0dev% Microdinstall
Advice... If you want the USB flash drive to be displayed with a specific name in the device manager, you need to edit the value of the Microdrive_devdesc variable, for example:
Microdrive_devdesc = "Transcend 64GB DIY SSD"
Installing the Hitachi Microdrive driver instead of the native USB drive driver
It remains to replace the driver used by the USB flash drive.
Important! If the Hitachi Microdrive USB driver is installed on a 64-bit system, then there is no digital signature for this driver, you have to either.
Open the Drivers tab and click the button Update Drivers. 
Specify the folder to the directory into which the downloaded archive with the Hitachi driver is unpacked: 
Let's choose a new driver. 
We ignore the warning about the missing digital signature of the driver. 
Advice... In Windows 10 and Windows 8, when installing the driver, the following error appears:
Windows found drivers for this device, but an error occurred while trying to install these drivers.
Hitachi Microdrive
Third party inf does not contain signature information

To disable verification of the digital signature of the driver, run the commands:
bcdedit.exe / set nointegritychecks ON
bcdedit.exe / set TESTSIGNING ON
Restart your computer and try to install the driver again.
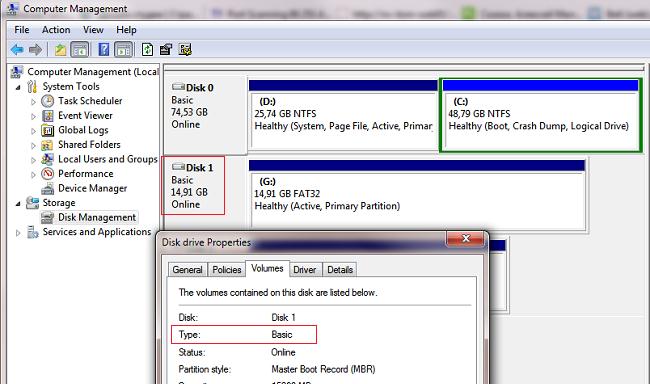
It remains to restart the computer and, opening the disk manager, make sure that your flash drive has begun to be defined as a regular hard drive ( Type: Basic), and the Hitachi driver is used as the driver.
Opening the explorer, you can also make sure that the icon of the flash drive has changed, it began to appear as a hard drive, a regular disk. 
Now you can work with this flash drive as with a regular HDD: create partitions, specify an active partition, create dynamic disks, install software that does not work from flash drives, etc.
Important... On other Windows computers without this driver, the second device partition will not be available.
To remove the Hitachi Microdrive driver, open the disk properties and click the Update Driver button on the driver tab - the system will install the native driver by itself.

Advice... If after installing the Hitachi driver, the system stops booting with BSOD, you need to boot the computer from the Windows / Live CD and manually delete the following files:
- cfadisk.sys in the% windir% \ System32 \ drivers directory
- Directory "cfadisk.inf_amd64_ ..." from% windir% \ System32 \ DriverStore \ FileRepositoty
Reboot your computer
You need to understand that this solution will only work on the system on which the corresponding driver is installed.
Usually, the suspects in this case are software malfunctions, incorrect operating system settings, outdated drivers, malfunctions of the computer's USB ports, adapters or the drives themselves.
Depending on the reasons, in each case the problem manifests itself in a different way. It happens that the computer does not react at all to a USB flash drive or hard drive. In other situations, the sound of connecting a new device is heard, but the drive icon does not appear in the explorer. And sometimes the computer just freezes right after contact with the USB device.
What to do if a Windows computer does not see a USB flash drive or external hard drive
First, figure out what exactly the problem arises: with a computer, an adapter (if the connection is via a cable) or a drive. Try connecting your USB device through different ports. If it does not help and you are using the cable, try replacing it with a spare one. If unsuccessful, check if the drive opens on other computers.
If the device works on another PC or you have no way to check it
Connect a hard drive or flash drive to your computer and follow these steps in order. If the first does not help, move on to the next and so on.
If the other PC does not see the drive either, or all of the above tips did not help
In this case, the problem is most likely in the drive itself.
If you have a flash drive, not a hard drive, you can use special utilities to fix software errors. Such software can usually be found on the manufacturer's website. For example, JetFlash Online Recovery is for Transcend drives. And USB Flash Drive Online Recovery is for ADATA flash drives. But keep in mind that during the recovery process, these utilities erase all data from flash drives.
If none of the above helped, then it is probably a physical malfunction of the hard drive or flash drive. Then it is better to show the device to a specialist or return it to the store under warranty.
What to do if Mac does not see a USB flash drive or external hard drive
On Apple computers, the verification procedure is somewhat different, but it follows approximately the same algorithm. We will assume that you have already tried restarting your computer, disconnecting and connecting a USB flash drive, and also made sure that the connection is reliable. If this does not help, you need to do the following:
Open the built-in tool for working with disks ("Programs" → "Utilities" → "Disk Utility") and check if the problematic flash drive is displayed there. If the drive is still visible, try it by pressing the "Erase" button and reconnect it. Keep in mind that all data from the flash drive will be permanently deleted.

A dedicated Mac diagnostic program provides detailed information about all the software and hardware components of your computer, including USB devices. Open the Apple menu, then hold down the Option key and click System Information and navigate to the USB section in the menu that appears.

If the flash drive is there, then the problem lies in the software and you can try to restore the disk by referring to the manufacturer's recommendations. If there is no information about the flash drive, then the matter is in a physical malfunction, and you should contact a store or service center if the repair makes sense.


