Attention! In accordance with paragraph 3 of Article 80 and paragraph 5 of Article 174 of the Tax Code
Installation of the "Legal entity taxpayer" program

To register, you must enter your Login, Password, Confirm Password and E-mail:

After clicking the "Register" button, an email will be sent with a link to confirm registration:

After confirming the e-mail and entering your personal account, a message will appear about the need to register a certificate and get an identifier:

After clicking on the "Register certificate" button, a form for uploading a certificate will open:
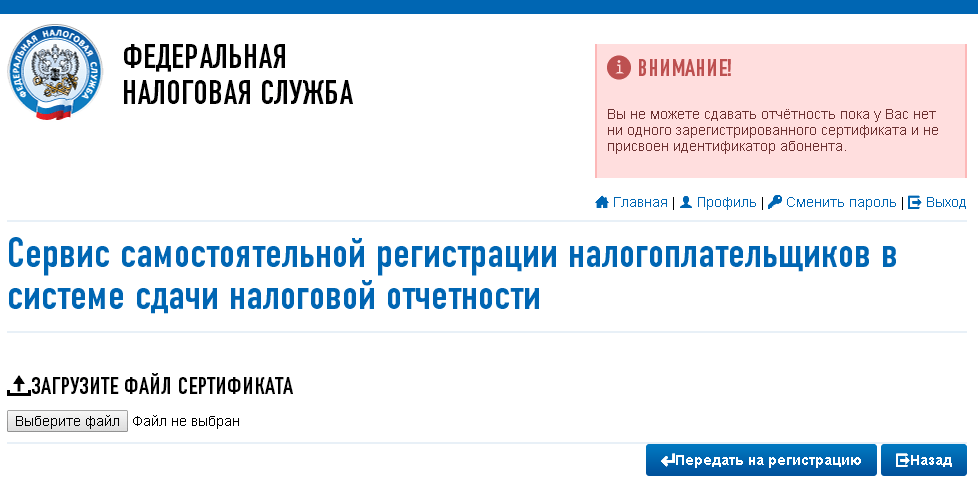
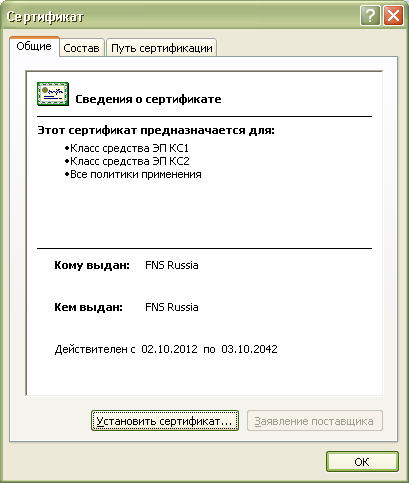
After selecting the certificate file, a window with information about the organization will open, in which you will need to fill in the empty fields (KPP and Tax authority code):

Then press the button "Submit for registration". The page will be refreshed and the status of the certificate registration application will be displayed:

When the certificate is registered and an identifier is assigned, a message will be sent to the mail (specified during registration) about the successful registration and the assignment of the identifier.
After refreshing the page, the status of the certificate registration will change, and the assigned identifier will be displayed in the organization data:

For reporting it is necessary to use the "Service for submission of tax and accounting reports."
Reporting to the Federal Tax Service
Attention! In accordance with clause 3 of Article 80 and clause 5 of Article 174 of the Tax Code of the Russian Federation, VAT returns are not accepted through the FTS service. Also, in accordance with clause 10 of Article 431 of the Tax Code of the Russian Federation, calculations of insurance premiums through this service are not accepted.
To submit tax and financial statements in electronic form, you need to go to the page: http://nalog.ru/rn77/service/pred_elv/:

Next, you need to install the Certificate of the public key signature of the MI FTS of Russia for the data center, the root certificate of the FTS of Russia and the list of revoked certificates.
Installing the public key of the Federal Tax Service
To install the certificate of the public key signature of the MI FTS of Russia for the data center, you need to save it and start the installation with a double click of the mouse.


It is necessary to check "Automatically select a storage based on the type of certificate", click "Next":


The certificate of the public key signature of the MI FTS of Russia for the data center has been installed.
Installing the root certificate
To install the root certificate of the Federal Tax Service, follow the link: http://www.nalog.ru/rn77/about_fts/uc_fns/, download the root certificate of the Federal Tax Service of Russia and double-click to open it, to do this, in the file open window, click the "Open ":

On the "General" tab, click the "Install certificate ..." button:
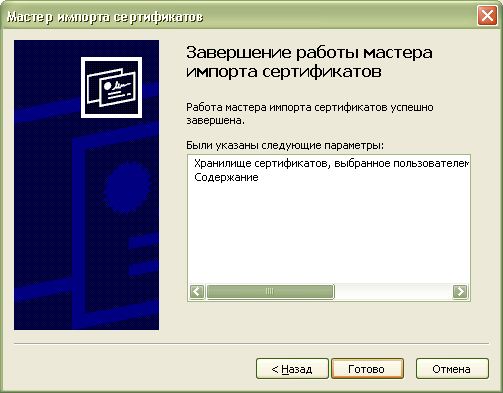
The "Certificate Import Wizard" will open:
You must select "Place all certificates in the following store", click the "Browse" button and select the "Trusted Root Certification Authorities" store and click "OK":

After selecting the certificate store, click "Next":

To close the Certificate Import Wizard, click the Finish button:
In the message window about the successful import of the certificate, click the "OK" button:
The root certificate is installed.
Installing a Certificate Revocation List
To install the revocation list, you need to save it to your computer, right-click on it and select "Install revocation list (CRL)". In the windows that open, sequentially click "Next" - "Next" - "Finish" without changing the default settings.
After installing the certificates and the revocation list, click "Go to" Service for submitting tax and accounting reports ".
Get acquainted with the technology of receiving and processing declarations (settlements) and proceed to checking the conditions by clicking "Check the fulfillment of conditions":

Make sure that all conditions are met, and click "Perform checks":

In the fourth step of verification, you will be prompted to select a digital certificate.
After selecting the required certificate, click "OK":

After checking the signing key certificate, click "Start working with the service":

In the window that opens:

You need to fill in the empty fields (Subscriber code, checkpoint) and click "Save":

After saving the entered data, go to the "File Download" section:

Click on "Browse" and select a container prepared using the program "Legal entity taxpayer".
After selecting the file, press the "Send" button.
After the file is transferred, an automatic transition to the processing status check page will occur:

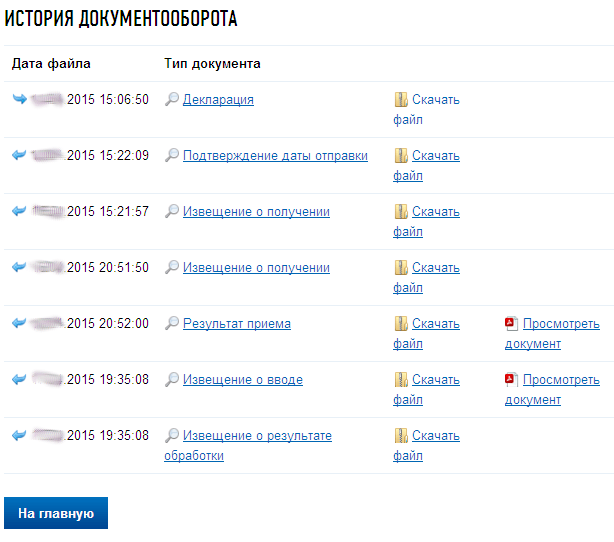
After the completion of the workflow, the status will change to "Completed":

You can view the sent file and the history of document flow by clicking on the link in the column "Status" - "Completed (successfully)":

In the "History of document flow" you can see or download all the regulatory documents.
In the future, you can go to this service at any time (https://service.nalog.ru/nbo/) and view the declarations (calculations) sent earlier.
The tariff line takes into account the different needs of users. Each tariff is a kind of constructor: a certain set of possibilities is offered in the basic version. If necessary, it is available to connect additional extensions and services. You can select a tariff and choose the type of electronic signature based on the list of sites required for operation.
Electronic signature
An electronic signature (ES, EDS) is information in electronic form, a special requisite of the document, which allows you to establish the absence of distortion of information in an electronic document from the moment the ES is generated and to confirm that the ES belongs to the owner. The value of the attribute is obtained as a result of cryptographic transformation of information.
Types of electronic signatures:
An important requisite of an electronic document is an electronic signature, which is usually denoted as an electronic signature or an electronic signature. ES means:
Simple electronic signature
a signature that, through the use of codes, passwords or other means, confirms the fact of the formation of an electronic signature by a certain person.
Unqualified Electronic Signature (NEP)
enhanced electronic signature, which is obtained as a result of cryptographic transformation of information using an electronic signature key. Allows you to identify the person who signed the electronic document, to detect the fact of making changes to the document after signing it; equates a document to a document signed with the seal of the organization, if it is established by the regulations of the information system in which this type of signature is used, or by agreement of the parties participating in the electronic document flow.
Qualified Electronic Signature (CEP)
enhanced electronic signature, complies with all the features of the NEP and additionally contains a key for verifying the electronic signature in a qualified certificate. To create and verify an electronic signature, cryptographic protection means are used, which are certified by the FSB of the Russian Federation. Due to the regulated rules for issuing and describing the structure of the electronic signature in the Federal Law No. 63-FZ "On Electronic Signature", it can be used in information systems without the need to describe the application in the regulations or agreement of the parties.
Who needs a qualified electronic signature
Depending on the needs of the user, the form of business, the legal status, the CEP can be used to certify documents for various purposes.
Physical person can use a qualified electronic signature to issue a passport or driver's license; submit a 3-NDFL declaration; send documents for admission to the university; remotely sign an employment contract; get a patent for an invention, etc.
- EDS for an individual is the cheapest, designed to work with the state. portals and for conducting legally significant document flow with confirmation of the sender's identity.
Individual entrepreneurs and legal entities CEP is necessary to carry out legally significant electronic document flow, send reports in electronic form, participate in tenders, work on state portals and information systems.
- The entrepreneur's electronic signature allows you to organize digital workflow, work for the state. portals, submit reports, participate in commercial auctions and bankruptcy auctions.
- The universal digital signature of a legal entity gives ample opportunities: organizing EDM, submitting reports, participating in tenders according to No. 44-FZ and No. 223-FZ, participation in commercial tenders (Fabrikant, AETP, B2B-Center, etc.), work with information systems: AZIPI, Interfax, PRIME and others.
State and municipal institutions and organizations use electronic signatures when working in specialized information systems, such as SMEV, Rosobrnadzor and others.
Spheres of application of a qualified electronic signature
Legally significant electronic document management (EDF)
EDF is a document flow in which system participants accept for execution documents in electronic form, certified by an electronic signature, and are responsible for the performance or non-performance of the actions specified in them. CEP ensures the necessary integrity, reliability, authenticity, non-repudiation and legal significance of electronic documents subject to the conditions of the Federal Law of 06.04.2011 No. 63-FZ "On Electronic Signatures". The use of CEP in EDM gives legal significance to electronic document flow and allows:
- conclude contracts;
- sign documents;
- exchange UPD (universal transfer documents), invoices, invoices, acts, payment orders and other documentation with counterparties in electronic form.
Electronic reporting
Electronic reporting is the provision of reporting documents in electronic form using the Internet to regulatory and supervisory authorities: the Federal Tax Service, the Pension Fund of the Russian Federation, Rosstat, etc.
Important! Electronic document flow and electronic reporting is carried out through an EDM operator licensed by Roskomnadzor of the Russian Federation. The operator of electronic document management "KALUGA ASTRAL" operates on the basis of licenses of the Federal Service for Supervision in the Sphere of Communications and Mass Communications for the provision of telematic communication services No. 120666 dated June 05, 2014 and for the provision of communication services for data transmission, with the exception of communication services for transmission data for the purpose of transmitting voice information No. 145888 dated September 02, 2016.
Electronic bidding
Electronic trading is a form of trading in which orders for the supply of goods or services are placed on the Internet at specialized electronic platforms. Bidders have access to procurement by commercial firms and government procurement.
Both legal entities and individuals can participate in the auction
Certification of documents required for participation in the competition, submission of a price offer and signing of a contract with the winner, takes place only if there is an EDS.
The platform on which the auction takes place itself determines the requirements for the signature used.
State portals
Depending on the needs of the user, the CEP gives the right:
- receive the services of state bodies and municipal organizations on the corresponding portals:
- Government services;
- FTS;
- FIU;
- FIPS;
- Rosstat;
- Rosobrnadzor, etc.
- work in federal state information systems, such as:
- EGAIS;
- Mercury;
- Honest SIGN;
- FIS FRDO and others.
How to buy an electronic signature
Astral-ET and 1C-ETP software products allow purchasing electronic signatures according to a simplified scheme, urgently within one hour or within one day. The systems are fully automated and operate via an Internet browser. However, according to it, in order to obtain the electronic signature, a personal meeting of the applicant with representatives of the certification center is required to identify the owner. Therefore, in order to obtain an EDS, it is necessary to set aside time to visit our office.
Documents for obtaining ES
A complete list of documents for obtaining an electronic signature is posted
Advantages of TC "Kaluga Astral" and "Astral-M"
Save time
You can get a signature within 1 hour, if you provide all the necessary documents
Professional help
Our specialists will perform all the settings for working with CEP and trading platforms.
Territorial accessibility
Qualified assistance can be obtained in our Sales Centers or from partners in any region.
24/7 technical support
Our call center is open seven days a week, 24 hours a day.
Call or order a qualified certificate via the feedback form!
The article contains step-by-step instructions for setting up a computer to work in the personal account of the Federal Tax Service and the subsequent registration of an online cash register.
Instructions: how to set up a computer to work in the personal account of the Federal Tax Service
Preparing for setup
First of all, check the presence / absence of software and other technical means for working on the ETP.
You will need:
- License for a means of cryptographic protection of information (CIPF);
- to work at federal trading floors;
- A computer with an installed operating system (OS) Windows XP / Windows Vista / Windows 7 / Windows 8;
- Internet Explorer browser version 8.0 and higher;
- Administrator rights to install software;
- Availability of Internet access.
If everything is there, then you are ready to set up.
Licenses for cryptographic information protection tools and an electronic signature certificate can be purchased from the "ASP Electronic Services" company.
To download the distribution kit, register on the website, go to the "Support" section and select "Download Center".
Determining the version and bitness of the operating system
CryptoPro is divided into versions of operating systems (Windows XP, Windows 7, etc.) and their bitness (x64 / x86). Therefore, in order to download the product you need, it will first determine the version of the operating system (OS). Right-click on the "Computer" icon ("My Computer" / "This Computer") and select the "Properties" context menu item.
After clicking, a window with information about the operating system will appear on the screen.
In this example, the computer is running Windows 8 Professional. Accordingly, you need to download the CryptoPro CSP distribution kit. Accept the license agreement to start downloading.
After downloading the distribution, proceed with the installation of the CIPF. Run the downloaded distribution and click "Install".
Installation of all software is performed on behalf of a user with administrator rights.

The necessary packages and modules will be automatically unpacked, after the installation of which a window will appear about the successful installation.

After installation, a trial mode is activated for 3 months, to continue working, enter the serial number.
Serial Number Entry / License Activation
If you are using a demo version of CryptoPro CSP, you can skip this item "Entering a serial number / Activating a license".
To enter the serial number, enter the "Control Panel", select the "System and Security" category, and then - the "CryptoPro CSP" program.
The workspace "CryptoPro CSP" will be displayed on the screen.
In the "License" section, click the "Enter license ..." button.
Indicate the full name of the user who plans to work on this computer, the name of the organization and the serial number that is indicated on the form with the purchased license.
Complete the activation by clicking on the "OK" button.
The license term will change according to the purchased license.
At the moment, work with "CryptoPro CSP" has been completed, but you may have to return to it later to configure electronic signatures and install root certificates.
2. Installing the plugin
To work with cryptography (encryption) on the FTS portal, install a special plug-in on your computer. You can download it at the link: http://www.cryptopro.ru/products/cades/plugin/.
There are no special nuances in installing the plugin, you just need to download the distribution kit, run it and follow the instructions of the installation wizard by clicking the "Next" button.
3. Configuring secure media (eToken / ruToken / JaCarta)
After installing the cryptographic information protection tool and the CAPICOM library, proceed to setting up the protected medium on which the electronic signature is stored (eToken, Rutoken, JaCarta).
To work with media, you need to install additional software (drivers). Below are the media and links to the official developer sites for downloading drivers.
JaCarta- More often than not, installation of additional software is not required, the system will install the necessary drivers by itself when the device is connected for the first time. However, if the automatic download did not work, download the utility from the official website: http://www.aladdin-rd.ru/support/downloads/39038/.
There is nothing difficult in installing drivers. Follow the instructions of the installation wizard by clicking the button "Further".
Important! When installing the drivers, remove the protected media from the USB connector of your computer.
To work with electronic signatures, in accordance with legal requirements, certified secure media are used. Do not write electronic signatures on ordinary usb media and in the operating system registry, this is unsafe.
4. Working with certificates
After installing the main and additional software, you can proceed to configuring certificates. To do this, it is necessary to give permission to CryptoPro CSP to work with a certain protected medium.
Insert the secured media into a USB port on your computer.
Launch the "CryptoPro CSP" workspace from the Control Panel.
Go to the tab "Equipment" and in the section "Private Key Readers" press the button "Configure readers".
A window will appear on the screen "Reader Management".
Place the mouse cursor on the item "All smart card readers" and press "Add…".
A window of the reader installation wizard will open, click "Further" to continue.
Rice. ten
In the next window, select the manufacturer "All manufacturers" In chapter "Producers".
In chapter "Available readers" you need to select the name of the protected medium on which the electronic signature is recorded (eToken / JaCarta / Rutoken). After selecting the reader, press the button "Further".

Rice. eleven
After the program completes all the necessary actions, a window will appear on the screen with information about the successful addition of a new reader. Finish adding the reader by pressing the button "Ready".

Rice. 12
After configuring the readers, go to the tab "Service" and in the section "Certificates in the private key container" press the button "View certificates in the container ...".

Rice. 13
A window with a key container selection will appear on the screen. Click the button "Overview" to display electronic signatures that are recorded on your secure medium.

Rice. fourteen
In a new window with a choice of a key container, select the first entry in order and click "OK" and then the button "Further".

Rice. 15
Information about the electronic signature you have chosen will open. If you have determined that you need a different signature now, click the button "Back" and choose a different signature. Continue the procedure until you find the required electronic signature.

Rice. 16
As soon as you find the required electronic signature, press the button "Install".
After successfully installing the personal certificate, you will receive a notification. Click the button "OK" to complete.

If you have several certificates (with different extensions or for different organizations), go through this step for each of the certificates.
After installing the certificate, do not rush to close the information window. It is necessary to install the root certificate of the Certification Authority (CA) that produced the electronic signature.
To do this, press the button "Properties"... An electronic signature certificate will open.

In the tab "General" in the "Certificate Details" section, you will see the information: "This certificate could not be verified by tracing it to a trusted certification authority." To fix this, go to the tab "Certification path".

In chapter "Certification path" the chain is indicated from the name of the head to the publisher (certification center). Double-click the left mouse button on the root certificate of the certification authority to install it. Another window of the electronic signature certificate will open.

Rice. twenty
Click the button "Install Certificate", the Certificate Import Wizard will open on the screen, click "Further".
At this stage, you need to place the cursor in the item "Place all certificates in the following store", then press the button "Overview".

Rice. 21
A list of storages for installing certificates will open. You must select a repository Trusted Root Certification Authorities... Complete the selection by clicking the button "OK" and "Further".
At the final stage, press the button "Ready".

If you did everything correctly, the installation of the certificate will begin. Confirm the installation. To do this, in the Security Alert window, click "Yes".

Successful installation is confirmed by a notification window. Close it by clicking "OK".

If you have several certificates (with different extensions or for different organizations), you must go through this step for each certificate.
Attention! All these actions for you will be done by the automatic installation of root certificates of the certification authority. To do this, download the file "CertificateInstaller.zip", run the file from the archive and wait for the inscription "Installation of certificates has been completed successfully. Press any key to exit "(see fig. 24.1).

After installing personal and root certificates, you need to perform verification.
Close the windows with certificates and return to the "CryptoPro CSP" window with information about the certificate. Press the button again "Properties".
A certificate with detailed information will appear on the screen: for whom it is intended, to whom and by whom it was issued. If this is the case, close all the CryptoPro CSP windows, they will no longer be needed.

If you need to build the whole chain to the Head Certification Center, download the certificates of certification centers of the Ministry of Telecom and Mass Communications "Head Certification Center", "TC 1 IS GUTs", "TC 2 IS GUTs" download at the link: http://e-trust.gosuslugi.ru/MainCA ...
4. Browser settings
At the final stage, configure the Internet browser.
The FTS portal works exclusively in Internet Explorer version 8.0 or higher. Because it is built into every Windows operating system and the user does not need to install additional browsers. In addition, not all Internet browsers support the ActiveX components required to perform cryptographic tasks on the Internet.
In order for the browser to run all the necessary "scripts" and modules for working with cryptography, it is necessary to add the addresses of electronic sites to the trusted addresses.
Launch Internet Explorer browser. Click the button « Alt» on keyboard. After that, an action bar will appear at the top of the browser. Press the button on the panel "Service" and select "Browser properties".
A window will open "Browser properties"... To configure trusted sites, go to the tab "Security".

Select a zone "Trusted sites" and press the button "Sites".
At the bottom of the window "Trusted sites" uncheck of the item "For all sites in the zone, server check is required (https:)».

For the personal account of legal entities:
For the personal account of individual entrepreneurs:
Configuring ActiveX Components
After adding the sites, enable the ActiveX components that you need to interact with cryptography in electronic sites.
In the browser properties on the tab "Security" select zone "Reliable nodes"... At the bottom of the window, in the "Security level for this zone" section, click the button "Another".
A window with security settings for trusted sites will open. In the option "Access data sources outside the domain" in the "Miscellaneous" section, and in the option "Block pop-ups" in the "Miscellaneous" section, set the cursors to "Turn on".


Rice. thirty
At the very bottom of the parameter table there is a section "ElementsActiveXand connection modules "... Set cursors to points "Turn on" for all parameters of this section. Click on "OK" and close all currently open windows to complete the browser configuration.

After completing all typical setup, restart Internet Explorer and test.
Click on the " Start check". If the check fails at some stage, you will be notified of this.
Check the correctness of the fulfillment of the conditions of this paragraph and repeat the check.
If the browser is configured correctly, the button "Start working with the service" is activated.
This completes the setup of the workplace for working with the personal account of the Federal Tax Service.
Thank you very much, Mikhail, we did everything promptly and the main thing is clear to me ... Since we have found a common language. I would like to continue the communication with you in the future. I look forward to fruitful cooperation.
Olesya Mikhailovna - General Director LLC "VKS"
On behalf of the State Unitary Enterprise "Sevastopol Aviation Enterprise" we express our gratitude for the professionalism and efficiency of your company! We wish your company continued prosperity!
Guskova Lilia Ivanovna - manager. SUE "SAP"
Thank you, Mikhail, very much for your help with the design. Very qualified employee +5!
Nadia Shamilevna - entrepreneur IP Anoshkina
On behalf of the company "AKB-Auto" and on my own behalf, I express my gratitude to you and all employees of your company for the productive and high-quality work, sensitive attitude to the client's requirements and efficiency in the execution of the ordered work.
Nasibullina Alfira - Senior Manager"AKB-Auto"
I would like to thank the consultant Mikhail for the excellent work, timely and complete consultations. He is very attentive to the client's problems and questions, prompt solution of the most difficult situations, it would seem to me. It's a pleasure to work with Mikhail !!! Now I will recommend your company to my clients and friends. And the technical support consultants are also very polite, attentive, helped to cope with the complex installation of the key. Thanks!!!
Olga Sevostyanova.
Acquiring a key turned out to be very easy and even enjoyable. Many thanks for the assistance to manager Mikhail. Explains complex and massive things to understand, succinctly, but very clearly. In addition, I called the free hotline and online, together with Mikhail I left a request. I got a key made in 2 working days. In general, I recommend it if you save your time, but at the same time want to have an understanding of what you buy and what you pay for. Thanks.
Levitsky Alexander Konstantinovich Samara
Personal gratitude to the consultant Mikhail Vladimirovich for prompt advice and work on the accelerated receipt of the ES certificate. During the preliminary consultation, the optimal set of individual services is selected. The end result is immediate.
Stoyanova N.L. - Chief Accountant LLC "SITEKRIM"
Thank you for your prompt work and competent help! I was very pleased with the consultation!
Dmitry Fomin
Expert Sistema LLC would like to thank the consultant Mikhail for the prompt work! We wish your company growth and prosperity!
Sukhanova M.S. - Appraiser LLC "Expert System", Volgograd
Thanks to the consultant who introduced himself as Mikhail for his prompt work with clients.
Stepan Gennadievich Ponomarev
Many thanks to the consultant Mikhail for his assistance in obtaining an EDS. For operational work and advice on issues arising in the process of registration.
Leonid Nekrasov
The company, represented by its consultant Mikhail, does the impossible! Acceleration of accreditation in less than 1 hour! Payment upon delivery of the service. I thought it couldn't happen. With full responsibility, I can advise you to contact the Center for issuing electronic signatures.


