To whom Forgive. Have sexual intercourse with someone. Elistratov 1994, 313; DL, 43; Raskin, 310; Belyanin, Butenko, 75, 89; TSUZH, 24, 35; UMK, 151; Yuganov, 161; Rossi 2, 270; Baldaev 1, 306; BBI, 169; Milyanenkov, 189; Vakhitov 2003, 21, 32, 77 ...
Wolf stick. Psk. Reeds. SPP 2001, 59. Threshing stick. Gorky. Unapproved Chatterbox, idler. BalSok, 43. Inadequate stick. Perm., Prikam. Unapproved About an awkward, inept, unadapted person. MFS, 72; SGPO, 420. Fire stick. ... ... Big dictionary of Russian sayings
CLEANING OF THE APARTMENT- CLEANING OF THE APARTMENT. There are 3 types of cleaning: daily, weekly and seasonal (general). Cleaning equipment: brushes and brooms for sweeping the floor, brushes for cleaning upholstered furniture, rags, soap and soda for washing, special powders and ointments ... ... The Concise Encyclopedia of the Household
stick- A double-edged sword about what n. doubtful, uncertain, which can lead to favorable and negative consequences. But psychology, gentlemen, although a deep thing, is still like a double-edged sword. ostoevsky. From… … Phraseological dictionary of the Russian language
New Year's children's morning performances are costumed children's holidays, where every child has a desire to stand out in his own way. In suits, many moments play into the hands of the image: from the fabric from which it is made, to accessories. The fashion for wizards and Harry Potter has taken its toll, and now many children want to look just like that, we offer you step-by-step instructions to help you make such an important accessory as a magic wand with your own hands.
Master class number 1: how to make a Harry Potter magic wand

In New Year's costumes, such details as accessories play an important role. It is they who help to place the necessary accents in the image. In this tutorial, we will show you how to make a Harry Potter wand in a short amount of time.
materials
Before starting work, prepare:
- a wooden dowel or a long, even stick;
- hacksaw or saw;
- acrylic paints;
- brush;
- hot glue sticks;
- glue gun;
- sandpaper;
- varnish (can be replaced with clear nail polish);
- bead in the form of a large crystal.

Step 1. From a dowel or wooden stick, cut a piece of the length you need. In this case, the length of the stick was 30 cm. If you didn’t succeed in cutting the dowel carefully, process the edges with sandpaper. It is imperative to clean them so that the child does not get hurt.


Step 2. For the convenience of further work, put the blanks for the future magic wand in an empty jar with a sharp end. On the thicker end, start applying hot glue. Apply it carefully, layer by layer, allowing it to cool slightly, and then giving it a characteristic shape. A little closer to the thinner end of the stick, apply glue in stripes, giving the homemade product a characteristic vegetative relief.
At the top of the stick, make a straight cut straight across the glue. It will be needed to glue the bead.


Step 3. After the glue has completely dried, paint the stick with acrylic paints and, using different shades of brown, add depth to the texture.


Paint the previously prepared flat cut with black paint.

Step 4. After the paint has dried, cover the stick with varnish. It is best to use a spray nail polish or replace it with regular clear nail polish.
Step 5. Glue a bead in the form of a crystal on the base of the magic wand. Also put it on hot glue.

After the glue has dried, the Harry Potter wand is ready!

Master class number 2: do-it-yourself luminous magic wand


Magic wands have become especially popular with children after the film adaptation of J.K. Rowling's book. It's easy to make one for your child or with him. Materials for this will need the most simple. A little more work and money will have to be invested if you want the wand to become truly magical and glow in the dark. How to make a magic wand, we will tell in this master class.

materials
To create a magic wand that can glow in the dark, you will need:
- 2 - 3 thick sheets for drawing;
- PVA glue; clerical knife;
- hot glue sticks and gun;
- acrylic paints;
- wet wipes;
- a small flashlight with an LED bulb;
- wiring;
- blowtorch.
Step 1: Assemble the LED Light for the Wand
Well, if you managed to get a small flashlight with an LED bulb. In this case, you have less work to do.
Remove the bulb itself from the flashlight, remove everything superfluous from it (body, handles, etc.), leaving the switch.
Using a soldering iron, assemble part of the structure from the switch and long wires. Set it aside.


Step 2: preparing the base of the magic wand
For an ordinary magic wand, two sheets of thick drawing paper will suffice. They must be rolled into a cone. One sheet of paper may not be enough - the stick will be short. So twist the two cones and insert one into the other. Since there will be additional decoration on the stick, try to roll the cone as narrowly as possible. To prevent it from falling apart, secure the free ends of the cones with PVA glue.
After the cone is ready, run the wires through it so that the switch is in the handle of the cone.
Cut off the excess wires and solder the LED bulb contacts to them. As a result, it should clearly fit at the end of the stick. At the location of the switch, cut a hole for the switch with a clerical knife.
Carefully fill the cone itself with hot glue. Attach the light bulb to the outside of the end of the magic wand and the switch. Do this work yourself. Working with hot glue requires skill. Plus, they get burned easily. When filling the cone, work with the glue in stages, periodically letting it cool completely.
Working with glue on the outside, shape it after it cools down a bit. So the wand will look neater.


Step 3: Forming and Preparing to Paint
After the glue has dried, we also draw volumetric patterns on the outside of the stick.
As the glue dries, it is necessary to start preparing the surface. Ideally, a white primer should be applied. If not, regular white acrylic paint will do.


Step 4: painting and aging
Paint the entire stick brown with a brush. After the paint has dried, you can give the wand an authentic vintage look.
Take black acrylic paint, dilute it a little with water and use a brush to drive it into a stick.
Wipe the main convex parts of the stick with a damp cloth. As a result of such manipulations, black paint will remain in the irregularities on the surface, giving visual depth.
Cover convex patterns with golden paint and also remove some of the paint with a napkin. Leave the stick to dry completely.


A vertical stick or pipe is used for various purposes: programmers use a dash for disjunction functions or separation of object parameters, mathematics as a sign of a module or norm, and pseudographics lovers draw tables with it.
However, the cherished symbol seems to be playing hide and seek with the user: it is rather difficult to find a way to enter the pipe.
Some do not bother and are content with uppercase English i, while others are desperately looking for options to enter a genuine character.
If you are one of the latter, then this article is for you - today we will tell you how to put a vertical wand on your keyboard!
How to type a vertical wand on a regular keyboard
The pipe key is usually located between Backspace and Enter or to the left of one of them. It would seem that something complicated - you press and that's it. But no matter how much you hit the button, only brackets come out. The point is the keyboard layout: it needs to be changed to English. There are a couple of options to do this:

After that just press Shift+\ - the output will be a vertical stick.
How to put a vertical wand on the macOS keyboard
Pipe key on MacOS
On an Apple keyboard, the pipe corresponds to the Russian key Yo. As with Windows, to enter a vertical wand on a Mac, you must first switch the layout to English. In older versions, you need to press cmd+space, and on new ones ctrl+space.
After that, we press all the same Shift+\.
Vertical wand input combination for macOS
We hope we have helped you deal with the problem of entering a vertical wand once and for all!
Vote for the post - a plus in karma! :)
The symbol "Straight stick" or "pipe" is often used in programming and mathematics. Writing it by hand is not difficult, but when typing on a computer, difficulties are not excluded. The thing is that the mentioned element is a special sign. And it's not always easy to print. Novice PC users simply do not know how to achieve the desired result. Next, we will try to consider all possible ways to print "pipe".
Keyboard Help - Method 1
How to put a straight stick symbol? There are a lot of options for the development of events. Each user can independently choose the course of action. Therefore, further we will study all possible methods of printing "pipe".
Let's start with the simplest. We are talking about using the keyboard of a computer or laptop. Some special characters are located on the keypad of the device, which greatly simplifies the process of typing them. Pipe is no exception. The main thing is to know how and where to find the appropriate sign.
How to put a straight stick symbol on the keyboard? For example, you can use the following guide:
- Switch the keyboard layout to English in any known way.
- Find the key with the image of "pipe". On computer keyboards, it is usually located between Enter and Backspace, on laptops - to the left of "Enter". Typically, the user will see a variety of dash characters on the corresponding control.
- Click on "Shift".
- While holding the key pressed, press the button with the “pipe” picture.
Ready! The straight wand will appear in one place or another in the text editor. This is one of the simplest and most common spellings.
Keyboard help - method 2
The symbol "Straight stick" can be placed in the text differently. The next option also involves the use of the keyboard panel.
The previously suggested instruction requires switching the keyboard layout. This is not always convenient. Users can put "pipe" in the text without changing the language layout.
How to do it? Would need:
- Place the cursor where you want to insert a special character.
- Make sure that the keyboard panel allows you to type text in Russian.
- Click on the control labeled Shift.
- Find and press the button with the "pipe". It is usually located at the bottom of the keyboard, to the right of Shift and to the left of the letter Z.
- Release the pressed keys.
It is done. Now it is clear where the symbol of a straight wand is located on the keyboard. These are not all ways of printing the mentioned special sign. What else can be done to get the desired result?
Keyboard help - method 3
It is worth paying attention to the fact that computers and laptops from Apple have a slightly modified keyboard. And it gives a lot of trouble to novice PC users. Printing special characters becomes even more difficult.
"Pipe" can be put on the "Macbook". But how to do that? The following type of guide will help you cope with this task:
- Switch the keyboard layout to "English".
- Find the button with the image of "pipe". On Macbooks, the key with the letter "E" is responsible for printing this character. It is located near Enter.
- Press the key combination Shift + E.
Ready! Now on the "Macbook" the user will be able to put the "pipe" without any problems. The straight stick symbol is printed in different ways. And keyboard shortcuts aren't everything. You can get out of the situation in various ways.
Windows character table
For example, some users resort to using the "Copy" and "Paste" operations. In order for the “pipe” symbol to appear in the text, you can use a specialized Windows table. It's called "Symbol Table". Here the user will be able to see all the special characters.
- Go to "Start" - "All Programs".
- Find the "Standard" folder and open it.
- Look in the "Utilities" section.
- Click on "Symbol Table".
- Find "pipe" in the menu that appears, and then double-click on it with the left mouse button.
- Select the straight stick symbol at the bottom of the window, press Ctrl + C.
Now you can open your text and insert a sign with Ctrl + V. Fast, simple and very convenient.
Important: in the same way, you can copy a character from the finished text, and then paste it into your document.
Word Paste Special
How to put a straight stick symbol? Some use a special Word insert. The corresponding menu item duplicates the "Symbol Table", but it works mainly in a text editor.
The Word Paste Special instruction looks like this:
- Go to a text editor and set the cursor to the desired location.
- Click on the menu item "Insert" - "Symbol".
- Find a vertical straight stick in the window that appears.
- Double click on the corresponding picture.
But that's not all! The symbol of a straight stick on a computer is proposed to be printed in different ways. Consider two more approaches to solving the problem.
ASCII to the rescue
For example, advanced users use ASCII codes. With their help, printing special characters delivers a minimum of hassle.
In our case, we will have to adhere to the following algorithm of actions:
- Open the "Word" and put the pointer in the place of the intended print.
- Press Alt. You can use the button on the left or right side of the keyboard panel.
- Dial code 124 while holding Alt.
- Release keys.
At this stage, the action ends. Now it is clear how you can insert a straight stick character using ASCII codes.
Unicode and signs
The last scenario is the use of "Unicode". Not everyone knows how to use this technique.
The step by step process looks like this:
- Type in the text where the "pipe" should be, the combination x7C.
- Press Alt + X at the same time.
- Release keys.
How to put a straight vertical stick on the keyboard?
Looking at the keyboard
On a Samsung Android 4.2 tablet, I have such a wand
In icon layout, page 2
To call the keyboard, put the cursor in the text input field, a pop-up keyboard will appear, you need to switch to the symbols tab, and then open the second page of symbols
On my laptop, the keys are slightly different. The necessary straight stick is located along with the designation Slash / above the Enter key.
For a straight wand, an English keyboard layout and simultaneous pressing of the Shift button are required.
To put the or vertical stick using a regular computer keyboard, you first need to translate the font into English using the Shift and Ctrl keys. After these manipulations, press the / key.
In order to put down a sign using a standard computer keyboard, you need to translate it into the English layout by pressing the key combination provided for this computer in the settings - this can be Shift + Alt or Shift + Ctrl. Then press the / key to the right of the E key on the keyboard in combination with Shift.
In order to put a straight vertical stick when typing on a computer, you first need to translate the keyboard to the English layout, while you need to use a combination of two keys provided by your computer. It can be Shift + Ctrl or Sift + Alt.
After that, we find the / key on the keyboard (I have it to the right of the key with the letter Equot ;, press it simultaneously with the Shift key, and you will get this sign quot ;.
I don’t know about anyone, but I have this key on the keyboard immediately above the Enterquot ; button. And to put / - you need to hold down the button on the keyboard Shiftquot ;. But in order to put exactly a vertical wand, you need to translate the keyboard to the priority of the English language. If it is difficult for someone to do this, then you can simply click on the icon at the bottom of the screen RU and change the language there by choosing English instead of Russian. And then also holding down the Shift press the button with chopsticks - .
In order to put a straight vertical stick on the keyboard, it is enough to do these very simple steps:
firstly, make an English layout, and for this you need to press keys such as Shift, Alt- simultaneously.
secondly, you need to press the stick with the key, but at the same time you need to hold the key Shift.
There is another way, in my opinion it is much faster, and besides, not every keyboard has a wand key. I do so. We will need an English layout and on it, I choose capital letter l" l". On my keyboard, I can only do this, since I have no other key.
A straight vertical stick on the keyboard can be typed like this:
1. We switch to the English layout, for this we type the key combination Shift" +" Alt quot ;, or Shift" +" Ctrl quot ;, you can also do this in the taskbar.
I have never used this sign, but it is easy to find. It is located on the keyboard above the ENTER key and below the BACKSPACE key. (at least on my netbook).
First you need to switch to English. To do this, simultaneously press the SHIFT + ALT keys. Next, simultaneously press SHIFT and a key with this sign, we get - quot ;.
Our world is amazing in itself, but sometimes you want to bring a little more magic and magic into it! Few people know that you can make a real magic wand yourself !!! Well, how? Do you want to learn how to make a magic wand, observing all the magical rules and secrets, how to handle and store it? Follow our instructions exactly, and you will have a personal magic wand that will certainly cheer you up, serve as a wonderful thing and make you feel like Harry Potter or an excellent Hermione.
A real magic wand should be exclusive and individual! Since she herself chooses her own, so to speak, owner and copyright holder. It acts as a conduit for the energy of magic and wonder.

Material selection
Few rules, but they are. Mr Ollivander confirms!
Firstly, the stick must be natural, i.e. made from wood. It must be chosen in the forest, since the city trees are weak in terms of the vitality of the tree. Such trees have a broken connection with the elements.

It is necessary to go to the forest or park for a twig with a positive attitude and complete harmony in the soul. At this moment, you should have the desire to merge with nature. Also time your trip and making a magic wand with the growing phase of the moon.
In addition, the tree itself must give you a twig. To do this, you must mentally sincerely turn to the tree with a request.

Then you must take a twig in your hand and feel exactly your wand. Close your eyes and listen to your feelings: has the branch become, as it were, an extension of your hand ...
Do not forget to thank the tree and give it some of your positive energy. So the wand will retain its connection with the forest and will generate its energy in itself.

Since ancient times, it was believed that elder and hazel are endowed with magical qualities.
Cut the branch carefully and quickly with a sharp knife. The size of the wand should be equal to the length from your middle finger on your hand to your elbow. It is better to hide the selected branch from prying eyes and bring it home. In the house, she should be nourished by your energy.
Manufacturing technology
Making a wand is a whole sacrament, so it must be hidden from prying eyes.
Clear the branch of your choice of bark and knots. Sand it gently with sandpaper to make your wand smooth. At the same time, you need to say the magic words to yourself:
“I conjure you, O almighty branch (oak, maple, etc.) by the forces of the four elements - Earth, Air, Water and Fire! Embrace their strength and power. Be my faithful assistant!
Next, at the base of the branch, you need to make a hole. It can be done with a screwdriver, screw, nail or drill. Do it especially carefully so that the stick does not crack. A magic core must be placed in the hole made. But what kind of core it will be, you need to determine yourself.
If you want to be helped AIR energy, then you can put it in a stick bird feather but not a black crow or a rooster.
Crystal or pebble give your wand energy of the EARTH. Perhaps you will choose a stone that has certain properties or suits your horoscope.
You can also use field herbs. For example, rosemary symbolizes long memory, sage wisdom, lavender devotion, laurel glory.
Attention! Under no circumstances should curry powder be used to create sticks.
Little ember fill the wand energy of FIRE.
WATER the most complex element, it is unchanging in its variability, therefore it can be symbolized wire, spring washed ashore amber or small soldered flask with water from the source of your choice.
After you have placed the core in the stick, you need to seal the hole in the stick. It is necessary to seal the wand on consecrated water. On the seal, draw the initial letter of the selected element. Different schools of the occult have different spellings of the four great elements, choose the one that is closest to you.
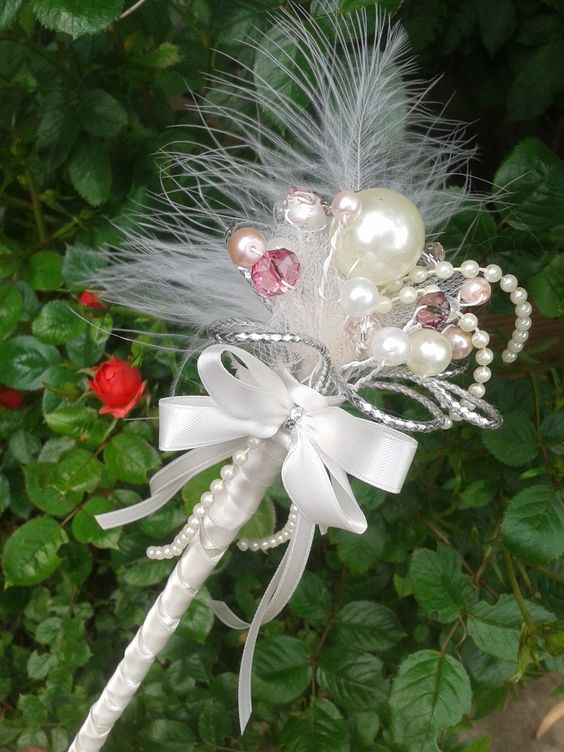
decoration
Some magicians cover the wand with varnish. It's not forbidden, but it's not encouraged either. It is better to cover it with natural, pleasantly smelling oil, wrap it in a scarf and leave it like that until the next full moon.

However, it all depends on the magician, so you can decorate the wand with beads, stones, or give it the necessary shape with hot glue and paint it with paint. This is more clearly presented in the master class. igrateshka for beginner wizards:
Also, the stick can be decorated with feathers.

Wrap with magic twine and add a magic crystal.

Acorns, elements of marine fauna - all this can be useful in the decor of your wand.

Copper wire will also help with this.

If you own art, then perhaps you can create a magical masterpiece.

Rite of passage
This is the final stage in the creation of the wand, one might say, the launch of its magic to life. It is recommended to dedicate the wand on Beltane or Walpurgis Night (May 1) or You Saiman (October 31). To do this, at midnight, the magic wand is placed on a clean white cloth. A lit candle is placed nearby.
In this case, it is necessary to pronounce the following words: “Become a guide, helper and keeper!” Next, the candle must be extinguished in water and buried in the ground. The ritual must be done completely.

In this case, the owner of the magic wand must remember:
Wishing and doing evil - the wizard will lose his power. It will happen suddenly and irrevocably!

Don't hurt anyone with your wand. Better wish well-being, health, prosperity and joy to your loved ones and friends!
Do not throw it anywhere and do not point it at anyone! These are important rules when using it!
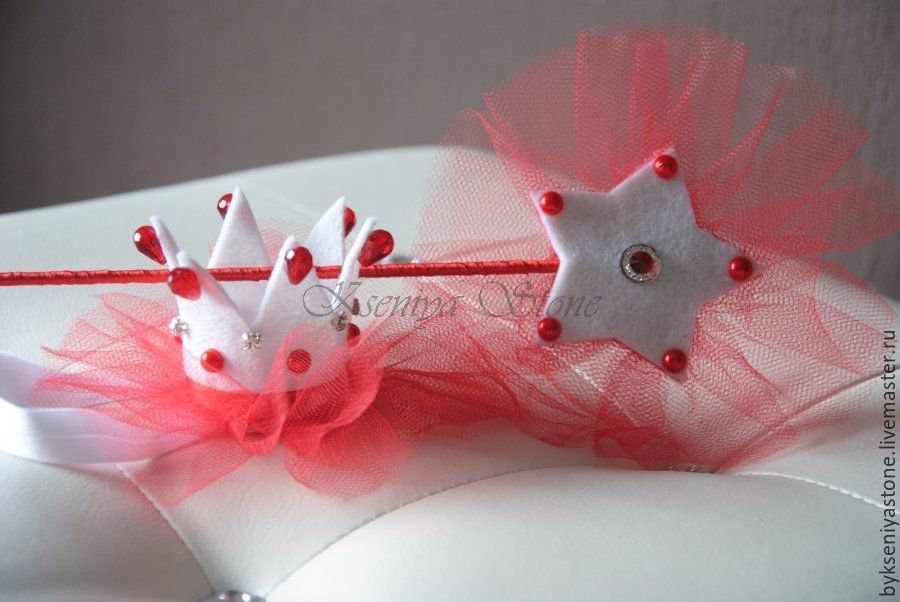
Magic wand for a little fairy
Little fairies also need a real magic wand. You don’t need to do it according to all the rules, because children have the power to change the world with the help of fantasies, so the wand should only help you feel like a fairy fairy!


Take a piece of ribbon or fabric and cut it into narrow strips. It will be more interesting to look if the stripes are of different colors. The more there are, the more magnificent the magic wand will be, or rather its top. Gather the cut strips into a fluffy pom-pom. It can be complemented with beads and satin or silk ribbons. We wrap the stick itself with tape or paint it in the desired color. We assemble our stick by attaching our pom-pom to it! The wand is ready, even a child can make this!
Watch the master class TullnieShtuchki how to make a fancy magic wand:
In the same way, you can make an astrologer's wand:

In company with a stick, you can make a small or, with or.
Lace is also relevant in the magical theme!

Beads, rhinestones and feathers will also come in handy.
Do not forget about, perhaps the wand belongs to the flower fairy.


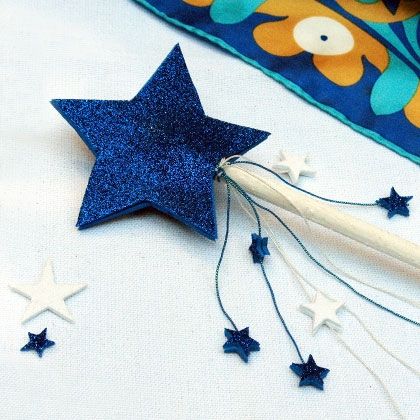
We turn a simple pencil into a real magic wand!
This is the easiest way to make a stick at home. First, do not look for a branch on a tree. Secondly, it is easy and simple, and there is a pencil in every home.
We take a pencil, it is better to pick it up with a hardness index “T” or “T2” and sharpen it, and then decorate the stick with a satin ribbon or other dense fabric.

You can combine ribbons of different colors. Fasten the ends of the tapes with glue.


We cut out stars from felt or felt paper that match the color of our stick.

We fasten it all to our stick.

The wand is ready, you can go to conjure!

The simplest magic wand is made of paper
A magic wand can also be made from a simple sheet of A4 paper. In addition, you will need: PVA glue, glue gun, scissors, acrylic paints, brush and sparkles.
We take an A4 album sheet, coat about 2/3 of it with PVA glue and begin to carefully twist diagonally into a tube. In this case, the tube should acquire a conical shape, tapering towards the bottom. We give our future stick to dry and cut off the extra edges with scissors.

We take a glue gun and fill the void of the stick from the side of the wider edge. Instead of glue, it can be filled with cotton wool or paper, which is more convenient for you to work with.
After the glue has hardened, you can start decorating the stick. To do this, we use a glue gun to make monograms and intricate patterns on a stick. We are waiting for the pattern to dry.


 and geographic information systems (GIS) and can be the result of their work.")


