We will analyze the reasons why a network drive may not be connected and how to fix this problem on the Windows 7/10 operating system.
Share a folder
Read also: TOP 3 Easy Ways How to Show Hidden Folders or Hide a Necessary Folder and Set a Password on It in Windows 10
Open the folder you plan to use as the new device on your . It will not be difficult to do this, it is just important not to miss a few points.
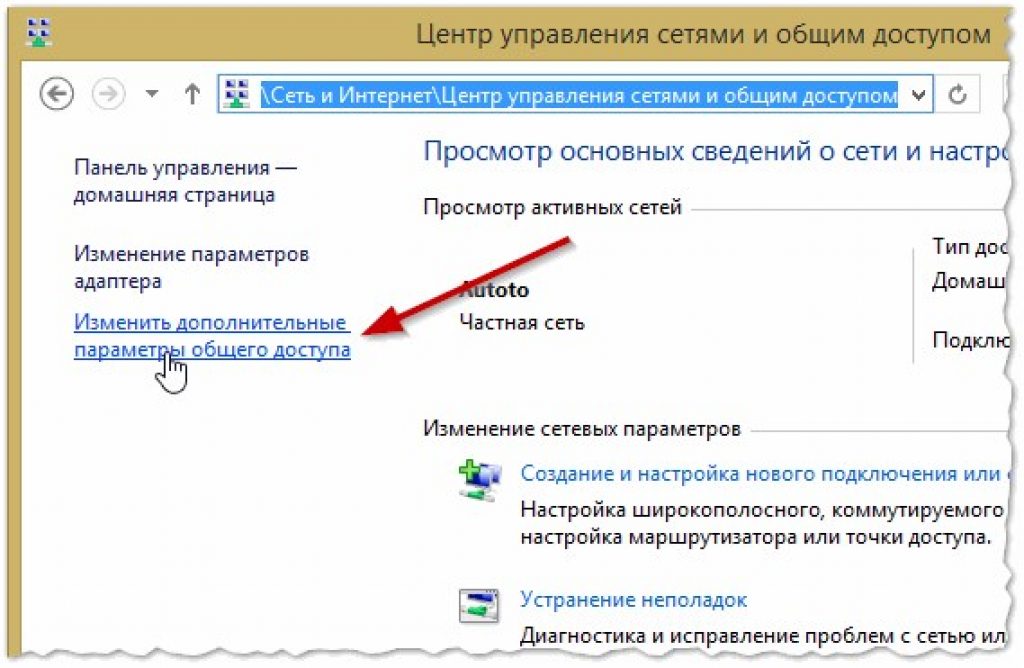
Correctly configure the local network by logging into the control center and clicking on the link "change advanced options" .
In the window that opens, click "Network Discovery" .
Disable "General access" if you don't need it.
Open access to the directory that should be connected as an application. Right select "Properties" if the network drive is not mapped.
Open a tab "Access" and and select "General access" .
In the new window click "All" and "Add" . A list of users will appear in the list "All" . The user will have access to the folder.
At the last step, confirm opening access to the folder by clicking on "Ready" . As a result, access to the folder will be opened.
Now you need to move on to connecting the disk on the second computer. open "My computer" , click "Connecting a new floppy disk" tab "a computer" .
After the Map Network Drive Wizard is launched, the "Device connection" , select the appropriate drive letter and specify the address to access the network folder.
You can choose any drive letter. The folder address should be specified like this: /Computer name/Shared folder name.
For example, you can select drive Z and specify the address as notebook/tmp. If you have forgotten the name of the shared folder, click "Review" .
Near "Reconnect at login" , check the box next to the item to connect the new application again after rebooting the device.
After all the settings have been made, confirm the action and click "Ready" .
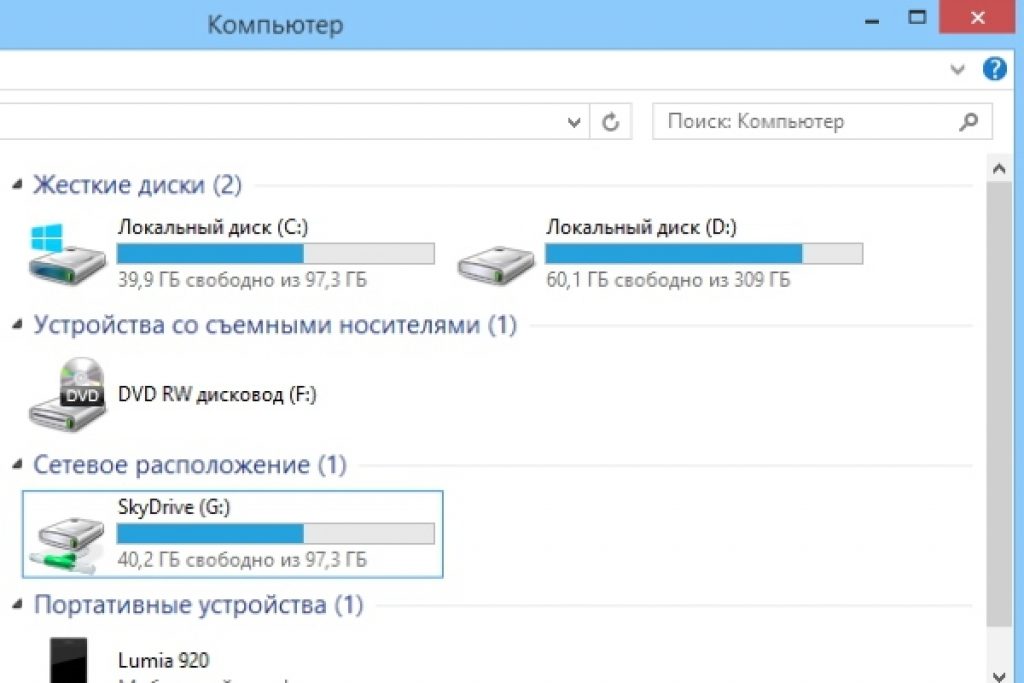
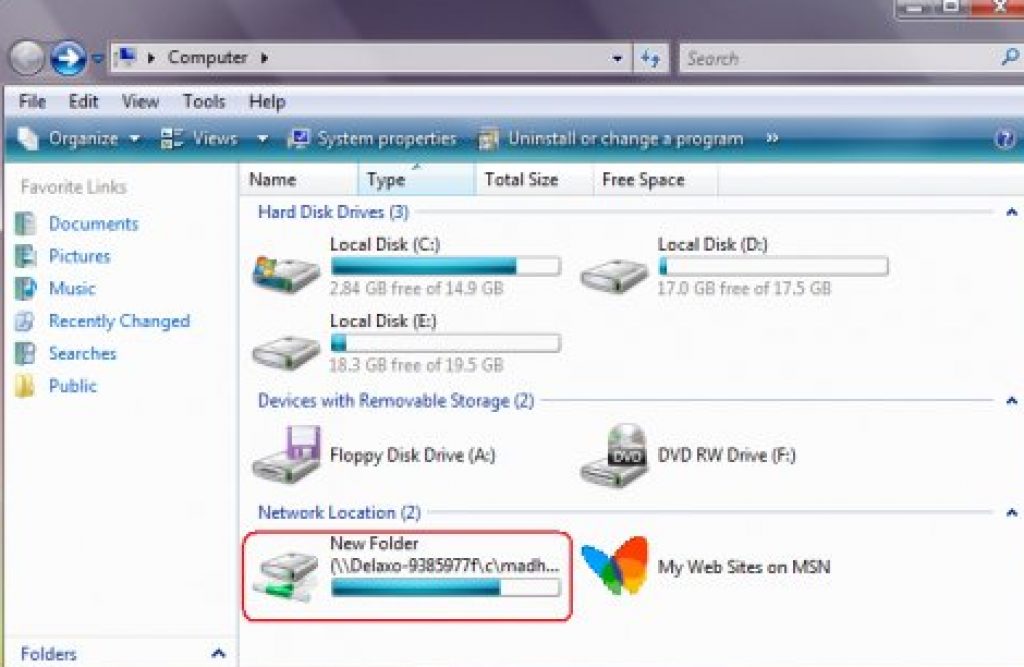
If everything is done correctly, the system will connect the folder as an installed add-on and open a window. It will appear in the window "My computer" .
Ways to map a network drive
Read also: Top 10 Best Network Attached Storage (NAS) for Home and Work | Rating of current models in 2019
You can connect your device in the following ways. So, you can create an additional service that can handle two functions.
That is, it starts the mount, and after that it starts an additional service that uses this add-on. It must have the following properties:
- It is important that the helper service executes the same commands as the regular service, i.e. start/stop/restart.
- The helper and main services should perform tasks on behalf of the same user so that there are no access rights issues. If the main service is started from LocalSystem, there may be problems with access to various applications.
A more interesting option is also possible. Just use it at your own risk. This will require Sysinternal Suite. So the steps are:
1 Open cmd.exe(on behalf of the administrator);
2 Select the PsExec.exe option. Navigate to the SysinternalsSuite folder and run psexec -I -s cmd.exe . As a result, the user will have nt authority/system rights. This can be checked by typing whoami . The i option is needed because floppy disks cannot be displayed without user interaction.
3 You need to create a permanent connected application that will be used as the SYSTEM account. To do this, type the following command net use z://servername/sharedfolder /persistent:yes
This add-on can be disabled the same way it was created, along with .
If you need to remove it, follow the first and second steps, but in the third step change the command, namely write
Net use z: /delete .
Connecting with Group Policy
Read also: [Instruction] Unidentified network without access to the Internet - How to fix it? | 2019

Many people think that the way to create a new application through Group Policy is outdated. However, most system administrators prefer this option.
So, using group policy, you can connect the installed device as follows.
First, launch the Group Policy Console by pressing the Win + R combination. In the window that opens, click "Run" and enter the gpmc.msc command. After that, the user will see the Group Policy Management Console on the screen.
If the network drive is not connected by going to "Group Policy Management Editor" do the following "user configuration-settings-configuration-disk mapping" .
In the right half of the window, right-click "create-associated device" .
Specify its name and check the box next to the option "reconnect" . Then go to the tab "Common parameters" .
In the tab, check the box next to the item "Target element level" and press "targeting" .
Going into "targeting editor" press the button "element creation" and choose "security team" .
There, specify the name of the user that you want to connect to the floppy disk you are using. Activate item "Users in a group" .
Many users say that this method is quite difficult.
It is especially difficult for those who do not have sufficient knowledge in the field of Windows architecture. So it is recommended for use by people with a high level of training.
Read also: Control Panel in Windows 10: where is it located, how to open and how to make a shortcut to the desktop

If necessary, you can easily create a shortcut to any application by matching its position.
Once the user has plugged in the device, it will be displayed in File Explorer so that the required file can be easily accessed as if the user were working with an existing local floppy disk.
You can make a similar shortcut for a new device in the OS as follows:
- With File Explorer open, click "My computer" .
- By clicking "Connect new add-on" , choose "Connection of the application in use" (this option is located near the tab "A computer" , which opens automatically when the user goes to the PC in the specified way).
- After selecting the letter of the floppy disk that you plan to use for network folders, click "Review" .
- Navigate to the folder for which you want to create shortcuts, click OK after selection.
- Don't forget to confirm your choice and click on "Ready" . The user can choose to be permanently connected to this particular folder during the login process. As a result, it will always be available, and if necessary, you can use a different computer user account to connect to the folder.
After the user has finished with the settings, he should see under the label "New device" . This will give him the ability to access content and other folders on the PC.
If you no longer need a network application and want to disable it, right-click on it and select "Disable" .
Connection methods in Windows XP
Read also:
For quick access to shared resources, assign them floppy letters. This way you can make it easier to access.
As a result, in the folder "My computer" a special icon will appear. So you do not need to surf the net to find the information you need from online resources.
The main way to connect a device from "My Network Neighborhood" :
- Click on "Network environment" on the menu "Start" by choosing the command "Net" , double click on "Windows network" ;
- Double click on the domain you want to open;
- Be sure to double-click the containing the shares you want to mount. The windows will display the shared resources of the device.
- Press "shared resource"
, which you want to connect, right-click, and in the context menu select the command
If necessary, you can map a network drive on Mac OS
Instructions for users who are wondering how to map a network drive to the following. First you need to open Finder.
To open a window "Connecting to Server" , press Command + K . Don't forget to enter the path to the gadget you want to connect to.
Enter the path in the following format: Protocol/Computer name. It is optional to specify the protocol at the beginning. After the user has entered the password, the OS will ask you to specify the required folder for connection.
The network drive will become available after the computer is turned on, if you add it to "Login Items" . Click on the menu, click on "System Setting" .
After selecting the appropriate option, click on "Add" . If nothing is displayed, you need to open Finder by going to settings and pressing Command .
Selecting the tab "General" , check the box next to "Server connection" . As a result, the desired icon will appear on the display.
Today, when the prices for computer equipment have become more or less acceptable, each member of the family can get their own computer. There is nothing to say about small and medium-sized enterprises, the use of several computers united in a single local network is a common thing in them. Naturally, in such conditions, users often have to exchange files in the process of work. Using removable portable drives for this is not very convenient, so operating system developers have implemented such an opportunity as creating a network drive. In fact, this resource is a directory or a separately created logical partition, to which opens, i.e. hosts connected by a local network can connect. Very rarely, network drives on a home PC are created to be accessed from the global network, for example, when the machine is used as a mini-server, but mostly shared folders on cloud services are used to provide unified access to user files from the Internet.
Today we will learn how to create and add a network drive exactly on the local network. The main distributor is usually the administrator's computer, but it can also be any other PC on the network.
Sharing
It all starts with creating an ordinary folder with unusual properties. Our example resource will be called WorkFolder. Create a folder with a suitable name in the location you need, open its properties, switch to the "Access" tab and click the "Advanced settings" button.
In the new dialog box, check the checkbox "Open sharing ...", set, if necessary, the number of users simultaneously accessing it, and then click "Permissions". By default, everyone has read-only permission, if you want other users to be able to edit files on the disk and write their data to it, change the permissions accordingly. Save the settings one by one.


At the last stage of saving in the properties window, you should see the message “There is a shared access” and the path itself, starting with two slashes.

Now, by clicking the share button, in the window that opens, add users who can access the shared folder on their PCs, otherwise they will receive a network error, the description of which is presented in the screenshot below.


At this stage, the basic configuration of the network drive is completed. The next step is to test network discovery. If your network is defined as a private network, discovery should be enabled by default, but if it is a public network, it will most likely need to be opened. Run the command in the Run window control /name Microsoft.NetworkAndSharingCenter, and then click the "Change advanced sharing settings" link on the left.

Activate the "Turn on network discovery" radio button in the current profile and apply the changes. To be able to connect a network drive, the performed manipulations should be enough, if the latter then does not want to connect, try changing the network mode.

Adding a network drive
You can connect the newly created resource in many ways, including through the familiar CMD console, but we will consider the simplest option. Right-click on the "This PC" shortcut (no matter where) and select "Map Network Drive" from the menu.

In the window of the launched wizard, select a letter for the future resource, be sure to check the “Use other credentials” checkbox, otherwise other users will not even be able to see it on their computers.

Through the browse button, select the folder for which you set up sharing.

After clicking the "Finish" button, Windows will ask for the current username and password.


The corresponding section should also become visible in the main workspace of this computer.

To disable a network resource, right-click on it and select "Disable" from the menu. You can also select it with the mouse and select "Disconnect Network Drive" from the Network ribbon menu.

Connect by name or IP address
There are also other ways to connect the created and configured shared resource, but they are less convenient. For example, instead of searching for it through browsing, you can specify its symbolic or IP address in the field of the connection window. The symbolic address is specified in the properties of the folder, IP in the properties of the adapter "Local Area Connection" (parameter IPv4 address).

The same address can be obtained from the command line by executing the command ipconfig /all(the data will be in the section of the same name).
Using the command line
And finally, let's see how to map a network drive in Windows 7/10 using the CMD command line or the PowerShell console, perhaps this method will seem even faster to someone. The general command syntax looks like
net use \\ComputerName\ShareName[\volume]
username]
Here drive is a free drive letter, and \ComputerName\ShareName– path to the shared folder. Let's connect our WorkFolder folder from the desktop as a network drive, for which we execute the following command in the line running with administrator rights:
net use Z: //DESKTOP-8CS7OLG/WorkFolder /user:comp 11111

Parameter /user is required so that the system does not request authorization. The string element "comp" in this example is the name of the computer's administrator, and "11111" is its current password. To make a network drive connected permanently, and not just during an open session, you can add the switch to the end of the command /persistent:yes.
To disable the disk, run the command net use z: /delete, where z is the drive letter.

Unfortunately, in the Windows 10 we tested, when connected with the net use command, the corresponding volume was not displayed in the “This PC” section, remaining still accessible from the Explorer navigation bar.
So, now you know how to set up a network drive, but these are, of course, only general recommendations. Practice shows that in the process of connecting such resources, one often encounters various errors, of which the most common is “The network path was not found”. The causes of failures can be problems with network adapter settings, drivers, network security settings, and so on. In such cases, problems are usually resolved privately based on the identified cause.
For active data exchange over a local network, you can use network folders that store various information you need. However, for complete convenience, these folders can be configured as a network drive.
And in this article we will consider connecting a network drive using the example of Windows XP, Windows 7 and Windows 10 operating systems.
How to map a network drive in windows xp?
So let's start with Windows XP. To add a network drive, go to the "My Computer" section and in the "Tools" menu, click on the "Map Network Drive" tab
You will see the "Map Network Drive" window, where there will be two active editing windows: these are "Disk" and "Folder"

The active editing window "Disk" means that you can select any "unoccupied" letter of the Latin alphabet to designate the disk.
To do this, click on the arrow of the active window and select the drive letter you need

And the active editing window "Folder" means that you must specify which you want to make a network drive. To do this, click on the "Browse" tab and select the location of your folder. It can be either yours or another


This completes the creation of a network drive in Windows XP, and we move on to the next example.
How to map a network drive on windows 7?
When creating a network drive on windows 7, you should first make sure that the network settings are correctly configured. To do this, click on the network connection icon in the lower right corner and select "Network and Sharing Center"

Or click on the "Start" menu, click on "Control Panel" and find the "Network and Sharing Center" tab.

You will see the Network Control Center window, where you will need to go to the “Change advanced sharing settings” tab, having previously looked at which network is being used (in this example, this is “Home”).

To do this, check the box "Enable network discovery"

After the manipulations have been done, you can start creating a network drive on windows 7. To do this, go to the "My Computer" section and click the "Map Network Drive" tab.

You should see the "Map network drive" window, where you should select a drive letter and specify the path to your network folder. To do this, first select the disk (by clicking once on the "Disk" tab), and then click the "Browse" button, where select the computer name, as well as the name of the network folder and click "OK"


What is a network drive in windows 10?
And in the third example, we will analyze how to map a network drive in windows 10.
To make a network drive here, first of all, you should check the network settings. To do this, right-click on the network icon in the lower right corner of the taskbar and select "Network and Sharing Center"
You will see the network management window, where you should click on the "Change advanced sharing settings" tab

In the next window, check the box next to the "Enable network discovery" tab (if it is not there) and click on the "Save changes" button

Now you can start connecting a network drive in windows 10.
Go to the "This PC" tab → the "Computer" menu and click on the "Map Network Drive" tab

You will see the "Map Network Drive" window, where you will be prompted to change or leave the letter of the network drive, as well as specify the path to the network folder


net use map network drive
It should be noted that there is another way to map a network drive in the Windows family, namely using a script.
To use the script to map a network drive, you will need the "Net use" command: this command allows you to map a network resource.
Within the framework of this article, we will not give the full syntax of the “Net use” command, limiting ourselves to only a few of them.
To do this, open a text editor (for example, Notepad) and write the command there:
net use z: \\WORK\Users, where the letter "Z" means the letter of the network drive, and \\WORK\Users means the network path of the folder (in your case it should be different). Next, add the inscription: net use /Persistent:Yes, which means to restore the mounted disk on reboot. Then save the text document with the extension "bat"

Now if you click on the file that you saved, then you will automatically connect the network drive
A network drive is a logical drive (folder) created to share files between PC users. The drive can be on a PC, server, or network storage device using the same local area network.
A network drive is often created by enterprises and educational institutions that store documents on servers, providing more space for storing and backing up files. However, with the growth of the amount of data, the disk becomes relevant in the home network.
To connect a network folder, you must transfer all PCs connected to it to a common workgroup.
Step 1. Press the key combination Win + R. Type in the menu sysdm.cpl and click OK.

Step 2 Click the Computer Name tab and click Change.

Step 3 Type the name in "Is a member" of the "working group" in English letters. "Computer name" can be chosen any or left the same. Press OK.

Step 4 Restart your PC for the changes to take effect.
Step 5 to do Steps 1-4 on all computers on a common network, specifying the same workgroup name for them.

Setting folder access
Before making a connection, you must create a folder on the selected device located on the public network, naming it in English letters.
Step 1. Click on the created network folder, selecting "Properties".

Step 2 Click the "Sharing" tab and click "Sharing".

Step 3 Select "All" from the drop-down list and click "Add".


Step 5 Press "Finish".

The folder will be shared.
Disable network credential entry
When connecting to a network, it is often necessary to disable the prompt for network credentials in Windows 7, 8, and 10 (on XP, this setting is not required). To disable the request, you need to change the settings for accessing the PC.
Step 1. Click on the network icon in notifications (bottom right of the screen) and select "Control Center ...".

Step 2 Click "Change Sharing...".

Step 3 Check in all profiles (opening the drop-down list) whether points are set for network discovery and sharing.

Step 4 Scroll down the list of permissions with the mouse wheel, select "Turn off password protection". Click Save Changes.

Reference! You may also need to disable and then re-enable Windows Firewall to connect to a network share.
Mapping a network drive
Step 1. Open the Computer folder by double-clicking.

Step 2 Click "Tools" - "Map network drive" ( in Windows XP).

Click the "Connect ..." button at the top of the window ( in Windows 7).

Click the "Connect ..." button on the disk image on the ribbon interface ( in Windows 8 and 10).

Step 3 Select the letter of the folder and type the path consisting of two slashes " \\ ”, PC name followed by a slash “ \ ” and the name of the folder itself (with an underscore instead of a space, as shown in the “Example” in the screenshot).

Note! To connect, instead of the PC name, you can type it in, for example: \192.168.1.100folder_name.
Step 4 If the path to the folder is unknown, you can click "Browse ..." by opening the network tree with the mouse, clicking on the desired folder and clicking "OK". If you need a permanent connection to the folder, check the box "Restore connection ...".
If the connection requires different credentials, check the "Use different credentials" checkbox. The password and login will be requested after clicking "Done".
Press "Finish". The disk will be connected.

In a domain environment, you probably won't need to connect with other credentials, as the current domain login most likely already has access to the server.
For example, if you have a NAS file server and you want to mount its folder as a network folder, you will probably need to enter the credentials set on the NAS, since Windows credentials will not work.
Connecting a drive via the command line
Step 1. Press Win+R. Type cmd and click OK.

Connecting Yandex.Disk as a network folder
When installed on a PC "", it organizes a folder on it for storing copies of files transferred to the server. This is rather inconvenient if the files being backed up are too large and take up a lot of space on the PC.
At the same time, Yandex.Disk supports WebDAV, allowing you to connect the service as a regular network folder without saving files to your PC.
Step 1. Select network drive mapping ( see above) and click on the link "Connecting to the site ...".


Step 3 Enter address: https://webdav.yandex.ru and click "Next".

Step 4 Select a name for the connection and click Next.

Step 5 Enter a username and password to connect to the service.

Important! The point indicated by the arrow in the photo must be marked only if one account is used for the service!
Step 6 Check the box "Open ...", click "Finish".

The Yandex.Disk folder will open.
A location will appear in the Computer folder that you can already use.


Yandex.Disk will be connected as a network folder.

How to connect a computer to Wi-Fi
To connect your computer to a Wi-Fi access point, you will need to purchase a Wi-Fi adapter, or connect an existing adapter to the network.

Step 1. To turn on Wi-Fi on your PC, click on the network in the notifications (bottom right) and select "Network and Sharing Center ...".

Select "Network Control Center..."


Step 2 After turning on the adapter, click on the network and select "Connect" to the desired Wi-Fi network.

Step 3 Enter the access point password and click OK.

A wireless Wi-Fi connection will be established.
If the drive is 100% loaded in Windows 10
Windows 10 sometimes encounters an error that causes the hard drive to be 100% used. At the same time, the performance of the PC is reduced up to its complete “hanging”. If a computer running Windows 10 has become strongly "", you need to look at what is causing this situation.
Step 1. Press Ctrl+Shift+Esc. The Task Manager will launch. Click on the "Processes" tab and see the status of the CPU, memory, disk and network.
If the drive is 90-100% loaded, you need to take action to reduce the load on it. Most often, high HDD load is associated with the system “looping” on file indexing, which is carried out to speed up access to them.
Step 2 Click on the magnifying glass icon next to the start button and type in cmd. Click on the "Command Prompt" utility found and select "Run as Administrator".

Step 3 Type the command in the window that appears: NET STOP "Windows Search" by pressing Enter.

Step 4 Run Step 1 this section and see if the load on the HDD has decreased. If the load has not decreased, disable the indexing service completely.
Step 5 Press Win + R, in the window that opens, type services.msc and press Enter.

Step 6 Click on the Windows Search service and select Properties.

Step 7 Click Stop, then select Disabled. Click "Apply" and "OK".

Step 8 Run Step 2 this sub-item and in the window that opens, type the following commands to disable the Windows Diagnostics service, pressing Enter after each command.

Step 9 Without closing the previous window, type the following command, which disables the SuperFetch service, which improves the launch of frequently used applications, by pressing Enter. In practice, the SuperFetch service is often the cause of high HDD load: net.exe stop superfetch

Step 10 Without closing the previous window, type the following command, which disables the Windows automatic update service, by pressing Enter: net stop wuauserv.
Also enter the following command by pressing Enter: sc config wuauserv start= disabled.

Step 11 Without closing the previous window, type a command that disables the paging file if the main disk in the system is an SSD solid-state disk by pressing Enter. The swap file on the SSD disk sometimes loads the HDD at 100%: wmic pagefileset where name="C:\pagefile.sys" delete(where: name="C:\pagefile.sys"- file location)

Step 12 Without closing the previous window, type the following command to check and fix errors on the HDD by pressing Enter. To complete the HDD check, the computer will need to restart: chkdsk /F /R

Step 13 After restarting Windows, run Step 1 this section and see if the load on the hard disk has decreased.
Disabling these services in most cases allows you to get rid of the high HDD load.
Video - How to add a network drive in Windows 7,8,10
Net use is a command to connect to network shares or display information about computer connections. The command also manages persistent network connections.
If you have a local network configured at your home or office, and network folders are also used, then for the most convenient use of them, it is recommended to configure network drives. Such a network drive will not differ in any way from other drives (for example, C or D) that are used on your computer. The only difference among these drives is the low speed of writing or reading data.
Command Options
Net use is a command that is designed to make connections to a network share or to display information regarding computer connections. Net use also manages persistent network connections. A command called with no parameters retrieves a list of network connections.
The Net use command is used in batch files and scripts. Let's take a look at the main Net use command line options:
- Device name. To use the name of the device to which you want to map a network drive, use the "*" character;
- Computer name. The name to which the resource currently belongs;
- Resource name. The name of the shared resource;
- volume. Is the name of the volume if the share is a Net Ware server;
- password. Password for making connections to the resource;
- "*". This character is a password prompt;
- /user:<домен>\<пользователь>. A string for specifying the username under whose rights it is necessary to connect;
- /home. The function is designed to connect the user's home directory;
- /delete. Connection cancellation;
- /persistent: . Designation of the need to restore connections during subsequent user registrations in the system.
In order to connect a network drive, you must:
- Press the "Start" button, then select the "Run" command;
- Enter the command "cmd" in the "Open" field;
- Enter - net use x: your computer name (or IP address), resource name.
The use of the command and its nuances
The net use command, when creating a network drive, returns the current status of each connection, along with the name of the drive, the UNC name of the share, and the type of network. Most often, the network type is Microsoft Windows Network, but if the computer uses a different operating system, then this will be reflected in the Network column. For example, if the user is running the client software, NovellNetWare, and connects a drive to a server called NetWare, the Network column will say Net Ware. Thanks to the Net Use command, it is possible to use batch files to create shared resources. With the Net Use command to assign resources to users, you can use command files in the process of registering a network drive.
Differences
The difference between the Net Use command and the Windows graphical interface is unlimited connection to shared folders. To connect to a subdirectory that is not shared, you can type the following command on a shared drive: "netuse f:\". This feature can be quite useful in most situations where the operation of a network drive and its connection is important. For example, you can share an entire drive, and set up connections for users to individual directories using netuse. From a security point of view, this approach is questionable, so if you need to use this feature, you should make sure that the permissions for a specific folder that has not been shared are correct. Assigning resources will make it easier for you to access the appropriate program folders and disk data. If you are a user working in a corporate database, you can create a login script. If you learn how to use the command line, as well as create batch files, then you can distribute them to other users. This will make the job much easier. Batch files can also be useful in a peer-to-peer network in order to connect to resources or when performing maintenance tasks on other computers.
If you need to connect a network drive, you can easily do it using this article.


")


