Word for Office 365 Word for Office 365 for Mac Word for the web Word 2019 Word 2019 for Mac Word 2016 Word 2016 for Mac Word for iPhone Word for Android phones word for Windows phone 10 less
Use Word with your keyboard and a screen reader to give your document a polished look appearance by searching for them as needed. We have tested with Narrator and JAWS, but may work with other screen readers as long as they follow standard standards and practices. accessibility. You will learn how to set the spacing before and after each paragraph, as well as the size of indents and lines.
Need instructions on how to adjust line spacing and indents in Word document but not using a screen reader? See how to change line spacing in Word, adjust indents and spacing, and create an overhang.
Notes:
In this section
Open a document and select the paragraph for which you want to adjust the spacing. If you want to set paragraph spacing for the entire document, click CTRL keys+A.
To change the spacing before a paragraph, press ALT+P, SB. You hear: "Paragraph, spacing before." Press the Up and Down arrow keys until you hear the item you want, or type desired value(for example, 6 or 18 ), and then press Enter. Values with smaller dots indicate less space.
To set spacing after a paragraph, press ALT+P, SA. You hear: "Paragraph, spacing after." Press the Up and Down arrow keys until you hear the item you want, or type the value you want (for example, 6 or 18 ), and then press Enter.
Additional spacing options
In your document, select the text that has the paragraph spacing you want to use by default.
paragraph
To set the default spacing between paragraphs, press Alt+D.
In the dialog box Microsoft Word only this document or parameter all documents
paragraph
To quickly set up line spacing For a selected paragraph in Word, press Alt+H, K. You hear: "Spacing between lines and paragraphs." Use the up and down arrow keys to select from a list of commonly used sizes, and then press Enter to apply it.
To use the default paragraph spacing, do the following:
Setting paragraph indents
Open a document and select the paragraph for which you want to adjust the indents. If you want to set a paragraph indent for the entire document, press CTRL+A.
To set the left indent size, press ALT+P, IL. You hear: "Paragraph, left indent." Use the up and down arrow keys, or type a value (for example, 0.25 or 0.5 ) and then press ENTER.
To set the right indent size, press ALT+P, IR. You hear: "Paragraph, right indent." Use the up and down arrow keys, or type a value (for example, 0.25 or 0.5 ) and then press ENTER.
Other indentation options
Select the piece of text in the document for which you want to apply the default indent.
To open the dialog box " paragraph", press ALT+H, PG.
To set the default paragraph indent, press Alt+D.
In the dialog box Microsoft Word use the up and down arrow keys to select only this document or parameter all documents, press the Tab key until you hear "OK," and then press Enter.
To close the dialog paragraph, press the Tab key until you hear "OK," and then press Enter.
Select in the document a piece of text with a paragraph indent that you want to reflect on opposite pages.
To open the dialog box " paragraph", press ALT+H, PG.
To turn on mirror indents, press ALT+M.
To close the dialog paragraph, press the Tab key until you hear "OK," and then press Enter.
To quickly apply a first line indent to just one paragraph, move the focus to the beginning of the first line of the paragraph, and then press the Tab key. You can indent the first line more than the rest of the lines.
To use the selected default indentation, do the following:
For book-style printing, use the mirror indent feature, which shifts paragraphs on opposite pages. Left indent becomes internal indent, and indent to the right - with external indented. To enable mirroring indent, do the following:
additional information
Use Word for Mac with your keyboard and VoiceOver, the built-in Mac OS screen reader, to give your document a polished look by making paragraphs stand out so they look the way you want.
You can set the spacing before and after each paragraph, as well as the size of the indents. You can also indent only the first line of a paragraph, or create an indent where the first line of a paragraph is not indented, but subsequent lines will be.
Need instructions on how to adjust line spacing and indentation in a Word document but not using a screen reader? See Customize indents and spaces or Create a ledge.
Notes:
In this section
Adjusting the spacing between paragraphs
To set spacing before a paragraph, press Control+Option+Right arrow key until you hear the current spacing size followed by "Before, editable text."
To set spacing after a paragraph, press Control+Option+Right arrow key until you hear the current spacing size followed by "After, editable text."
Select the paragraphs in your document that you want to change the spacing for.
Paragraph Indents and spacing.
Interval
In field Front or After enter a value in points, such as 6 or 18 (the smaller the value, the smaller the interval).
To close the dialog Paragraph and return to the document, press Enter.
To change the line spacing in a paragraph, select the paragraph you want to format and press Option+Command+M. A dialog box will open Paragraph.
To select a line spacing option, press Control+Option+Right arrow key until you hear "Line" and a line spacing option. To open a list of options, press CONTROL+OPTION+SPACEBAR. Press the UP ARROW or DOWN ARROW key until you hear the option you want. Press the SPACEBAR to select.
If you chose the custom option, for example Factor, then press the Tab key to set the interval size. You hear the current interval size. Enter value.
Setting paragraph indents
Indent the first line of a paragraph
Select the paragraphs whose first lines you want to indent.
To format a paragraph, press OPTION+COMMAND+M. A dialog box will open Paragraph Indents and spacing.
To add an indent to the first line of a paragraph, use the options in the group Indent. Press Control+Option+Right arrow key until you hear: "Custom popup button." To select an option, press CONTROL+OPTION+SPACEBAR. Then press the UP ARROW or DOWN ARROW key until you hear: "First line." To make a selection, press the SPACEBAR.
To set the indent size for the first line, press the Tab key. You hear the current indent size followed by "On." Enter a value in centimeters, such as 1.2.
Note: The indent will apply to all subsequent paragraphs.
Select the paragraph in which you want to create an indent.
To format a paragraph, press OPTION+COMMAND+M. A dialog box will open Paragraph; tab will be in focus Indents and spacing.
To create a ledge, use the options in the group Indent. Press Control+Option+Right arrow key until you hear: "Custom popup button." To select an option, press CONTROL+OPTION+SPACEBAR. Then press the UP ARROW or DOWN ARROW key until you hear "Protrusion." To make a selection, press the SPACEBAR.
To set the protrusion size, press the Tab key. You hear the current indent size followed by "On." Enter a value in centimeters, such as 1.2.
To return to the document, press Enter.
To change the indent from the left margin, press Control+Option+Right arrow key until you hear: "Before text."
To change the indent from the right margin, press Control+Option+Right arrow key until you hear: "After text."
Select the paragraphs in your document for which you want to increase or decrease the left or right indent.
To format a paragraph, press OPTION+COMMAND+M. A dialog box will open Paragraph, the focus will be set to the tab Indents and spacing.
Using parameters in a group Indent do one of the following:
To set the indent size, enter a value in centimeters. The selected indent size will be announced.
To return to the document, press Enter.
additional information
Use Word for iOS with VoiceOver, the built-in iOS screen reader, to change paragraph and line spacing.
Notes:
In this section
Adjusting the spacing between paragraphs
Select the paragraph in your document for which you want to set the spacing.
Note:
Setting line spacing
Select the paragraph in your document whose line spacing you want to set.
To go to the feed, swipe right or left until you hear "Show feed," and then double-tap the screen. You hear the name of the current ribbon tab.
To select the Home tab, double-tap the screen and swipe right or left until you hear: "Home tab." Then double-tap the screen again.
Swipe right until you hear "Paragraph formatting, button," and then double-tap the screen.
Swipe right until you hear "Line spacing, button," and then double-tap the screen.
1,0 , 1,15 , 1,5 , 2,0 , 2,5 And 3,0
Setting paragraph indents
Indent the first line of a paragraph
To go to the feed, swipe right or left until you hear "Show feed," and then double-tap the screen. You hear the name of the current ribbon tab.
To select the Home tab, double-tap the screen and swipe right or left until you hear: "Home tab." Then double-tap the screen again.
Swipe right until you hear "Paragraph formatting, button," and then double-tap the screen.
Swipe right until you hear "First line, button," and then double-tap the screen.
Indent all lines of a paragraph except the first
Select the paragraph in your document that you want to indent.
To go to the feed, swipe right or left until you hear "Show feed," and then double-tap the screen. You hear the name of the current ribbon tab.
To select the Home tab, double-tap the screen and swipe right or left until you hear: "Home tab." Then double-tap the screen again.
Swipe right until you hear "Paragraph formatting, button," and then double-tap the screen.
Swipe right until you hear "Special indent, button," and then double-tap the screen.
Swipe right until you hear "Protrusion, button," and then double-tap the screen.
Change the indent for an entire paragraph
To increase the indent, swipe right until you hear "Increase indent location," and then double-tap the screen.
Select the paragraph in your document that you want to indent.
To go to the feed, swipe right or left until you hear "Show feed," and then double-tap the screen. You hear the name of the current ribbon tab.
To select the Home tab, double-tap the screen and swipe right or left until you hear: "Home tab." Then double-tap the screen again.
Do one of the following.
additional information
Use Word for Android with TalkBack, the built-in reader with android screen to change the spacing between paragraphs and lines.
Notes:
In this section
Adjusting the spacing between paragraphs
To add a space before a paragraph, swipe right until you hear "Add space before a paragraph," and then double-tap the screen.
To add a space after a paragraph, swipe right until you hear "Add a space after a paragraph," and then double-tap the screen.
To remove the space before a paragraph, swipe right until you hear "Remove space before paragraph," and then double-tap the screen.
To remove a space after a paragraph, swipe right until you hear "Remove space after a paragraph," and then double-tap the screen.
To select a tab home
Do one of the following.
Note: You can toggle spaces before and after a paragraph, so the option to add white space will only be available if there is already free space before or after the paragraph, and the option to remove white space is only available if there is currently free space before or after a paragraph.
Setting line spacing
Select the paragraph in the document for which you want to change the spacing.
To go to the ribbon, swipe right or left until you hear "Unchecked, more options," and then double-tap the screen.
To select a tab home, double-tap the screen, swipe left or right until you hear "Home, tab," and then double-tap the screen.
Swipe right until you hear "Line spacing in combo box," and then double-tap the screen.
Swipe right to preview the available line spacing: 1,0 , 1,15 , 1,5 , 2,0 , 2,5 And 3,0 . When you hear the value you want, double-tap the screen to set the line spacing.
Setting paragraph indents
Indent the first line of a paragraph
Select the paragraph in the document for which you want to change the spacing.
To go to the ribbon, swipe right or left until you hear "Unchecked, more options," and then double-tap the screen.
To select a tab home, double-tap the screen, swipe left or right until you hear "Home, tab," and then double-tap the screen.
Swipe right until you hear "Paragraph formatting," and then double-tap the screen.
Swipe right until you hear "First line, unchecked, switch," and then double-tap the screen.
Indent all lines of a paragraph except the first
Select the paragraph in the document for which you want to change the spacing.
To go to the ribbon, swipe right or left until you hear "Unchecked, more options," and then double-tap the screen.
To select a tab home, double-tap the screen, swipe left or right until you hear "Home, tab," and then double-tap the screen.
Swipe right until you hear "Paragraph formatting," and then double-tap the screen.
Swipe right until you hear "Special indents," and then double-tap the screen.
Swipe right until you hear "Protrusion, not installed, toggle," and then double-tap the screen.
Change the indent for an entire paragraph
To increase the indent, swipe right until you hear "Increase indent, button," and then double-tap the screen.
To decrease the indent, swipe right until you hear "Decrease indent, button," and then double-tap the screen.
Select the paragraph in your document that you want to indent.
Do one of the following.
additional information
Use Word Mobile with the built-in narrator Windows Tools screen reader to change paragraph and line spacing.
Notes:
In this section
Adjusting the spacing between paragraphs
To add a space before a paragraph, swipe right until you hear "Add space before a paragraph," and then double-tap the screen.
To add a space after a paragraph, swipe right until you hear "Add spacing after a paragraph," and then double-tap the screen.
To remove the space before a paragraph, swipe right until you hear "Remove space before paragraph," and then double-tap the screen.
To remove a space after a paragraph, swipe right until you hear "Remove space after a paragraph," and then double-tap the screen.
Place the cursor anywhere in the paragraph for which you want to set the spacing.
On the tab home Swipe right until you hear "Paragraph formatting," and then double-tap the screen.
Do one of the following.
Note: You can toggle spaces before and after a paragraph, so the option to add white space will only be available if there is already free space before or after the paragraph, and the option to remove white space is only available if there is currently free space before or after a paragraph.
Setting line spacing
Place the cursor anywhere in the paragraph whose line spacing you want to adjust.
Swipe up or down until you hear "Items."
Swipe right until you hear " Extra options", and then double-tap the screen.
Swipe left until you hear the name of the current tab, and then double-tap the screen.
Swipe left or right until you hear "Home," and then double-tap the screen.
On the tab home Swipe right until you hear "Paragraph formatting," and then double-tap the screen.
Swipe right until you hear " line spacing, button", and then double-tap the screen.
Swipe right to cycle through all available line spacing values. When you hear the value you want, double-tap the screen to set the line spacing.
additional information
Use Word for the web with a screen reader to make your document look flawless by searching for them the way you want. We've tested with Narrator, but may work with other screen readers as long as they follow standard accessibility standards and practices. You will learn how to set the spacing before and after each paragraph, as well as the size of indents and lines.
Open a document, and then select the paragraph you want to set the spacing for by moving the insertion point to the beginning of the paragraph while holding down the Shift+Ctrl+Down arrow key. If you want to set paragraph spacing for the entire document, press CTRL+A.
To change the spacing before a paragraph, press Alt+Windows logo key, and then press N, SB. You hear: "Line space before." Press the Up and Down arrow keys until you hear the item you want, or type the value you want (for example, 6 or 18 ), and then press Enter. Values with smaller dots indicate less space.
To set spacing after a paragraph, press Alt+Windows logo key, and then press P, SA. You hear: "Line space after." Press the Up and Down arrow keys until you hear the item you want, or type the value you want (for example, 6 or 18 ), and then press Enter.
To set line spacing for the selected paragraph, press Alt+Windows logo key, and then press H, 02. You hear: "Line spacing." Press Enter, and then use the Up and Down arrow keys to select from a list of commonly used sizes, and then press Enter to apply it.
Setting paragraph indents
Open a document, and then select the paragraph you want to indent by moving the insertion point to the beginning of the paragraph while holding down the Shift + Ctrl + down arrow key. If you want to set a paragraph indent for the entire document, press CTRL+A.
To set the left indent size, press Alt+Windows logo key, P, IL. You hear: "Left indent." Use the up and down arrow keys to set the value you want, or type a value (for example, 0.25 or 0.5 ) and then press ENTER.
To set the right indent size, press Alt+Windows logo key, P, IL. You hear: "Indent right." Use the up and down arrow keys to set the value you want, or type a value (for example, 0.25 or 0.5 ) and then press ENTER.
To add a first line indent to a paragraph, move the focus to the beginning of the first line of the paragraph, and then press the Tab key. You can indent the first line more than the rest of the lines.
additional information
Note: This page is translated automatically, so it may contain inaccuracies and grammatical errors. It is important to us that this article is useful to you. Was the information helpful? For convenience also (in English).
While creating text document needs to be changed very often. This is due to the fact that for many documents it is necessary to use a line spacing of 1.5 (one and a half spacing), while in Word 2003 the default line spacing is 1, and in Word 2007, 2010, 2013 and 2016 - 1.15.
Obviously, there is a problem and it needs to be able to solve. In this article, we will talk about how to make an interval of 1.5 in Word, and also consider some other features of working with line spacing.
How to make spacing 1.5 in Word 2003, 2007, 2010, 2013 or 2016
So, in order to make an interval of 1.5 in Word 2007, 2010, 2013 or 2016, you you must first select all the text for which you want to change the line spacing. If you want to change the line spacing for the entire document, you can simply press CTRL+A and select all the text without using the mouse.
After the text is selected, you can change the line spacing. For this without removing the selection from the text, click on the "Interval" button on the "Home" tab.
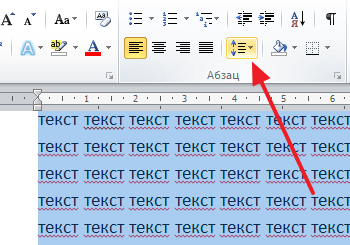
After clicking this button, a pop-up menu will appear in which you need to select option "1.5". After that, the line spacing of the selected text will be changed to one and a half.

If you are using more old version Word, for example, Word 2003, then changing the line spacing to 1.5 is performed in much the same way as described above. First, select all the text, and then click on the "Interval" button and select one and a half intervals.

Alternative way to make spacing 1.5
Also in Word there is alternative way make one and a half line spacing. To do this, select the text and click on the small button to the right of the inscription "Paragraph" on the "Home" tab.
Most often, this topic is of interest to schoolchildren and students who have strict requirements for the design of work. Or those who started using Word 2007 or Word 2010. Compared to previous version, where the line spacing is 1, and there were no paragraphs at all, now the values are 1.15 and 10 points, respectively.
If you need to correctly format a document in accordance with some requirements, or maybe it’s just not customary to look at the new distances between rows in Word 2007 and Word 2010, let's deal with the question of how to set the necessary intervals in Word.
Interline
To adjust the line spacing for all text, select it by pressing the key combination Ctrl+A. Go to the "Home" tab and in the "Paragraph" section, click on the button "Spacing". Select the appropriate value from the dropdown list.
If none of the suggested values suits you, click the button "Other options…".
On the tab "Indents and Spacing", in field "interline" select "Multiplier", in the field "value", put the desired number. Then click OK.

If you need, for example, to reduce the distance between rows for a certain piece of text or for one page so that a certain text fits on it, select it with the mouse and repeat the above steps.
Between paragraphs
In order to adjust the spacing between parts of the text in the document, on the "Home" tab in the "Paragraph" section, click on the small arrow in the lower right corner.

The familiar dialog box will open. Here, in the "Interval" section, set the value in the field "Before" and "After". You can also check the box "Do not add ... between paragraphs of the same style". Click OK.
If you set the fields to "0 pt", then there will be no spacing between paragraphs.

To save the set parameters in all subsequent Word documents, in the dialog box shown above, click the button "Default". Now put a stamp in the box "all documents based on the Normal template" and click OK.

Consider another method that will help you change the spacing between paragraphs. On the Home tab, click the button "Change Styles" and select "Spacing Between Paragraphs". A list will open. Hover your mouse over different items and see how the text changes. Choose the right one.
If you have changed the interval and want it to be applied in other documents, click the button "Default".

I think you managed to set the required line spacing and spacing between paragraphs in Word 2007 or Word 2010.
Rate article:How to change line spacing in Microsoft document Office Word 2016 to make it easy to read (suitable for 2007, 2010, 2013, 2016 versions).
To create a document with one of the standard line spacing, set it before you start. If you want to change the line spacing of the finished document, then first select it (tab home> group Editing > Highlight > Select all). Then use any of the following methods.
The simplest and fast way to change the spacing between lines of text and paragraphs in the entire document is to use the button Spacing between paragraphs tab Design groups Document Formatting, which changes both types of intervals at the same time.
Hover your mouse pointer over each of the spacing options provided in the section Embedded, and see how the line spacing changes.

Choose the option that suits you. If you want to single-space your document, select No spacing between paragraphs.
IMPORTANT:
The settings for the current style set will be overridden. If after a while you need to restore the original settings, click on the tab again Design > Spacing between paragraphs and select an option under Style set. It could be a parameter Default, or the name of the current style set.
How to change line spacing for part of a document
To change the line spacing for a portion of a document, follow these steps:
Highlight the paragraphs you want to change. Then on the tab home, in a group Paragraph, press the button Interval.

Choose the amount of line spacing you want, or click Other line spacing options at the bottom of the menu.

In the dialog box that appears Paragraph, in section Interval, set the options you need using the drop-down menu Interline.

If you want to change the spacing before or after the selected paragraphs, use the arrows Front And After enter the desired value.
If you have to change the line spacing frequently, then using a keyboard shortcut to do this will save you a lot of time.
Select the text where you want to change the line spacing.
Press keyboard shortcut ctrl+2, To obtain double spacing.
Press keyboard shortcut ctrl+5, To obtain one and a half interval.
Press keyboard shortcut ctrl+1, To obtain single spacing.
Most often, this topic is of interest to schoolchildren and students who have strict requirements for the design of work. Or those who started using Word 2007 or Word 2010. Compared to the previous version, where the line spacing was 1, and there were none at all between paragraphs, now the values are 1.15 and 10 points, respectively.
If you need to correctly format a document in accordance with some requirements, or maybe it’s just not customary to look at the new distances between rows in Word 2007 and Word 2010, let's deal with the question of how to set the necessary intervals in Word.
Interline
To adjust the line spacing for all text, select it by pressing the key combination Ctrl+A. Go to the "Home" tab and in the "Paragraph" section, click on the button "Spacing". Select the appropriate value from the dropdown list.
If none of the suggested values suits you, click the button "Other options…".
On the tab "Indents and Spacing", in field "interline" select "Multiplier", in the field "value", put the desired number. Then click OK.
If you need, for example, to reduce the distance between rows for a certain piece of text or for one page so that a certain text fits on it, select it with the mouse and repeat the above steps.
Between paragraphs
In order to adjust the spacing between parts of the text in the document, on the "Home" tab in the "Paragraph" section, click on the small arrow in the lower right corner.
The familiar dialog box will open. Here, in the "Interval" section, set the value in the field "Before" and "After". You can also check the box "Do not add ... between paragraphs of the same style". Click OK.
If you set the fields to "0 pt", then there will be no spacing between paragraphs.
To save the set parameters in all subsequent Word documents, in the dialog box shown above, click the button "Default". Now put a stamp in the box "all documents based on the Normal template" and click OK.
Consider another method that will help you change the spacing between paragraphs. On the Home tab, click the button "Change Styles" and select "Spacing Between Paragraphs". A list will open. Hover your mouse over different items and see how the text changes. Choose the right one.
If you have changed the interval and want it to be applied in other documents, click the button "Default".
I think you managed to set the required line spacing and spacing between paragraphs in Word 2007 or Word 2010.
Rate article:


 between two Wi-Fi routers?")


