We present to your attention a selection of creative ideas with step-by-step master classes of manufacturing covers for the phone with your own hands.
Case for mobile phone from paper in Origami technique (budget option)
You will need: Sheet of paper A4 format of any color, PVA glue.
Master Class
- Put a horizontal sheet of paper.
- Put your phone on top.
- Turn the phone to the end of the sheet.
- Wrap the bottom of the paper to the phone several times.
- Bend triangles at the bottom of the sheet up.
- Fix the bends glue.
You will need: Rubber 3 colors in the amount of 500 pieces, a hook, a machine for weaving (there should be 2 rows on it: the holes in the lower row should look at the right, and the upper - left).
Master Class
- Put the rubber bands from the top row of the second pin, then wear it on the cross on the third pin pin.
- Jump the gum cross on the cross, from the second pin pin on the third pin pin.
- Put the rubber bands in the same way from the third pin pin on the fourth pin of the upper row. There should be three crosses.
- Miss the center in the center of two pins, fall into the same way four more crosses. There should be four crosses and at the edges of the machine should remain two free pins.
- Rubber tower on the top and lower pins of the next row standing opposite. In the same way, put on the rubber bands on all the pins of the past row.
- Turn the machine vertically to yourself so that you watched the top pins on you.
- Jump, without crossing the first elastic band on one lower part and on one top.
- Attach, without crossing the remaining rubber bands along the top row - one after another, not passing two middle pins.
- Make the bottom row in the same way by connecting with a rubber band from the second side.
- Remove the crocheted two rubberbers from the lower row of each pin.
- Skip the average pins, should remain on every pin two gum.
- Take the elastic bands of another color and make the next row in the same way as the third one.
- Remove the two lower loops in a circle and again put on the elastic bands of another color in a circle, then remove the lower loops.
- Make two rows in the same way, alternating colors. (For one row - once the loops, then remove).
- Make a screen hole in this way: vertically turn the machine, the bays of the left row should look at you. From the third pin of the left row, remove the bottom gum and tilt on the fourth. Must turn the last looting on the seventh pin.
- Remove the remaining loop from the middle five pins. It should remain three pins with rumored rubber bikes.
- Check in this way the following ranges: Start from the third working pin to determine the elastic band over a rubber room clockwise. Leave five pins on one side.
- Remove the lower gum, should remain two loops on the pins.
- Check another eleven rows, in the same way alternating color.
- Check the row clockwise by filling out all the pins.
- Remove the lower gum from the pin, and from five not involved before - do not remove.
- Skip two working pins in a row, where there are not accurate pins, remove the lowest loop from the third pin and put it on the next pin. Do so while the last two pins are empty. Check one row.
- Take a vertically machine, remove the bottom loop from the right row of the second working pin and put it on the next bayonet. The last loop on the fourth working pin should be thrown.
- Remove the lower loops from the third and second pin.
- Put on the circle of the loop, leaving two pins empty, then remove the lower loops.
- Jump gums on the next row using all pins. Remove the loops and do not touch the pins on which two gum is located.
- Change the top and bottom loop on the first pin, throw the top loop to the next pin. Connect the design.
- Remove on the same bottom loop with the other two pins and throw them into the next pin.
- Check a number in the usual way.
- Close the cover in this way: Make a row from the crosses as at the beginning, using all the pins. Make the next row between the opposite pins of crossbars.
- Remove the bottom loops and leave the gum from which the eights were made. There should be three loops on the lower pin.
- Put the next pin lower loop of each pin. In the same way, make the following row.
- Make a node with additional rubber band on the right side, then remove the cover from the machine. Hide the node and repent sticking loops, and then dress the case on the phone.
Case-bumper for a mobile phone from hot glue
You will need: Adhesive gun, nail polish, scotch, parchment paper.
Master Class
- Take the parchment paper and enclose the phone so that the rear panel and the side panels are without junctions.
- Secure the joints with scotch in the screen area.
- Check the places where the camera, socket and buttons are located.
- Apply hot glue on the side of the phone, then highlight the designated locations along the contour.
- Make a pattern on the back of the phone in such a way that the pattern is connected to the side of the phone.
- Wait for complete drying.
- Apply nail polish your favorite color, coloring the pattern.
- Wait for complete drying.
- Put the case on the phone.
Case for a mobile phone from a balloon (budget option)
You will need: Ball of his beloved color.
Master Class
- Take the ball, inflate it and do not tie.
- Put the screen up the phone on top to the bowl.
- Put the phone to the bowl, gradually blowing it off.
- Release the ball when the air remains little and continue to give the phone into the ball.
- Wait until the ball will cover the phone, this is a sign that the case is ready.
You will need: Notepad with a rubber band in size of your phone, stationery knife, line, glue, felt, simple pencil, cardboard, narrow gum.
Master Class
- Cut the sheets and side parts of the notepad using the stationery knife.
- Separate one side of the notepad in half, noting a simple pencil.
- Cut up the line to the extreme notebook cover using the stationery knife, then cut the strip of half a centimeter in this place for future bend.
- Clear the inner side of the notepad cover.
- Outline notepad cover on fiet and cut it out.
- Attach felt on the inside of the notepad cover, then cut the felt on the side split.
- Stick to the cover of notepad blank from felt.
- Outline the phone on the cardboard sheet, then cut the workpiece.
- Get cardboard to the felt and cut it out in shape, retreating from cardboard centimeter.
- Cut into two sections in the corners of the felt on each side, then glue the corners.
- Enclose two gums across this workpiece.
- Stick the blank to the flexing extreme half.
- Put the case on the phone.
You will need: List of cardboard of any color, scissors, glue, marker, gum.
Master Class
- Discuss the phone on the cardboard with a distance of the floor centimeter and cut out.
- Make along the lines, in the center of the workpiece, two bend.
- Stick to the back cover of the phone one side of the case.
- Attach a thin rubber band to the cover so that the case can close.
You will need: Felt of any colors, needle, thread, adhesive gun, scissors, ruler, simple pencil.
Master Class

Case for mobile phone from fabric
You will need: Dense fabric, threads with needle, acrylic paints, colored paper, scissors, glue, stencil, line.
Master Class
- Measure the size of the phone, cut two identical billets with wavy edges using a stencil.
- Draw on one blank the face Sponch Bob.
- Make out of colored paper clothes for the sponge and glue it.
- Sustrate the workpiece with each other from the wrong side.
Case for mobile skin
You will need: Leather of any color, scissors, clamps, thick thread, pattern of cardboard, tongs for installing champs, two gypsy needles, for decorating (two eglet, decorative thread), handle, line.
Master Class
- Measure the size of the phone, add a centimeter to the length, and to two width, remember the parameters.
- Make two identical leather blanks with the desired parameters.
- Round the corners of the billets.
- Make round small holes on the cardboard template with a distance of 5 mm.
- Fold the workpiece from the skin by the inside side to each other and attach the template.
- Make holes with tongs on the bottom and sides. Secure the clips pattern.
- Put two needles on the thread from two sides.
- Sustrate from the side in this way: one needle passes the first hole, straighten the thread, then take turns to two needles, dragging them into one hole, but in different directions.
- Watch the entire case, then fasten the thread several times.
- Make two through holes with a distance of centimeter on the top of the cover.
- Put on the ends of the decorative thread eguelets.
- Passe through through holes decorative thread and make a bow.
You will need: yarn, scissors, adhesive gun, tape, parchment paper, line, baking paper.
Master Class
- Out the phone with parchment paper.
- Secure the bend and joints with scotch from the screen.
- Make the basis on the back cover of the phone using a glue gun, covering the entire rear and side surface with hot glue except the camera hole and microphone.
- Wait for complete drying and remove the basis from the phone.
- Mix thread on the line in parallel, given the width of the phone.
- Apply glue to one rib line and glue to the base.
- Wait for complete drying and cut the thread on the opposite edge of the line, then cut the thread from the maid.
- Fill the entire cover of yarn vile, receded with 5 mm between the rows.
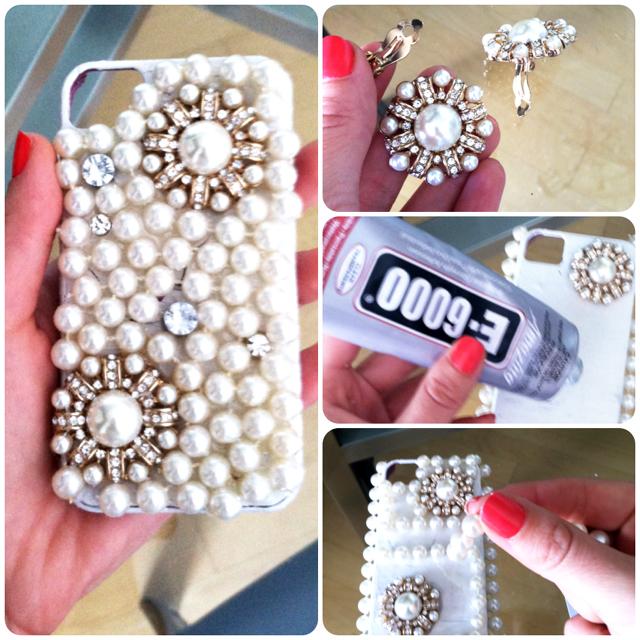
You will need: Beads of any colors of the same size, adhesive gun, toothpick, cardboard.
Master Class
- Pour some beads on the table.
- Apply a drip of hot glue to the cardboard.
- The tip of the toothpicks dip in the drip of hot glue.
- Touch the toothpick to the bead.
- Pulp the bead in a drop of hot glue.
- Stick the bead to the phone.
- Enclose in the same way the rest of the beads on the back and side tires of the phone. Please note that the work is painstaking and takes a certain amount of time, but you need to work at the pace, as hot glue quickly freezes.
You will need: Bars (to cover the entire phone you will need 80 ripples, partly as in the picture - 31), adhesive gun, cardboard, nippers or tweezers.
Master Class
- Cook the crosses, putting them with a sharp portion.
- Take a bone tweezers.
- Apply a small droplet of hot glue on a ripple.
- Stick the rumble to the phone.
- Stick all the rivets in this way.
You will need: Cosmetic glitter, brush, hair polish, transparent nail polish.
Master Class
- Spray hair sprinkle parts of the back of the phone.
- Apply glitter on a tire with a brush.
- Cover with glitter in a fast pace, as the lacquer dries up, and the glitter may not stick.
- Secure the good layer of transparent varnish.
- Let dry.
You will need: Beads, adhesive gun, nippers or tweezers.
Master Class
You will need: Cotton or woolen thread for knitting (white, black), needle, hook (clover 1.8 mm), black marker, wool.
Master Class
- Type the desired number of loops so that they match the width of the phone. (Standard size - 20 air loops, designation - VP).

- Check the 4 rows, the 19th Stage without a Nakida (Designation - UBF), 20 loop do with the rise and turn. There should be a base of the case.

- Tie the bases in a circle of the failure, to the desired height of the case. (Standard size - 10 cm).
- Tie ears according to the scheme specified in the picture.
Without a cover, our phone feels quite uncomfortable - that looks accidentally scratched or chasso. Of course, now there are models of phones that are not afraid of either scratches or other damage. But they are not available to everyone, and the more nicer to give themselves or close a gift created by itself. In this master class, we will tell how to sew a cover for your own hands.


Required materials and tools:
- dense tissue for the main, front and back of the exterior;
- dense tissue for accent;
- lining fabric;
- sarge tape;
- velcro;
- metallic or plastic ring;
- lightning;
- threads;
- transparent line;
- chalk;
- iron and ironing board;
- scissors;
- roulette;
- portnovo accessories;
- sewing machine.
Cut the detail of the case
Today we will tell how to sew a case for your own hands. First of all, download and print the template here. Cut the details along solid lines. From the fabric for the main, front and back of the exterior, we cut such details: one rectangle with a size of 12x19 cm. Cut one using the case template. A bag cuts out of the fabric for the front and accent. From the tissue for lining, you need to cut two rectangles with a size of 12x19 cm. From the sarge tape, cut off 22 cm. Cut from the velcro 2.5 cm. Single one velcro to the front side of one external part.


Send ribbon
Fold one piece of lining by involving parties together with the part on the velcro so that the velcro is on the reverse side. Find the middle of the lining and run the line. Attach the sarzhey tape to this line. Insert the metal ring. Stretch on the sewing machine. Watch the ribbon crosswise, as shown in the photo.


Send lightning
Find two angular parts or cut them out using a template. Bend the edges of each part by 0.5 cm and start the iron. Take the lightning and place it between two details. Stretch on the sewing machine. Find the remaining piece of lining and fold it from the wrong side along with the front part. Disseminate zippers and push along both sides and at the bottom edge.


Send details
On the front and rear details, throw off the top edge and push on the sewing machine. Fold the two main details of the front parties together. Stretch on the sewing machine along three sides and treat the edges of the zigzag seam. Cut the allowances and corners in the bottom edge. Remove on the front side. Stop again along the top edge, capturing a metal ring. Ready! That's how you learned how to sew a phone case.
Today in cellular salons There is a huge range of covers for cell phones, which to satisfy any requests and tastes. Nevertheless, it is often possible if you wish to purchase a cover for a specific phone model, it turns out that the choice is limited to several standard options. For a touch phone, it is very easy to find a silicone case or handbag, but the original options are not so simple.
Swing case for phone.
We propose hard to get involved in the search for commercial offers, but to make an armor-piercing case for a mobile phone with your own hands. The process will take about three hours of time, with all the necessary nearby. So, for the manufacture of the cover will be needed:
Mobile phone. You can do the data on its size, but it is advisable to try on it every item in the process of manufacture
Flexible plastic. A plastic paper folder is suitable.
Leather. Or other fabric. Better - leather
Metal plate thick from 1 mm. Professor - Good
Tools and Other: Scissors, Marker, Line, Sewing Machine, Glue "Moment"
Make a frame.
The frame side is that the whole design will hold on. We will make it from plastic.
1. We have a phone with a display down on a sheet of plastic, and mark the dimensions of the cellular on it. It will take a ruler for accurate verification of the size and applying them to the material. In order not to get confused, you can act in stages: first "wrap" the phone into a sheet of material first, keeping the place of its bend, and only then cut the elements, the position and the form of which corresponds to the cellular display elements, buttons. It should be approximately such a frame:

The largest cutout in the center - the display, two "squares" on different sides - window for the camera
2. Try in the framework, it should turn out something like this:

Fastening on the body of the phone.
Front part.
The front part is a folding plate that protects the display of the phone. May be similar to the back side - depending on the dimensions of the phone. About everything in order.
1. As the basis, take the metal plate. Here the main thing is to correctly calculate strength and weight, since heavy iron will be simply pulling the pocket during operation. It will suit the professional flooring, I used an aluminum leaf, which made ribs of stiffness, bent the edges.
We apply the phone with the front side to the sheet, and mark the dimensions.


2. Cut the plate:


in the second drawing, the mark is made on the outside of the material for the convenience of sewing.
4. Apply the outer side of the marked piece of leather to another piece with similar dimensions. We sew them on the HM markup:

The height of the "pocket" can be greater than the height of the phone, taking into account the value of another parameter - its width.
5. Cut out unnecessary parts of the material along the seam:

6. We turn the "pocket" \u003d), and "wear" it on the metal plate. Facial part ready!

Production of the rear.
As mentioned, the rear part can be absolutely identical front (excluding cell size). To facilitate the design, replaced aluminum on plastic.

Cut plastic from a plastic folder. The main task is to preserve the shape of the body, and not to strengthen.
We fasten the resulting details.
7. I turn around the frame side around the phone body, we press it overlapping parts, and glue them.

Two sheathed plates and glued frame part.
8. Cut in the back plate hole for the camera's eye. The edges of the hole can be glued or torn the thread from the inside so that they do not sprawl.
9. We fasten the front folding plate (sorry for the terms) and the rear plate using "extra" millimeters in length, or sewing an additional piece of skin. The mounting place will hold the folding plate.
If you urgently need a mobile phone case to protect it from scratches and falls, it is not necessary to go to the store - you can make a beautiful case at home.
How to sew a cover with your own hands

1. To begin with, you need to know what size your future case will be. You can use two halves of felt of different colors. In this example, it was dark green for the back of the case and white for the front.

2. Both halves are connected by the thread manually. A double thread is used (see picture).
3. The rear of the cover is longer so that the case can be closed.


4. A small strip of felt is a trick in the top of the cover, as shown in the image.

5. To decorate the case, you can prepare a few strips of different colors and glue them to the case. If there is no glue, you can sew them.


How to sew the phone cover with your own hands

You will need:
Scissors
Adhesive tape
Cover scheme
1. Print the cover circuit and use the holes specified by the points with the selection.

2. Cut the sample.

3. Manually break the thread through the leather sample.

4. To provide strong seam, it is better to flash 3 times.
5. Create the left and right side as shown in the picture, and connect them with a thread.

6. Apply glue on the bottom of the case and glue from the inside.


How to make a cover with your own hands.

You will need:
Piece of unnecessary leather clothes
Scissors
Sewing machine (you just need a needle and thread)

1. Prepare the material from which it will later be necessary to cut 3 equal parts - 2 will be used as anterior and rear of the cover, and the third piece for decoration.
2. Put the phone on the material and designate about 2.5 cm from the rapid part.
3. To decorate the cover, you need a third piece of tissue to cut in half.
4. It's time to cut the cloth into 3 equal parts.
5. Put the two parts on each other and measure the approximately 2.5 cm from above.
6. From the third part of the third part gently make a fringe.
7. Sew every half with a fringe to the front and rear parts of the cover as shown in the picture.
8. Cut on the left and right from each fringe one piece.
9. Sewing machine connect half the cover.

Tailoring covers with your own hands

Make this case is very simple. This project is on an ambulance hand - if you urgently need a case.
Find out the size of your phone so that it is easier to work in the future.


You will need:
Lipucca
Material for Czech
Pins
Two D-Rings

1. Prepare the material for the strap. Fold it in half and burst, as shown in the picture.

2. Prepare 2 pieces of fabric, which will serve as the back and front pieces of the cover (in this case, fabric with a pattern). Also prepare 2 pieces of fabric that will be the inside of the cover (in this case fabric beige color), and 2 pieces of fabric that will cover beige parts (Blue fabric). Put each outdoor part on the inner and connect them with pins.
3. Sew the strap to one of the halves of the cover.

4. Put the D-rings on the strap and bend it in the opposite direction. Build the strap with two rows of threads in the place indicated in the picture.


5. Invert this part of the cover and over the top cover with a piece of tissue of blue color.


6. Prepare the velcro, which consists of 2 parts. Sew one part to one half of the case.


7. Prepare the second half of the cover and sushach it to the first.

8. Correct the place where you sew the second half of the velcro and the trick.

Your case is ready.
Case made of leather with your own hands

Option 1
1. Prepare a sheet of A4 format and fold it in half.
2. Mark on one half the paper contours of your mobile phone.

3. You will get this figure - it needs to be cut.


4. Check if you chopped the size correctly.

5. Now you need to move the contour from the leaf to the skin.

You have to get here such a segment. Generate ends and burst them.

6. Check the correctness of the size again.

7. Using a ruler and sewer, start making holes in the segment.

8. Start sewing. In this case, the color of the thread was chosen in the ratio with the color of the skin of the case, and the seam was used internal.


9. If after sewing the cover turned out to be uncomfortable, then you can turn it inside out, like this.

1. With a plate, you can round the bottom cover.

2. At the top of the cover, let the braid, which should take place on both sides.

3. Double external seam by the cover around the perimeter and then you can, as you like to decorate, for example, attach the keychain.
In today's master class we will make a stylish skin case with your own hands for your phone or smartphone. Gadget can be reached using a tongue hidden between leather layers.
To sewing a leather cover, we will need:
Genuine leather of the desired color;
dense braid;
brown threads for skin;
needle;
stationery knife;
scissors;
a piece of chalk;
line;
glue pistol;
lighter;
paper clips - 2 pcs.;
Little pin;
Hammer and banker.
First you need to do the measurements of the smartphone, for which you intend to sew a case. If the model of your Samsung Galaxy Advance DUOS or a 4.3 diagonal smartphone, then the measurements specified in the workshop will also be suitable. If the diagonal of your smartphone is different, then you just need to measure the width, height, the thickness of the gadget and transfer them to the wrong side of the skin, as in the picture. Blacks with chalk on the inside, but cut out the allowances only on the side parallel sides of 0.7 cm.
We have prepared the inside of the cover. Now put it on the skin, we supply chalk and cut out exactly the same outer part, which we immediately lay aside and work with the inner.

Prepare a tongue with which you can easily get a smartphone from the cover. To do this, you need a length of a dense braid with a length of 25 cm. If your device is more, then mark the same as indicated in the master class, only the length of the braid should be increased by so many centimeters, as much as your own phone. On the inside of the cover with chalk, we note the place where cuts need to be done to go tape. The length of the sand should be equal to the width of the braid.

The edges of the ribbon need to be cut a lighter. On the one hand we will make a leather end. We cut out two squares from the skin, the length of which will be 2 cm, and the width is such that the braid is placed and from three sides of the allowances remained 0.3 mm. This means if the width of the braid is 1.5 cm, then the width of the square is 2.1 cm. And the length is the segment that will look out from the cover when the smartphone will be inside.

Glue braid on the wrong side, leaving the allowances from three sides.

We put together the second square so that the edges with the first coincided. In no case in any case, the glue should not get to the allowance, only on the braid.

The edge on the side of the braid we flash the stitching needle with brown threads, making an indent 0.2 mm. Then all three sides are sewn with looped seam, performing neat and identical stitches. Hide all the nodules between the layers.


Stationery knife make cuts and produce braid through holes, as in the figure. The leather root should be on the edge to the edge, and the braid lay exactly along the pattern.

From the reverse side we glue only the free end of the braid.

Now put the second fragment (outer part) of the cover with the invalid side up and glue from above the same detail with a braid. In no case do not apply glue to the edges of the skin, as it will be necessary to make holes, retreating from the edge of 0.5 cm. We begin to glue from that edge, where there is a free end of the braid and smoothly go to the opposite. On the smooth surface of glue only to the middle, and in the place of bend, raise the croned part up.

In this position, we continue to glue the layers of the skin. If you immediately glue the layers on a flat surface, then when bending, the skin is deformed and goes with waves, and the product will not look very carefully. In no case we do not rush the braid between the layers, as it should be freely between them.


We will fold in half an almost finished case and make rounded corners.

Clips fasten the upper part so that the edges completely coincided. Making indents from the edge of the skin of 0.5 cm, we pierce the holes with a hammer and a punch at the same distance from each other throughout the length. The diameter of the displacement should be no more than 0.5 cm.

We remove the paper clips and tear separately both edges, not hurt.

Now we cut the skin strip in 0.5 cm. The edge permeate the end of the strip and closed the pin.

The pin will serve us with a needle, and a strip thread. End Breppi between layers with glue and flashing starting from bending.

When we reach the rounded part, we turn only to one layer until you need to sew both layers again.

If the skin strip is over, then its end is neatly glue between the layers and in the same place glue the end of the new one so that it completely repeats the trajectory of the previous one.

Separately flash the remaining fragment of the upper layer.

That's so simple we made a leather case for a smartphone with their own hands, which will accurately serve for a long time and will save your gadget safe and safety.


 in Photoshop How to make a grid in photoshop CS6")


")


