Lack of space on the "C" drive is a common problem faced by almost all users of the Windows operating system. In this article, we will look at the main reasons leading to this problem, and also tell you what to do in a similar situation.
Reason # 1. Trash, temporary files and other rubbish.
During the operation of the Windows operating system, a large number of unnecessary files are collected on the C drive. These are temporary files that are created by various programs, deleted files in the recycle bin, and much more. Therefore, if you do not have space on the "C" drive, then you need to press to remove this garbage.
The easiest and at the same time the safest way to delete such files is the built-in Windows tool called "Disk Cleanup". In order to use this tool, you need to go to "My Computer", right-click on the "C" drive and select "Properties" in the menu that opens.
After that, a window will appear with the properties of the disk, here you need to click on the "Disk Cleanup" button.

In the "Disk Cleanup" window, you need to mark the files that you want to delete from the disk, and click on the "OK" button. It should be noted that "Disk Cleanup" offers to delete only unnecessary junk files, so you can safely set all the marks. You won't delete any user or system files this way.

Also in the window there is a button "Clean up system files". If you click it, then "Disk Cleanup" will search for unnecessary system files and also offer to delete them. Usually this way you can delete unnecessary files that remain after you upgrade the operating system to a new version.

In any case, Disk Cleanup will not disrupt your operating system.
Reason # 2. User files on the C drive.
If you've performed a Disk Cleanup, but there is still not enough space on the C drive, then you should check the user folders. It is possible that a lot of files have accumulated there that can be deleted or moved to another disk.

The first thing to check is the Downloads, Desktop, and My Documents folders. In Windows 7 and Windows 10, these folders can be found at the following addresses:
- C: \ Users \ User_name \ Downloads or C: \ Users \ Username \ Downloads
- C: \ Users \ User_name \ Desktop or C: \ Users \ Username \ Desktop
- C: \ Users \ User_name \ Documents or C: \ Users \ Username \ Documents
Reason # 3. Unnecessary programs.
Most users do not uninstall unnecessary programs. As a result, over time, a large number of them accumulate, and they begin to take up a noticeable amount of free space on the "C" drive. Therefore, if you do not have enough space on the "C" drive, then it is worth revising the installed programs and removing those that you do not use.
Recently I met a poll "how much space do you have on the C drive", and this prompted me to show you how to clean the C drive of unnecessary files without deleting anything unnecessary.
As the survey showed, most people have only 100 GB allocated for the C drive, of which a couple of GB are free. This is not surprising, the OS and the necessary software take up 50 GB, plus garbage, temporary files and, as a result, the memory is all occupied. Let's get started and remove all the trash from the computer in order.
Quick clean Windows 10
We clean the downloads
I think everyone knows what this folder is and why it got full. If anyone is in the "Downloads" tank, this is the place where all your files that you downloaded / saved on the Internet are located. To find this folder on your computer, open "Computer / My Computer" and "Downloads" will be in the left menu.
If, for some reason, this folder is not in the left menu, then go to: Drive C, Users, "Your PC username", Downloads.
Now, as you understand, I propose to delete everything from this folder, except for what you need. It is better to move the rest of the files that will be useful to you to another disk.
To move files to another section, hold down the "Ctrl" key and left-click on the files / folders you need. After you have selected everything, press "Ctrl" + "X" (Cut) then open the folder where you want to move and press "Ctrl" + "V".
We transfer the downloads folder to disk D, E, F
If you have little space on the C drive and you cannot / want to expand it, it would be logical to transfer the downloads to another drive, where the capacity allows it. It won't work just like that, so you have to use the following method:
- Go to drive C, Users, "Your PC Username", "Downloads".
- Right-click on the "Downloads" folder and select "Properties" from the menu.
- In the top menu, go to "Location".
- Here is the path of your folder, which you can change manually or click "Find folder".

- After you have selected a folder on another drive, click "Apply" and you're done!
Removing temporary files
Temporary files are stored in the "Temp" folder and they are all unnecessary junk that clogs up your computer. These files remain after installing programs, updates, etc. You can delete absolutely everything without even looking at what is there.
First, let's open the Temp folder. Open "Drive C", then "Windows" then open the "Temp" folder. Select all files with the keyboard shortcut "Ctrl" + "A" and delete them.
Windows may notify you that you can only delete a specific file with Administrator rights. Click yes / continue.
If you have Windows XP, then go to the next point, if Windows 7-10, then do the following:
In the search, on the start panel write "% temp%" and open the folder.

Alternative way to open: in the address bar, enter "C: \ Users \ UserName \ AppData \ Local \ Temp". Where "UserName" you need to enter the username of your PC.
In this folder, delete everything that you can delete. Personally, I have collected almost 2 GB of temporary files in 1 month.
We carry out cleaning with the Ccleaner utility
I would like to suggest that you use a program called "ccleaner". This is a very powerful utility that does half of what I said above, and also cleans cache, browser history and whatnot. If you don't need to clean something, for example, your browser history, you can turn it off in the settings.
In any case, I advise everyone to use it, so let's see where to download it and how to use it:
Go to the official website "https://download.ccleaner.com/ccsetup541.exe" and download the program.
Install and run the program. During installation, uncheck the boxes next to unnecessary programs (Avast, etc.).
Go to the "Options" tab, then "Setting" and select Russian instead of English.
Go to the cleaning tab and uncheck the checkboxes everywhere that you do not want to clean (browser history, etc.). After that click "cleanup".
You will be pleasantly surprised, after cleaning the program will show how many MB it has freed up your computer.
Removing unnecessary programs
Over time, a large amount of software is collected, which in fact is not used. You installed something yourself, something installed itself (viruses from mail.ru, avast and others ...). Earlier, I already wrote « » , so let's take a look at his example:
Remove the program in Windows 7:
- Open the "Start" menu and click on "Control Panel". Now find "Programs and Features" in the list.
- In the menu you see all the programs that are installed on your computer. Select "Avast" among them, click on it 1 time and click "delete" in the top menu.
- You will open the program installer, in which there is an inconspicuous delete button at the very bottom. Click on it. After that, the antivirus will try to convince you, but you continue what you started and do not believe him.
- Ready! Next time, be careful when installing software and games.
Remove Avast in Windows 10:
- Open "Start", then "Settings", after "System".
- Find "Avast" in the list, click on it, and then click "delete".


In this way, remove all programs that you do not use. Do not delete nothing you're not sure about, especially software from Adobe and Microsoft, and the rest is not really important.
Increase the space on the C drive
Increasing the space on the C drive at the expense of another drive is quite simple and in order not to take a million screenshots, I suggest watching a short video:
We clean the basket
After you delete any file or folder, it goes to the trash in case you suddenly change your mind. These files accumulate there until you empty the trash manually or restore them back.
After such a global cleaning of the C drive, be sure to empty the trash. In general, I recommend doing this regularly (once a week will be enough), especially since it does not take much time.
So that Empty trash, find on the desktop the icon with a trash can and the corresponding inscription, then right-click on it and select "Empty Trash" from the menu. Ready! Case for 10 sec. and there is more disk space.
What not to do
Here I will try to list all the possible mistakes of inexperienced users, as well as mention the tips of other sites and explain why you should not do this (if you forgot something, add in the comments):
- Do not under any circumstances delete any files and folders on the C drive if they are there without your actions. Those. you can only delete the folders that you have created. Otherwise, it may crash the OS.
- Don't do anything with the hibernation file. Do not disable it, do not delete it. Only experienced users can properly disable it, so as not to face a system error in the future. The megabytes won are not worth it.
- Do not disable or resize the paging file - this will affect the performance of your system.
- Standard "Disk Cleanup". In the properties of the computer there is a standard utility that supposedly cleans the C drive from garbage. Yes, it is, but for example, for 1 year of using a computer, 60 MB of files will be collected there (this is very small). It's just not easy already not relevant and don't waste your time.
- Uninstall programs completely (see details above) using the special installation files uninstall.exe. It is not necessary to delete programs together with the folder in the “program files” section, otherwise many other files of this program will remain on the disk.
Conclusion
As you can see for yourself, a lot of unnecessary files, programs and folders have been removed. Now you have a lot of free space on the C drive. I also recommend cleaning your computer so that it does not slow down.
In this article, we will look at how to clean the C: \ drive in the Windows 7 operating system and increase the amount of free space on it for the normal functioning of the system.
The article will be divided into two parts: the first for beginners and the second for more advanced users.
So let's go.
I am engaged in the repair of computer equipment. And quite often they bring a computer with the problem "Not enough space on the system disk". Due to the congestion of the system disk, such problems arise: some programs do not start, video does not load in the browser, general system slowdown, etc. This is due to the fact that many programs need space for storing temporary files, but there is simply no space on the disk ... If you begin to receive a message that there is not enough space on the system disk, and your hand began to operate the mouse in search of a shortcut to CCleaner or a similar program, then raise your second hand higher and hit yourself on the first. I categorically do not recommend using such programs, since more than once I had to restore the operating system after the actions of this program.
Let's take a look at other ways in which we can free up free space on the system drive.
The first step is to transfer data (photos, videos, music, etc.) to the second disk. Since the "Desktop" and the "My Documents" folders are physically located on the system drive (I will continue to write the C: \ drive, since basically everyone has the "C: \" drive on the system drive), therefore, to free up space, you need to transfer user data to the second section. In order to make it easier to copy data from the desktop, go along the path C: \ Users \% Username% \ Desktop, select the "Table" view, filter by type. Next, press Ctrl + X or the right mouse button "Cut", then go to the second disk, create a folder and paste all the data Ctrl + V into it. Next, go to My Documents and in the same way we transfer everything from the folders "My Pictures", "My Videos", "My Music". Do not forget to look into the "Downloads" or "Downloads" folders, from there we either move everything to the second disk, or, if the downloaded files are unnecessary, we simply delete them (To completely remove them from the computer, select and press the key combination Shift + DEL if you just press DEL, then the files will be deleted to the trash can, and it is also located on the C: \ drive). Also, in the "My Documents" folder, you can find many folders with the names of games - you can leave them alone, they often store game saves and they do not take up much space. Next, go to the "Cart" and click the "Empty cart" button.
Second action - delete temporary files. In the process of running applications, they create temporary files necessary for normal operation. These files are created in the folder TEMP, which is located on the path C: \ Windows \ Temp and should be automatically deleted when the application ends, but this does not always happen. Therefore, we go to the folder TEMP highlight all (Ctrl + A) and click Shift + DEL... If some files are necessary for the application to work at this very moment, then Windows will not allow them to be deleted. Can also be cleaned TEMP via function Disk Cleanup, but more on that later.
Third step - clearing the browser cache. In each browser, the cache is cleared from different menu items, how to clear the cache of your particular browser, you can find using Google. Most importantly, when cleaning Don't forget to uncheck the saved form data from the cache, cookies, saved passwords, etc. Otherwise, after clearing the cache, you will have to re-enter all passwords on the sites.
Step four - "Disk Cleanup". To use the Disk Cleanup feature in Windows 7, go to My Computer, right-click on the desired drive, select the Properties menu item and click the Disk Cleanup button. We will see the following window.
Upon completion of the evaluation of free space, a window will appear where you can check the boxes necessary for deleting the items. Then click "OK" and click the "Delete files" button. We are waiting for the deletion and that's it.
The fifth action is to remove unnecessary programs. We go to "Start "-" Control Panel "-" Programs "-" Remove Programs ". The list of installed programs will be loaded. You can filter them by size and remove those that you do not use (modern games are especially large).
Important: If you do not know the purpose of any programs, then it is better not to touch them or use them before uninstalling.Google in order to understand what kind of program it is and whether it can be removed!
Act six- clean the temporary folder Temp v ApplicationData... The AppData folder is hidden by default. In order to see hidden folders go to "Start "-" Control Panel "-" Small icons "view -" Folder options "- the" View "tab - and put a marker next to the inscription" Show hidden files, folders and drives ".
After we go along the path C: \ Users \% Username% \ AppData \ Local \ Temp. Here we select all files and folders and then click Shift + Del... The data that is currently being used cannot be deleted, so just click the "Skip" button.
These were ways to clean up the disk for novice users in the continuation of the article, we will consider ways to free up free space for more advanced users, although they are not very complicated.
The second part will consist in disabling not all the necessary functions of the Windows 7 operating system, as well as in reconfiguring some parameters.
The first point is to disable hibernation.
Hibernation is a computer operating system mode, saving the contents of RAM to a non-volatile storage device before shutting down. That is, in fact, this is a mode in which everything that was launched on the computer from RAM is reloaded onto the HDD and after exiting hibernation we get running programs and a working operating system. To implement this function, the operating system reserves on the hard disk a volume approximately equal to the amount of RAM. Personally, I never liked this mode because the exit from it was previously accompanied by malfunctions of the operating system, so I advise you to disable it (especially if you have a lot of RAM and little space on the C: \ drive). To disable hibernation, click Start - Run and write the cmd command (the command line will start). On the command line, write powercfg.exe / hibernate off... After restarting your computer, you will see the free space on the system drive.
Or you can go to "Start" - "Control Panel" - "Power supply" - "Setting up a power plan" - "Change power settings" - find the item "Sleep", open it, the item "Hibernation after" enter the value "0".
The second point is to move or disable the paging file.
The paging file is a special space on the disk that is reserved by the system and, in case of insufficient RAM, is used to store temporary data. The space for the paging file is located on the C: \ drive and, if necessary, can be moved to the second drive. If you have a large amount of RAM (from 6 GB), then the paging file can be disabled altogether. To transfer or disable the paging file, right-click on "My Computer" - "Properties" - "Advanced system settings" - "Advanced" tab - "Performance" section - "Settings" button.
Here you can change the location of the swap file, or specify the size of the swap file "0" and put the marker "without swap file" to disable it.
The third point - we transfer the Temp folder.
In order to prevent the temporary folder from growing on the system disk again, it can be moved to the second disk.
The fourth point is to delete restore points.
In order to remove all restore points, go to "Start" - "Control Panel" - "System" - click "System Protection".
Press the button "Configure".
In the window that opens, click the "Delete" button opposite the inscription "Delete all restore points, including system settings and previous versions of files."
To delete all restore points except the last one, go to "Disk Cleanup" as in the first part of the article, go to the "Advanced" tab. Next to the inscription "System Restore and Shadow Copying", press the "Clear" button and in the window that appears, press the "Delete" button.
I also recommend checking for old copies of Windows 7. Starting with Windows Vista, it became possible to install a new operating system on the same partition with the old one. As a result, after installing new operating systems on the C: \ drive, folders appear in the root directory Windows.old... We go into this folder (or if you have several of them, then in each turn), transfer important information from “Documents and Settings” and from “Desktop”, and then delete the entire folder.
It seems that these are all the main ways to clean up the C: \ drive. After completing all the steps, I was able to free up to half of the capacity on the system disk. If you have any other ways - write in the comments.
Thank you all for your attention, good luck setting up your computers.
In our age - the age of huge hard drives with a volume of 1-1.5-2 terabytes, despite the huge disk space, some problems remain the same. The space on the system disk, as before, ran out, and now little has changed.
There are many specialized programs designed to help the user in this seemingly difficult task, but most of them are paid. In this article, we will look at methods of freeing up disk space manually and using free programs and utilities.
Then I will tell you how you can urgently free up space on the system (and not only) disk as soon as possible, but first you need to familiarize yourself with the basic methods of cleaning a disk WITH:(What is C: drive?)
Where does the free space on the C: drive go?
In addition to the fact that disk space ends up through the efforts of the user himself, who actively uses his data storage, and through the efforts of various programs and the operating system itself.
In the first case, these are numerous films and music stored on the desktop (after all, we are talking about the system disk C:, and not about others, and by default all the contents of the desktop are stored on the system drive). If you have several disks, no matter physical or logical, then you can copy all the contents of the desktop to one of these disks, depending on which space is more. If you only have a disk C:, unfortunately, this is not available to you.
In the second case, these are temporary program files that create these very temporary files to store some data that is required during the time the program is running until it is closed. In the process of closing the program, these same files should be deleted, but this is not always the case, and they tend to accumulate indefinitely. Temporary Internet files, if you use the Internet Explorer browser, are also in the habit of collecting. Of course, to free up disk space, you can delete unused programs and games, but today we will consider how to do without sacrifices, namely ...
How can I free up space on the C: drive without deleting the programs it contains?
First, let's carry out a little preparation that we need to get rid of temporary files more successfully and efficiently. For the purity of the experiment, we will note how much space was on the hard disk of the author of this article and we will monitor these values after each stage of disk cleaning.
1. Go to the folder My computer and select the menu there Tools> Folder Options.

2. Go to the tab View and in the window Extra options choose Show hidden files and folders... We need this to clear temporary files from our profile. By default, these things are hidden from users, but this state of affairs will not suit us. Push OK to save the settings. For Windows Vista / 7 users - to get to this window, you need to go to Start> Control Panel, select in the graph View Small icons and double click on the icon Folders settings.

3. Now click Start, we find the Run command there (in Windows Vista / 7 they are not displayed by default - see) and type (or copy from here) the% USERPROFILE% command and press the button OK... In the window that opens, go to the folder Local Settings> Temp(Windows Vista / 7/8 owners - you need to go to AppData> Local> Temp).

4. Click Ctrl + A and after that the keyboard shortcut Shift + Delete(deleting files, bypassing the trash can) and click Yes.

All these files can be safely deleted, since since they got into this folder, they cannot be of any value. However, during the removal process, the following situation will surely arise:

Here we answer Yes for everyone
And then this:

Here we click OK, then press the key Ctrl and left-click on the file with the name indicated on the message to deselect it. After that again Shift + Delete and drove on until everything that is possible to delete is removed.

Why did this situation arise? The fact is that we delete files from the current profile, so there are files that are used by the operating system and programs at the moment. Naturally, Windows will not let you uninstall them, so as not to cause a system crash. Everything else must be removed.
This is how the folder looks like Temp after global cleanup:

Here's how much disk space was freed WITH:

This computer is regularly cleaned, so in your case the result can be much more noticeable. The author once thus freed 20 (!) Gigabytes disk space and this is only by deleting the contents of the Temp folder. True, it was someone else's computer.
Let's move on to the next step. Go to the folder My computer, disk WITH:, folder Windows and there is a folder Temp... If during this long path a message appears:

Feel free to choose Display the contents of this folder and move on.

In fact, this folder Temp left in the operating system only for compatibility with old programs, so it will most likely be almost empty. But the chicken bites by the grain, so we will clean everything we can, and the result will be good. We do exactly the same thing with this folder as with the previous one of the same name. Namely Ctrl + A and Shift + Delete.
In this case, about three megabytes were freed, so there is no point in looking at how the disk space of the tested disk has changed.
We clean temporary Internet files. This method works if you are using Internet Explorer. Although, in other browsers, everything is removed in about the same way. Go to Start> (Settings>) Control Panel and double click on the icon Internet options.

Push the button Delete.

We put the checkboxes like this and click Delete... And than OK after the uninstallation is complete. Let's see how the indicators of free disk space have changed:

On this computer, Internet Explorer is almost never used, so in your case the effect can be much more noticeable.
Now we right-click on Basket and choose Empty trash... This is done just in case, you never know something flew into the basket. You do not store in Basket the files you need most, right? Just like not putting food in the trash can.
Further we will use the program DupKiller- this program will help us get rid of duplicates. The program is absolutely free. You can download it either from our website (Download DupKiller), or the latest version from the manufacturer's website DupKiller. There is a suspicion that in the near future it will become a full-fledged paid commercial product, but so far this has not happened (the program is under beta) - we use it!
Moving virtual memory from the system drive C: to another drive
This method is suitable for those who have on their computer in addition to the system disk C: there are other logical drives, for example D:, E: etc. Naturally, we are talking exclusively about hard drives, both physical and logical. Card readers, DVD drives, flash drives and other benefits of civilization, of course, will not work. And the space on these disks must be at least 5-6GB.
To do this, in any version of Windows, you need to go to the Control Panel and open the System properties. This is done as follows:
Go to Start and choose Control Panel(a small clarification for happy owners of computers running Windows 8 - to enter the control panel, you need to place the mouse cursor in the upper or lower right corner of the screen, select Settings and Control Panel).

In the window that opens, select Small icons or Large icons (1), depending on your visual acuity and double-click on the icon System (2).
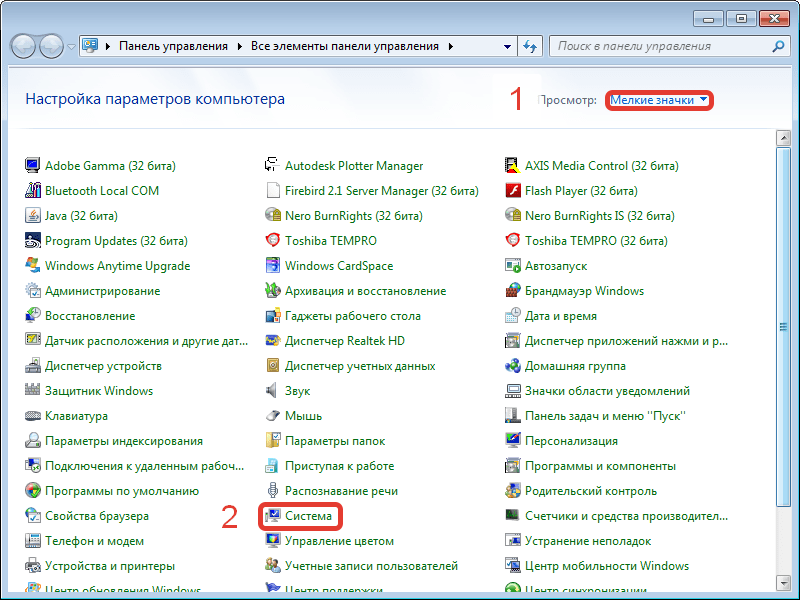
In the window that opens, click Additional system parameters.

In the window that appears, press the button Parameters.

Selecting a tab Additionally and press the button Change.
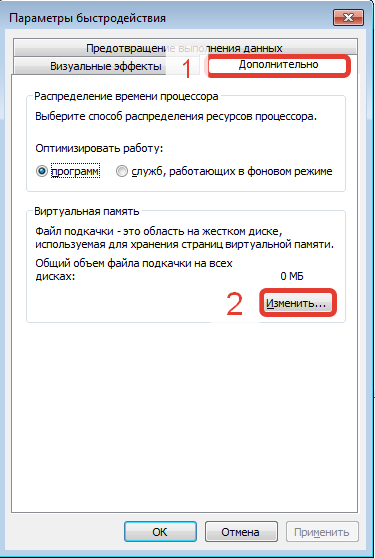
In the next window, you will need to do exactly the following things:
Uncheck the box Automatically select paging file size (1), select disk C: (2), put the radio button No paging file (3), be sure to press the button Ask (4)... At the same time, Windows will certainly swear at our actions and say that this is not good. But we are not afraid of difficulties and continue our sorrowful work and transfer virtual memory to disk D:(or whatever you have - in which place is more).

Basically, if you have 16 gigabytes of RAM or more, then you can skip the next item, press OK, to agree with everything and restart the computer - it will also give an increase in performance. If it is less than 8 GB, then it is better not to experiment and move on to the next step.
Now we need to place the swap file on disk D: or any other of your choice. I have only C: and D:, so let's look at this example. Select the disk D: (1) then choose System selectable size (2), press Ask (3) and the button OK.

Now we press everywhere OK and we answer the question about restarting the computer Yes... If Windows for some reason does not ask you to restart your computer, you should still do this in order for the changes to take effect.
Installing the DupKiller program

Select the installation language.


We accept the terms License Agreement.

You can't really change anything here, so click Further.


Installation progress window.

Push Ready.

Now we need to go to Start> (All) Programs> DupKiller> DupKiller... At startup, the advice flies. If necessary, remove the checkbox. Show tips at startup... Push Close.

This is how the main window of the program looks like. You just need to choose a disk C:- I have no duplicates on it, so for better clarity, I selected all the disks. There I definitely have duplicates, tk. I duplicate especially important information on different disks (I physically have 3 of them).

Files and folders menu - select All files.

Menu Exceptions... You can leave it as it is so that it is clear to you on what principle the program selects. After analyzing the selection results, it is possible to add exceptions and scan the disk again.

Menu Search settings- we leave everything as it is.

Menu Other settings- we leave everything as it is.

Menu Deleting- you can leave everything as it is, you can choose to Delete files immediately, if you are not afraid to accidentally delete something important. For the first time, it is better to leave the option with Basket.


Push the button Scan and we are waiting ...

This is how much space is occupied by duplicates on all drives.

And now the routine begins - we put down flags on the files that we definitely don't need in the form of duplicates. Keep in mind that only one copy of the duplicate should be checked, otherwise it is highly likely that both the original file and its duplicate will be deleted. There is no doubt that in this case even more space will be freed up (smile), but you and I agreed to do without sacrifices.
I want to draw your attention to another moment that will make your life much easier - if you see duplicate folders in the Dupkiller list, then this routine can be simplified - go through the explorer to the desired folder and delete it manually. It will be much faster than putting down thousands of jackdaws.
Warning for Windows Vista / 7/8 users:
While the DupKiller program is running, you can see the following picture:
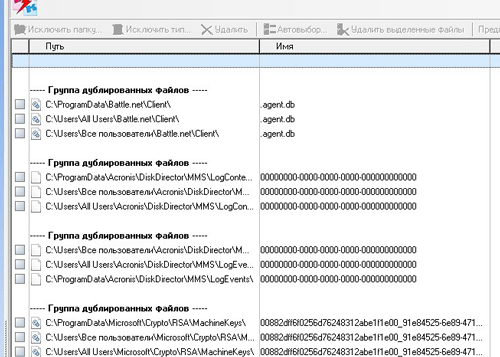
Remember - files located on such paths are not duplicates. These are the so-called symbolic links, i.e. the file is physically located on the disk alone, and the link to it can lead from different places. Remember this! For simplicity, you can focus on this - if a folder appears in one of the three paths ProgramData- this suggests that everything else is links.
Well, and the last stage in our epic - defragment disks... The defragmentation program optimizes the location of files on the disk (after our actions there is something to work on, take my word for it) and compresses files that have not been used for a long time, which also frees up additional disk space.
To start it, you need to right-click on the disk WITH:, go to the tab Service and press the button Defragment.

In the window that opens, click - Defragmentation and we go to smoke, eat, buy bread, etc., since this process is quite long. It is recommended to carry out it every 3-6 months, depending on how actively the computer is used.
In principle, during defragmentation, you can even try to do something, however, the computer will work very, very slowly.
Emergency way to clean up (free up space) drive C:
As I promised at the beginning of the article, here is a method of emergency release of disk space from the category "when it was completely screwed up".
You can buy a new hard drive (you can use an external one) and dump some of the information on it, but not always there is time, opportunity, money, finally.
In this case, it comes to the rescue Compressing a disk... If you go to My computer, right click on the disk WITH:(and anyway, except for a flash drive and a floppy drive) and choose Properties then you will see a checkbox Shrink disk to save space... After setting it and clicking on the OK or Apply a window will appear:

Here you need to choose To C: \ and to all subfolders and files and press OK... The procedure will take from 10 minutes to half an hour and will free up a certain amount of disk space.
As a flip side of the coin, in this case, you will notice that the speed of the computer has decreased. This happens because the operating system on a compressed disk must unpack a file when opening a file, and then perform certain actions. This very "unpacking" takes processor performance and machine time. Therefore, even if you had to shrink the system disk, try to find an opportunity to uncompress it back as soon as possible in order to return the computer to its previous performance.
Owners of computers with Windows Vista / 7/8.
The location of data in the folders of user profiles of computers with installed operating systems Windows Vista / 7/8 differ from those in Windows XP. Here's a quick look at the main differences:
Folder Documents and Settings now called folder Users;
- Folder Local Settings is now in the folder AppData and called Local- there you can find a thick folder Temp and clean up.
I also recommend to use a program called CCleaner. The program is good, the only thing that it does not know how to do is to clean the profiles of other users on the computer. Those. it will delete all temporary files accumulated in the folders of the active profile, and all the rest either manually or under each go and run CCleaner.
As a result of these manipulations, the properties window of the drive installed in the system will open.
So, we got to the cleaning mechanism. All groups of files that are listed in the list that opens can be painlessly deleted. As the checkboxes are ticked, the system calculates the amount of free space. However, the utility's capabilities do not end there. Since we are going to carry out a total cleaning, we will clean up the system files at the same time.
The parameters indicated in the screenshot allow:
- Remove programs that have not been used for a long time. By choosing the first item "Clear", we will move to the standard software control menu. As a result, it works as an interactive reminder for especially forgetful users;
- The second point is much more interesting. If System Restore is enabled on your computer, which creates restore points, you can delete them. In a long-running system, they can take up a significant amount of space.
Actions taken when the second item is selected will need to be confirmed additionally.
Go to the main tab and confirm your choice again.
The system is deleting temporary files. The time it takes to complete the operation will depend on their size and the type of drive.
New cleaning menu
In addition to the classic method we just looked at, Windows 10 has a new one. To use it, go to the options menu.
We will use the search function as a universal option suitable for any user.
Select the item highlighted in the screenshot to go to the new system settings.
In the quick jump menu located on the left side, select the item "Storage"... Click on the stylized image of the system disk, which displays the degree of its filling.
The statistics on disk space usage opens, showing the size occupied by each file category. We are interested in deleting temporary files, so let's move on to the corresponding point.
We tick the necessary items and confirm our action. After making sure that the operation has been completed, we return back to the section "Storage"... In it, we have one more option that has not been considered. Pay attention to the position of the slider in the "Memory Control" section. His position answers the question: why temporary files are not deleted, accumulating in the system over time. It is always off by default.
Move the slider to the on position to let Windows automatically clean up temporary files. Open the link "Change the way of release" and see what exactly falls under the action of the automation.
If you're not using the trash bin as a pantry to store junk files, you can leave the sliders on. Click on the highlighted button to make sure that there is no "garbage" left in the system. At this point, the cleaning can be considered complete.
Cleaning up the system after updating
With Microsoft's latest update, the Fall Creators Update, Windows 10 has received additional tweaks and early Fluent Design elements. The main changes concerned the optimization of the executable code and outwardly are almost invisible. The good news ends there. After installing it, the user may be faced with the fact that the disk "WITH" crowded.
Let's figure out where the space disappeared after the update. First, let's see how long Windows 10 takes after installation. Let's open the system drive in Explorer.
Pay attention to the highlighted folder Windows.old - we will return to it a little later. Find the directory with the installed OS and right-click the context menu.
We are interested in the item marked in the screenshot. By clicking on it, we will open the properties of the selected folder.
Now let's go back and check the size by analogy. Windows.old.
Now you understand how it turned out that the disk is full.
At the time of installation of the update, Windows makes a complete copy of the previous version so that the user can return back if something does not suit him. Microsoft has set aside 10 days for testing. After their expiration, the copy should be deleted automatically. If there is really not enough space on the system drive, you need to delete the Windows.old folder earlier than the allotted time.
Let's go to the section in which we configured the settings for automatic cleaning of temporary files.
After installing the Fall Creators Update, its appearance has changed somewhat. Added auto-cleaning of the downloads folder, and the sliders have been replaced with checkboxes. We go down and see additional options related to the past OS update. To delete a saved copy, tick the corresponding item and press the highlighted button. As a result, we reclaim almost 20 GB of disk space.
The order of interaction between OS and RAM
A few more gigabytes can be taken away from the system by changing the order of working with memory. In the process, Windows creates and uses two hidden files with the "sys" extension:
- Pagefile- the so-called "paging file" or virtual RAM. To take advantage of RAM in the speed of information processing, non-urgent data is cached into it. By default, the size of this file is regulated by the operating system. If the amount of RAM is large enough, from 8 GB or more, it is practically not used. The lower the RAM value, the larger the paging file becomes;
- Hiberfile- intended for storing the contents of RAM at the time of transition to the "deep sleep" or hibernation mode. Accordingly, in order to successfully save information, it must be within 75% of the RAM.
The use of the options listed in this section depends on the tasks for which you are using the computer and its hardware configuration. The struggle for free space should not be carried out at the expense of performance.
Change the size Pagefile
To change the size of the paging file, you need to open system properties (Win + Pause / Break).
Select the checked item and move to the additional parameters window.
Go to the desired tab and open the performance parameters.
Change the tab again and move on to managing virtual memory.
We carry out the sequence shown in the screenshot, first of all unchecking the automatic size selection. After that, the rest of the items are activated. To determine how much space to allocate for the pagefile, we'll use the OS's recommended value. In this case, let's agree and reduce the size of the paging file by setting it to a fixed value. By pressing "OK" a warning will appear prompting you to reboot.
We confirm our decision. After restarting, the computer will use the limited amount of disk space allocated to it to organize virtual memory.
Disable hibernation
Users who, after each work session, prefer to turn off their PC, can safely get rid of Hiberfile... It is worth warning that this may slightly increase the overall boot time of the OS. If ten seconds are not critical, then launch PowerShell in administrator mode.
The menu shown in the screenshot is invoked by right-clicking on the button "Start"... If at one time you did not agree to switch to a new shell, the command line will be located in this place. The functionality of PowerShell is above, but using either of these tools will produce the same results.
Entering the command shown in the screenshot will instantly delete the Hiberfile from the hard drive. Replacement « off " on the "On" returns it to its place. This does not require a reboot.
Compression mode
You already know how and what can be removed from the disk to free up space without uninstalling the programs. Let's consider another useful function available in Windows 10. It should be noted right away that it can be successfully used only on computers with a modern configuration. In this case, in accordance with Microsoft's recommendations, it means the presence of an SSD as a drive. According to the technical documentation, the Compact OS feature is automatically enabled when it does not cause an overall performance degradation.
The point of its work is the "transparent" compression of system files. As a result, the space required to place the OS on the drive decreases. You can check if compression is working on your computer with the following command (you need to enter it in the command line or PowerShell):
compact / compactos: queryYou can see the result of its execution in the screenshots below.
Now let's see how much space was required to install Windows 10 in both cases.
You can see that on the right screenshot the disk space occupied by the OS is 2.5 GB less than the actual folder size.
The result is fully consistent with the stated. In the documentation, Microsoft promises savings from 1.5 to 2.5 GB, depending on the bitness.
If Compact OS does not start automatically, but you decide to check how it will work in your configuration, you can do it forcibly. In the above command, after the colon, type not « query ", a "Always"... After some time, which is spent on compactification, you will see the result.
We check how much space the system folder takes to make sure that the actions performed are effective.
If the result of the compressed operating system does not suit you, you can reverse the process. Enter the parameter after the colon into the command « never " and return the system to its original state.
Third party cleaning programs
Users who are too lazy to do the work with their hands can use third-party programs to clean Windows. When installing such software, do not forget to read the license agreement.
It says in black and white that the developers are not responsible for the consequences of using the software.
Reg Organizer
The product of domestic developers is distributed on a paid basis. The cost of a personal license is 650 rubles. However, you can find version 7.52 from September 2016 which is free for non-commercial use.
You cannot update the program for free, but you can use it as much as you like.
The screenshot shows the main window with a list of features expanded on the left. You can download the program on its official website.
CCleaner
The most popular utility among Windows users. Developed by the British company Piriform Limited and distributed under a shareware license. More than 50 languages are supported, including Russian. At the time of installation, it offers to additionally install the Chrome browser.
As you can see, the program offers a lot of possibilities. The "safe" items are marked with checkmarks. How inactive sections look, indicating what can be removed additionally.
In any program designed for automatic cleaning, the main thing is not to overdo it. Do not repeat the mistake of users who, having discovered the parameters of the OS type, first of all strive to delete hidden files. Check only those items that you are sure of.
Finally
Reasonable use of the above methods will allow not only to put a one-time order in the computer, but also to maintain its stable operation for a long time.
Video
For those users who like visual material, we have prepared a video on the topic.


