Hello everyone! Because the most popular operating system is windows now, I decided to show on it how you can return your legitimate, free space on the system disk.
5. We look suddenly you have unnecessary files on your disk. At the very beginning of the disk, it should look like this (be careful, suddenly you have a folder with the program):

6. If you have one user, it will be easier, if not, you will have to view all users. I'm almost lucky, I have my user and my mother's. And since mom does nothing except watching classmates, then you shouldn't go into her folder)

Here, of course, the most important folder is downloads (you can move it in the properties). Everything sways there according to the standard. You can also find many files in other folders. Do not forget to also see what you have on your desktop! I have a lot of files. I also show hidden files!
7. Now you can remove the paging file or move it to another disk. To do this, go to:
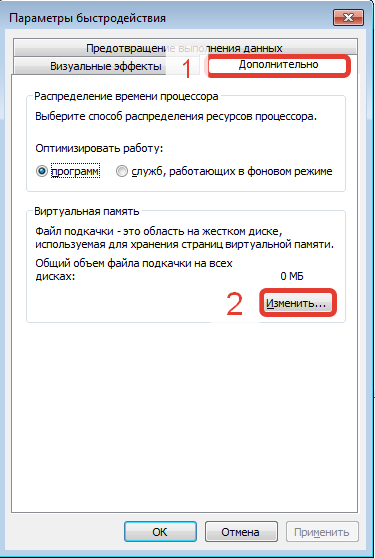
start - control panel - system - additional system parameters - additional - performance - parameters - additional - virtual memory - change


Select without swap file. And, to transfer to another disk, just click on the D disk, for example, and select the size of the paging file, or at the choice of the system.
8. Delete duplicate files. Perhaps you have. Duplicates are rarely needed, so we are looking for a suitable program to search for identical files and delete.
9. You can see the save from games, sometimes they weigh a lot.
10. Delete infected files from the anti-virus quarantine. If the antivirus has quarantined a weighty file, you can delete it)
11. By the way, look at what you have in your shopping cart)
12. Delete help and manuals if you do not use them in the folder:
13. Delete the entire program cache in the folder: C: \ Windows \ Prefetch (which is needed, windows will create it again) 14. Clean the folder: C: \ Windows \ SoftwareDistribution \ Download 15. So be careful with this friend! A folder can take up a lot, these are folders and installed software packages installed on your computer. After removing them, you will not be able to add components and uninstall programs. But this is not for all programs. Here you do at your own peril and risk, for example, after the removal, everything was fine.
16. Drivers are stored here, deletion at your own peril and risk, I did not try to delete, but they say you can only have to constantly shove disks with drivers. This folder is:
C: \ Windows \ System32 \ DriverStore
17. There is a lot of rubbish here, for example - there are old folders from remote programs:
C: \ Users \ your username \ AppData
If you still do not have enough disk space, then you need to use More methods I did not remember, if you know - write in the comments. And that's all I hope you got free disk space back🙂 Now you can relax)
In our age - the age of huge hard drives with a volume of 1-1.5-2 terabytes, despite the huge disk space, some problems remain the same. The space on the system disk, as before, ran out, and now little has changed.
There are many specialized programs designed to help the user in this seemingly difficult task, but most of them are paid. In this article, we will look at methods of freeing up disk space manually and using free programs and utilities.
Then I will tell you how you can urgently free up space on the system (and not only) disk as soon as possible, but first you need to familiarize yourself with the basic methods of cleaning a disk WITH:(What is C: drive?)
Where does the free space on the C: drive go?
In addition to the fact that disk space ends up through the efforts of the user himself, who actively uses his data storage, and through the efforts of various programs and the operating system itself.
In the first case, these are numerous films and music stored on the desktop (after all, we are talking about the system disk C:, and not about others, and by default all the contents of the desktop are stored on the system drive). If you have several disks, no matter physical or logical, then you can copy all the contents of the desktop to one of these disks, depending on which space is more. If you only have a disk C:, unfortunately, this is not available to you.
In the second case, these are temporary program files that create these very temporary files to store some data that is required during the time the program is running until it is closed. In the process of closing the program, these same files should be deleted, but this is not always the case, and they tend to accumulate indefinitely. Temporary Internet files, if you use the Internet Explorer browser, are also in the habit of collecting. Of course, to free up disk space, you can delete unused programs and games, but today we will consider how to do without sacrifices, namely ...
How can I free up space on the C: drive without deleting the programs it contains?
First, let's carry out a little preparation that we need to get rid of temporary files more successfully and efficiently. For the purity of the experiment, we will note how much space was on the hard disk of the author of this article and we will monitor these values after each stage of disk cleaning.
1. Go to the folder My computer and select the menu there Tools> Folder Options.

2. Go to the tab View and in the window Extra options choose Show hidden files and folders... We need this to clear temporary files from our profile. By default, these things are hidden from users, but this state of affairs will not suit us. Push OK to save the settings. For Windows Vista / 7 users - to get to this window, you need to go to Start> Control Panel, select in the graph View Small icons and double click on the icon Folders settings.

3. Now click Start, we find the Run command there (in Windows Vista / 7 they are not displayed by default - see) and type (or copy from here) the% USERPROFILE% command and press the button OK... In the window that opens, go to the folder Local Settings> Temp(Windows Vista / 7/8 owners - you need to go to AppData> Local> Temp).

4. Click Ctrl + A and after that the keyboard shortcut Shift + Delete(deleting files, bypassing the trash can) and click Yes.

All these files can be safely deleted, since since they got into this folder, they cannot be of any value. However, during the removal process, the following situation will surely arise:

Here we answer Yes for everyone
And then this:

Here we click OK, then press the key Ctrl and left-click on the file with the name indicated on the message to deselect it. After that again Shift + Delete and drove on until everything that is possible to delete is removed.

Why did this situation arise? The fact is that we delete files from the current profile, so there are files that are used by the operating system and programs at the moment. Naturally, Windows will not let you uninstall them, so as not to cause a system crash. Everything else must be removed.
This is how the folder looks like Temp after global cleanup:

Here's how much disk space was freed WITH:

This computer is regularly cleaned, so in your case the result can be much more noticeable. The author once thus freed 20 (!) Gigabytes disk space and this is only by deleting the contents of the Temp folder. True, it was someone else's computer.
Let's move on to the next step. Go to the folder My computer, disk WITH:, folder Windows and there is a folder Temp... If during this long path a message appears:

Feel free to choose Display the contents of this folder and move on.

In fact, this folder Temp left in the operating system only for compatibility with old programs, so it will most likely be almost empty. But the chicken bites by the grain, so we will clean everything we can, and the result will be good. We do exactly the same thing with this folder as with the previous one of the same name. Namely Ctrl + A and Shift + Delete.
In this case, about three megabytes were freed, so there is no point in looking at how the disk space of the tested disk has changed.
We clean temporary Internet files. This method works if you are using Internet Explorer. Although, in other browsers, everything is removed in about the same way. Go to Start> (Settings>) Control Panel and double click on the icon Internet options.

Push the button Delete.

We put the checkboxes like this and click Delete... And than OK after the uninstallation is complete. Let's see how the indicators of free disk space have changed:

On this computer, Internet Explorer is almost never used, so in your case the effect can be much more noticeable.
Now we right-click on Basket and choose Empty trash... This is done just in case, you never know something flew into the basket. You do not store in Basket the files you need most, right? Just like not putting food in the trash can.
Further we will use the program DupKiller- this program will help us get rid of duplicates. The program is absolutely free. You can download it either from our website (Download DupKiller), or the latest version from the manufacturer's website DupKiller. There is a suspicion that in the near future it will become a full-fledged paid commercial product, but so far this has not happened (the program is under beta) - we use it!
Moving virtual memory from the system drive C: to another drive
This method is suitable for those who have on their computer in addition to the system disk C: there are other logical drives, for example D:, E: etc. Naturally, we are talking exclusively about hard drives, both physical and logical. Card readers, DVD drives, flash drives and other benefits of civilization, of course, will not work. And the space on these disks must be at least 5-6GB.
To do this, in any version of Windows, you need to go to the Control Panel and open the System properties. This is done as follows:
Go to Start and choose Control Panel(a small clarification for happy owners of computers running Windows 8 - to enter the control panel, you need to place the mouse cursor in the upper or lower right corner of the screen, select Settings and Control Panel).

In the window that opens, select Small icons or Large icons (1), depending on your visual acuity and double-click on the icon System (2).

In the window that opens, click Additional system parameters.

In the window that appears, press the button Parameters.

Selecting a tab Additionally and press the button Change.
In the next window, you will need to do exactly the following things:
Uncheck the box Automatically select paging file size (1), select disk C: (2), put the radio button No paging file (3), be sure to press the button Ask (4)... At the same time, Windows will certainly swear at our actions and say that this is not good. But we are not afraid of difficulties and continue our sorrowful work and transfer virtual memory to disk D:(or whatever you have - in which place is more).

Basically, if you have 16 gigabytes of RAM or more, then you can skip the next item, press OK, to agree with everything and restart the computer - it will also give an increase in performance. If it is less than 8 GB, then it is better not to experiment and move on to the next step.
Now we need to place the swap file on disk D: or any other of your choice. I have only C: and D:, so let's look at this example. Select the disk D: (1) then choose System selectable size (2), press Ask (3) and the button OK.

Now we press everywhere OK and we answer the question about restarting the computer Yes... If Windows for some reason does not ask you to restart your computer, you should still do this in order for the changes to take effect.
Installing the DupKiller program

Select the installation language.


We accept the terms License Agreement.

You can't really change anything here, so click Further.


Installation progress window.

Push Ready.

Now we need to go to Start> (All) Programs> DupKiller> DupKiller... At startup, the advice flies. If necessary, remove the checkbox. Show tips at startup... Push Close.

This is how the main window of the program looks like. You just need to choose a disk C:- I have no duplicates on it, so for better clarity, I selected all the disks. There I definitely have duplicates, tk. I duplicate especially important information on different disks (I physically have 3 of them).

Files and folders menu - select All files.

Menu Exceptions... You can leave it as it is so that it is clear to you on what principle the program selects. After analyzing the selection results, it is possible to add exceptions and scan the disk again.

Menu Search settings- we leave everything as it is.

Menu Other settings- we leave everything as it is.

Menu Deleting- you can leave everything as it is, you can choose to Delete files immediately, if you are not afraid to accidentally delete something important. For the first time, it is better to leave the option with Basket.


Push the button Scan and we are waiting ...

This is how much space is occupied by duplicates on all drives.

And now the routine begins - we put down flags on the files that we definitely don't need in the form of duplicates. Keep in mind that only one copy of the duplicate should be checked, otherwise it is highly likely that both the original file and its duplicate will be deleted. There is no doubt that in this case even more space will be freed up (smile), but you and I agreed to do without sacrifices.
I want to draw your attention to another thing that will make your life much easier - if you see duplicate folders in the Dupkiller list, then this routine can be simplified - go through the explorer to the desired folder and delete it manually. It will be much faster than putting down thousands of jackdaws.
Warning for Windows Vista / 7/8 users:
While the DupKiller program is running, you can see the following picture:
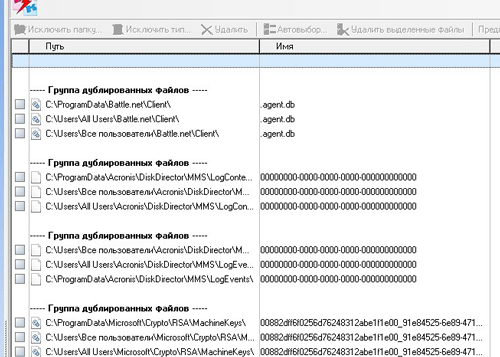
Remember - files located on such paths are not duplicates. These are the so-called symbolic links, i.e. the file is physically located on the disk alone, and the link to it can lead from different places. Remember this! For simplicity, you can focus on this - if a folder appears in one of the three paths ProgramData- this suggests that everything else is links.
Well, and the last stage in our epic - defragment disks... The defragmentation program optimizes the location of files on the disk (after our actions there is something to work on, take my word for it) and compresses files that have not been used for a long time, which also frees up additional disk space.
To start it, you need to right-click on the disk WITH:, go to the tab Service and press the button Defragment.

In the window that opens, click - Defragmentation and we go to smoke, eat, buy bread, etc., since this process is quite long. It is recommended to carry out it every 3-6 months, depending on how actively the computer is used.
In principle, during defragmentation, you can even try to do something, however, the computer will work very, very slowly.
Emergency way to clean up (free up space) drive C:
As I promised at the beginning of the article, here is a method of emergency release of disk space from the category "when it was completely screwed up".
You can buy a new hard drive (you can use an external one) and dump some of the information on it, but not always there is time, opportunity, money, finally.
In this case, it comes to the rescue Compressing a disk... If you go to My computer, right click on the disk WITH:(and anyway, except for a flash drive and a floppy drive) and choose Properties then you will see a checkbox Shrink disk to save space... After setting it and clicking on the OK or Apply a window will appear:
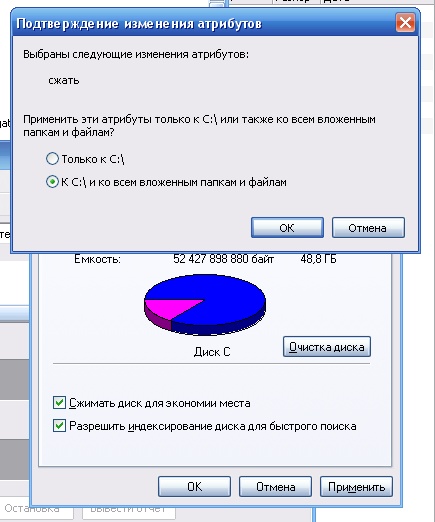
Here you need to choose To C: \ and to all subfolders and files and press OK... The procedure will take from 10 minutes to half an hour and will free up a certain amount of disk space.
As a flip side of the coin, in this case, you will notice that the speed of the computer has decreased. This happens because the operating system on a compressed disk must unpack a file when opening a file, and then perform certain actions. This very "unpacking" takes processor performance and machine time. Therefore, even if you had to shrink the system disk, try to find an opportunity to uncompress it back as soon as possible in order to return the computer to its previous performance.
Owners of computers with Windows Vista / 7/8.
The location of data in the folders of user profiles of computers with installed operating systems Windows Vista / 7/8 differ from those in Windows XP. Here's a quick look at the main differences:
Folder Documents and Settings now called folder Users;
- Folder Local Settings is now in the folder AppData and called Local- there you can find a thick folder Temp and clean up.
I also recommend to use a program called CCleaner. The program is good, the only thing that it does not know how to do is to clean the profiles of other users on the computer. Those. it will delete all temporary files accumulated in the folders of the active profile, and all the rest either manually or under each go and run CCleaner.
In this article, we will look at various ways to clean up the disk and free up space on it in any operating system Windows XP, 7, 8.1, 10.
1. Where does disk space go?
In the process of computer operation, system updates, installation of programs, visits to sites and other activities, a lot of unnecessary files accumulate on the disk, which are often called garbage or junk. In addition, we often download some files ourselves, and then, when they are no longer needed, we forget about them.
Extra files not only take up disk space, but also slow down system performance. The disk takes longer to search for the files it needs, and some of them can take up RAM space and use up processor resources. In addition, viruses often like to sit in temporary files.
For stable, fast and reliable operation of your computer, you must keep the disk clean and tidy. Nowadays, the problem of lack of space on SSD disks is also urgent, the volume of which is very limited.
In this article, we will try to comprehensively solve the problem of insufficient disk space. To achieve high results, we recommend that you read the entire article and follow all the tips in the order in which they are presented.
2. Removing unnecessary programs and games
First of all, remove all programs and games you no longer need. This will not only free up disk space, but also speed up the system.
Press the key combination "Win + R", type "appwiz.cpl" and press "Enter" or use the "Uninstall Programs" shortcut from the "" section.
In the window that opens, carefully review the list of programs, games installed on you and remove all that you are unlikely to use in the near future.

To uninstall a particular program, right-click on it and select "Uninstall".
Do not delete what you do not understand the purpose of or if you are not sure.
After that, manually find and delete the folders with the saved games of the deleted games, as they can take up a lot of space. It is easy to find out where the save of this or that game is by searching on the Internet.
Many online games also save their distributions (installation packages) during updates that are no longer needed, but take up a lot of space. For example, the Mail.Ru game center saves distributions in the Distrib folder, and the World of Tanks game in the Updates subfolder. Files in such folders can take tens of gigabytes and can be removed painlessly.
3. Search and delete unnecessary files
It often happens that some old unnecessary files take up a lot of disk space, but we have forgotten about them and do not know where they are. In order to find them, I recommend using the "TreeSize Free" utility, which you can download in the "" section.
Once launched, the program will scan your disk, determine the size of files, folders and sort them by size.

This way, you can easily determine which folder contains the files that take up the most space. Delete any files you no longer need. If you think you may need any of them, write them to disk. The choice of the drive for scanning (C, D, etc.) is done in the "Scan" menu.
4. Transferring user files and folders
If you have a second drive or partition (for example, drive "D"), then first of all transfer to it all files from the desktop and user folders such as "My Documents", "My Music", "My Videos", etc. ., since they are all physically located on the "C" drive.
You can move files manually by creating folders for them on another disk or partition in advance. But it is more correct to change the location of the user's folders by means of the operating system. Then all new files that you or any programs will save on the desktop and in the user's folders will automatically go to another disk partition without causing the system partition to overflow.
4.1. Transferring user folders in Windows 7, 8.1, 10
Go to the "C: \ Users \ Name" folder.

Right click on the "My Documents" folder and go to the "Location" tab.

Replace the drive letter with the one where you want to move the folder (for example "D") and click "OK".

Agree to move the files, and then repeat the steps for the Desktop folder and the rest of the user's folders.
4.2. Transferring user folders in Windows XP
In Windows XP there is no function of automatic movement of user folders and we will use a special utility "XP Tweaker", which you can download in the "" section.
Install the utility and run it. Then, in the left pane, select the Windows XP section and go to the System Folders tab.

Select the "My Documents" folder with the mouse, change the drive letter to the one where you want to move the folder (for example, "D") and click the "Change" button.

Follow the same steps for the folders "My Pictures", "My Music", "Desktop".
After that go to the folder "C: \ Documents and Settings \ Name".

And manually move the My Documents and Desktop folders to the new location D: \ Documents and Settings \ Name.

5. Disk cleanup using Windows
All versions of Windows have a Disk Cleanup feature. It can be used to clean up any disk partition (C, D, etc.), but it is most effective for cleaning the system partition (drive "C"), since it is on it that most temporary files are stored.
Right-click on the C drive and select Properties.

Click the Disk Cleanup button.

Click the "Clean up system files" button (in Windows 7, 8.1, 10).

Check all the boxes and you will see how much space will be freed by deleting temporary files.
![]()
The size of temporary files can be up to 5-10 GB. Click the "OK" button and all temporary files will be deleted.
6. Deleting the hibernation file
The hibernation file (hiberfil.sys), which can be close to RAM size, is located on the C drive and is used for sleep mode. If you do not use this mode, and each time you turn on and off the computer in the usual way, then this file can be removed painlessly, since it takes up a lot of space.
The system will not allow you to manually delete this file, and even if you do it using a special utility for deleting files, the system will create it anew. Therefore, for the correct deletion of the hibernation file, you need to disable sleep mode.
Run Command Prompt as Administrator and run the following command:
Powercfg -h off
After that, the system itself will delete this file and will no longer create it.
If you do not know how to work with the command line or do not want to bother, you can download the command file "Deleting the hibernation file" in the "" section.
You just have to right-click on it and run as Administrator (except for Windows XP).

7. Disable or resize the paging file
The paging file (pagefile.sys), which can be one and a half times the size of the RAM, is located on the C drive and is used by many programs to compensate for the lack of RAM.
With a sufficiently large amount of RAM and a small "C" drive (for example, SSD), many enthusiasts advise disabling the paging file.
In the window that opens, go to the "Advanced" tab and in the "Performance" section, click the "Options" button.

In Performance Options, go to the Advanced tab and click the Change button.

Uncheck "Automatically select paging file size", set the checkbox "No paging file" and click "OK".

After restarting the computer, the paging file will be deleted and a lot of space will be freed up on the "C" drive.
But keep in mind that the work of the system is tightly tied to the paging file, and some programs may not even have enough 8 GB of RAM. Therefore, out of memory errors may start to appear.

You can try to completely disable the paging file if you have 16 GB or more of RAM, but still I would not recommend doing this.
HDD A-Data Ultimate SU650 120GB8. Disable System Restore
The restore service makes backups of system files and stores them in a special hidden folder, which can take up a lot of disk space. At the same time, the built-in recovery tool does not always work correctly, and viruses like to hide in the folder with backups.
Press the key combination "Win + R", type "sysdm.cpl" and press "Enter" or use the shortcut "System Properties" from the "" section.
In the window that opens, go to the "System Protection" tab, select the "C" drive and click the "Configure" button.

Set the "Disable system protection" checkbox and click "OK".

After that, all backup copies of system files will be deleted and additional disk space will be freed up. In this way, you can free up 5-10 GB of valuable space on the "C" drive.
9. Disable the recycle bin
You can disable the Recycle Bin on drive "C" so that it does not take up space on it. To do this, right-click on the trash can icon and select "Properties".

Set the "Shred files immediately after deletion" option for the "C" drive and click "OK".
After that, if you delete large files from the folders with distributions of games or any others, then they will not go to the trash and will not take up space on the "C" drive.
10. Clearing the backup storage
To clear the storage of backup copies of system files in Windows 8, 8.1, 10, I recommend running the following command at the command prompt as Administrator.
Dism.exe / Online / Cleanup-Image / StartComponentCleanup
For this purpose, you can also download the "Clean up backup storage" batch file in the "" section and run it on behalf of the Administrator.
11. Removing temporary folders
You can painlessly delete temporary folders left after installing some drivers and programs:
C: \ AMD C: \ ATI C: \ CONFIG.MSI C: \ Intel C: \ MSOCache C: \ NVIDIA C: \ SWSetup
12. Automatic cleaning and disk acceleration
There are special utilities for automatic disk cleaning of temporary files. One of the best I recommend is.
It can be configured to clean up temporary files every time the computer boots, which will maintain free space on the C drive, and will also provide a little extra protection, since temporary folders are a favorite place for viruses.
But it is necessary to correctly configure it, otherwise this utility will clean you not what you need, but will leave what needs to be removed. Since the utility's settings are quite extensive and it has many additional useful functions, I decided to talk about it separately in the next article.
13. Links
HDD A-Data Ultimate SU650 240GB
Transcend StoreJet 25M3 1 TB Hard Drive
Western Digital Caviar Blue WD10EZEX 1 TB Hard Drive
In this article, we will look at how to clean the C: \ drive in the Windows 7 operating system and increase the amount of free space on it for the normal functioning of the system.
The article will be divided into two parts: the first for beginners and the second for more advanced users.
So let's go.
I am engaged in the repair of computer equipment. And quite often they bring a computer with the problem "Not enough space on the system disk". Due to the congestion of the system disk, such problems arise: some programs do not start, video does not load in the browser, general system slowdown, etc. This is due to the fact that many programs need space for storing temporary files, but there is simply no space on the disk ... If you begin to receive a message that there is not enough space on the system disk, and your hand began to control the mouse in search of a shortcut to CCleaner or a similar program, then raise your second hand higher and hit yourself on the first. I categorically do not recommend using such programs, since more than once I had to restore the operating system after the actions of this program.
Let's take a look at other ways in which we can free up free space on the system drive.
The first step is to transfer data (photos, videos, music, etc.) to the second disk. Since the "Desktop" and the "My Documents" folders are physically located on the system drive (I will continue to write the C: \ drive, since basically everyone has the "C: \" drive on the system drive), therefore, to free up space, you need to transfer user data to the second section. In order to make it easier to copy data from the desktop, go along the path C: \ Users \% Username% \ Desktop, select the "Table" view, filter by type. Next, press Ctrl + X or the right mouse button "Cut", then go to the second disk, create a folder and paste all the data Ctrl + V into it. Next, go to My Documents and in the same way we transfer everything from the folders "My Pictures", "My Videos", "My Music". Do not forget to look into the "Downloads" or "Downloads" folders, from there we either move everything to the second disk, or, if the downloaded files are unnecessary, we just delete them (To completely remove them from the computer, select and press the key combination Shift + DEL if you just press DEL, then the files will be deleted to the trash can, and it is also located on the C: \ drive). Also, in the "My Documents" folder, you can find many folders with the names of games - you can leave them alone, they often store game saves and they do not take up much space. Next, go to the "Cart" and click the "Empty cart" button.
Second action - delete temporary files. In the process of running applications, they create temporary files necessary for normal operation. These files are created in the folder TEMP, which is located on the path C: \ Windows \ Temp and should be automatically deleted when the application ends, but this does not always happen. Therefore, we go to the folder TEMP highlight all (Ctrl + A) and click Shift + DEL... If some files are necessary for the application to work at this very moment, then Windows will not allow them to be deleted. Can also be cleaned TEMP via function Disk Cleanup, but more on that later.
Third step - clearing the browser cache. In each browser, the cache is cleared from different menu items, how to clear the cache of your particular browser, you can find using Google. Most importantly, when cleaning Don't forget to uncheck the saved form data from the cache, cookies, saved passwords, etc. Otherwise, after clearing the cache, you will have to re-enter all passwords on the sites.
Step four - "Disk Cleanup". To use the Disk Cleanup feature in Windows 7, go to My Computer, right-click on the desired drive, select the Properties menu item and click the Disk Cleanup button. We will see the following window.
Upon completion of the evaluation of free space, a window will appear where you can check the boxes necessary for deleting the items. Then click "OK" and click the "Delete files" button. We are waiting for the deletion and that's it.
The fifth action is to remove unnecessary programs. We go to "Start "-" Control Panel "-" Programs "-" Remove Programs ". The list of installed programs will be loaded. You can filter them by size and remove those that you do not use (modern games are especially large).
Important: If you do not know the purpose of any programs, then it is better not to touch them or use them before uninstalling.Google in order to understand what kind of program it is and whether it can be removed!
Act six- clean the temporary folder Temp v ApplicationData... The AppData folder is hidden by default. In order to see hidden folders go to "Start "-" Control Panel "-" Small icons "view -" Folder options "- the" View "tab - and put a marker next to the inscription" Show hidden files, folders and drives ".
After we go along the path C: \ Users \% Username% \ AppData \ Local \ Temp. Here we select all files and folders and then click Shift + Del... The data that is currently being used cannot be deleted, so just click the "Skip" button.
These were ways to clean up the disk for novice users in the continuation of the article, we will consider ways to free up free space for more advanced users, although they are not very complicated.
The second part will consist in disabling not all the necessary functions of the Windows 7 operating system, as well as in reconfiguring some parameters.
The first point is to disable hibernation.
Hibernation is a computer operating system mode, saving the contents of RAM to a non-volatile storage device before shutting down. That is, in fact, this is a mode in which everything that was launched on the computer from RAM is reloaded onto the HDD and after exiting hibernation we get running programs and a working operating system. To implement this function, the operating system reserves on the hard disk a volume approximately equal to the amount of RAM. Personally, I never liked this mode because the exit from it was previously accompanied by malfunctions in the operating system, so I advise you to disable it (especially if you have a lot of RAM and little space on the C: \ drive). To disable hibernation, click Start - Run and write the cmd command (the command line will start). On the command line, write powercfg.exe / hibernate off... After restarting your computer, you will see the free space on the system drive.
Or you can go to "Start" - "Control Panel" - "Power supply" - "Setting up a power plan" - "Change power settings" - find the item "Sleep", open it, the item "Hibernation after" enter the value "0".
The second point is to move or disable the paging file.
The paging file is a special space on the disk that is reserved by the system and, in case of insufficient RAM, is used to store temporary data. The space for the paging file is located on the C: \ drive and, if necessary, can be moved to the second drive. If you have a large amount of RAM (from 6 GB), then the paging file can be disabled altogether. To transfer or disable the paging file, right-click on "My Computer" - "Properties" - "Advanced system settings" - "Advanced" tab - "Performance" section - "Settings" button.
Here you can change the location of the swap file, or specify the size of the swap file "0" and put the marker "without swap file" to disable it.
The third point - we transfer the Temp folder.
In order to prevent the temporary folder from growing on the system disk again, it can be moved to the second disk.
The fourth point is to delete restore points.
In order to remove all restore points, go to "Start" - "Control Panel" - "System" - click "System Protection".
Press the button "Configure".
In the window that opens, click the "Delete" button opposite the inscription "Delete all restore points, including system settings and previous versions of files."
To delete all restore points except the last one, go to "Disk Cleanup" as in the first part of the article, go to the "Advanced" tab. Next to the inscription "System Restore and Shadow Copying", press the "Clear" button and in the window that appears, press the "Delete" button.
I also recommend checking for old copies of Windows 7. Starting with Windows Vista, it became possible to install a new operating system on the same partition with the old one. As a result, after installing new operating systems on the C: \ drive, folders appear in the root directory Windows.old... We go into this folder (or if you have several of them, then in each turn), transfer important information from “Documents and Settings” and from “Desktop”, and then delete the entire folder.
It seems that these are all the main ways to clean up the C: \ drive. After completing all the steps, I was able to free up to half of the capacity on the system disk. If you have any other ways - write in the comments.
Thank you all for your attention, good luck setting up your computers.
This article will cover three methods disk cleanup.
1 Disk cleanup using Windows software.
2 Removing temporary Windows files.
3 Delete temporary files in the browser.
4 Delete personal files and folders.
Cleaning the C drive using Winodows software.
In order to run the cleaner, you must:
v Windows XP(choose one of the ways):
On the menu " Start"select item Execute... In the Open box, enter the command cleanmgr and press the button OK.
On the menu " Start"select items in sequence All Programs, Standard, Utilities, and then - Disk cleanup.
In Windows Explorer or in a tool window " My computer"right-click the disk you want to free up space on, select" Properties", open the tab Are common and press the button Disk cleanup.
v Windows 7(choose one of the ways):
On the menu " Start"select the search box for folders and files, enter the command cleanmgr and press the button OK
Go to " Start - All Programs - Accessories - System Tools - Disk Cleanup".
Click the " Start"in the search box enter" Disk cleanup", and then select Disk Cleanup from the list of results.
v Windows 8(choose one of the ways):
Click on keyboard shortcut
Move the cursor to the right edge of the screen to bring up the sidebar and select search. Switch to " Parameters", enter the query“ cleaning”And click on the shortcut" Free up disk space by deleting unnecessary files"in the search results.
After analyzing the state of the disk, the utility will display a list of files that can be deleted to free up space. You can indicate with checkboxes what to delete (I recommend leaving everything as default). Click the " Clean up system files».
The program will ask you to confirm the deletion. Click " Delete files".

Removing temporary Windows files.
Temporary files are a file created by a specific program or operating system to save intermediate results during operation or transfer data to another program. Usually, such files are deleted automatically, but quite often they remain in temporary folders from where it is advisable to periodically delete them, since this is not only unnecessary garbage, but also the first haven for most viruses.
In order to delete temporary files, go to the appropriate folders:
V Windows XP:
C: \ Documents and Settings \<Ваша учетная запись>\ Local Settings \ Temp Local Settings is a hidden folder, in order to make it visible, use the article How to see hidden folders
.
C: \ WINDOWS \ Temp
C: \ Temp
V Windows 7:
C: \ Users \<Ваша учетная запись> How to see hidden folders .
C: \ Windows \ Temp
V Windows 8 / Windows 8.1:
C: \ Users \<Ваша учетная запись>\ App Data \ Local \ Temp App Data, hidden folder, in order to make it visible, use the article How to see hidden folders .
C: \ Windows \ Temp
After you get into these directories (folders), select all the files by pressing the keyboard shortcut
Removing temporary files in the browser.
Any browser saves a lot of unnecessary information in a folder for temporary files. In order to remove the excess, you need to perform a few simple steps, so to remove the excess:
V Chrome
- Press the wrench button - "Options" - "Additional" - "Clear history" button at the top.
- Press the key combination
A window will appear in which you can mark what to delete, you can leave everything by default, except for the specified time, I recommend choosing - Delete the following items - For all time. Click " Clear the history".

V Mozilla Firefox:
Open the Firefox menu - Settings - Advanced - open the Network tab - In the "Cached Web Content" section, click the " Clear now".

V Internet Explorer(choose one of the options):
Click the nut button - Internet Options - General tab - in the Browsing history field, the Delete button.
Press the key combination
- "Start" - "Control Panel" - "Internet Options".
A window will open in which we indicate what data can be deleted, I recommend leaving everything by default and clicking the button " Delete".

V Opera(choose one of the options):
Opera menu - "Settings" - "Privacy and security" - "Clear browsing history".
Press the key combination
As a result, a window will open with a choice of elements to be deleted, in the line - Destroy the following elements, select "from the very beginning", I recommend leaving the checkboxes by default, press the button " Clear browsing history".

V Yandex browser(choose the one that suits you best):
Press the nut-shaped button - select the "History" tab - "Clear history".
Press the key combination
A window will open in which you need to delete the following elements in the line, select "for all time" and press the button " Delete history".

Removing personal files and folders.
There are thousands of directories and files on the C drive, figuring out where a large large file or folder is that takes up a lot of disk space is very difficult, but it's easy to deal with it if you use a free program Scanner... It allows you to scan a disk and show a diagram of the use of space by folders.
After downloading, unzip the archive and run the Scanner.exe file. The program window will open, on the left you can select the disk to be scanned, on the right you will see information on the folders and the space they occupy. When you hover over any area, the path to the folder and its size will be shown at the top.

I do not recommend deleting folders and files that you are not sure about. I would advise you to use this program to find personal information (movies, music, pictures) and delete them or move them to another drive.
If the freed space is still not enough, I recommend increasing the space using another disk, for example D, if available, for more details see the article


")


 How to find out the number of processors")


