How to extract BIOS Dell files?
Copy the Bios.exe file to the C drive:
Run the command line in the administrator mode and write it:
cD \\
bios.exe / writeromfile
bios.exe / writebinfile
bios.exe / writehexfile.
»Bios.exe - This file is downloaded from Dell website. "
The unpacked BIOS file will be copied to the C :!
Unpacking new Bios Dell.
- Download Python 2.7 Interpreter.
https://www.python.org/download/releases/2.7/ - Install Python 2.7 on your computer (it is this version!).
- with Python - Decompnewdell.py script.
- Extracted from the archive the decompnewdell script. Please copy to the folder with the Python interpreter (usually C: \\ Python27).
- Also in the folder with the interpreter (usually it is C: \\ Python27) Copy our accumulated Dell BIOS. Rename it in biosupdate.exe. It should turn out to be in the photo below.
- Run the Windows command prompt in the administrator mode and write it:
cD \\
CD Python27
Python Decompnewdell.py Biosupdate.exe.
It should turn out to be in the photo below.

And in the folder with Python (usually C: \\ Python27) will appear Biosupdate.exe_decompressed.hdr.
- With the PfSexTractor.exe program, I remove the program in the same folder where the file has been created. HDR (usually C: \\ Python27).
- On the Windows command prompt, we write:
PfSexTractor Biosupdate.exe_deCompressed.hdr.
It turns out in the photo below.

And the biosupdate.exe_decompressed.hdr.exe_decompressed.hdr.extracted folder will be created, within which all the extracted files are located from which you can collect a dump for firmware on the programmer. Ready!
Universal program for removing firmware and BIOS backups from any models of laptops and personal computers.
Dump should always do when we want to make firmware, update, Update or BIOS rollback. Sometimes they are asked to make a copy of the Bios laptop or personal computer board, to repair similar equipment.
And what is BIOS and how this abbreviation is decrypted.
BIOS is cuts from the English words base_input_output_system and translates it as basic_ysystem_vod
Making a dump of bios laptops and computers using this program is very easy and simple.
Brief instructions How to use Universal BIOS Utility Backup Toolkit 2.0 to create a BIOS DAMP, and in Russian backup.
Video instruction manual with this program.
Many antiviruses define this program as a virus, but it is not.
After downloading, you can check this archive on the site www.virustotal.com which will say that half of antiviruses will find various viruses in it, and the second half does not find.
My AVG defines its same as a virus. And on Buke, Casper says that everything is fine.
After checking this file, look, whether your antivirus finds the virus in it. If so, disconnect it during the program.
Then unpack the archive and run the resulting file named Universal BIOS Backup Toolkit 2.0.exe
If your system tells what administrator rights are required. Then click the right mouse button on this file and click the item to start on behalf of the administrator.
After that, the program window opens in which we see information about the type, version, size, manufacturer and the date of your bios.
After that, we click the Read button and wait until the process of reading the bios does not end.
After that, the signboard will appear with the inscription that the reading of the bios is completed successfully.
Click OK. Then click the backup button.

We are offered to choose a place where we will keep the bios dump. Select the desired folder and click the Save button.

We all made a backup copy of the bios, you can upgrade the version, sew a new or old stable version of the bios.
Probably today there are no users who would not hear about BIOS. Beginner users (some of all their lives are in the state of beginners) are afraid of this BIOS like fire and do not even imagine how to go to it, not to mention the setting. Well, the experienced users or, as they are called, computer enthusiasts, not only adjust the BIOS system, but also reflash it. It should be noted that the BIOS flashing procedure even from experts causes a splash of adrenaline, since it is not safe and often represents a threat to life. However, the BIOS flashing procedure is still flowers. More extreme is modding, or editing, BIOS, which will be discussed in this article.
Before you start a story about the ways to edit the BIOS, briefly remind what BIOS is, what opportunities it provides the user and why update it and even more edit it.
What is bios
BIOS (BASIC INPUT / OUTPUT SYSTEM) is the basic input system. More precisely, the BIOS is a system of configuration and memory management, a processor, chipset integrated on the board with controllers and connected to the board of devices. Unlike most other programs, the BIOS is not located on the hard disk, but on a special chip with autonomous power on the motherboard.
A lot depends on the BIOS in the computer. In fact, BIOS determines the system setting, which defines the functionality and performance of the PC. Often the first versions of the BIOS, with which motherboards appear, are replete with "bugs", disappearing only in subsequent versions.
The BIOS system is in any system board (with the exception of boards for Apple computers) whether it is designed for desktop PC or for a laptop. However, traditionally found it that the BIOS for a laptop has a minimum of settings and is rather information in nature. As for the BIOS motherboard for desktop PC, it allows you to perform a sufficiently large number of settings that affect both the performance of the system and its functionality. In particular, the traditional acceleration of the system, which implies an increase in the processor clock frequency, changing the processor supply voltage, changing the clock frequency, timings and memory voltage is made in the BIOS settings. In addition, in some cases, the BIOS allows you to configure the high-speed mode of operation of the fan installed in the processor cooler, and additional fans installed in the system, to implement the setting of the RAID solid disk array in the event that this array is created on the basis of the controller integrated into the chipset, as well as Perform a lot of other thin computer settings.
BIOS is located in the ROM memory chip (Read Only Memory), which ensures the constant availability of BIOS, regardless of the performance of the external components with respect to the motherboard (for example, boot discs). Since access to RAM (RAM) is carried out much faster than ROM, many manufacturers provide for power on the automatic copying of the BIOS from ROM into RAM. The operational memory area is called Shadow ROM.
Currently, most modern motherboards are equipped with Flash BIOS chips, which can be overwritten using a special program. This approach provides the ability to update (new version firmware) BIOS.
BIOS kernel manufacturers are not so much. The most common BIOS from Ami companies (American Megatrends, Inc.), Award and Phoenics Technologies. Other BIOS (from FirmWorks, Micro Firmware, etc.) are much less likely. And now dominates the Ami BIOS market, so in the future we will concentrate on the methods of flashing and modifying it.
Naturally, each manufacturer contributes to the basic version of the BIOS, and, of course, the one or another version of the BIOS is intended only for a particular product (computer or laptop) and incompatible with other solutions.
Finally, we note that currently the BIOS microcircuits use two interfaces to connect to the motherboard: either the LPC bus (LOW PIN Connection) or a new SPI tire (Serial Peripheral Interface).
Why reflash bios.
All manufacturers of motherboards and laptops strongly recommend reflashing BIOS, if there is no sharp need. Moreover, representatives of the service centers are constantly referring to the manufacturers of motherboards with a request to block the possibility of flashing BIOS for the user. Of course, this idea is absurd and one will never happen, but once again we emphasize that the BIOS flashing operation is unsafe and may pose a threat to life. If the board or laptop works normally, it makes no sense to update the BIOS.
At the same time, there are often situations when the BIOS update is necessary. For example, you purchased the motherboard with the processor and found out that they are incompatible with each other. Most likely, the problem is that the old version of BIOS is stitched on your motherboard, which does not support a new processor. The only option in this case is to find the old processor and update the BIOS on the board.
In addition, each new version of the BIOS is corrected errors made in previous versions, so the BIOS update procedure is very useful.
The most secure in terms of the Gigabyte, Asus and MSI, Asus and MSI fees, in which protection against unsuccessful flashing BIOS is implemented. The Gigabyte boards are installed two BIOS chips (DualBIOS technology), and if the BIOS is stitched incorrectly and the system cannot start, then the BIOS emergency recovery procedure from the backup chip is automatically started.
On New Asus boards, the BIOS emergency recovery technology received the name ASUS CrashFree BIOS 3. The essence of this technology is that in the case of the BIOS crash or discrepancy of the checksum after an unsuccessful firmware, a program is automatically launched that is looking for a BIOS on a CD / DVD disk, a diskette or Flashke (with FAT / FAT32 file system). If the file on a cat is found, the recovery procedure is automatically started.
A similar technology called M-Flash is available on MSI boards. The only difference is that the BIOS file must be on the flash drive.
Methods of flashing BIOS.
All manufacturers of system boards together with new versions of BIOS are laid out and utilities for their firmware, as well as detailed instructions, how to reflash BIOS. Alas, but there simply does not exist for any universal toolkit for flashing BIOS. In general, you can highlight three ways of flashing BIOS: from under DOS, from under the Windows operating system and directly from the BIOS.
Actually, the methods of flashing BIOS from under the BIOS and using the branded utility from under the Windows operating system, there is nothing to tell. Here everything is simple and understandable. Moreover, the BIOS flashing method from under the BIOS is the easiest and safest, however, alas, not all manufacturers support this feature. The exception is only ASUS and GIGABYTE.
Moreover, not all manufacturers are equipped with utility boards to flash BIOS from under Windows and in some cases the refressing method from DOS is the only possible.
The method of flashing BIOS from under DOS can be called classic, but also the most inconvenient. The fact is that, in addition to the availability of the corresponding DOS utility, this method of flashing implies the computer loading is not from the hard disk, but from the external medium. Earlier, ordinary 3.5-inch boot diskettes with DOS were used, and the BIOS file itself, and the DOS-utility of its flashing, and the flashing of it were recorded on this floppy disk, along with the operating system. However, there are currently 3.5-inch floppy disks, as well as the floppopovodes themselves, can be considered obsolete devices. On many modern motherboards there is no connector for connecting the floper, and the laptops with 3.5-inch flopers have not been produced for a long time. However, the problem of this method of flashing BIOS is not even in this. In the end, you can find a 3.5-inch floper with a USB interface, but it is unlikely to solve the problem. The fact is that modern BIOS can be a volume of several megabytes and simply do not fit on the floppy disk.
In principle, you can try to solve this problem using the loading flash drive with the DOS kernel instead of the boot floppy diskette. But in this case complications arise. First of all, you need to find a utility that will allow you to make a flash drive and system files of the DOS operating system. On the Internet you can find several utilities that allow you to make bootable flash drives with DOS, the most famous of them are HP USB Disk Storage Format Tool and Bootflashdos, which are in the network in free access.
The HP USB Disk Storage Format Tool utility allows you to create bootable flash drives in the presence of DOS system files, that is, the files themselves are also required. However, on torrentressurs, you can find builds in which the DOS system files are included.
In the case of using a flash drive with a capacity of less than 4 GB when formatting and creating a bootable flash drive using the HP USB Disk Storage Format Tool utility (Fig. 1), you can apply FAT file system or FAT32, but if a flash drive is used with a capacity of more than 4 GB, then a file system is required FAT32.
Fig. 1. Creating a bootable flash drive with DOS
Using the HP USB Disk Storage Format Tool utility
The bootflashdos utility allows you to create bootable flash drives with DOS by pressing only one button, solid all the necessary system files are already included in the utility itself (Fig. 2).

Fig. 2. Creating a loading flash drive with DOS using the BootflashDOS utility
In principle, if the bootable flash drive has been created with DOS, then no problems with flashing BIOS will not be. It is enough to copy to the boot flash drive of the DOS utility for flashing the BIOS and the BIOS file itself and download the computer from the flash drive. To load a computer from the flash drive, you need to insert it into a PC, restart or simply turn on the computer and on the download stage to enter the BIOS to set the download from USB Flash Drive in the settings. Next, saving the settings, reboot the computer and, downloading the DOS, perform the desired command in the command line according to the BIOS manufacturer's instructions.
Examples of the execution of such a team We will give a little later, in while we consider another way to flash BIOS from under DOS. It lies in the fact that instead of the boot flash drive, a boot CD / DVD is used. Bicycle to invent here is hardly worth it - it is better to use the already ready-made Dr. Hiren`s BootCD (current version 10.4), the image of which can be downloaded from www.hirensbootcd.net. If you use the Hiren`s bootcd boot disk, you will additionally need a flash drive (with a FAT or FAT32 file) to which the DOS utility must be recorded for flashing BIOS, and the BIOS file itself.
Now consider the BIOS flashing procedure from under DOS on the example of the MSI GX640 laptop with AMI BIOS. On MSI laptops, a single way of flashing BIOS is provided from under the DOS using the BIOS DOS-utility attached to the file itself. Actually, everything that is needed to flash the BIOS is to create a bootable flash drive, download from the MSI site archive with all the necessary files in which the BIOS file includes the flashing utility and the executable Flash.bat file with the prescribed sequence of all actions. After that, unzip this archive on the boot flash drive and, booting from the flash drive, run the Flash.bat file. The main thing is that all unaccompanied files are in the same folder (you can unzip them into the root directory of the flash drive).
In general, it should be noted that for each type of BIOS (AMI, Award) for flashing there are specialized utilities from Ami and Award. For example, from the Ami website, you can download the Amiflash package, which includes the AFUDOS and AFUWIN utilities, allow you to reflash AMI BIOS from under DOS and from under Windows, respectively. However, it should be borne in mind that AMI BIOS can be both a classic AMI BIOS and AMI APTIO BIOS. Aptio is a type of AMI BIOS, but the main thing is that for Ami Bios and APTIO AMI BIOS uses various Utilities AFUDOS and AFUWIN.
In addition, many system boards makers contribute to BIOS for their products such significant changes that universal AMI or Award utilities simply do not recognize them, and therefore, they cannot reflash. In particular, in the previously reviewed example with AMI BIOS laptop MSI GT640, the AFUDOS and AFUWIN utilities do not recognize it as AMI BIOS and, naturally, they cannot reflash.
In general, the situation when it comes to modified versions of Ami BIOS, which are defined as AMI BIOS utilities themselves from AMI, is found quite often. This is many MSI boards, and many Gigabyte boards. In such a "rested", only asus boards, BIOS on which you can reflash utilities from AMI (although, of course, the utilities supplied by ASUS itself are better suited.
Why modify bios.
So, we considered the basic ways of flashing BIOS, and now we will discuss how to modify it. Naturally, the question arises: why do I generally modify the BIOS? On this occasion, you can argue indefinitely, as well as whether you need to overclock the computer. Actually, if the BIOS modding procedure is in principle possible, there will always be enthusiasts that will be engaged in this.
A few years ago, few people wondered about the possibility of self editing BIOS. However, recently, this procedure has become popular, and there can be a lot of resources dedicated to the modding BIOS on the Internet. Interest in this issue can be explained by the fact that in recent times many users have become stitching a SLIC table in their BIOS, and this is one of the options for modding, or editing, BIOS. By itself, the procedure for firmware Slic-table in BIOS is completely legal, and this is why it is, of course, is already illegal - this is exactly what the popularity of this procedure is explained.
Briefly explain what we are talking about. The BIOS Slic Table Firmware is used to implement the OEM activation mechanism of the Windows 7 operating system in the same way as Microsoft OEM partners are made to activate the preset Windows copies without checking Microsoft. This method allows you to activate the system while complying with three conditions: Using a special OEM key and an OEM certificate, as well as the presence of a SLIC table in the computer BIOS.
Windows 7 requires the presence of version 2.1 in BIOS SLIC tables, with the hard binding of the OEM key to the SLIC table and the certificate is not. The key is tied only to the Windows edition and allows you to activate both the X86 and X64 version of the OS. File-theft and SLIC tables are interrelated, and for successful activation, both components should be from one OEM partner.
We will not tell how to illegally activate Windows 7, but we will focus on the sewage procedure in the BIOS Slic Table. Immediately, we note that this is not always possible and not all BIOS givend to any editing.
On the Internet you can find a software tool package (amitool), containing both the SLIC table and the utility (AMI Slic Mod) for their firmware in AMI BIOS. However, for this it is necessary that you can use AMI BIOS on the board, but even in this case there is no guarantee that the Slic Table Firmware Procedure in the BIOS will be possible. As we have already noted, many manufacturers are so modified by BIOS for their products that the AMI Slic Mod utility simply does not recognize it as AMI BIOS, and therefore cannot modify it.
However, even in this case should not despair and run to the store at another system board. Before trying to flash a SLIC table in the BIOS, you should check the fact of its absence in the BIOS. If you bought a motherboard or a laptop recently, it may well find that the version of the Slic Table you need (version 2.1) in BIOS already exists.
You can view the version of the Slic Table in the BIOS using the RW - Read & Write Utility Specialized Utility (Current Version 1.4.7), which can be downloaded from http://rweverything.phpnet.us. Another name of this utility is rw-everything.
By installing this utility, run it and in the main program window on the toolbar, press the button with the ACPI inscription. In the ACPI Table window that opens, click on the SLIC tab. Next, view the table in hexadecimal format and find a string starting with byte 53 20 in it. If the following four bytes 00 00 00 00, it means that the BIOS is stitched by the SLIC table version 2.0, and if - 01 00 02 00, then the SLIC Table version 2.1 (Fig. 3).

Fig. 3. Definition of the BIOS Slic Table version
Of course, the Slic-table sewing in BIOS is far from the only option of possible modding. Another modding method is unlocking some BIOS functions. Indeed, motherboard manufacturers often intentionally block some BIOS functionality in order to simplify the Setup BIOS setup procedure. They are turned off and those functions that are absent in a particular motherboard, but can be used in the following modifications.
Using specialized utilities, you can try to unlock all the disabled features and options in the BIOS. In addition, you can change the logos (some manufacturers of motherboards, such as ASUS, even supply special utilities to change the BIOS logo), as well as some names so that, for example, when loading is not displayed, not the actual name of the processor, and something like "AMD Core i9 -995.
You can also give another example of the modding BIOS. Some craftsmen manage through the BIOS unlock the possibility of using the SLI mode for NVIDIA video cards on the motherboards, where this mode is not provided. Actually, if the board officially supports SLI mode, then its BIOS has an appropriate key from NVIDIA. The idea of \u200b\u200bmodding is to cut this key from the BIOS of the board at which SLI mode is officially supported, and insert it into the BIOS for the board on which SLI mode is not supported (that is, in the BIOS without a NVIDIA key). In particular, there are examples of how at the expense of such modding, SLI mode was activated on boards based on Intel P45 Express chipset.
However, we turn from the theory to practice and discuss the editing of the BIOS, in particular, editing Ami Bios as the most common.
Editing Ami Bios.
To edit a BIOS with a kernel from AMI, the AMIBCP utility will be required, which, by the way, the Ami company is released. This utility can be downloaded both separately and as part of AMI Bios Rom Utilities. It should be noted that since we have already emphasized more than once, manufacturers of motherboards and laptops make changes to AMI BIOS for their products, then no guarantee that the AMIBCP utility recognizes BIOS, no. Alas, but not every BIOS can be modified. As practice shows, the ASUS and ECS boards can be edited without any problems, but for the Gigabyte and MSI boards of the AmIBCP utility are powerless.
So, back to the consideration of the editing of the BIOS in the case when it is possible. The AMIBCP utility (3.x) is running from under the Windows operating system, but it should be noted that there are options for the same utility for DOS.
By downloading the utility, you must open the BIOS file. In our example, we will consider editing AMI BIOS for the ASUS P6X58D-E system board using the AMIBCP V.3.37 utility. Edit We will expose the P6X58DE.ROM file.
So, in the main window of the program, you load the BIOS file, which will be modified (Fig. 4).

Fig. 4. Main Window AMIBCP V.3.37 Utilities
First of all, the Setup Configuration tab, in which, in fact, the BIOS settings are modified. In the left window of this tab, the BIOS settings menu is displayed. If you remove a tick from a menu item, it will not be displayed in the BIOS menu. In the considered example (see Fig. 4), we removed the ticks from the AI \u200b\u200bTweaker and Advanced items, thereby blocking all the possibilities for overclocking the system. That is, the BIOS menu items in which you can view information about the processor and memory, as well as change frequencies, supply voltage, etc., will simply be absent in the modified BIOS version.
Similar to the situation when disclosing the tree structure of each BIOS setup menu item: If you remove a checkbox from any subparagraph, it will not be displayed in the BIOS menu. For example, if we do not want the Advanced settings menu, the Intel PPM Configuration point is displayed, you just need to remove a tick from the corresponding point (Fig. 5).

In order to block any option to the BIOS setup menu, is enough in the SHOW graph for the corresponding item to set the value No. Such blocked items will (after saving the changes made) are highlighted with a green strip.
For example, if there are no additional fans in the case in our system, we do not want the items to be displayed in the BIOS, you enter the Power menu, then open the Hardware Monitor menu and for Chassis Fan 1 Speed \u200b\u200boptions, Chassis Fan 2 Speed, Chassis Fan 3 Speed, Chassis Q-Fan Profile and Power Fan Speed \u200b\u200bInstall the NO value in the show column (Fig. 6).

Fig. 6. Blocking display in BIOS various options setup menu options.
It should be noted that the BIOS P6X58DE.ROM for the ASUS P6X58D-E fee of any improvements using the AMIBCP V.3.37 utility does not allow. All options are unlocked in it, so the maximum that can be done is to block what you do not need (although it is not clear why to do it).
You can also try to change some inscriptions, but it should be borne in mind that in Russian inscriptions will not be displayed. For example, if we want, when downloading instead of the ASUS P6X58D-E ACPI BIOS Revision 0106, the COMPUTERPRESS P6X58D-E BIOS Edition is displayed, it is enough to find the ASUS P6x58D-E ACPI BIOS 0106 string on the BIOS STRINGS tab and change it to the specified .
We have left to consider another type of modding BIOS - changing the background image (logo) BIOS. At the same time, ASUS even completes its fees with a special utility that allows you to implement this opportunity. Of course, for Asus boards, it is easier to apply this utility. However, for AMI BIOS, you can use the OEM logo utility itself (Fig. 7).

Fig. 7. Changing the BIOS logo using the OEM Logo utility
The interface of this utility is very simple and does not require comments. Just download the BIOS and specify the path to the file with the new logo. The only limitation is the drawing must be a certain resolution and format.
Actually, the original method, snap and microcodes can be found (directly by AMI instructions), and in most cases the use of this method does not bear any problems and does not have underwater stones, but I regularly encountered such a problem with my practice:
Those. There was a banal lack of free space inside the image. When you modify the BIOS for yourself for a specific processor, you can not pay attention to this, because You can always upload only one microcode to your processor, or remove some old microcode to release the place, but when you modify the stream, you need to search for another solution, compromise.
As a compromise, I chose the following solution - we take the latest modes of microcodes for all Core generation processors in all designs (Celeron E, Pentium E, Core 2 Duo, Core 2 Quad, Xeon * 3xxx / * 5xxx) and replacing them all that was before . The set of microcodes turned out the following:

The volume of this set is only 76 kilobytes. This file turned out by combining these files:
cPU00010676_PLAT00000001_VER0000060F_DATE20100929.BIN.
CPU00010676_PLAT00000004_VER0000060F_DATE20100929.BIN.
CPU00010676_PLAT000010_VER0000060F_DATE20100929.BIN.
CPU00010676_PLAT00000040_VER0000060F_DATE20100929.BIN.
CPU00010677_PLAT00000010_VER0000070A_DATE20100929.BIN.
CPU0001067A_PLAT00000011_VER00000A0B_DATE20100928.BIN.
CPU0001067A_PLAT00000044_VER00000A0B_DATE20100928.BIN.
CPU000006F2_PLAT00000001_VER0000005D_DATE20101002.BIN.
CPU000006F6_PLAT00000001_VER000000D0_DATE20100930.BIN.
CPU000006F6_PLAT00000004_VER000000D2_DATE20101001.BIN.
CPU000006F7_PLAT00000010_VER0000006A_DATE20101002.BIN.
CPU000006F7_PLAT00000040_VER0000006B_DATE20101002.BIN.
CPU000006FB_PLAT00000001_VER000000BA_DATE20101003.BIN.
CPU000006FB_PLAT00000004_VER000000BC_DATE20101003.BIN.
CPU000006FB_PLAT00000010_VER000000BA_DATE20101003.BIN.
CPU000006FB_PLAT00000040_VER000000BC_DATE20101003.BIN.
CPU000006FD_PLAT00000001_VER000000A4_DATE20101002.BIN.
The modification procedure itself has also changed a bit and became not easier, then faster:
Step 1 - Open the BIOS image in the MMTOOL program: 

Step 2. - To check, go to the last tab (CPU Patch) and see the number of microcodes. Here are them for example 31 pieces: 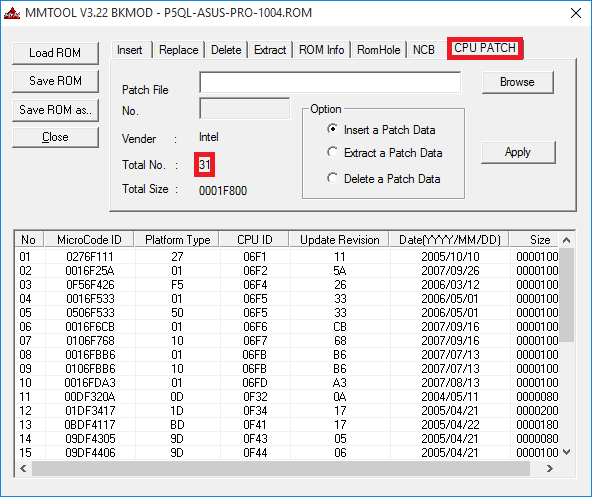
Step 3. - Go to the Replace tab and look for "P6 Micro Code" on it: 
Step 4. - By selecting "P6 Micro Code", click the button of the Ikshchi, select the ncpucode.bin file, described above and replacing it with the Replace button: 


Step 5. - To check, go to the last tab (CPU Patch) and see the number of microcodes. After the microcodes change, 17 remains, the latest version: 
The fundamental difference with the order of modification described on delidded.com is not. In most cases, it is not the same at the output, but the processor receives the desired microcode. From subjective positive moments, I would like to pay attention to only the fact that microcodes are guaranteed to update all current processors, whether "civil" or "server", as well as practically no risk of getting a message about the lack of space. Although, in my practice, there was not enough space for such a set of microcodes a couple of times, it was with BIOS for ECS P4M900T-M and ECS P4M900T-M2 boards, which are generally compatible with Xeon E5450.
By tradition, a public link to the archive with tools - (Zip, 234Kb). Archive contains executable file Mmtol.exe. (version 3.22 BKMOD), File with microcodes for all 45 / 65nm Core / Xeon generation processors ncpucode.bin., as well as two files 45nm.bin. and 65nm.bin. With microcodes only on 45NM processors and only 65nm. Using these files can be useful in cases when it is necessary to release an additional volume in the BIOS, for example, for a new Firmware which is a controller, network, disk, etc.
! Nb.: Nor in the ncpucode.bin file, nor in the files 45nm.bin / 65nm.bin there is no support for Pentium 4 processors, Celeron (without alphabetic indexes), Pentium D, Celeron D and Xeon W (Xeon 5080 for example). These are Netbrust generation processors.
About Three of the riddle: worth the hive buzzing. But smoke from the pipe does not go, because it is not a native factory, but the computer on which the BIOS is damaged. And he bursts because only it is now capable. Without bios, he is just a bunch of lifeless iron. Is it worth worrying because of this? Of course not. After all, now you have a great bedside table!
System block as a bedside table? Well, I do not! We know how to make it work. Today we will talk how to restore the BIOS if he flew.
What leads to the BIOS firmware
B iOS and its "descendant" of UEFI, which are stitched with modern motherboards, are special computer programs necessary for the initial configuration and control of PC devices until the operating system starts. They are stored in special flash memory chips on the motherboard, one of which is shown in the picture above. It seems to be a good place of storage, reliable, but sometimes Bios becomes uncomfortable there and he runs away. More precisely, it is damaged and ceases to fulfill its tasks.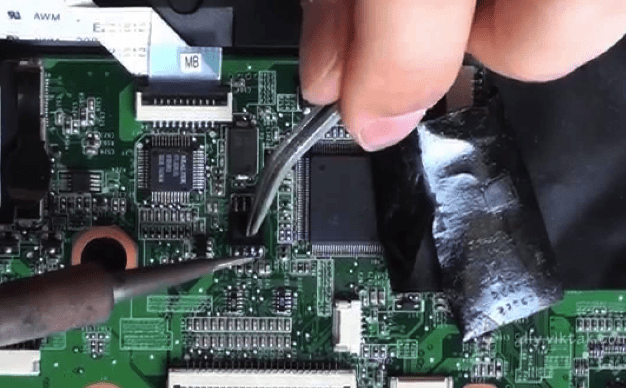
The reasons for the damage of the BIOS is not too much, in some cases they are obvious, in others - no. Here is the list of the most common:
- During the power supply of the computer, the power supply was shutdown.
- The firmware program (flash drive) incorrectly interacts with the firmware or flash memory microcircuit.
- The BIOS version is stitched, not suitable for this motherboard. Yes, .
- If the update is carried out from under the operating system - a system failure or program interference, for example, an antivirus blocking.
- Incorrect user actions, such as a reboot of the computer until the update is completed.
- Flash memory microcircuit failures.
- Hidden BIOS firmware errors. Sometimes spontaneous "towers", occurring without visible causes.
- Electrical problems of motherboard.
How do BIOS damage manifest
In most cases, the BIOS firmware is partially damaged, so the symptoms of the failure can be different:- When you press the PC power, only the cooler is turned on, which immediately begins to rotate at maximum speed. Sometimes the LED indicators on the housing and keyboard light up.
- After one or a few seconds after switching on, a cyclic reboot begins. Externally, this is manifested by a cycle of promotion and stops of a cooler, which are repeated while power is supplied.
- When you turn on the power indicator lights up, the cooler does not spin.
- The computer does not submit any signs of life. This happens when damaged BOOT BLOCK - BIOS initial loader. This is the hardest case.
The image on the screen is absent. Even the manufacturer's screensaver does not appear.

There are other forms of BIOS damage, more precisely, its area that stores the configuration of the ME controller (part of the chipset) on boards operating with Intel processors - the so-called ME region. In case of failures in this area, a computer or laptop can:
- It is incorrectly loaded or not included at all.
- Turn off or restart at equal intervals.
- It is incorrect to adjust the speed of rotation of the cooler, for example, to turn it on high revs regardless of the load.
The elimination of such failures is to read the BIOS dump, replacing the ME region to clean and re-firmware using the programmer. Since the repairmen usually do this, and not the owners of computers, we will not stop at this. It is better to deal with what can be done at home without special equipment and risk to finally send your Iron Pet in the kingdom of eternity.
BIOS recovery without a programmer is possible only when the initial bootloader is saved. It is possible to determine whether it has been preserved or not, sometimes it is possible for indirect features: flashing the screen illumination, sound signals from the system speaker, the motherboard reaction to switching on without RAM (sound or flashing indicators), etc. When the initial boot loader is safe, the first time of work Computer pass normally, failure manifests itself a little later.
How to return the performance of the motherboard with the flying BIOS
ASUS
M Feet Desktop Motherboard Made ASUS Support Technology USB FlashBackwhich is designed to quickly update and restore the BIOS in case of failure. For this, nothing needs to be required, except for a USB flash drive to a capacity of up to 4-16 GB and the BIOS file itself, which you need to download from the manufacturer's site from the section about your Mama model.After downloading, the firmware needs to be renamed. For example, the file "SABERTOOTH X79" (model name) is renamed to "saberx79.rom", the file "SABERTOOTH Z77" - in "z77st.cap". Information should be called the firmware file for your model, most likely there is on the ASUS website, but if you do not find it, check on the forums or in support.
Next, save the renamed BIOS on the flash drive formatted in FAT32, and connect it to the USB port with the mark " FlashBack" or " Rog Connect." The computer before it is desirable to turn off, it will increase the chance of successful recovery.

After connecting the flash drive, turn on the PC and click on the rear panel button " Bios." Hold it down for about 3 seconds until the light indicator flashes on the board. The flashing indicates that the file was successfully considered and stitched into memory. When the firmware process is completed, the indicator goes out.
If your fee from the budget segment is not too new, that is, does not support the USB Flashback, most likely you can restore it with another way. If the computer is equipped with a floppy drive or optical drive, write down the renamed bios file in the root directory of the pure floppy disk or CD, place it in the drive, turn off, and then turn on the PC again. The firmware will be completed when the actuator indicator goes out. If there is no drive, use the USB flash drive.
Gigabyte.
Gigabyte cards with Dual (double) Bios fails rarely occur, since in case of damage to the firmware in the main microcircuit ( M.aIN_ Bios.) Dump from the backup is copied to it ( B.ackup_ Bios.). While the main flash memory is good and contains a firmware, even damaged, the fee retains performance.
Problems with the launch of the board with Dual_BIOS are possible in the following cases:
- The main microcircuit is absent or failed.
- Microcode in the main microcircuit completely erased.
- The contents of both microcircuits are damaged.
Some "moms" Gigabyte are able to boot from backup flash memory and use it as the main one. Another group of boards of this manufacturer uses a dedicated area on the hard disk as a BIOS backup. It is a less reliable option, but also better than nothing.
BIOS GIGABYTE recovery from backup is usually automatically executed, but if this does not happen, try turning off the computer from the outlet, wait a bit and turn it on.
MSI and others
Moother Micro Star Motherboards is used by the firmware restoration technology, very similar to Asus'ovskaya - using a flash drive, floppy disk or a CD. Copy the BIOS on a clean media, connect it to the PC, click the off button 4 seconds, clamp a combination on the keyboard leftCtrl +.HOME (or Alt +.Ctrl +.HOME) And, without releasing the keys, turn on the computer. On the beginning of the firmware process, you can judge the flash drive indicator or drive. BIOS on MSI card. Right JSPI1 port for firmware on programmer
 On MSI motherboards and some other brands, which are more than 8-10 years old, the bios flashing is made from the floppy disk. Instructions for Award and Ami Bios differ slightly.
To restore AMI BIOS, do the following:
- Rename the BIOS file downloaded from the manufacturer's website to amiboot.rom.
- Transfer it to the root of a clean floppy disk. Install the floppy disk to the PC turned off.
- Press the left Ctrl + Home keyboard and turn on the computer.
For recovery AWARD BIOS:
- Place the Firmware and BIOS files on the diskette (usually downloaded in one archive).
- Create a text document on a diskette, which indicates the name of the bios file with the BIN extension. Rename the document in AUTOEXEC.BAT.
- Further actions are similar to the above.
By the way, some manufacturers of the motherboard are postponed on their BIOS sites only in EXE format - in the "one bottle" with a firmware program for updating from under Windows. Sometimes such a file can be unpaved as an archive, but users are often unclear that it is from its contents that is firmware. For such problems there is no universal solution. In order not to exacerbate the problem, it is better to consult on profile forums or in the technical support of the manufacturer.

On some boards before the restoration of the BIOS, you also need to extract the real-time clock battery (RTC) or rearrange (remove) the CMOS cleaning jumper. These moments are important to find out before the procedure.
BIOS recovery features on laptops
N and laptops, as well as on Gigabyte boards, BIOS is also often stored in two flash memory chips. But this is not Dual and there is no backup copies. Both chips contain different parts of the firmware or in one is the main BIOS, and in the other - the program of the multi-protroller. So that the device does not turn on, it is enough to damage the microcode at least in one of them.
The method of restoring the flying BIOS on laptops is about the same as on desktops. The firmware file downloaded from the manufacturer and the firmware program (the latter is not always needed) is placed on a clean, formatted in FAT32 / 16 USB flash drive, connect it to a de-energized machine (just turn off the laptop is sometimes not enough, you need to disconnect the power supply and remove the battery), insert the charged The battery in place includes the machine and clamp the key combination. On different laptops, various keyboard combinations are used for this, for example:
- Ctrl (left or both) + Home
- Windows + B (this and other letters are given in Latin layout)
- Windows + F.
- Windows + M.
- Windows + ESC
- Fn + B.
- Fn + F.
- Fn + M.
- Fn + ESC.
The main work consists in unpacking and renaming bios files. One rule here, again, no. In most cases, get the firmware comes from EXE-Shnikov, but! Many manufacturers include a BIOS program for different revisions of one platform or a whole series of platforms, and choose from them the only file you need is very difficult. To not be mistaken, read the instructions for the firmware of your model and revision of the platform on profile forums. And do not hesitate to ask questions.
I intentionally do not at the article by the instructions for restoring the BIOS by firmware on the programmer with feeding and without, closing various contacts, hot replacement of removable flash memory, etc., since all these methods are unsafe and require certain knowledge. However, among readers, you will probably have Those who did something similar on their PC and received good results. It will be great if you describe your actions in the comments in detail. Stories about negative experience are also welcome to other readers thanks to you able to avoid mistakes. In the comments, be sure to give the name of the model and the revision of your motherboard, as well as the BIOS version with which you worked.


 in Photoshop How to make a grid in photoshop CS6")


")


