Electronic digital signatures (EDS) have long and firmly entered into use both in public institutions and in private firms. The technology is implemented through security certificates, both common to the organization and personal. The latter are most often stored on flash drives, which imposes some restrictions. Today we will tell you how to install such certificates from a flash drive on a computer.
Despite their reliability, flash drives can also fail. In addition, it is not always convenient to insert and remove the drive for work, especially for a short time. The certificate from the key carrier can be installed on a working machine to avoid these problems.
The procedure depends on the version of Cryptopro CSP that is used on your machine: Method 1 is suitable for the newest versions, Method 2 is suitable for older versions. The latter, by the way, is more universal.
Method 1: Installation in automatic mode
The latest versions of Cryptopro DSPs have a useful feature for automatically installing a personal certificate from external media to a hard drive. To enable it, do the following.
- The first step is to launch CryptoPro CSP. Open the menu "Start", in it go to "Control Panel".

Click the left mouse button on the marked item. - The working window of the program will start. Open "Service" and select the option to view certificates marked in the screenshot below.
- Click the browse button.

The program will prompt you to select the location of the container, in our case, a flash drive.
Select the one you want and click "Further".. - A preview of the certificate opens. We need its properties - click on the desired button.

In the next window, click on the install certificate button. - The Certificate Import Utility opens. Press to continue working. "Further".

You have to choose a repository. In the latest versions of CryptoPro, it is better to leave the default settings.
Finish working with the utility by clicking "Ready". - A message will appear indicating that the import was successful. Close it by clicking "OK".

Problem solved.


This method is by far the most common, but in some variants of certificates it is impossible to use it.
Method 2: Manual installation method
Older versions of CryptoPro only support manual installation of a personal certificate. In addition, in some cases, the latest versions of the software can take such a file into work through the import utility built into CryptoPro.
- First of all, make sure that the USB flash drive that is used as a key has a certificate file in CER format.
- Open CryptoPro DSP as described in Method 1, but this time choosing to install certificates..
- Will open "Personal Certificate Installation Wizard". Proceed to choose the location of the CER file.

Select your flash drive and a folder with a certificate (as a rule, such documents are located in the directory with the generated encryption keys).
After making sure the file is recognized, press "Further". - In the next step, review the properties of the certificate to make sure the selection is correct. After checking, press "Further".
- The next step is to specify the key container of your .cer file. Click on the appropriate button.

In the pop-up window, select the location of the desired one.
Returning to the import utility, press again "Further". - Next, you need to select the storage of the imported EDS file. click "Review".

Since we have a personal certificate, we need to mark the appropriate folder.
Attention: if you are using this method on the latest CryptoPro, then do not forget to check the box "Install a certificate (certificate chain) into the container"!
- Exit the import utility.
- We are going to replace the key with a new one, so feel free to press "Yes" in the next window.

The procedure is over, you can sign the documents.


This method is somewhat more complicated, but in some cases it is the only way to install certificates.
As a summary, we remind you: install certificates only on trusted computers!
Good afternoon!. The last two days I had an interesting task of finding a solution to such a situation, there is a physical or virtual server, on which the well-known CryptoPRO is probably installed. Connected to the server , which is used to sign documents for VTB24 DBO. Locally on Windows 10 everything works, but on the server platform Windows Server 2016 and 2012 R2, Cryptopro does not see the JaCarta key. Let's figure out what the problem is and how to fix it.
Description of the environment
There is a virtual machine on Vmware ESXi 6.5, Windows Server 2012 R2 is installed as the operating system. The server is running CryptoPRO 4.0.9944, the latest version at the moment. A JaCarta key is connected from the network USB hub using USB over ip technology. Key in the system sees, but not in CryptoPRO.
Algorithm for solving problems with JaCarta
CryptoPRO very often causes various errors in Windows, a simple example (Windows installer service could not be accessed). This is how the situation looks when the CryptoPRO utility does not see the certificate in the container.

As you can see in the UTN Manager utility, the key is connected, it is seen in the system in smart cards as a Microsoft Usbccid (WUDF) device, but CryptoPRO does not detect this container and you do not have the opportunity to install a certificate. Locally, the token was connected, everything was the same. Began to think what to do.
Possible causes with container definition
- Firstly, this is a driver issue, for example in Windows Server 2012 R2, JaCarta should ideally be listed as JaCarta Usbccid Smartcard in the smart card list, not Microsoft Usbccid (WUDF)
- Secondly, if the device is seen as Microsoft Usbccid (WUDF), then the driver version may be outdated, and because of which your utilities will not detect the protected USB drive.
- Legacy version of CryptoPRO
How to solve the problem that the cryptopro does not see the USB key?
We created a new virtual machine and began to install the software all in sequence.
Before installing any software that works with USB media containing certificates and private keys. Need NECESSARILY disable the token, if stuck locally, then disable it, if over the network, break the session
- First of all, we update your operating system with all available updates, as Microsoft fixes many errors and bugs, including drivers.
- The second point is, in the case of a physical server, install all the latest drivers on the motherboard and all peripheral equipment.
- Next, install the JaCarta Unified Client.
- Install the latest version of CryptoPRO
Installing a single JaCarta PKI client
Single Client JaCarta is a special utility from the Aladdin company for the correct work with JaCarta tokens. You can download the latest version of this software product from the official website, or from my cloud, if it doesn’t work out from the manufacturer’s website.

Next, you unpack the resulting archive and run the installation file for your Windows architecture, I have it 64-bit. Let's start installing the Jacarta driver. A single Jacarta client, very easy to install (REMINDER your token at the time of installation, must be disabled). On the first window of the installation wizard, just click next.

Accept the license agreement and click "Next"

In order for JaCarta token drivers to work correctly for you, it is enough to perform a standard installation.

If you choose "Custom installation", then be sure to check the boxes:
- Drivers
- Support modules
- Support module for CryptoPRO


After a couple of seconds, the Jacarta Unified Client is successfully installed.

Be sure to restart the server or computer so that the system sees the latest drivers.

After installing JaCarta PKI, you need to install CryptoPRO, for this go to the official website.
https://www.cryptopro.ru/downloads

At the moment, the latest version of CryptoPro CSP is 4.0.9944. Run the installer, check "Install root certificates" and click "Install (Recommended)"

CryptoPRO installation will be performed in the background, after which you will see a suggestion to restart the browser, but I advise you to completely restart.

After reboot connect your JaCarta USB token. I have a network connection, from a DIGI device, via . In the Anywhere View client, my Jacarta USB drive is successfully defined, but as Microsoft Usbccid (WUDF), and ideally it should be defined as JaCarta Usbccid Smartcard, but you need to check anyway, since everything can work like that.

When opening the "Jacarta PKI Unified Client" utility, the connected token was not found, which means that something is wrong with the drivers.

Microsoft Usbccid (WUDF) is a standard Microsoft driver that is installed by default on various tokens, and it happens that everything works, but not always. The Windows operating system, by default, puts them in mind for its architecture and settings, I personally don’t need this at the moment. What we do is we need to uninstall the Microsoft Usbccid (WUDF) drivers and install the drivers for the Jacarta media.
Open Windows Device Manager, find "Smart card readers", click on Microsoft Usbccid (WUDF) and select "Properties". Click the Drivers tab and click Uninstall

Agree to remove the Microsoft Usbccid (WUDF) driver.

You will be notified that for the changes to take effect, you need to restart the system, be sure to agree.

After rebooting the system, you can see the installation of the ARDS Jacarta device and drivers.

Open the device manager, you should see that now your device is defined as JaCarta Usbccid Smartcar and if you go to its properties, you will see that the jacarta smart card now uses the driver version 6.1.7601 from ALADDIN R.D.ZAO, as it should be .

If you open a single Jacarta client, you will see your electronic signature, which means that the smart card has been correctly identified.

We open CryptoPRO, and we see that the cryptopro does not see the certificate in the container, although all the drivers are defined as needed. There is one more feature.
- In the RDP session, you will not see your token, only locally, this is how the token works, or I did not find how to fix it. You can try the suggestions to resolve the error "Unable to connect to the smart card management service".
- You need to uncheck one checkbox in CryptoPRO

MUST uncheck "Do not use outdated cipher suites" and reboot.

After these manipulations, CryptoPRO saw my certificate and the jacarta smart card became working, you can sign documents.

You can also see your JaCarta device in Devices and Printers,

If you, like me, have the jacarta token installed in the virtual machine, then you will have to install the certificate through the console of the virtual machine, and also give rights to it to the responsible person. If this is a physical server, then you will have to give rights to the control port, which also has a virtual console.
When you have installed all the drivers for Jacarta tokens, you may see the following error message when connecting via RDP and opening the Jacarta PKI Unified Client utility:

- The smart card service is not running on the local machine. The architecture of the RDP session developed by Microsoft does not provide for the use of key media connected to the remote computer, therefore, in the RDP session, the remote computer uses the local computer's smart card service. It follows from this that starting the smart card service inside an RDP session is not enough for normal operation.
- The smart card management service on the local computer is running, but is not available to the program inside the RDP session due to Windows and/or RDP client settings.\
How to fix "Unable to connect to smart card management service" error.
- Start the smart card service on the local machine from which you are initiating the remote access session. Set it to start automatically when the computer starts.
- Allow the use of local devices and resources during the remote session (in particular, smart cards). To do this, in the "Remote Desktop Connection" dialog in the settings, select the "Local Resources" tab, then in the "Local Devices and Resources" group, click the "Details ..." button, and in the dialog that opens, select the "Smart cards" item and click "OK", then "Connect".

- Make sure the RDP connection settings are saved. By default, they are saved in the Default.rdp file in the "My Documents" directory. Make sure that the line "redirectsmartcards: i: 1" is present in this file.
- Make sure that group policy is not activated on the remote computer to which you are making an RDP connection
-[Computer Configuration\Administrative Templates\Windows Components\Remote Desktop Services\Remote Desktop Session Host\Device and Resource Redirection\Do not allow smart card reader redirection]. If it is enabled (Enabled), then disable it and restart the computer. - If you have Windows 7 SP1 or Windows 2008 R2 SP1 installed and you are using RDC 8.1 to connect to computers running Windows 8 and above, then you need to install an operating system update https://support.microsoft.com/en-us/ kb/2913751
Here was the troubleshooting for setting up the Jacarta token, CryptoPRO on the terminal server, for signing documents in VTB24 RBS. If you have comments or corrections, then write them in the comments.
What to do when an error occurs when sending reports in the "SBiS ++ Electronic reporting" program "A valid client certificate is missing" or "Access denied"? In this scenario, the report cannot be sent. The first thing that comes to mind is something with a certificate! However, you should not panic: you can fix this error yourself by checking the certificate and configuring the readers correctly. To do this, follow our instructions!
Error in SBiS++: The taxpayer "LLC "Name" does not have a valid EDS certificate (electronic digital signature).
The reasons:
- Incorrect update of the system "SBiS ++ Electronic reporting";
- There is no private key carrier;
- One of the chain of custody certificates is out of date;
- There is no valid EDS certificate (electronic digital signature);
- The carrier is missing in the added CryptoPro readers.
Solution:
Checking the presence of an EDS on the media, reloading the certificate in the SBiS ++, performing a system check.
Step 1: Checking for the presence of an EDS carrier
First you need to check the presence of the certificate on the media. If the certificate is installed on removable media, check that the media is present on the computer.
When you have made sure that the media is present in the computer or the certificate is installed in the Computer Registry, you can start checking CryptoPro.
Step 2: Run CryptoPro for verification
To check, you need to run the CryptoPro program from the Control Panel.
If you have Windows XP, then there are two ways:
- Start\Settings\Control Panel\CryptoPro CSP.
If you have Windows Vista or Windows 7, then you need to look for the program here:
- Start\Control Panel\CryptoPro CSP;
- Start\Control Panel\System and Security\CryptoPro CSP.
The shortcut of the CryptoPro program is shown in Figure 2. Run the program for verification by double-clicking the left mouse button.

Step 3: Run Administrator Rights
After the CryptoPro program window appears, it must be launched with administrator rights (this does not always happen automatically). To do this, click on the highlighted link in the lower half of the program window "Run as administrator".
After launch, this inscription will disappear - this means that you launched the program with administrator rights. Now you can start checking the digital signature on the media.
Step 4: View the certificate in the container
To view the certificate, go to the service tab.
A window will open prompting you to enter a name for the container. To select a certificate, click the Browse button.
A window with a container selection will appear on your screen. Select a container and click OK and Next.
Before you in the window "Certificates in the container of the private key" data about the certificate will appear.
If data is displayed in the viewport necessary you a certificate, you can continue to correct the error. If not - on the screen you see the data of the certificate of another organization - browse the certificate by selecting other containers until you find required certificate. When the certificate is found, click "Finish" and close the CryptoPro window.
Step 5: Reader Setup
If the required certificate is still not found in the container selection list, you can view the presence of your carrier in the added CryptoPro readers. To do this, go to the “Hardware” tab in CryptoPro, click on the “Configure readers” button in the “Private key readers” section.
The "Manage readers" window will open, click the "Add" button to check the media in the added readers.
The "Reader installation wizard" will start, in the first window click "Next", a window will appear asking you to select a reader.
In the right half of the window, in the "Available readers" section, see if your media is on this list. If present, select it and click Next, then Finish. If the required reader is not in the list, then the media is already in the list of added ones. You can continue checking.
To reload the certificate, open the program "SBiS ++ Electronic reporting" in the main window, where the "Calendar of the taxpayer" is located. Select the required taxpayer in the "Taxpayer" section and click on the "Edit" panel (see Figure 12 for an example).
Double-click to select an employee and delete a valid certificate from him by pressing the “Delete” key on the keyboard (see example in Fig. 14).
After deleting, double-click on the white field in the "Issued to" column. The "Certificate Creation Wizard" will appear, select "Install from media" and click "Next" (see Figure 15 for an example).
In the next window, select the “Upload certificate” item, a window will appear with the choice of a container (see Fig. 16 for an example).
If you click on the certificate with one click, all information about the owner of the certificate will appear. After selecting the certificate, click "Select" and "Finish".
After performing the previous steps, it is advisable to conduct a full system check by clicking the "Service" button on the top panel and selecting the "System Check Protocol" item. During a communication session with the operator, windows may appear prompting you to install a certificate, respond to all such offers "Yes". If the system check protocol ended positively, then the system is ready for reporting. In this case, re-sign the report that you were trying to send before the error occurred and send it again.
The introduction of modern means of personal identification is a huge step in the development of electronic document management. Many believe that the development of such a direction does not make practical sense, that the use of such tools is necessary only for a small number of users and nothing will exceed a simple signature in reliability and convenience, but this is far from the case.
An electronic digital signature allows you to determine the authenticity of a person in a digital workflow, which significantly increases its efficiency and saves time and money.
An electronic digital signature (or EDS) is, in fact, electronic props, which allows you to protect the digital version of any document from forgery. The legislator defines an EDS as an analogue of a handwritten signature, which is used to identify a person in electronic document management.
 In practice, several variants of EDS are used.
Does not contain cryptographic protection elements. Security is ensured by using a login, password and connection codes.
In general, it is used only for the actual identification of the user, and is not used to protect a specific document.
Such a signature can still certify documents, however, this requires execution certain conditions:
- adding to a specific document;
- use complies with the internal rules of workflow;
- the presence of information about the identity of the sender of the file.
Unskilled refers to an enhanced signature, but the degree of its protection is less than that of a qualified one. However, in this case cryptographic methods of protection are already used. Using such a signature allows not only to sign a document, but also to make changes to it with their subsequent confirmation.
Qualified i is considered the most secure option. Cryptographic protection methods are used, the confirmation of which is carried out by special authorities. It is difficult to use in practice, but there is a definite plus - reliability. You can connect such a signature only in a special certification center.
When signed with such a seal, the document is equated to a paper counterpart signed by an official, with a special seal.
Methods, services and test results
The use of EDS is undoubtedly practical and convenient. However, each user must have the skills to check its validity, which protect against possible violations by counterparties.

Checking is not difficult. To do this, just use one of several services. So, you can check the authenticity of a document signed with an EDS by uploading it to the site crypto.kontur.ru.
This service will allow you to quickly analyze the document and get the result. To use it, you need to properly configure your computer, but it's not difficult, you just need to follow the instructions on the site.
If you can’t install the ES on your computer on your own, you should contact the certification centers. At the end of their work, an act of installing an electronic signature means is drawn up.
The second service provided by the State Services Portal is also not difficult to use. Using the link www.gosuslugi.ru/pgu/eds, you can download a file signed with an EDS, and the service will verify its authenticity.
Using the www.iecp.ru/ep/ep-verification service, you can verify not the document, but the signature itself. It is necessary to upload a file of the appropriate format, the system will check:
- Certificate validity period.
- Whether the signature is on the revoked list.
- Whether the EDS belongs to the number issued by accredited centers.
The most popular way to check is to check through the State Services portal. However, there are many more services that are approximately the same in terms of their effectiveness.
In general, verification methods can be divided into two types:
- Verification of a document signed with an EDS.
- Checking the EDS itself.
Both methods are recommended for best performance. In addition, it is periodically necessary to check the EDS itself in order to exclude its invalidity.
Another way to check the EDS is to install the appropriate program on a PC. Typically used CryptoPro because of the many full-fledged functions for working with EDS.
The result of any verification is confirmation or non-confirmation of the authenticity of the digital signature or the document signed by it. Such services simply need to be used for work, as they fully allow you to ensure the security of electronic document management.

In the event that work through is carried out on an ongoing basis, then the use of software from CryptoPro is recommended.
How to install an EDS
To install an ES on a PC, you will need to download the appropriate software and follow the instructions.
Programs
First of all, you need to install on your computer CryptoPro CSP program. Further:
- Run the program in any of the ways. As an option - open the Control Panel, the "Programs" menu and find the one you need there, or find it through the search if the location is not known. The launch is performed on behalf of the administrator.
- After starting the program, a window will appear in which you need to find the "Service" tab.
- Next, look for the menu "View certificates in the container."
- The "Browse" window appears, in which you can see information about the name of the container and the reader. Press OK.
- In the next window, "Certificates in the Private Key Container", no action is required. Just skip it by clicking Next.
- A window with user data will appear. You need to select "Properties".
- We install a new Certificate, for this we select "Install Certificate".
- In the next window, do nothing and just click "Next".
- Next, you need to select the item "Place all certificates in one store", for this we click "Browse" and select the "Personal" folder.
- The last step is to click Finish.

Plugins
There is also a useful plugin from CryptoPro that allows you to create and verify signatures on web pages. CryptoPro EDS Browser plug-in can work with any modern browser, including Chrome and Yandex.
Many people think that it is necessary to use Internet Explorer to work with EDS, but this is not so. It is enough that the Internet browser supports Java.
This plugin allows:
- Sign documents for electronic document management.
- Validate web form data.
- Notarize any files sent from the user's computer.
- Sign messages.
Using the plug-in, you can check both a regular ES and an improved one. An important plus is that it is distributed completely free of charge.
No special skills are required to install the plugin, everything happens automatically. You just need to run the installer file, then select "Run", "Next" and "OK". The program will do everything itself.
If you encounter any difficulties with installing or operating the program, you can always contact the company where the signature was purchased for help. In most cases, they give detailed instructions and provide assistance over the phone.
Setup and activation
For the full-fledged operation of the EDS, its correct configuration and activation is required. For this, it is necessary, in addition to installing the CryptoPro program and the corresponding plug-in, to install a number of system programs and drivers which will ensure stable operation.
- First of all, the Rutoken drivers are installed. To do this, you need to run the installer file, before that, remove the electronic identifier from the USB. After starting, follow the instructions of the program.
- After installation, you should restart your computer and connect the ID. The system will automatically detect it.
- Next, CryptoPro CSP is installed. This step was described in the previous section.
- After these manipulations, you need to install the root certificate. It must be downloaded from the certification center website. Then you need to find the cacer.p7b file among the downloaded files, click on it with the mouse, right-click, and select "Install certificate". Click next, then select "Place certificates in one store", then "Browse" and select "Trusted Root Certification Authorities". Then "Next" and "Finish".
- If a pop-up window appears, you will need to click "Yes" several times, then "OK".
- The next step is to install a personal certificate. Click on Start and look for CryptoPro CSP. Select "Service" and "View certificates ...", then "Overview". We choose and accept. After acceptance, a pop-up window will appear in which you should enter the pin code of the electronic media, and then click "Install".
- The next important step is to bind the key to the certificate. As a rule, it occurs automatically, if not, then you should be guided by the instructions of the certification center.
- You should also install CAPICOM, which is distributed free of charge on the Microsoft website. You need to run the installer file and follow the instructions.
Proper configuration of the electronic signature will avoid many problems. Therefore, all steps must be done very carefully. If you have any questions, it is better to once again contact the certification center.
Detailed instructions for installing and activating the CryptoPro program can be found below.
FAQ
How reliable is the use of EDS?
The reliability of the use of an electronic signature is at a fairly high level; a regular digital signature is equated to a handwritten signature. It is almost impossible to hack the system, and the chance of forging it is much lower than the chance of forging a handwritten signature.
Is it relevant to obtain an EP for an individual?
Federal Law can use a signature for any electronic document management. In addition, the use of such a signature significantly expands the capabilities of the public services portal.
How much does an ECP cost?
The cost of an electronic signature is not very high. For an individual, it will cost about 1,000 rubles, the maximum cost for a legal entity is up to 2,500 rubles.
How to install and configure Rutoken, you will learn from this video.
We are often asked the question how to install a certificate through CryptoPro CSP. There are different situations: a director or chief accountant has changed, a new certificate has been received from a certification center, etc. Everything used to work, but now it doesn't. We tell you what you need to do to install a personal digital certificate on a computer.
You can install a personal certificate in two ways:
1. Through the CryptoPro CSP menu "View certificates in the container"
2. Through the CryptoPro CSP menu "Install personal certificate"
If the workplace uses the Windows 7 operating system without SP1, then you should install the certificate according to the recommendations of option No. 2.
Option number 1. Install through the menu "View certificates in the container"
To install a certificate:
1. Select Start -> Control Panel -> CryptoPro CSP -> Tools tab and click the “View Certificates in Container” button.
2. In the window that opens, click the "Browse" button. Select a container and confirm your choice with the OK button.

If the message “There is no encryption public key in the private key container” appears, proceed to install the digital certificate according to option #2.
4. If you have “CryptoPro CSP” version 3.6 R2 (product version 3.6.6497) or higher installed on your computer, click the “Install” button in the window that opens. After that, agree to the suggestion to replace the certificate.
If there is no "Install" button, in the "View Certificate" window, click the "Properties" button.

5. In the “Certificate” window -> “General” tab, click on the “Install Certificate” button.

6. In the "Certificate Import Wizard" window, select "Next".
7. If you have the version of “CryptoPro CSP” 3.6 installed, then in the next window, just leave the switch on the item “Automatically select a storage based on the type of certificate” and click “Next”. The certificate will be automatically installed in the "Personal" store.


Option 2. Install through the menu "Install personal certificate"
To install, you will need, in fact, the certificate file itself (with the .cer extension). It can be located, for example, on a floppy disk, on a token, or on a computer hard drive.
To install a certificate:
1. Select Start -> Control Panel -> CryptoPro CSP -> Service tab and click the “Install personal certificate” button.

2. In the “Personal Certificate Installation Wizard” window, click the “Next” button. In the next window, to select a certificate file, click "Browse".

3. Specify the path to the certificate and click the "Open" button, then "Next".
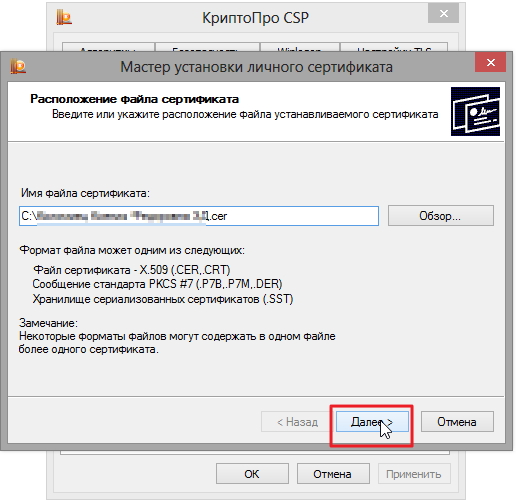
4. In the next window, you can view information about the certificate. Click "Next".

5. In the next step, enter or specify the private key container that corresponds to the selected certificate. To do this, use the "Browse" button.


If you have CryptoPro CSP 3.6 R2 (product version 3.6.6497) or higher installed, check the “Install certificate in container” box.

8. Select the "Personal" storage and press OK.

9. The storage you have chosen. Now click "Next", then - "Finish". After that, a message may appear:

In this case, click "Yes".
10. Wait for a message about the successful installation of a personal certificate on the computer.
That's it, you can sign documents using the new certificate.


")


")


