After carrying out the primary installation of the Windows 10 operating system from the removable media, it is necessary to make it activate to confirm license rights to possession of this version. This is required in order to exclude the use of pirate content and reconciliation of the license key of the product with the operating keys of the Microsoft Corporation. Before entering the key, the system will work in a trial mode for thirty days, after which it will stop running. For the deadline, the user is required to activate or uninstall the system. Windows 10 will automatically remind you of the need to activate each time launch, displaying a watermark with text-reminder in the lower right corner. It is sometimes annoying many users, because of which they start looking for ways to remove automatically pop-up inscriptions. The removal process itself is not much labor and does not require special training.
Why a watermark appears with Windows 10 activation
A watermark with a reminder of activation may appear in test versions, in pirated copies of the licensed OS or if a user for any reason forgot to activate Windows 10 after the installation is completed to the computer.
Activation of Windows 10 appears on the desktopThis feature is fixed in the registry and does not have any effect on the speed and performance of the computer. You can use the non-activated version of Windows 10 (with some limitations), but it is not too convenient. Most users try to remove annoying reminders using third-party programs or edit branches in the registry.
There is a specific series of rules that need to be observed when removing a watermark resembling activation, as in most cases a third-party software is used. Often, do not everyone wants to risk and change records in the registry, it is fairly fearing to violate the normal performance of the computer.
Basic rules requiring compliance when removing a watermark:
- always create a system recovery point before starting the watermark removal using the registry;
- use software only from official manufacturers sites;
- ways to remove watermarks and reminders of activation should have good recommendations on the network and be repeatedly proven.
If you do not fulfill at least one of these rules, then no one guarantees you that the result of the removal of a small problem will not be a big problem, entailing a complete reinstalling of Windows 10.
How to remove the inscription about the activation of Windows 10
There are several ways to remove the automatic reminder of the system to activate the software product. Sometimes the result is achieved immediately, sometimes you need to sort out several ways to succeed. The main ways to remove a watermark with an inscription on Windows 10 activation include the use of third-party software programs and registry proofreading. In addition, you can use the built-in system software, but in home versions not all functions to remove notifications are included in the Windows 10 installation package.
How to remove the inscription on activation through the registry
There are two easiest ways to remove the inscription on activation.
The first way:

The second method (for those who fear manually enter registry proofreading):

Remove activation alert by third-party programs.
Remove a watermark with an inscription about the need to activate Windows 10 using third-party programs. There are several such programs, and they are repeatedly tested in fact by various groups of users.
Universal Watermark Disabler utility has the following advantages:
- can quickly erase watermarks on any version of Windows;
- carries out support for any languages \u200b\u200bwhen working;
- does not harm system files;
- instantly removes all watermarks on the display.
Operation with the utility:

Video: Deleting watermarks using the Universal Watermark Disabler utility
In addition to the most common universal Watermark Disabler utility, two small utilities are used for the same purposes:

How to delete an activation window and disable pop-up notifications
Remove the activation window and turn off the notifications in Windows 10 using the built-in "Notifications and Actions" service.
This service includes the following functions:
- allows and prohibits the emergence of Windows 10 pop-ups and third-party programs;
- allows you to show a system of alerts about various events and received from the network updates;
- using the pop-up menu speeds up the process of extracting removable media, activation and disabling various adapters.
Using this service, you can disable boring notifications, block them and disable the notification center.
Disconnect the notification center
In Windows 10, you can disable the notification center in three different methods:
- using the change in Windows 10 parameters;
- by editing the Windows 10 registry;
- by changing group policies of the system.
Disable notifications to change parameter settings
This is the fastest way to prohibit the emergence of unnecessary notifications on the display. It is performed in several stages:

Video: Disable notifications by changing Windows 10 parameters
Turn off pop-up notifications using the registry editor
This method is suitable for users who have already confidently feel, working in the registry editor. The changes to be made to the registry and disabling alerts require action on the following algorithm:

Now pop-up alerts are disabled.
It should be borne in mind that in the latest versions of Windows 10 versions, regardless of the user's desire, the settings for switching off the notifications in the registry can already be created. This can be traced only with a clean installation from a licensed distribution.
Turn off the notifications when changing the general group policy
Video: Disconnect the notification center and pop-up notifications
Deleting watermarks and notifications in Windows 10 is a pretty light process. At the same time, it is necessary to clearly represent that they were not accustomed. It is quite possible that the activation for some reason has not passed or has failed in system files. Watermark, deleted earlier as the boring, will not appear. This may lead to the fact that at the most unsight now you will not be able to start the system and see a warning warning to end the period to activate Windows 10. You will need to spend time searching the key that, as always, will not be at hand. Therefore, it is necessary to think well, whether it is worth removing watermarks and inscriptions about the need for activation.
Each version of Windows carries a specific set of installed programs, functions and applications, while the user can disable (delete) unnecessary features, or add those that are needed, but not installed by default. Removing unnecessary functions, programs or applications, it is possible to release quite a lot of disk space, which is especially relevant for 100-dollar tablets, which have recently flooded the market.
In this tutorial we show you how to add or remove components in Windows 7, Windows 8 and Windows 8.1.
All the necessary actions we will produce in the window called "Windows Components".
How to open "Windows Components" in Windows 7
Box "the Windows Components" section can be accessed from the "Uninstall or change a program" (which is also known as the "Programs and Features"). The easiest way to open "the Windows Components" is to use the "Start" menu. To do this, open the menu, enter "switch components" into the search box and click on the appropriate item in the search results (see. Screenshot below).

How to open "Windows Components" in Windows 8 and 8.1
press the key combination Win + S, type "switch components" on the desktop, and then in the search results, click on the "Enable or disable Windows features."

In addition, there is another way that also works in Windows 7. Open the "Control Panel" and in the "Programs" section, click on the "Delete Program" link.


As a result, you will see the Windows Components window.
How to remove Windows components
Windows Components Window is a list of all functions, programs and applications available for a specific version of Windows. Components, which are marked by a flag, already installed and available on your computer. To view more information about a feature, simply hover your mouse over.

To remove the component or program, simply remove the check mark. You can delete several components at once. After that, click "OK".
When you remove the checkbox, you will see a warning that the function shutdown may affect other components, programs or settings. To learn more, you can click on the link "Details on the Internet" at the bottom of the warning. If you agree with the consequences of your choice, click "Yes." Otherwise, click "No" and the removal process (disconnection) will be canceled.

Windows requires time to make the necessary changes. Some features may not be removed or disconnected without having to reboot the system. If in the case of the function you chose, everything is the case, you will be informed that Windows has completed the requested changes.

After deleting some components, Windows can inform you that in order to apply the changes, you need to restart the computer. Click "Restart Now" and wait for the process to complete. Keep in mind, the reboot will take longer than usual, since the operating system will be required to spend extra time for setting up itself according to your instructions.

How to add Windows Components
Adding components in Windows consists of the same actions as their removal. The only difference is that instead of removing the flags, they need to be installed.
During the installation process, depending on what you have chosen to install, Windows can request permission to download some files from Windows Update. Let the operating system do this to successfully complete the installation. And in some cases, Windows may even ask the installation disk of the operating system.
Conclusion
Is there any sense to remove some unused components and programs if you do not have enough disk space? The answer is yes!
For example, if you, being a user of Windows 7, do not use gadgets, Windows Media Center, DVD studio, "Internet games", "Other games", as well as a fax and scanner, the removal of these components will allow you to free a total of 0.24 GB (245 MB). This is a decent savings when the disk space is a real issue.
Excellent day!
Windows Hot keys are used to simplify (acceleration) of the user's work with a computer. This is achieved by minimizing the user with the mouse.
Most combinations use a key combination with Windows logo with other keyboard keys. For example, key combination Windows +.M. Folds all open windows. Agree, it is much faster and more convenient than turning all the windows separately.
Now let's go directly to the topic of the article. Although these shortcut keys are designed to simplify the life of the user, in some cases there is a need to turn them off. How to turn off the Windows hotkeys? Let's consider several options.
Using gpedit.msc.
1. Cover the menu Start.
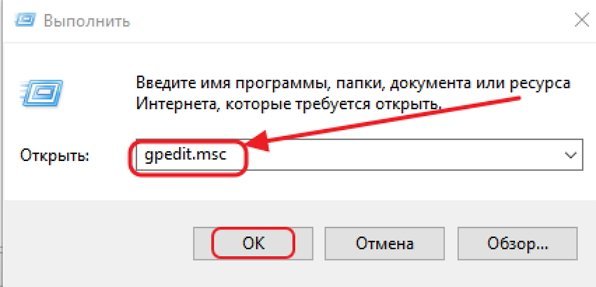
2. Select Perform.
gpedit.msc.and press ENTER.

If you have Windows 7 Home Premium, Home Basic or Starter, then to start the gpedit.msc use the instructions.
4. In the window that opens , on the left in the menu tree, select items User Configuration - Administrative Templates - ComponentsWindows - conductorWindows
5. In the list of parameters on the right we find the string Disable keyboard shortcutsWindows +.X. And click on it 2 times.
6. A window will appear in which you want to select item. Enable and press OK..

7. Close the window Local Group Policy Editorand reboot the computer.
As a result of the execution of the above actions, all hot keys using the key will be disconnected. Windows.
Using the registry editor
Attention! Incorrect use of the registry editor can damage your computer's operating system. Therefore, very carefully follow the items described below. It will not be superfluous to create a system recovery point.
1. Cover the menu Start.
2. Select Perform.
3. In the window that appears, enter regedit.and press ENTER.

HKEY_CURRENT_USER \\ SOFTWARE \\ Microsoft \\ Windows \\ Currentversion \\ Policies
If in paragraph Policies.present section Explorer, then go to paragraph 7.
Policies. Create, then Section.

6. Rename just created section in Explorer.
7. Press the right mouse button on the section Explorerand in the context menu select the item Create, then ParameterDWORD (32 bits).

8. Assign the name created by the parameter. NowinKeys..
9. Right-click on the parameter NowinKeys.and choose paragraph Change.
10. Enter the value 1 and click OK.
11. Close the registry editor window and reboot the computer.
As with the first option, in this case all hot keys using a key will also be disabled. Windows.
Disconnecting selected hot keys
Both variants described above are disabled all hotkeys. But how to disconnect individual hotkeys? To do this, you need to perform the following actions:
1. Cover the menu Start.
2. Select Perform.
3. In the window that appears, enter regedit.and press ENTER.
4. The registry editor opens in which you need to go to the next section:
HKEY_CURRENT_USER \\ SOFTWARE \\ Microsoft \\ Windows \\ CurrentVersion \\ Explorer \\ Advanced
5. Press the right mouse button on the section Advancedand in the context menu select the item Create, then Expanded string parameter.

6. Assign the name created by the parameter. DisabledhotKeys..
7. Right-click by parameter DisabledhotKeys.and choose paragraph Change.
8. Next, you need to enter the characters used in the combinations of the Windows hotkeys that you want to disable. For example, if you want to prohibit combinations Windows + R. and Windows + E.then you need to assign a value to the string parameter Re..

Now consider an example in which you need to prohibit a combination with the key that is not associated with any letter of the Latin alphabet or a digit. In this case, you need to use virtual key codes and a table of ASCII character codes.
Here we will not disassemble what the codes of the virtual keys and give the ASCII code table, because On the Internet on these issues of information is enough. Consider only one option on the example of a combination of hot keys Windows +.HOME.
And so, key HOME corresponds to the virtual key code 24 . But we are in the string parameter DisabledhotKeys.you need to enter a symbol. Therefore, using a table of ASCII character codes, find what character corresponds to the number 24. In this case, it is a symbol $ .
Now, if we want to disable hotkeys Windows + R., Windows + E.and Windows +.HOMEneed to in the string parameter DisabledhotKeys.enter the value Re $.

9. Close the Registry Editor and restart your computer.
That's all. Now that you know how to disable Windows hot keys in three different ways.
Sometimes it is vital to learn how to disable the Windows key on your keyboard to onaya, in the case of accidental operation, do not interfere in the programs, games, or somewhere else.
My colleague Eugene, from the project otstrel.ru, known to you on the cycle of articles about working with the video, found how to do it and wrote a wonderful article, which, in fact, is in front of you.
Ways to do a few signified and choose the most convenient, of course, only to you.
Go.
How to disconnect the Windows key - Press method - manual editing in the registry
- "Start" - "Run" - write "regedit" - Hit OK
- Go to B. HKEY_LOCAL_MACHINE \\ SYSTEM \\ CURRENTCONTROLSET \\ CONTRO L \\ KEYBOARD LAYOUT
ATTENTION! Nearby there is a Keyboard Layouts - do not miss, we need a single number - Create a new binary value, called him Scancode Map and assign it a value, which is selected from the following list, depending on what you want to disable. Tsiferki will have to drive manpone, because Copy-Paste does not work in this place
- After that you need to overload
If someone is afraid to do such operations, then here you screenshots of how it should look like (increase click-through):


If you want to return, as it was then simply remove the option from the registry Scancode Map
- Disable both Win keys
00 00 00 00 00 00 00 00 03 00 00 00 00 00 00 00 5B E0 5C E0 00 00 00 00 - Disable only the left key WIN
00 00 00 00 00 00 00 00 02 00 00 00 00 00 5b E0 00 00 00 00 - Disable the right WIN key and the MENU key (it is also right)
00 00 00 00 00 00 00 00 00 00 00 00 00 00 5C E0 00 00 5D E0 00 00 00 00 00 - Disable both WIN keys and the MENU key
00 00 00 00 00 00 00 00 04 00 00 00 00 00 00 E0 00 5B 5C 5D E0 00 00 E0 00 00 00 00
Ready.
If it does not work, I do not like this method, then go to the second.
How to disconnect the Windows key - in the second method - an automated edit in the registry

What to do:
- In the picture of the keyboard, poke the mouse to the button that we want to disable
- I poke into the "Disable Key" button, after which the information entry will appear in the right field
- Repeat items 1 and 2 with all the keys that we want to disable
- Poke the "apply" key


")


