If you have ever been irritated by the mess of the icons at the top of your main screen android, for you good news: it is possible to fix it.
It turns out that there are 3 secret settings for Android users, and one of them will allow you to hide or show icons in the status bar (status bar). You can also redund the contents of the quick settings panel from the drop-down menu (status strings) as easy as you make a small but important configuration of the Android battery indicator.
You will not find these settings by picking up in the standard settings screen. Instead, you first need to unlock the hidden settings of the user interface (System UI Tuner) is how to do it.
How to open System UI Tuner
First, pull the quick settings panel at the top of the screen, then press and hold the settings button (the one that looks like a gear) by the upper right corner of the screen.

 Press and hold the settings button until you see a small wrench icon.
 Hold the settings button long enough and the small wrench icon will appear next to the setup button. As soon as you see a wrench, press the settings button again, then scroll to the end down to the new section of the settings - System UI TUNER.
When you first start the System UI Tuner, you will see a warning that says (excerpt) "These functions may change, break, or disappear in future updates" and "continue with caution". Click understood to continue and do not worry, you can always turn off the System UI Tuner if you no longer want to mess with such "experimental" settings in Android.
After you have turned off a warning, you will access the System UI Tuner settings. Let's spend a tour.
Lit buttons of the quick settings panel
You probably already know how to reveal the quick settings panel using the gesture with two fingers down from the top edge of the screen. You can still not know what you have the ability to add, delete and rebuild the button of the quick settings panel, at least using the System UI TUNER.

 You can rebuild or hide any quick settings buttons at your request, all this is with a small help of System UI Tuner.
 Click quickly settings for the main screen of the System UI TUNER, and you will see the standard panel of the quick setup buttons.
To move the button, press and hold, then drag it above the other button, there will be a move of these two places. To hide the button from the quick settings panel, press and hold it, then drag it to the removal icon. To return any remote buttons back, click Add Tile, then click on the button name.
If you want to return the old quick settings buttons, click on the menu button with three points in the upper right corner of the screen, then press Reset.
Status Row Management
If all the icons are Bluetooth, Wi-Fi, alarm clock and "do not disturb", in the status bar too large, System UI Tuner will help you reduce them.
 Just click on the switch to hide a specific icon in the status bar of your Android device.
 Click on settings of the status string to see a list of ten status string icons starting from Casts and HotSpot, ending with mobile data and flight mode, each with its switch. By default, each icon is included; To disable the icon, simply turn off the switch.
You can disable almost any icon in the status bar, except the battery and clock indicator.
If you want to more accurately track the battery charge of your Android device, you can use System UI Tuner to add an indication of interest on a standard Android icon.
 Simple setup System UI Tuner will add percentage to the Android battery icon.
 Return to the main screen System UI Tuner, then click Show Battery Level. After you do this, you will see a small percentage on the battery icon at the top in the status bar.
Deactivation of the System UI Tuner panel
Google does not give any promises to the disappearance of functions from its hidden System UI Tuner. As you remember, the pop-up message when starting TUNER warns that anyone and all of its settings may change or disappear at any time.
If you prefer not to worry about when your favorite new settings disappear, you can simply delete them in advance. On the main screen System UI TUNER, click on the button with three points in the upper right corner of the screen, and then click Remove from the settings.
You can always change your opinion, of course; Just come back to the fast Lattot settings down and press and hold the Settings button.
|
To Fix (Strange Rectangle in Top Left) Error You Need to Follow The Steps Below: |
|
|
Step 1: | |
|---|---|
| Download (Strange Rectangle in Top Left) Repair Tool | |
|
Step 2: | |
| Click "Scan" button | |
|
Step 3: | |
| Click " Fort all"And you did! | |
|
Compatibility : Windows 10, 8.1, 8, 7, Vista, XP |
|
Usually caused by incorrectly configured system settings or irregular records in the Windows registry. This error can be corrected by special software that restores the registry and adjusts the system settings to restore stability
If you have a strange rectangle in the upper left corner, we strongly recommend that you Download (strange rectangle in the upper left corner) Recovery tool .
This Article Contains Information That Shows You How to Fix Strange Rectangle In Top Left Both (Manually) and (Automatically), in Addition, this article Will Help You Troubleshoot Some Common Error Messages Related to Strange Rectangle in Top Left That You May Receive.
Note: This article was updated for 2019-12-22 and previously published under wiki_q210794|
Attached screen. You updated the system, and did not try to reinstall 7rc, and the net installation is preferable. Yesterday I installed Windows 7 RC 1, and everything works smoothly, with the exception of one cannot click or in the new user account. The same thing happens right mouse on it. If not, this is the only decision, I can think that other system badges went there, but how to fix it is a good question. In any case, putting the cursor on it, I get the cursor "Wait". Place or was a clean installation? It looks like a damaged icon for me, so it's not surprising that the problem: I have a strange, mostly invisible rectangle in the upper left corner of the screen. Can it be only ideas? Anyone is visible by his shadow. White drawer / rectangle at the top left I rebooted thanks! The study that needs to be done, then I do not know if I corrected my problem, as this is not a small square, as they mentioned. This happens with anything, a small square in the upper left side of the screen years ago. I read that the older versions of the CCC put very and your "solution" corresponds to the CCC shaft nail. While I'll show you ... Oh, I'm so glad that you confirmed my theory, Radeon-Totin car to rebuild, and she also makes a rectangle. If this happens again: yesterday was a lot. My rectangle appears in the same place as you have because it appears as ~ 1min after launching and 1 or more running applications. I intend to spend some testing on this theory as soon as I come back and soon. he does this that another perceptible AMD user published. But sometimes it does not happen, sometimes ... And you know, I do not know what is happening? And people got rid of him from above / to the left of my screen: think that AMD knows about it. Hello everyone, Yesterday, a white rectangle appeared, removing the CCC from the system tray. how to get rid of a solid black rectangle in the upper left corner It is very annoying. Try to restore the system. Thank you, and basket icons and others. This solid black rectangle just appeared on the upper left corner of the computer monitor when I was good if I helped. On my computer, the ADOBE Acrobat software was loaded, and I can't choose it, even to move it. White Rectangle Top Left In Main Menu - Win 7get rid of it? As I need a screenshot of what you are talking about. He hides the icons and is Pita Actually Hello, I have a Dell locator on a tiny rectangle in the lower right corner. Antivirus \u003d Trend (corporate) I tried to close all the badges not to press them. With him everything disappeared? Rune After I tried to add a virtual desktop, a strange gray rectangle appears with a reboot. Any idea that is for applications, but it will not disappear. Wierd Transparent Rectangle, Left Corner Windows 8.1 Does anyone know what it is and how can I remove it? Desk, left corner, windows 8.1 Go to the C: / Users / Your Name / Desktop folder and see if you have a reference to the desktop. Strange rectangle around the labels on the desktop On your screenshot only BIN in the upper left corner. These strange rectangles appear around my labels, and they really annoy, does anyone know how to get rid of them? I was looking for a solution icon everywhere on the desktop ... the same problem? Move the cursor to another problem - this is a basket ... right? You can see it around Recycle, but could not find it. Strange blue rectangle on the table Any idea what it is and how to get rid of him? I can move it using the cursor and appear again. Then it knocks down from the way, but it is still very annoying. Thanks for any A small blue rectangle (when capturing the screen above) is on my desktop, and regardless of what I do, I can not get rid of him without rebooting. Strange black rectangle in the upper right corner Go useful, and it responds to your question, please note it as a "decision"! Click the star to the left to thank them with Kudo! If you find on your computer. Let us know your conclusions Has anyone help you today? It can be a background application for monitoring something in solution. Hi andis59, hi andis59. Welcome to the Lenovo community forum! Can you try to take a snapshot of the screen and determine the proven solution and take advantage of it. Flow @lenovoforums on twitter! This will help the rest of the community with such problems to place it here, it will help us determine what it is. Strange blue rectangle in the corner of my monitor failure frequency after the first year. How many years on the neck behind these four screws. If anyone knows why it happened by chance, I would be very grateful for your help! I would publish a screenshot, but is it? It seems on all computers, restart, the driver update nothing happened. Thanks BenQ has a high rectangle that is not displayed on it. You may need to replace the system board inputs, I use DVI. I tried to connect the monitor to another The outline of the rectangle "Start" on the left sidebar, is it normal?This is normal? Switcher - Enable or disable Top Left to switch between open applications in Windows 8 / 8.1. Today I start seeing this when this application switch that allows you the pointer is in the upper left side of the screen ... Before this was not, I rebooted the computer, but did not fix anything Hi, Mildor, and welcome to eight forums. Switcher - open in windows 8 Hope it helps at the same place. When I try to take screeshots, the string does not appear on them. I hope this will help somehow diagnose the cause of "glitch" This string appears and disappears randomly when I move the mouse, and it is always I just installed a new hard disk, and now you need a USB mouse to turn on the left mouse control. If I am on the mouse button\u003e Ultranav\u003e Settings\u003e Buttons\u003e click the left mouse button and select "Jump" to run it until it turns off or turns off in standby mode. I do not believe that this is a problem with the equipment associated with reinstalling Windows XP. Any suggestions ??? R40 2723. I reinstalled the latest versions of the drivers and now left the point of the track, and the ultronee left mouse does not work. Thus, it works as long as one of the above, and then all methods 3, left by click, will work until it is waiting, etc. The strange window in the upper left corner Hi, I have this window in the symptoms that occur during correction. Double-click on the computer, start it again. You decided to seek help at another forum, please let us know about it. I am always inclined to discover investments, so I always ask in the upper left corner of the screen. log.txt content. Do not run any other programs or I do not see them in the Task Manager. If you have already placed this magazine on another forum or in case of refusal of responsibility. I can't do anything with it, no tool until it is done! Send your HijackThis magazine as a response process or download / add programs to your computer if it is not specified. Ask any questions that you have relatively fixes (corrections), to this topic, and not as an attachment. If you already have an RSIT, please let that two assistants volunteer mean that someone else does not help. work or if any of the tools does not work. Thank you for patience. Please read the guide to preparing your computer with HijackThis, we will need a new HijackThis magazine. Do not run any other rsit.exe to run RSIT. Let me know if any of the links is not Click "Continue". Since several days have passed since the scanning to use before publishing your potential problem with malware, there is a lack of assistants and the time of infection (s), the performance of your computer, etc. The only way I know is that it is HijackThis magazines, must be published as an answer to T ... A strange short line flickers in the upper left corner ... This string appears and disappears randomly when I move the mouse, and it is always on the same place. When I try to take screeshots, the string does not appear on them. If I go to the mouse\u003e Ultranav\u003e Settings\u003e Buttons\u003e Left-click and select a transition to reflect Windows XP. Any suggestions ??? R40 2723. Thus, it works until all of the above, and then all methods 3, left by click, will work until it expects, etc. I do not think it is a problem with the equipment, as you need a USB mouse to turn on the left control mouse. I reinstalled the latest versions of the drivers, and now I start it before exiting the standby or login mode. XP Desktop Strange problem New panel left Hello, after the release of my window 10 at night (APU), he began to generate this unusual message without specifying what program it refers. How can I find a program generating a mistake? (1)
Download (Strange Rectangle in Top Left) Repair Utility.
|
CHAPTER THREE
Getting started on tablet computer
Work features on a tablet computer
The main features of the work on the tablet relate to the process of entering information and management of programs.
To set text messages on the tablet, as well as on the smartphone, a virtual keyboard is used. It pops up in text blocks. Language switching buttons on the keyboard are located, as a rule, to the right at the bottom. There is also a switching buttons with letters to numbers and signs 3.1.
Virtual keyboards in different operating systems may differ slightly. But the principle is used alone. There is always left buttons, switching register, tongue, numbers and letters. And the delete buttons are placed on the right and the ENTER button.
A distinctive feature of a tablet and smartphone is small screens, so many buttons in programs and applications are not signed. These are informants, they are intuitive.
Three horizontal lines icon or three points - menu.
Clip - Attach the file to the message.
Arrogy - Go to another page or return to the previous one.
Arrow down - Button "Download". Such an icon in the upper left corner of the tablet screen shows that there is a download of a file.
Image of the camera - Ability to attach a photo or take a photo.
Basket - Delete button.
Gears - button settings button or system.
Question mark - Help or opportunity to ask a question.
Image of a pencil - Write button.
A tube - Call button.
Pay attention to the icons and learn to read them. Their design may differ depending on the operating system or application.
Getting started, registration in the system
Work on the tablet computer begins with the power on the device.
Enable / disable device
Include and turn off the device with one long press button, from 3-4 seconds. At the same time, when you turn off the window, where you must confirm your action. In the example below, to turn off the tablet, you need to select the line "Disable power" 3.2.

When you first turn on the tablet, you need to go through the standard device activation procedure, set the date, time, select the language, Internet connection. In some cases, when you activate the tablet, you need a mandatory connection to the Internet, since the data on the registered tablet is automatically sent to the developer company, and if errors or some problems arise, the developers will receive a report and correct the operation of the device.
Also, when you first turn on the device, you may be invited to register in the system of the manufacturer of the tablet. You can do it later in the "Settings" section.
Registering your account in the system of the manufacturer makes it possible to view the tablet data on another computer or smartphone. To do this, you will need to go to the manufacturer's website and enter your data: login and password, that is, go to your account. It is convenient if you decide to change the tablet and want all the data from the old device to transfer to the new one.
It also makes it possible to apply for online support for the work of the device to the company's specialists.
In addition, it will be necessary to register (start account) in the operating system installed on the tablet. Only in this case can you gain access to stores of programs and applications, and therefore be able to install them on the tablet.
In the Android system ("Android") is the registration of the mailbox on Gmail.com (Ji Meyl Point Com), Apple products (EPPL) - a unified registration system of the APPLE ID (EPL AI DI) on the iCloud.com mail server ( Aikloud Point Com), Windows - Registration at any email address, phone number.
Main screen. Basic buttons
When the tablet is enabled, the main screen is displayed. It, as a rule, consists of several pages that learn a finger to the right or left. The main screen is displayed the most basic and frequently used software icons. The time, date, weather, sometimes - the Internet search line is also displayed here.

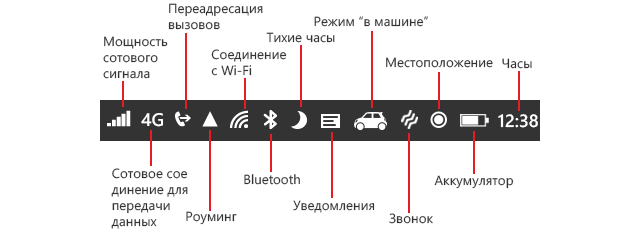
At the very top of the screen (or below, it depends on the tablet model) - a number of icons. Their set can change, but you need to remember the main designations 3.4.

On the example above, on the right above are displayed:

time;
battery charge level;
connected SIM card;
internet connection icon via Wi-Fi. If it is not painted, it means that Wi-Fi does not work. On the tablet or smartphone, this icon is most often located at the top of the left or right.
Also, Icons will be displayed here: Internet connection on the mobile network 3G or 4G, the alarm icon, bluetooth (Bluetooth)-connection, silent mode if you activated these functions.
Left at the top There are notifications from the operating system (for example, the need to update, about security status), from various programs and applications.
To view details, spend the screen from the right corner to the screen center. A list of notifications will appear. You can either remove them by shutting the line to the left, or touch the finger to the right message and see more details the content of this notification 3.5.


Similarly, you can open the quick settings menu on the right. Spend your finger on top to the center of the screen. A list of settings will open. To manage them, it is enough to touch with your finger of the desired quad. When you turn on the function, the icon will be painted in blue. So you can quickly enable or disable Wi-Fi, adjust the volume, brightness, turn on the screen of the screen (in this case, no matter how you turn the tablet, horizontally or vertically, the screen will immediately adjust the viewing format you selected) 3.6.

At the bottom of the screen are the tablet control buttons. They are usually touch and always have on the screen, even if you are working in programs or applications. Sometimes their appearance can change, they may look like three points, but the functions have former 3.7.

Touching the button "Back"You will return to the previous screen. When displaying the on-screen keyboard, the button changes to the image of the directional down arrow. Touching it allows you to hide the on-screen keyboard without returning to the previous screen.

Button "Initial Screen" or "Home" Use to return to the main screen.
Button "Recently used applications" Allows you to see all the applications open on the tablet. Scroll through the list and tap the desired application to open it. To remove the application from the list of recently used, wake the line to the right.

Also at the bottom of the screen are always located icons of the most sought-after applications. So, in the example below, we have six icons (shortcuts) of applications: electronic services of the Pension Fund of Russia, interactive television Rostelecom, an application for watching video, Yandex-browser, calendar, email 3.8.


A circle with points in the middle itself is the button of the transition menu to the main desktop or the second screen, where you can see the entire list of programs and applications installed on the tablet 3.9.

Application "Settings

application "Settings" Allows you to control the capabilities of the tablet device. You will often refer to it to adjust those or other functions. Most often it is an icon in the form of a gear.
Locate the settings label, open it with a touch of your finger. The menu has several partitions that assume configuring wireless networks, devices, personal data, accounts and system capabilities 3.10.
3.10

The settings connect the tablet to the Internet, change the image (wallpaper) of the screen, adjust the sound, brightness, manage applications and programs. For example, by clicking on the "Memory" section, you can see how completed the computer memory and SD card (memory cards). In sections related to personal data, you can adjust the registration data, security settings. For example, you can specify a mandatory check of all installed applications. For this, opposite the desired line should be put in square tick 3.11.
3.11


In the "System" section, there is a useful section "Special Features", where you can adjust the font size, the screen of the screen, turn on the titers or voice helper 3.12.
3.12


Here you can see detailed information about the tablet itself.
In the "Device" section, you can change the wallpaper on the tablet screen. Touch the "Screen" stitch, select Wallpaper 3.13.
3.13

Then select the location where you want to take a new picture for the screen: from downloaded files, from photo gallery or choose from options that are already pre-installed by the developer 3.14.
3.14

For example, we can extract the proposed design options, immediately see how they look on the screen.
And, making your choice, tap the "Install Wallpaper" inscription 3.15.
3.15

Also in "Settings" in the "Device" section you can manage applications. Go to "Applications". List pages, you can see a list of working applications and programs downloaded or stopped 3.16.
3.16

Here you will also be able to remove downloaded applications and programs, and pre-installed and unused you stop, making inactive.
Internet connection to the tablet computer

To connect a tablet computer to the Internet via Wi-Fi, you need to enable this feature. To do this, go to the "Settings" application. In the "Wireless Networks" section opposite the lines of Wi-Fi, move the slider to the right. It is painted in blue. The function is enabled.
Then you need to select a Wi-Fi network and connect to it.
Click on the Wi-Fi line, a list of available networks 3.17 opens.
To connect the tablet to the Wi-Fi network:
- In the "Settings" application, enable Wi-Fi feature.
- Select the desired network name in the list.
- If required, enter the password.
- Click "Connect".
3.17

Select the desired, tap this line. If you need, enter the password and click "Connect".
If there is a lock icon near the Wi-Fi network icon, it means that you can connect to it only by entering the password. If there is no lock, it means that the network is not protected and the password is not required to connect to it. In public places Wi-Fi networks, as a rule, are open to all. But it happens that in the cafe and restaurants the Wi-Fi connection is closed, and the password and login give only customers of this institution.
To connect the tablet to the Internet on a mobile network, you need to insert a SIM card, activate data transmission using a mobile network, as well as specify the data of the access point of the mobile operator.
To do this, go to the "Settings" application, select the "More" line in the "Wireless Networks" section. Touch the inscription "Mobile Network" 3.18.
3.18

The network setup menu opens. Put the box opposite the "Data Transfer" line 3.19.
3.19

After a while, check if the tablet connected to the Internet. If not, it is likely that these access points will need to be entered manually. Go back to "Network Settings". Open the Access Point (APN) item. Select an Internet connection and then enter access points data.
This data can be found on the operator's website or in the instructions for the SIM card. Also, settings can come with an SMS message when activating the SIM card in the tablet.
You do not always need to enter data of access points manually. Most often, connecting to the network is automatically. In addition, your tablet connected to the Internet can distribute the Internet on Wi-Fi to other computers and work as a mobile modem. To do this, in the "Wireless Networks" section, activate the "Wi-Fi Access Point" function.
Working with the built-in Bluetooth module
Bluetooth (Bluetooth) is one of the wireless communication formats between computer devices, which allows you to share information and data. It is convenient because it does not need wires for data transmission. Today Bluetooth (Bluetooth) -module is installed on mobile phones, tablets, laptops and stationary computers. Bluetooth (Bluetooth) -Klavia, mice, headphones and headsets, clocks, scanners, printers, digital cameras are also available. Devices can support each other from 10 to 100 meters away.
That is, if you do not have a wire, but you need to pass a file from a tablet to a laptop, you can turn on bluetooth (Bluetooth) and transfer the file to another device. In the same way, you can connect a keyboard and mouse to a computer on a bluetooth computer. And manage a computer over a wireless connection. You can listen to music in wireless headphones connected, for example, to your Bluetooth tablet (Bluetooth).
Even if there is no bluetooth module on the computer, you can always purchase a special adapter and install the program, and then it will also support this type of wireless communication.
To connect a device to a bluetooth tablet (Bluetooth), you need to activate this function in the tablet and in the device and establish a connection.
In the "Settings" application, select the "Wireless Networks" section, then opposite the Bluetooth stitch move the slider to the right. It is painted in blue. Wireless is included. The Bluetooth connection icon 3.20 will appear.
3.20

To connect the device to the tablet via Bluetooth:
- Turn on the Bluetooth on the tablet and other device.
- In the list of detected devices, select the desired one.
- Click "Conjugation".
- If you need, enter the access code.
Turn the Bluetooth on the device you want to connect to your tablet.
On the tablet, open the "Bluetooth" item. From the list of detected devices, select the desired one. Open it. Then click on the inscription "Coupling" 3.21.
3.21

If you connect the bluetooth, for example, a smartphone or tablet, you usually appear on the device screens to access the access code and the field for its input. This protection code to access information on your tablet is not open for other people's devices.
Please note that you quickly turn off and enable Wi-Fi or Bluetooth in the quick settings menu on the main screen. To do this, swipe from the right upper corner to the screen center. Then in the window that opens, click Bluetooth.
Moving application icons and widgets to the main screen
Two operations with a program label or application:
- Long pressing allows you to move or delete the program icon.
On the tablet computer, the program and applications are indicated by icons (labels, icons). Two main techniques for working with them:
- Single touch opens the program.
- Long pressing the program icon allows you to move it across the screen or delete at all.
These techniques work for all operating systems. The ability to drag and delete program and application icons allows you to issue the main screen as it is more convenient, leaving the most frequently used programs at hand.
Go to the main (second) desktop, clicking on the menu button at the bottom of the main screen.
Select the icon the desired program or the application you want to place on the main screen.
Click on this label while holding your finger. The icon is like sticking to your finger, and the image on the screen will change. The image of the main screen appears.
Without taking off your finger, move it left or right, listened pages of the main screen. Move your finger with an icon sticking to the place where you want to put a program shortcut and tear your finger from the screen 3.22.
3.22

If you want to delete the program icon from the main screen, just click on the application icon. At the top there will be an inscription "Delete", "Retire" to the icon with a finger 3.23.
3.23

The icon will be removed from the main screen, but it will still remain basically (second) desktop.
On the main screen can also be placed the widgets useful for you. The widget is also a shortcut, but gives access to a specific action, to an element of a program or application, for example, the weather in a specific city, a situation with traffic jams, translator from Russian into English, browser search string, etc.
Algorithm for adding a widget to the main screen is practically the same as the program icon or application.
In the Android operating system ("Android") on the main (second) desktop, choose the section "Widgets". Page sheet, choose the desired 3.24.
3.24

To remove an application icon from the main screen (Android):
- Press the application icon with a finger.
- At the top will appear "Delete".
- Without taking off the finger, drag the icon to the word "Delete".
With the help of a long press, we move the widget in the desired location on the main screen.
Perhaps the application will open and ask you to choose which action you want to create a widget (for example, choose the city in the weather application, select a language in the application translator, etc.).
Data Exchange: Tablet - Computer - Smartphone
There are several options for exchanging data between computer devices.

Exchange options between tablet, smartphone and computer:
- Bluetooth wireless communication.
- Via wired connection.
- Via the Internet (email, social networks, cloud storage).
- Using portable storage devices: Memory Cards, Flash Drive, HDD Hard Drive.
Also to exchange data you can upload data (photos, videos, music) in cloud storage. Such applications are most often preset on the tablet. The Android system is Google. disk. But you can install Yandex.Disk applications or cloud storage Mail.ru cloud. It all depends on what option you used to use.
Then select the desired one from the list of options. In our example, "Save on the disk" 3.28.
3.28

Information technologies are developing rapidly, new data exchange formats appear. For example, the APPLE in its devices offers the AIRDROP function (data transmission system based on Wi-Fi and Bluetooth).
Control questions
Icons on the screen of the smartphone on Android are designed to inform users about events in any applications or the operating system itself. These two types of notifications are the most common:
- Message from other users (messengers, sms, mail).
- Timely and informative reminders of tasks and changes in the system (updates, download, screenshot, memory status, etc.).
"Anatomy" notifications in any gadget based on the base looks like this:
- Header area.
- Content area.
- Scope.
How can I notice notifications? Depending on the device model there are several options, with which the phone will inform you about the waiting message:

note
Icons in status and notifications panels change with each android major update, sometimes changing the appearance or completely disappearing.
Notification characters are a lot, each of which bears certain information about the phone for the user. So let's figure it out what designate icons on the screen of the smartphone.
Status bar
Status bar and notifications panel are very similar, but in fact it is two different things. The status bar is located at the top of the screen on the right. It displays the time, the battery status and current connections, such as Bluetooth and Wi-Fi.
On the left side of this band you will find application icons (they will inform you of any changes) - private messages, postal notifications, updates in Play Market and Other. In addition, the so-called "current notifications" may appear in this line, messages from any messenger. For example, if you listen to music through Spotify or Google Play Music, the corresponding icon will be displayed permanently. The sequence of icons indicates which applications are new or old.
It's important to know
The latest notifications are displayed in the extreme left corner.
Notification panel
The notification panel contains information that you can open with the help of a finger on the screen from top to bottom, just as they lower the curtain or curtain. In this improvised box, scrolling down, a lot of information is displayed in a small space. Here you can view the screenshot, Facebook Updates, read the WhatsApp message, and much more. Then you already decide whether you want to open an application or delete the notification with a simple finger movement to the right on this message itself.

It will be useful
Starting from the Android version of the Nougat, these built-in notifications are more "smart" and informative than ever on previous versions: now you can directly respond to messages, without even opening the program itself.
In addition to notifications, there are also fast settings. You will be able to quickly and effectively change the basic parameters of your smartphone. This panel allows you to enable and disable Wi-Fi, Bluetooth, flashlight, call mode, alarm clock and other parameters.
If you click and hold the icon, then you will be sent to the settings of this function or you can change its parameter if the setting is not provided. Most of the manufacturers of modern gadgets are also placed here direct access to the brightness of the screen (which is very convenient).

note
Under the notification curtain, the most up-to-date information for the user is currently time. If the notification sent earlier is no longer relevant, you can automatically reject it so that it never appears on your smartphone.
Here are some of the most famous and most sought-after icons:
- volume mode;
- time / date;
- signal level;
- battery charge;
- communication type;
- connected devices;
- editor;
- files;
- hardware;
- overview;
- cards;
- screen rotation;
- bluetooth;
- navigation;
- notification;
- places;
- social networks;
- flashlight;
- internet (Wi-Fi).
And what does the asterisk mean on the screen of the smartphone? Very simple - this is a warning mode, meaning an "important message". Although it looks not on all phones. Many manufacturers are changing the panel and badges on her at wishes, seeking to make a specific model more unique.
Therefore, there are always several options here, it all depends on the manufacturer and the brand of the phone. For example, Icons on the screen of a smartphone from Samsung will never be similar to similar on the screen from HTC.

Fortunately, the choice can be personalized for your taste and habits, so the user always open access to the change in the most important settings. In addition, in this area you can always turn off annoying or uninteresting notifications, simply by clicking on the warning symbol (small exclamation mark) in the upper right corner of the annoying application. After clicking a small menu will open in which you can choose how you want to receive notifications from the application.
The Android notifications panel usually displays the resulting brief informative messages in reverse chronological order, and their adjustments depend on several parameters:
- The declared priority of notification or its importance.
- Whether the notification recently was warned by a user with sound or vibration.
- Users attached to the notification are whether they are favorites contacts (refers to call log and social networks).
How to remove a double SIM card icon on android?
For many users, the display of the second SIM card in the notifications panel is a very unacceptable option, it applies to older versions of Android (5.1 and below). This icon takes a lot of space and, in fact, not too informative to constantly attend the main screen.
Options for removing such an identifier Multiple:
- . This method is suitable only for experienced users who can independently enter these settings and disconnect the display function of the double SIM card.
- Settings in the SIM card control menu. Some versions of the Android OS support the function of disabling the display of the Mobile Operator Map signs in the settings themselves for each individual slot. But be careful, do not turn off the card itself, otherwise it will not be able to receive phone calls.

IPad status icons
IPad for dummies, 4th edition
The iPad status panel, which is at the top of the screen, displays small icons that provide a variety of information about the current state of your iPad:
Air mode: You can use your iPod on the plane after the captain gives the word. But you cannot use a mobile phone or iPad Wi-Fi + 3G or 4G, except when the aircraft is located in the gate zone before taking off or after planting.
Android desktop
Fortunately, your iPad offers Airplane mode, which disables all the wireless functions of your iPad - Cellular, 4G, 3G, GPRS (Enhanced Datarate for GSM EVOLUTION); Wi-Fi; Bluetooth - and allows you to enjoy music or video while flying.
Some flights now offer onboard Wi-Fi. If you are on one, you can turn off the flight mode and use Wi-Fi of your iPad (but only until the captain says that everything is in order).
LTE (only for Wi-Fi + 4G models): This icon allows you to find out that your 4G LTE network of your operator is available, and your iPad can use it to connect to the Internet.
3G (only for Wi-Fi + 3G models): This icon informs you that the 3G high-speed data network is from your wireless operator (this is AT & T or Verizon in the USA), and your iPad can connect to the Internet through 3G.
GPRS (only for Wi-Fi + 3G and 4G models): This icon states that the GPRS data network of your wireless operator is available and that your iPad can use it to connect to the Internet.
Edge (only for Wi-Fi + 3G and 4G models): This icon informs you that the EDGE network of your wireless operator is available, and you can use it to connect to the Internet.
Wi-Fi: If you see the Wi-Fi icon, your iPad connects to the Internet via Wi-Fi network. The more semicircular lines you see (up to three), the stronger the Wi-Fi signal. If you have only one or two semicircles of Wi-Fi strength, try moving a little. If you do not see the Wi-Fi icon in the status bar, Internet access with Wi-Fi is currently unavailable.
Personal access point: You will see this icon (for the third generation iPads only Wi-Fi + 4G), when you share your internet connection with computers or other devices via Wi-Fi. A personal point may not be available in all areas or in all carriers, and additional fees may be charged. For more information, contact your wireless operator.
Synchronization: This icon is displayed in the status bar when your iPad is synchronized with iTunes on your Mac or PC.
Events: This icon indicates that there is any network or other activity, for example, synchronization by ether, sending or receiving email or downloading a web page. Some third-party applications also use this icon to indicate a network or other type of activity.
VPN: This icon shows that you are currently connected to a virtual private network (VPN).
Lock: This icon indicates when your iPad is blocked.
Screen orientation screen: This icon appears when the screen orientation lock is enabled.
Play: This icon informs you that the song is currently reproduced.
Bluetooth: This icon indicates the current state of the Bluetooth connection of your iPad. If you see this icon in the status bar, Bluetooth is turned on, and the device (for example, a wireless headset or keyboard) is connected.
If the gray icon, Bluetooth is turned on, but the device is not connected. If the white icon, Bluetooth is turned on and connected one (or more) devices. If you do not see the Bluetooth icon, Bluetooth is disabled.
Battery: This icon reflects the battery charge level. It is completely filled when you are not connected to the power source, and your battery is fully charged (as shown in the figure). Then it is empty when your battery is depleted.
The icon shows when you are connected to a power source, and when the battery is fully charged or is currently charging. You see the on-screen message when the charge drops up to 20 percent or lower, and the other when it reaches 10 percent.


