Page Setup in Word Office since version 2007 is displayed in a separate menu tab. The menu design has changed significantly since this year's version, and many users have expended considerable emotional effort in switching to it. But after a while, changing page parameters and other design elements ceased to cause confusion.
When preparing a text document, you have to adjust the size of the page that the computer feeds to the printer, sometimes change the page orientation, and almost always change the margins of the document.
fields
To change document margins you need to click on the "Margins" button in the tab called "Page Layout". This will display the possible margin options, including the margin widths set the last time the program was used. You can choose from the proposed options or set new values, for this you need to find "Custom fields" at the very bottom of the list. Clicking on this inscription opens the "Page Setup" window.
Page Orientation
In the window that appears, you can change the field width values. Here it also changes page orientation"album" or "book". Changing the page orientation may be necessary when you have to insert large tables oriented under the landscape sheet into the document.
Paper size
In the same "Page Setup" window established and paper sizes, but you can do it in the tab of the same name. Here you can find the standard sizes of paper sheets and set them for the entire document or individual pages.

In order to change the settings for individual pages, you need to select the text on this page and then open the "Page Settings" window. In the corresponding tab, change the parameter and indicate at the bottom where it says "Apply" "to the selected text." In this way, you can change the sheet dimensions, margins, and orientation of the sheet of paper.
To quickly change the orientation and size of pages, the corresponding buttons are installed directly in the "page layout" panel. Here it should be noted that changing the orientation of not the entire document, but individual sheets only possible along the following path: fields/custom fields. Where you need to select the appropriate orientation and specify: apply to selected text.
speakers
If the text needs to be displayed in columns, then in the "Page Layout" tab there is a button " speakers”, by clicking on which you can select up to three columns and adjust their sizes and the sizes of the gaps between them. This can also be applied either to the entire document or to selections.
Hyphenation
In the same tab, you can do , moreover, Word 2007 makes it possible to do this automatically and manually, as well as change the parameters of their arrangement.
Home tab
Paperwork also requires compliance with such parameters as: line spacing, paragraph indentation and text alignment on the page. It turns out that many still do it like on a typewriter, that is, using the space bar.
Paragraph
For these settings, you need to go to the “Page Layout” tab, open the “ ” dialog box by clicking on this icon. In the window that opens, set the required parameters: line indents, first line indents ( paragraph indent), line spacing and spacing between paragraphs.

So in Word Office, you can configure page settings and other document design settings. This describes how to work with the tool menu in the 2007 version.
Word Page Setup -
it paper size, page orientation, margins in Word, Word wrapping, etc. Word Page Setup feature located on the Page Layout tab. Buttons for frequently used functions are located in the "Page Setup" section. But by clicking on the arrow at the bottom right of the Page Setup section, you can bring up the Page Setup window, in which you canMore functions where you can set your page parameters.
Fields button.
Fields in Word is the indentation of text from the edge of the page. They can be customized - reduce, enlarge, remove completely so that the text is printed from edge to edge of the page, etc.
On Word pages, a standard text indent from the edge of the sheet (margin) is set. On the right, this indent is wider so that when stapling a printed document, attaching it to a folder, the text does not close.
You can change the size of the field, separately top, separately bottom, left, right.To do this, there is a button "Fields".Click on this button and, from the list that appears, select the desired margin size.
If you want to set your own field size, click the "Fields" -> "Custom fields" button. A dialog box will open and, in the "Fields" section, configure each field separately. Below in the dialog box according to the model, we look for changes.
Also, the margins can be adjusted in view mode or in normal mode, move the ruler.
Remove margins in Word.
You can completely remove all fields. Then the text will be placed to the very edges of the page.
How to do different fields on different pages of Word document(for example, a form on both sides), see the article "Different fields in one Word document".
Orientation button
under "Page Setup"- expand the sheet. Make it portrait orientation or landscape. ![]()
Page parameters should be understood as its key specifications, defining the placement of text and other objects on it. They may include fields, dimensions, orientation.
fields define the edges and borders of the text area that place it within itself. Dimensions adjust height and width. Orientation means its location in relation to the reader. This article will discuss the features of adjusting settings in versions of Microsoft Office 2003, 2007, 2010. In addition, we will describe the word wrap setting.
Page settings
To set these settings in Word 2003, you need to go to the menu File and select point of the same name. In version 2007 and later, you need to go to the menu Page layout and click on the arrow below.
Page margins
A dialog box that allows you to change the margins in Microsoft Word 2003 will appear after clicking the item Page settings the aforementioned way. Its approximate appearance is shown in the photo. Thus, this window sets dimensions top, left, bottom and right margins, binding. Change if desired book orientation towards landscape and vice versa. These changes can be applied to the entire document or to its current page.
In version 2007 and above, everything is installed similar way.
Paper size
The size is set if necessary. print document on a sheet with a format other than A4 sheet. Last installed default. It is important that the paper size is supported by the printer. As you can see from the screenshot below, the user of the program is trying to set the format to A5, A6 or B5. For his convenience dimensions are indicated each type of paper.
It is also possible to set printer settings. The paper feed is adjusted and, like the margin settings, the settings are applied to the entire document or to the current position. For convenience of choice, a sample of the printed sheet is shown in the window. 
In Office 2007 and above, the size is configured with a different sequence of steps:

speakers
As a rule, texts are written from one column, but there are situations, say in newspapers or magazines, when they are written in several columns. Sometimes this is relevant when filling websites with content.
The choice of the number of columns in the version from 2003 is as follows:
- Choose from the menu at the top of the window Format;
- Then click on the item speakers;
- A window will appear;
- choose number columns, their width and scope.
Can be applied to the entire document, or to the end of the document. 
Working with Office 2007 or 2010, we act differently. Need to go to the menu Page layout. Then the item is selected speakers. Here is configurable number columns and their location. They can be moved to the left or right. 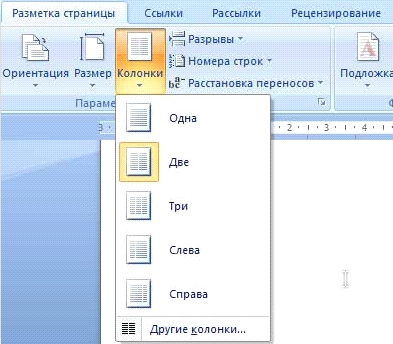
Hyphenation
In Word 2003, setting up word wrap is done like this;

If the text is already typed and you need automatically make transfers, then a marker is placed in the corresponding field. If you need to transfer abbreviations or other words with capital letters, then the appropriate one is selected setting. If necessary, adjust the distance from the last character to the right edge, make changes to the paragraph Transfer zone latitude. If desired, you can use forced method. 
In the 2007 version, the setup is done differently. First you need to go to the mentioned markup menu and select the command Hyphenation. If choose Auto, then they will separate themselves. At manual options will offer hyphenation options in the selected word. The decision is made by the person. To select specific settings, use the command Hyphenation Options. They are the same as the options in Word 2003. 
Page orientation.
Working with the package from 2003, we go to the item already familiar to us with fields from the menu Page settings. There will be two orientation options: bookstore and landscape. The current orientation will be highlighted with a frame. To change it, you need to check the box next to another item. 
It can be applied as to the whole document, and to the end of the document. For the first option, select the appropriate item. When working with a package from 2007, to change the orientation, you need to go to the menu Page layout and select item Orientation. The same options will be offered.
Page settings are designed to give the document the desired look. This is true for the creation of almost any document - from a contract or order, to an art book or a scientific work. Knowing how to change the margins and being able to choose the optimal paper size and page orientation for a particular document, you will be able to correctly and beautifully format documents and save yourself from unnecessary routine work.
Setting Page Options
Page settings are set immediately before formatting and placing various objects on it. You can also set these parameters at the end of working on the document, but keep in mind that, for example, with large margin values, the appearance of the document may change significantly. Page settings are most comparable to the foundation of a building and should therefore be set first, as all alignments in a document are tied to page orientation and page margins. You can also configure the settings in general or by category.
Document margins
Document fields can be quickly customized using ready-made templates. Go to the "Page Layout" tab - click the "Margins" button and select one of the margin options.
If you need to "manually" set up fields, do the following:
- Page Layout - In the Page Setup group, click Margins, and in the window that opens, click Custom Margins. The Page Setup window opens on the Margins tab;
- In the field position areas, specify their size, the binding size in the Binding area and the binding position in the field of the same name;
- Click the icon to open the Page Setup dialog box with the Page Layout tab open in the Page Setup group.
Figure 1. Setting fields in various ways.
Page Orientation
To set the page orientation:
- Page Layout tab - in the Page Setup group, click the Orientation button and select the option you want;
- "Page Layout" - the "Page Setup" group - click on the icon for opening the "Page Setup" dialog box and select the one you need in the "Orientation" area;
- Double click on the line.
Figure 2. Changing page orientation.
Paper size
- "Page Layout" - in the "Page Setup" group, click the "Size" button and select one of the 13 blanks present.
For more fine tuning:
- "Page layout" - group "Page settings" - "Size" - "Other page sizes";
- "Page Layout" - in the "Page Setup" group, click on the icon for opening the "Page Setup" window and go to the "Paper Size" tab;
- Double click on the ruler - Paper Size tab.
Figure 3. Selecting the paper size.
Page Setup window
The Page Setup window has three tabs: Margins, Paper Size, and Paper Source.
Figure 4. Tabs in the Page Setup window.
Fields tab
In the "Fields" area, set four document fields. For standard official documents, the margins are: left - 2.5 cm (1 inch), right - 1.25-1.5 cm (about half an inch), top and bottom 1.5 - 2 cm (in some documents, the bottom margin is larger than the top) , and the maximum margins are equal: for the left - 3cm, for the rest - 2cm.
In the "Binding" list, the binding position is selected - on the left or at the top. Binding is often used in the preparation of brochures, calendars, reference books, and in ordinary documents, as a rule, it is not specified.
If you need to place two documents vertically within one document, open the list and in the "Multiple pages" field and select the "2 pages per sheet" item.
Use mirrored margins when working with two-sided documents. In this case, the left and right margins are automatically reversed on odd and even pages. To do this, in the "Pages" area in the "Multiple pages" field, select the "Mirror fields" item from the drop-down list.
In the Sample area, from the Apply drop-down list, select an option to apply the changes.
- "To the current section" - the changes made are applied only to the current section;
- "To the end of the document" - from the selected place to the end of the document. If you change, for example, the size of the margins, this will affect only the pages that are in the margin of the selection;
- "To the entire document" - the changes will be applied to the entire document.
Paper Size Tab
In the "Paper size" area, you can select the specified paper size by format - A4, A3, A5, etc.
In the "Height" and "Width" fields, an arbitrary size is set.
The Paper Feed area selects how the paper is fed for printing. It is recommended to use the default values.
The "Sample" area is similar to the one described above.
Paper Source Tab
In the "Section" area, in the "Start Section" field, you can choose where the next section will start from.
In the "Page" area, you can choose the alignment:
- Top Aligned is the default and is the most commonly used;
- "Centered" - lines of text will be aligned to the center of the document, and the text will be evenly filled from the center, up and down;
- "By height" - there is a certain similarity with text alignment in width, only in this case the lines are aligned to the page height. The fewer lines on the page - the greater the distance between them;
- Bottom Align - Lines are aligned to the bottom of the page. Often used in letters and prologues to fictional novels.
In the "Distinguish between headers and footers" area, you can set the distance to the header and footer, and how the headers and footers will be distinguished - on the first page or on even / odd pages. Headers and footers will be discussed in more detail in future articles.
Default values
If you work with the same document type all the time and you want to use the same page setup, set the defaults. Go to the Page Setup window and set the options you are looking for, then click the Default button and confirm your choice. These settings will be applied to all subsequent documents until the next change.
Conclusion
After reading this article and following a series of simple steps, you can effectively customize the appearance of a document even before you start typing. This will come in handy in working with almost all documents. What's more, you'll save yourself the hassle of adjusting margins and paper size, or at least you'll know to prioritize page setup when you start working on a document. Knowing how to configure page settings will be useful to anyone who works with documents.
When creating a document in Microsoft Word, one aspect of formatting that you need to consider is changing the page layout. Page layout includes page orientation, margins, and scale, and allows you to see how the contents of your document will look when printed. All questions regarding page markup, we will carefully consider in the framework of this lesson.
Page Orientation
Word has two page orientation options: portrait and landscape. Landscape orientation means that the page is laid out horizontally, while portrait orientation means that the page is laid out vertically. Compare with our example how orientation affects the placement of text and images.
How to change page orientation

Page margins
The margin is the space between the text and the edge of the document. By default, a new document is set to Ordinary fields. If necessary, Word allows you to change the size of the margins in the document.
Page margin formatting
Word offers a wide range of predefined margin sizes.

Custom fields
Microsoft Word allows you to adjust the size of the margins in the dialog box Page settings.

Page Size
By default, the page size of a new document is 21 cm by 29.7 cm. Depending on the tasks, you can adjust almost any document page size. It is important to note that before changing the default page size, you need to check if your printer supports this format.
How to resize the page
Word offers a wide variety of predefined page sizes.

Custom Page Size Settings
Word allows you to adjust the size of the margins in the dialog box Page settings.

You can open a dialog Page settings by clicking on the small arrow in the lower right corner of the command group Page settings.

You can use the option Default to save all custom formatting settings and apply them automatically in every new document. To learn how to do this, read the article Change the default settings in Microsoft Word.


?")


?")


 Download pokemon go app on ios")


