And so, you have a pleasant evening at the computer - you play, chat, walk on the network, and Windows quickly executes your commands. All perfectly! Idyll! However, you should not think that it will always be this way. Know: the insidious Windows is preparing you a prank. She is just waiting for the moment when you are overtaken by some urgent business, to ... show you a fig. More precisely - do not boot.
Failure to boot Windows is an ordinary phenomenon, but according to the law of meanness, it usually happens when a computer is badly needed. So that the situation does not catch you by surprise, it is important to prepare for it in advance. Let's talk about what to do if Windows 10 does not load, why it happens and what each user should have in order to solve this problem as quickly as possible.
Why is it not loading
The reasons for the non-bootability of the "tens" are software and hardware. Programming is associated with the removal (damage) of boot and system files and / or responsible for starting the registry keys. As a rule, they are to blame for:- Installing another operating system on a different partition of the drive (the new OS replaces the bootloader with the old one).
- Experiments with disk partitions - compress, merge, split, format, and more. A typical error, which is just a consequence of this, is "" (the boot loader is compressed).

- Unqualified editing by hands of the system registry.
- Using various "tweak cleaners" to speed up and decorate the system, which "accidentally" change the registry keys responsible for launching, patch files, etc.
- Incorrectly installed Windows updates or shutting down the PC during the installation of updates.
- Viruses and antiviruses. Do not be surprised, the latter can do no less harm than the former if used thoughtlessly. It's like swallowing pills indiscriminately, hoping that one of them will be the right one.
- Bad hardware drivers. Loading in such cases is usually interrupted by a blue screen of death, sometimes with the name of the driver that caused the problem.
- "Clumsy" applications at startup. The crash occurs in the later stages of the boot - shortly before the desktop appears.
Hardware reasons for Windows 10 not starting:
- Changing the order of polling bootable media in the BIOS (the computer is looking for a Windows bootloader not on the system disk, but, for example, on flash drives).
- Connecting the drive to the wrong port on the motherboard that it used to work on - if it fails after removing and reinstalling the hard drive into the computer. Manifested by the INACCESSIBLE_BOOT_DEVICE error on the blue screen of death.

- Malfunction or poor connection of the system storage. It often shows up with the message "" (no boot loader available) on a black screen. Sometimes - stops, restarts, BSoDs at any stage of the download.

- Defective RAM. As with disk problems, it manifests itself by reboots and blue screens at any stage of the startup.
- Failure of the elements of the video subsystem. Windows may boot, but you will not see this, as the screen will remain black. Sometimes the fact that the system has booted can be recognized only by the characteristic sound.
- Other hardware problems such as the motherboard, peripherals, etc.
Prepare for the worst in advance.
Since 80-90% of Windows 10 not starting is due to software crashes, today's article is devoted to methods of dealing with them.So, in order to restore normal Windows startup, the computer needs to be booted into the recovery environment. If you have previously used Windows 7, then you know that this very environment is installed on the disk along with the main system. And in order to enter it, you need to open the menu of additional boot methods (by pressing F8 after turning on the computer) and go to the section " Troubleshooting».
The top ten also has a recovery environment, but since its loading time has significantly decreased in comparison with Windows 7, the interval when you can call the boot menu has also become much shorter. The chance to have time to press the desired key at this time (more precisely, the combination of F8 and Shift) remained only in one case: if the system is installed on an MBR hard disk and the quick start option is disabled in the power settings of the PC or laptop. If the system is on an SSD or GPT hard drive, you will need bootable media.
For emergency recovery of Windows 10, it is optimal to keep its official distribution kit on a DVD or flash drive, and the same bit as installed on the PC. Alternatively, you can use the bootable utilities package MS DaRT 10 (Microsoft Diagnostic and Recovery Toolset for windows 10 ).
MS DaRT distributions (formerly called "ERD Commander") are officially distributed only by paid subscription, but they are easy to find on the net. For example, on torrent trackers. Windows 10 images are available for download from.
As an example, I will use a home release of "ten" recorded on a bootable USB flash drive, since everything you need is in it.
Booting into Windows 10 Recovery Environment
In the event of a load blockage, the "ten", as a rule, tries to heal itself. When it succeeds, the user does not receive any notifications, it just takes longer than usual for the computer to start up. In case of failure, a message may appear on the screen, as in the screenshot below, but more often it will be just a "Malevich square" with or without a cursor, or a blue screen of death with a sad smiley face.
The failure scenario shown in the screenshot can be considered relatively favorable. By clicking, " Extra options»You will be taken to the recovery environment installed on your hard drive, and you do not have to boot into it from external media. But we will consider a more severe case, when the system shows no signs of life.
Connect the media to your computer, reboot, and make it the first boot device.
The window that you will see first after booting from a USB flash drive (DVD) will prompt you to select the system language. If Russian is selected, click “ Further».

Next, you will be prompted to proceed with the installation or recovery of Windows. Click " System Restore».

On the screen " Action selection»Click« Troubleshooting". There you are.

Tens launch recovery options
In the recovery options section (screen " Extra options") There are 5 subsections:- System Restore. When this option is selected, the standard Windows utility is launched rstrui.exe, the purpose of which is to roll back the system to one of the saved checkpoints.
- System image recovery. Launches the Windows Deployment Wizard from a backup created by the OS's own means.
- Startup recovery. Fixes errors in boot files and sections.
- Command line. Allows you to run various system utilities.
- Go back to the previous build. Rolls back to a previously installed OS version in case it was updated to Windows 10.
Rollback to checkpoint
Returning to a newly created checkpoint is the best first aid for all types of system failures, including when you do not know their cause.
By clicking on the first item, most likely the recovery utility you are already familiar with is launched. In it, you just need to select the date and time to which you want to rollback, and follow the instructions on the screen.

To use this option, you must have at least one saved checkpoint and a functioning system restore function. If the latter was disabled before the crash, skip this step and try other methods.
Startup recovery
This option effectively helps in case of damage or deletion of boot files, for example, when installing an additional OS in a different disk partition after Windows 10. As well as in case of accidental formatting or other manipulations with the "System Reserved" partition.
Command line
The command line itself does not restore anything, but it allows you to run other tools. So, with its help, we can open Windows Explorer to see the location of the installation (the letters of the partitions in the recovery environment and during normal boot of the system usually do not match), run the system file error fixer, the registry editor and the boot loader repair utilities.
If rollback to a checkpoint and auto-recovery at startup (the first and second options) did not give the desired result, the console utility often helps to raise the load of the "dozens" BCDBoot... It recreates the hidden System Reserved partition and copies the boot files from the Windows directory to it.
For BCDBoot to work correctly, you must specify the location of the Windows folder on your hard drive. To find out, you can use the utility Diskpart, but I find it more convenient to do this through a conductor.
So, to get into the explorer, open the command line and run notepad in it ( notepad).

Being in the notebook, go to the menu " File", Choose" Open"And go to the folder" This computer". Next, let's go through the disk partitions and determine in which of them the system directory is located. In my example, this is drive D.

Next, we return to the command line and execute the instruction:
BCDboot D: \ Windows

Please note that your path to the system folder may be different.
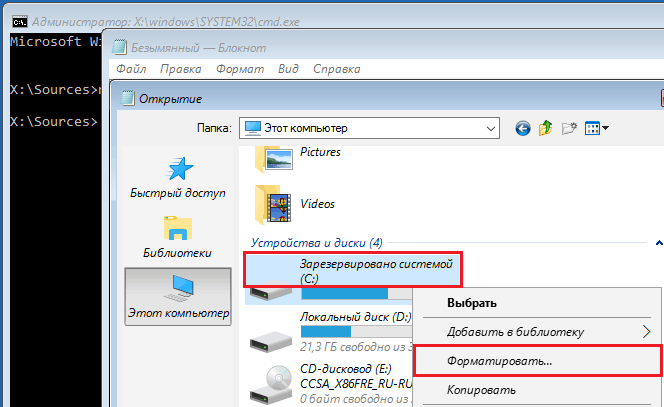
In 80% of cases, this is enough for the "ten" to be able to start normally. But in about 20% of cases, the command works incorrectly - it does not restore all boot files. To help the utility a little, before executing the instruction on the command line, you need to format the reserved boot partition (in my example, drive C) in FAT32... This can also be done using diskpart, but I find it more convenient to do it through explorer.
The next two console commands re-create the entire drive boot record (MBR) and system partition (VBR). They are used to solve problems with running Windows on MBR disks.
The commands are executed one after another in the following order:
bootrec / fixmbr
bootrec / fixboot
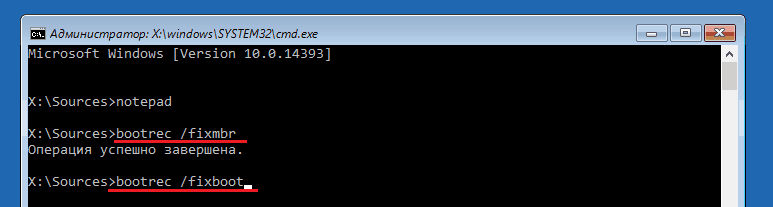
If you accidentally run them on a GPT disk, nothing bad will happen.
In some cases, startup problems arise due to damage not to the boot files, but to the main system files, for example, after a virus attack. As you may know, there is a special utility in Windows to fix them. Sfc.exe... So, thanks to the command line, it can also be run in the recovery environment.
The command for finding and fixing errors of protected system files in the recovery environment looks like this:
sfc / scannow / offbootdir = D: \ / offwindir = D: \

Parameter offbootdir defines the location of the main boot partition (in my example, as you remember, this is drive D), and offwindir- path to the system folder.
Using the command line, you can also fix registry errors on an unbootable system. But, unlike the previous instructions, this requires certain experience and qualifications, because the user needs to know exactly what to correct and how erroneous entries should look normal.
I will not dwell on registry errors leading to a failure to boot Windows 10, since this is the topic of a separate large article. I will describe only the method for starting the editor RegEdit.exe in the recovery environment and open the registry files in it so that you have the opportunity to fix the errors that you know about.
So, to start the editor, write the word on the command line regedit and press Enter.
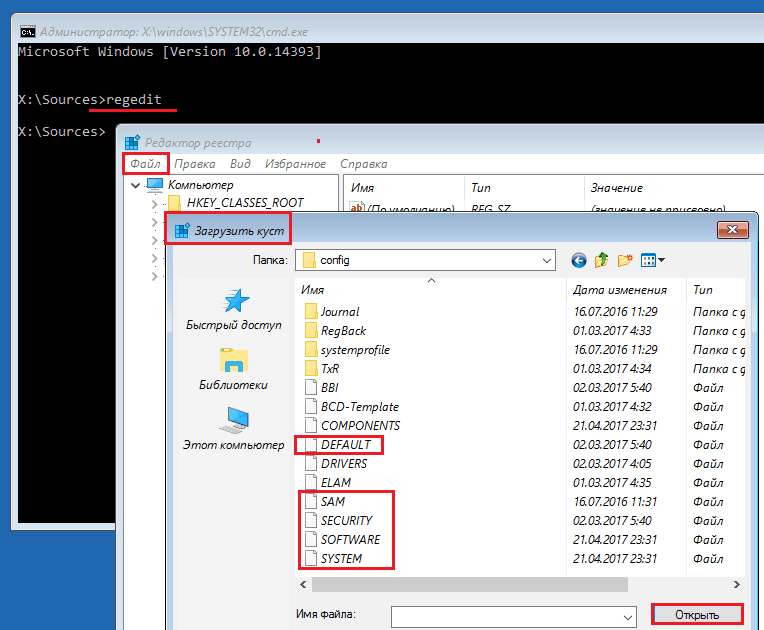
You will see that some kind of registry is already present in the utility window that opens, but not the one you need. Before us is our own registry of the recovery environment, and we are interested in the main system.
To load Windows 10 registry files into RegEdit, select the section in the left half of the editor window HKEY_LOCAL_MACHINE or HKEY_USERS, open the menu “ File"And click on the item" Upload bush».
In the explorer window that will open after that, go to the folder D: \Windows \System32 \Config(your drive letter may be different) and select the desired file.
Files without an extension in the \ System32 \ Config folder are the constituent parts (hives) of the Windows 10 registry. The main ones are framed.
Let's give the bush any meaningful name (it will be temporary until you unload it) and click OK.

Next, we will open the section in which we loaded the bush, and here it is - in front of us, available for editing. In my example, this is the registry file software which I temporarily renamed to soft_win_10.

After making the edits, go to the editor menu again “ File"And click" Unload the bush».
Reverting to a previous build

When returning to a previously installed assembly, the user's personal files will remain intact, but everything that was done after the update will be canceled.
System image recovery
In restoring an image from a backup, it helps to restore the system to operability in case of any malfunctions, but the problem is that almost no one creates these images.If you are an exception to the rule and the happy owner of a relatively fresh backup, select the item marked in the screenshot in the list of parameters,

One of the effective troubleshooting steps related to booting windows is to restore the boot record of Windows 10/7 / 8.1 with the new UEFI and GPT markup or BIOS with MBR markup. One of the common reasons the Master Boot Record can get corrupted is due to a malware infection or file corruption in that sector. Improper shutdowns can also damage the boot record (MBR). Sometimes the problem happens when Linux Grub is installed and Windows cannot detect it. In some cases, you may receive the error Bootmgr is Missing or BCD when you turn on your computer. In such cases, you can run a bootloader repair to fix these problems.
How to repair Windows 10 bootloader
You must prepare, as your computer will not boot to your desktop and additional boot options may not be effective. Therefore, you need Windows 10 with the same bitness (x32 or x64) that you are going to fix, and preferably the same version. You must boot in all of the below methods from a bootable USB stick in order to run the command line. Remember that after restoring the bootloader, some errors may appear and you just need to restart your PC a couple of times to get the bootloader to get used to it.
Start the installation of Windows 10 from a bootable USB flash drive and go to the installation point. Then click below on " System Restore"to get into advanced download options.
Method 1... Once you get into the advanced download options, then go to " " > "Extra options"> and select" "Wait for the process to finish and the Windows 10 bootloader should recover.

Method 2... In the same advanced boot options, go to " Troubleshooting" > "Extra options"> and run" Command line".

To begin with, we will make sure on which local disk the system is located on which we want to restore the bootloader. To do this, on the command line, do the following three commands, pressing Enter after each:
- diskpart
- list volume- displays a list of sections.
- exit- exit from the tool for working with discs.
In my case, the screenshot below shows that the local drive on which Windows 10 is installed is not "C", but "D". You will most likely have "C", but be careful, you must determine where your system is installed. Once you have determined what letter your system is under, enter the following command to restore the Windows 10 bootloader:
- bcdboot D: \ windows

Method 3... If you are using a Windows system with the new UEFI and GPT partition scheme, then you need to find a hidden partition with the FAT32 file system (it is approximately 90-300 MB). If you have BIOS and MBR markup, then the file system will be NTFS (about 500 MB). In my case, this is NTFS. So, we run the command line through a bootable USB flash drive, as described above in the ways, and write the commands:
- diskpart- launches a tool for working with disks.
- list volume- displays a list of sections.
- select volume 3- Choice hidden volumes (in my case it is NTFS, you may have a hidden FAT32).
- format fs = ntfs or format fs = fat32- formatting the selected volume (depending on which one you have).
- assign letter = E- We assign a new letter to the volume (I assigned what was already there).
- exit- exit from the tool discpart.
- bcdboot D: \ Windows / s E: / f ALL- copy the bootloader files. (In my case, the D: drive is the volume on which Windows itself is located, E: is the letter we assigned to the hidden partition).
- diskpart- launches back the tool for working with disks.
- list volume- display a list of sections.
- select volume 3- The number of the hidden volume, to which we assigned the letter.
- remove letter = E- we delete the letter so that the partition is not displayed in the system when we reboot.


Method 4... In this method, we will use the tool Bootrec.exe... Enter the following commands on the command line one after the other:
- bootrec / RebuildBcd
- bootrec / fixMbr
- bootrec / fixboot
Log out and reboot your system.

In some cases, you will need to run an additional command:
- bootsect / nt60 SYS or bootsect / nt60 ALL

A malfunctioning Windows 10 bootloader is a problem that every user of this operating system can face. Despite the variety of causes of problems, it is not at all difficult to restore the bootloader. Let's try to figure out how to restore access to Windows and prevent the malfunction from occurring again.
Reasons for problems with the Windows 10 bootloader
Before proceeding with the recovery of the bootloader of the Windows 10 operating system, it is worth identifying the cause of the malfunction. After all, it is possible that the problem will appear again, and soon.
- The most common cause of a bootloader problem is the installation of a second OS. If this was done incorrectly, the instructions for loading Windows 10 could be violated. Roughly speaking, the BIOS does not understand which OS to load first. As a result, none are loaded.
- The user could accidentally format or use a part of the hard disk reserved by the system. To gain access to such a segment, additional software or special knowledge is required. Therefore, if you do not understand what is at stake, this is hardly the reason.
- The Windows 10 bootloader may stop working correctly after a regular system update or internal failure.
- Virus or third-party software could also cause the bootloader to malfunction.
- Computer hardware problems can result in loss of system data. This causes the bootloader to stop working because the necessary files are lost.
It is often easy to repair Windows 10 bootloader. Moreover, the procedure is the same.
Hard disk problems - a possible cause of bootloader problems
The most serious problem is the last item on the list. Here we are often talking about a technical malfunction of the hard drive. The point is that it wears out. This leads to the appearance of bad blocks - "bad" disk segments, data from which it is physically impossible to read. If one of these segments contained files necessary to boot Windows, the system, of course, will not be able to boot.
In this case, a reasonable decision would be to contact a specialist. It can partially recover data from bad blocks and even fix the hard drive for a while, but soon it will still have to be replaced.
In any case, it will be possible to diagnose the described problems only after restoring the bootloader. Therefore, let's go directly to solving this problem.
How to repair Windows 10 bootloader
Regardless of your PC / laptop model, BIOS version or file system, there are two methods to fix Windows 10 bootloader: automatic and manual. Moreover, in both cases, you will need a bootable or USB disk with the appropriate operating system on it. Before proceeding with any of the methods, make sure that no other flash drives are inserted into the USB connectors, and that the drive is empty.
Repair bootloader automatically
Despite the rather skeptical attitude of power users towards automatic utilities, Microsoft's bootloader repair tool has proven itself well. In most cases, it can be used to quickly and easily solve the problem.

After the recovery process, the PC will reboot if everything went well. Otherwise, a message will appear stating that the system could not be restored. Then move on to the next method.
Video: Windows 10 Boot Loader Repair
Repair bootloader manually
To manually restore the bootloader program, you will also need a Windows 10 disk / flash drive. Consider two methods that involve using the command line. If you have not used it before, be especially careful and enter only the commands below. Other actions may result in data loss.
Using the bcdboot utility

Try turning off and on your computer (remember to disable booting from USB / disk in BIOS). The system may not boot immediately, but only after a second reboot.
If error 0xc0000001 appears, you need to restart your computer again.
Video: Step-by-Step Windows 10 Boot Loader Repair
Formatting a hidden volume

Now remember the letter of the name of the volume where the system is installed (as you did in the first method). Consecutively enter the following commands without quotes:
select volume N (where N is the number of the hidden volume assigned the letter Z);
remove letter = Z;
select volume N (where N is the number of the hidden volume);
format fs = fat32 or format fs = ntfs (depending on the filesystem of the hidden volume);
assign letter = Z;
bcdboot C: \ Windows / s Z: / f ALL (here C is the letter of the volume on which the system is installed, and Z is the letter of the hidden volume assigned earlier);
Reboot your computer. If this method did not help you, contact a specialist. If there is no important information on the system disk, you can simply reinstall Windows.
Video: a way to restore the bootloader for advanced users
Whatever the cause of the Windows 10 bootloader malfunction, these methods should fix it. Otherwise, reinstalling Windows will help. If even after that the computer runs slowly or there is a problem with the bootloader again, then its part (usually the hard disk) is faulty.
If the computer cannot start the operating system or the boot device with its files, then it is quite possible that the OS boot loader has failed. This could have happened after installing an additional system, due to deletion or formatting of hidden partitions of the hard disk, as a result of editing the boot menu, and due to other actions that led to the failure. This guide will help you get rid of it.
Of course, the cause of such a malfunction could also be a damaged drive, an additionally connected hard drive or removable media. So, first of all, you should leave only the main drive, disconnecting all other storage devices. If this does not help, you need to try to restore the Windows 10 bootloader using one of the methods below. In the absence of a positive result, it is necessary to diagnose the hard drive to identify malfunctions.
Automatic bootloader repair
Windows 10 has its own recovery environment. Among other features, it has an option to automatically resume the boot of the system. It is with the help of it that you can try to restore the bootloader.
Manual bootloader recovery procedure

Recovering the Windows 10 bootloader in the second way
- Launch the USB flash drive with the Windows installation files via the Boot Menu.
- Call the console with the keys Shift + F10 and run the command diskpart to run the storage management utility.

- Print a table with information about disks using the command list volume... Pay attention to which letters are not assigned. If your device has a BIOS, and MBR is used as the format for partitioning the hard disk, then find a disk with a size of up to 500 MB and the NTFS file system in the list. Remember its number indicated in the column Volume... In the case of using a more modern EFI paired with GPT, find a partition up to 300 MB, FS - FAT32, and remember its number. In addition, remember the drive letter on which the main Windows is located.

- Enter the command select volume Num, where Num- hidden volume number.

- Format the selected partition with the command format fs = fat32(if its file system is FAT32) or format fs = ntfs(if FS is NTFS).

- Fix a letter behind it using the command assign letter = X, where X- any free letter of the Latin alphabet.

- End Diskpart with the command exit.

- Execute the command bcdboot E: \ Windows / s X: / f ALL, where E- the letter of the Windows drive, and X is the letter assigned to the hidden partition. If you have several Windows installed on your computer, then run this command for them, substituting the letters of the drives on which their system files are located.

- Enter diskpart and list volumes with the command list volume... Look at the section number you previously assigned a letter to and remember it.

- Dial select volume#, where #
- the number of this volume.

- Untie the letter from it with the command remove letter = X, where X- a letter previously associated with a hidden disk. You do this so that it does not appear on the system.

- Enter exit, close Command Prompt, disconnect the Windows installation drive, and restart your computer.

If none of the methods helped you, it is quite possible that the cause of this failure is a damaged drive that hosts the system.
Microsoft engineers have implemented a boot store, also known as Boot Configuration Data (BCD), and a boot menu on Windows. The first contains the bootloader identifiers of all operating systems available on the PC, and the second reads them and displays them in the form of a list of operating systems available for launch. This makes life much easier for a user who has several systems on his computer. He doesn't need to be smart to switch between them. It is enough to restart your computer and select the one you need from the list provided. Like other parts of Windows, the boot menu is customizable. This guide lists the available ways to edit this section.
Note: almost all the actions described in this guide must be performed under an account with administrator rights. Otherwise, you must know the password from it.
Editing the Windows 10 boot menu in the bootloader window
The Windows 10 boot menu has a small settings section. It provides a minimal set of options - changing the value of the automatic start-up timer of the main system, changing the OS loaded by default, as well as an additional section with system start modes and the function of shutting down the computer.
Editing the Windows 10 boot menu in system settings
In the additional parameters of the system, which can be accessed through the properties of the OS, there is a section. It contains a small list of functions for editing the boot menu, which is suitable for undemanding users. So with it, you can choose which operating system will boot by default, set the display time for the list of installed systems, or turn off the timeout altogether, and also activate the output of recovery options.

To get to the specified section, you need to do the following:

Editing the Windows 10 boot menu in System Configuration
If you need a little more customization options, you can try the utility system configuration... In addition to the settings mentioned, it offers the function of deleting operating system boot records, an option for displaying information about the OS, the ability to start Windows without a graphical shell, select safe mode boot options and a few more minor functions.
You can edit the boot menu using System Configuration as follows:

How to edit Windows 10 boot menu with EasyBCD
EasyBCD is a free utility that provides a wide range of options for editing the boot menu. In comparison with it, all standard system tools (except for the Command Line) look very primitive.
This compact program allows you to:
- Remove OS from the list of available to run.
- Add new entries Windows (including obsolete ones), Linux / BSD, Mac.
- Add entries for installing systems using ISO images or individual hard disk partitions.
- Rename operating system entries.
- Set the system by default.
- Change the position of entries in the list.
- Set the boot menu language.
- Select the boot loader interface skin (Metro or earlier from Windows Vista / 7).
- Set the duration of the timeout.
- Back up and restore Boot Storage Settings (BCD).
- View BCD content and boot menu.
The program interface is completely localized in Russian, and it itself is quite simple to use and does not require any supernatural abilities from the user.


How to rename a system entry in the boot menu

How to move a system entry to the boot menu

How to choose the default system to boot

How to change the display time of the boot menu

How to change the boot menu language

How to edit the Windows 10 boot menu using the command line
If you do not trust third-party programs and are trying to use exclusively system tools, then you should try out ways to edit the Windows 10 boot menu using the command line.
Create or restore a Windows Boot Store backup
Before proceeding with all the steps, back up the boot store so that you can restore it if necessary. You can create a BCD backup as follows:

How to add a system entry to the boot menu

How to remove a system entry from the boot menu

How to change the order in which systems appear in the boot menu
To edit the position of records in the loader, use the command bcdedit / displayorder (ID2) (ID1) (ID3)... Instead of all ID specify the real codes of the entries in the sequence in which you want to see them when starting the computer. 


 icons on the Windows desktop How to enable the display of all windows 10 icons")


 switch")


 If you change the processor, what will change in the computer")


