It often happens that wires of different cross-sections come to the junction box and they need to be connected. It seems that everything should be simple here, as well as with the connection of wires of the same cross-section, but there are some peculiarities here. There are several ways to connect cables of different thicknesses.
Remember that you cannot connect two wires of different cross-sections in an outlet for one contact, since the thin one will not be strongly pressed by the bolt. This will lead to poor contact, high contact resistance, overheating and melting of the cable insulation.
How to connect wires of different sizes?
1.By twisting with soldering or welding
This is the most common way. You can twist wires of adjacent cross-sections, for example 4 mm 2 and 2.5 mm 2. Now, if the diameters of the wires are very different, then good twisting will no longer work. During twisting, you need to make sure that both cores are twisted around each other. A thin wire should not be allowed to wind on a thick one. This can lead to poor electrical contact. Do not forget about further soldering or welding. Only then will your connection work for many years without any complaints.
2.Using screw clamps ZVI
I already wrote about them in detail in the article: Ways to connect wires. Such terminal blocks allow you to start a wire of one section on one side, and on the other side of a different section. Here, each core is clamped with a separate screw. Below is a table according to which you can choose the right screw terminal for your wires.
| Screw terminal type | Permissible continuous current, A | |
| ZVI-3 | 1 - 2,5 | 3 |
| ZVI-5 | 1,5 - 4 | 5 |
| ZVI-10 | 2,5 - 6 | 10 |
| ZVI-15 | 4 - 10 | 15 |
| ZVI-20 | 4 - 10 | 20 |
| ZVI-30 | 6 - 16 | 30 |
| ZVI-60 | 6 - 16 | 60 |
| ZVI-80 | 10 - 25 | 80 |
| ZVI-100 | 10 - 25 | 100 |
| ZVI-150 | 16 - 35 | 150 |
As you can see, with the help of ZVI, you can connect wires of neighboring cross-sections. Also remember to look at their current load. The last digit in the type of screw terminal indicates the amount of permissible continuous current that can flow through this terminal.
We clean the cores to the middle of the terminal ...
We insert them and tighten the screws ...

3.Using Wago universal self-clamping terminals.
Wago terminal blocks have the ability to connect wires of different cross-sections. They have special nests where each core is "stuck". For example, in one hole of the clamp you can connect a wire of 1.5 mm 2, and in the other 4 mm 2 and everything will work properly.
According to the manufacturer's markings, terminals of different series can be used to connect wires of different cross-sections. See the table below:
| Wago Terminal Series | Cross-section of the connected conductors, mm 2 | Permissible continuous current, A |
| 243 | 0.6 to 0.8 | 6 |
| 222 | 0,8 - 4,0 | 32 |
| 773-3 | 0.75 to 2.5 mm 2 | 24 |
| 273 | 1.5 to 4.0 | 24 |
| 773-173 | 2.5 to 6.0 mm 2 | 32 |
Here's an example with the 222 series ...


4. Using a bolted connection.
A bolted connection of wires is a composite connection consisting of 2 or more wires, a bolt, a nut and several washers. It is considered reliable and durable.
Here it goes like this:
- we clean the vein by 2-3 centimeters, so that it is enough for one full turn around the bolt;
- we make a ring from a core according to the diameter of the bolt;
- take a bolt and put it on a washer;
- we put a ring from a conductor of the same section on the bolt;
- then we put on the intermediate washer;
- we put on a ring from a conductor of a different section;
- put the last washer and tighten the whole thing with a nut.
In this way, several conductors of different cross-sections can be connected at the same time. Their number is limited by the length of the bolt.


5. Using the junction nut clamp.
I wrote about this connection in detail with photos and the corresponding comments in the article: Connecting wires using "nut" type clamps. Let me not repeat myself here.

6. Using tinned copper lugs through a bolt and nut.
This method is well suited for connecting large cable sizes. For this connection, it is necessary to have not only TML tips, but also crimping pliers or a hydraulic press. This connection will be a little cumbersome (long), it may not fit into some small junction box, but it still has the right to life.
It's easy to connect here. A tip is put on each core, they are crimped and connected with a bolt with a nut and washers. This place is then insulated with insulating tape or heat-shrinkable tubing (it must be put on the wire before connecting).
Unfortunately, I didn't have a thick wire and the necessary terminals at hand, so I made a photo from what was. I think you can still understand the essence of the connection from it.

It seems to have listed everything. If you know other ways to connect wires of different cross-sections, then write in the comments.
Let's smile:
There are two sitting in the cell:
- What are you sitting for?
- For murder.
- How much did you give?
- 7 years. What are you for?
- For poaching.
- How many?
- Fifteen.
- Who are you hunting ?!
“I’m walking, so I’m hunting, I see a telegraph pole, an eagle is sitting on the pole. Well, I'm a doublet ...
- And what ?! For an eagle for 15 years? Did you even kill him?
- Yeah ... shot, claws in one direction, pliers in the other.
How to connect the wires? Soldering or welding? Long and inconvenient. We need to look for a soldering iron or a welding machine. But I'll tell you a secret that the best connection is welding, then soldering goes. Twisting wires? It's a good thing, but not aesthetically pleasing. And according to the new rules, it is forbidden to use it, except perhaps on the sly in the country. Currently, special connectors for wires have been invented, which greatly facilitate the life of electricians and electricians. We will just talk about them in this article.
How to connect wires correctly and quickly
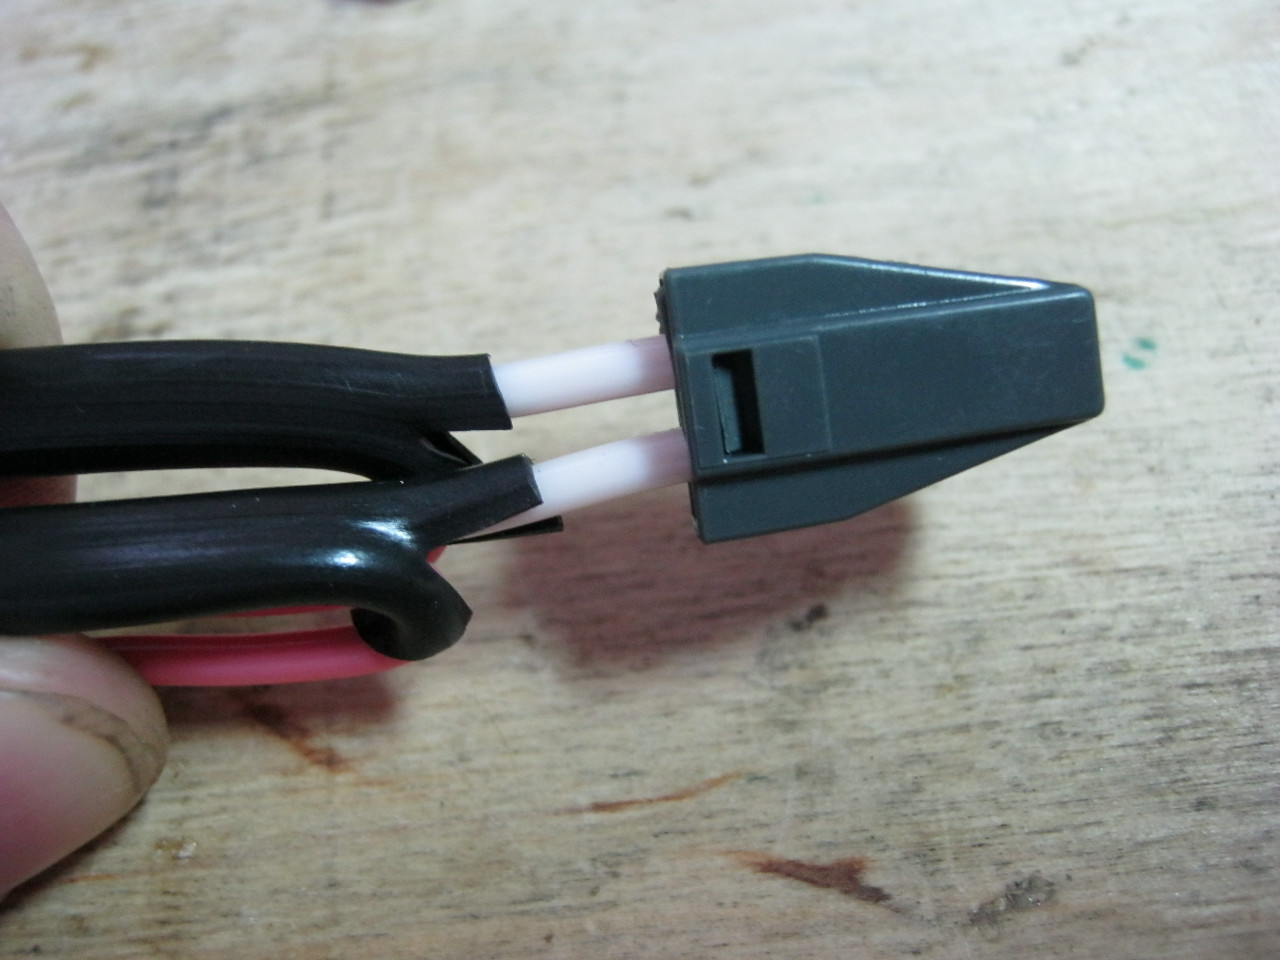
Connecting screw terminal block
It is used very widely in production, as well as in households, to connect two wires to each other. Sold as a cassette of 10 or more. As required, we cut and use as needed. It is mainly used for connecting copper wires. For aluminum, it is undesirable. Aluminum wires have the property of flowability. This means that after some time the clamped aluminum wire will “flow” out from under the clamping bolt and the connection will weaken.
The advantage of connecting terminal blocks is that they are very cheap and allow you to connect two wires together without any problems in a matter of seconds. The main thing is to find a suitable flat head screwdriver.


PPE caps

PPE - this is a connecting insulating clamp. Used to connect single-wire cores of wires, followed by screwing them clockwise. PPE caps are very comfortable, but still not very reliable. Therefore, if you have a critical part of the wiring, then it is better to give preference to cooler competitors of PPE caps.
As you may have noticed, there is a spiral inside the cap, which, when the cap is screwed on, compresses the wires to be connected.
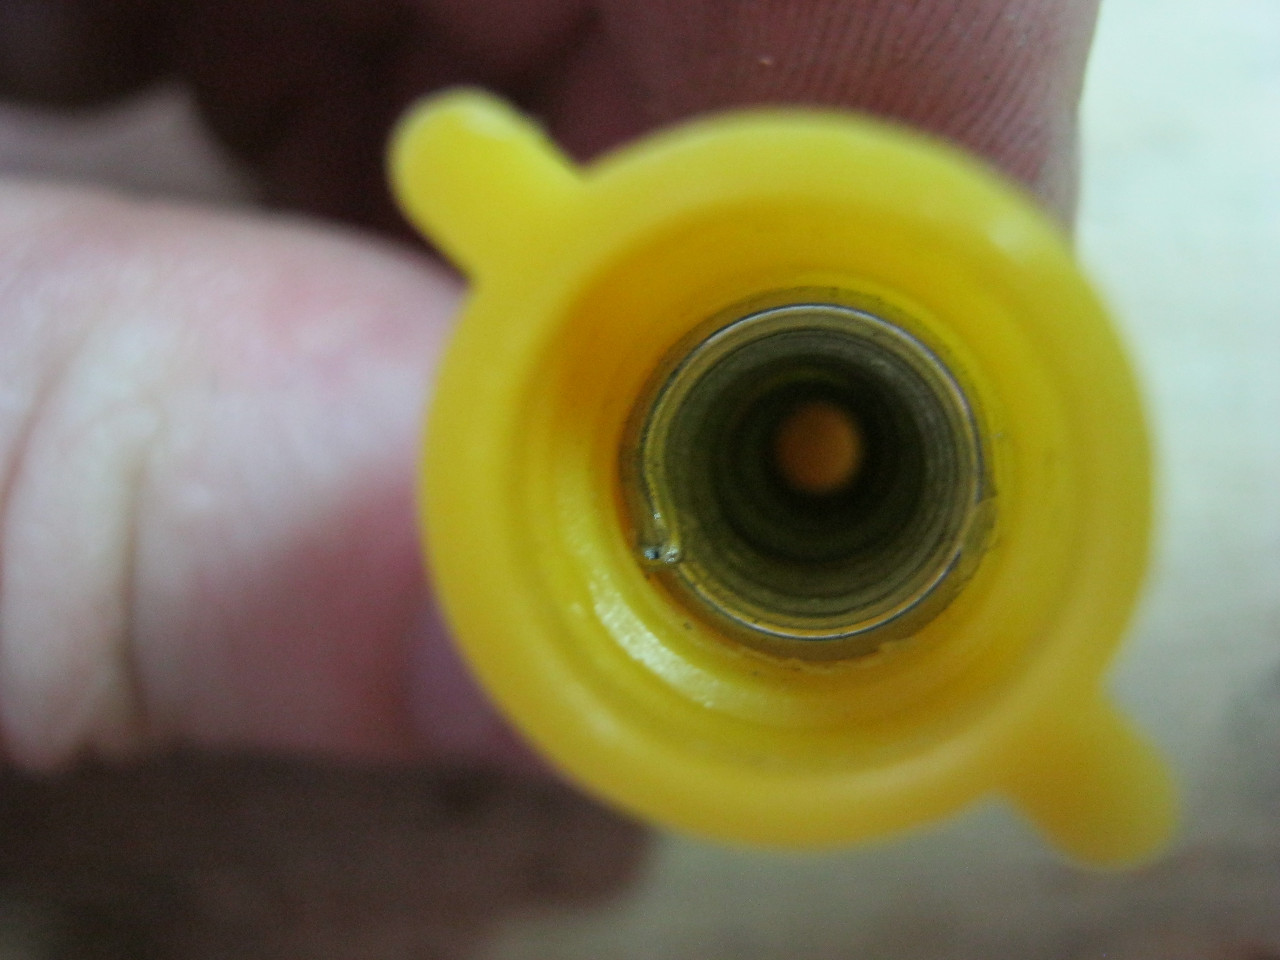
In practice, it all happens like this: we strip two wires, and then screw the PPE cap onto them

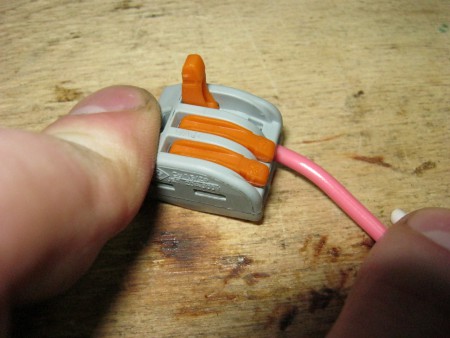
Terminal blocks WAGO (WAGO)
Vago terminal blocks are currently the most top-end connectors for wires. Although they also have their disadvantages - high cost and weak switching current. The photo below shows the principle of operation of the Vago terminal blocks.


Conclusion
Currently, the blue duct tape can already be put on the back burner. If earlier the Soviet Union was built with the help of it, now there is no longer any need for it. It is much easier to go to the nearest store and buy connectors for wires. It won't hit your pocket hard. As a result, your wiring will be much stronger and safer.
Also, do not forget about the amperage for which these connectors are designed. For example, you should not use VAGO terminal blocks for various electric boilers and powerful energy consumers. In this case, they may not withstand a heavy load, which will lead to even worse consequences.
Many of my friends and acquaintances ask to help them connect the Internet to 2 computers. There is nothing difficult in this, even a 5-year-old child can cope with this task. Today I want to tell you how to connect the Internet to 2 computers.
At first glance, organizing the distribution of the Internet over your network is not such a difficult matter, but many people get stumped by this question as soon as the situation comes down to business. In reality, everything is simple and I will be glad to help you, so let's get started.
In this article, we will consider the configuration option for two computers: the first (with Windows XP) server, the second (with Windows 7) client. Of course, I mean that we have already configured the Internet on the first computer and we need to share (multiply) this very Internet on the second PC.
We will need: actually two computers, one of which has 2 network cards, the required amount of network cable (UTP 5 cat), an 8p8c plug (which is also called RJ-45 by mistake), a crimping tool (if there is none, you can ask a friend a communications operator or administrator, in whose arsenal, for sure, there is one).
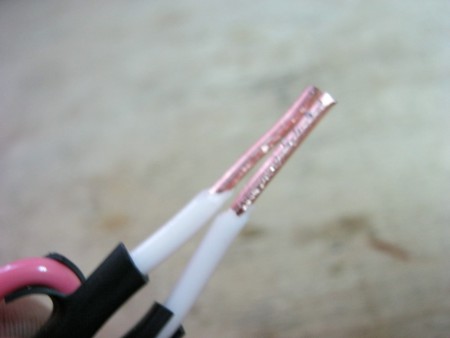
First of all, we measure the required length of the cable and cut it, only more carefully, so as not to re-measure and not alter it later. We need to crimp the resulting piece of cable on both sides. I can write a lot of water, that there is a crimp such as 568A, 568B, a crossover, etc., but we take into account the fact that in the versions of Windows under consideration, the network card automatically chooses how to work for it and does everything for you, we will not delve into the physical subtleties ... So, a standard Category 5 twisted-pair cable is crimped as follows:

Strictly observing the sequence of twisted pair wires, we insert them into the plug (the metal contacts should be on top, i.e. look at us when we insert the wires into the plug) and crimp the plug with the appropriate tool. We do this operation on both sides of the piece of cable we cut off. If you are not satisfied with the option of self-preparation, then a ready-made cable can be bought at any computer store in your city.
Connection setup
After adding the second network card, another connection icon will appear in the corresponding window (Start - Control Panel - Network Connections):

- Right-click on the connection shortcut and select "Properties" 2. Uncheck all checked boxes, except for "Internet Protocol TCP / IP" 3. On the "Advanced" tab, check the box 4. "Allow other network users to use the Internet connection of this computer" 5. Select in the connection "Local network"

This is where we finish setting up the Internet and move on to setting up the local network itself and setting up a second computer for its access to the Internet. For convenience, this connection can be renamed somehow, eg "Internet".
Setting up a local network
On the first computer, which acts as a server, as discussed above, there are two network cards: on the first we configured the distribution of the Internet over the network, on the second we configure the local network itself. We plug the cable prepared in advance by us into the second network card of the server computer and into the network card of the client computer. We start the setup from the server:

We assign the server an IP address (192.168.0.1) and a subnet mask (255.255.255.0), as shown in the figure. This is a simple example, but workable, if you have a desire to assign a different IP, then please - do as it will be more convenient and easier for you. Press the button and this completes the server setup.
Let's move on to setting up the client, i.e. second PC (as mentioned above, our client will be a computer with Windows 7). Go to "Start" - "Control Panel" - "Network and Sharing Center" - "Local Area Connection" - "Properties" - "Internet Protocol Version 4 (TCP / IPv4)"
We perform the configuration operations as with the server, but specify a different IP address (192.168.0.2) and the same subnet mask (255.255.255.0), the IP address of the main gateway (this is our server computer) and the preferred DNS server will be the same:

Next, you need to specify one workgroup so that computers can see each other in the local network we have created. By default, when installing the system, the name WORKGROUP is assigned to the workgroup of your computer (for sure, everyone has seen who installed Windows themselves, but did not think too much about it). But in this article we will nevertheless consider the option that our working group will have a different unique name, exactly the one that you like. On the server (Windows XP), this is done as follows: in the context menu "My computer" select the item "Properties", the tab "Computer name" - "Change" and assign a name convenient for you to our workgroup:

We remember the name assigned by us and proceed to setting up the client's computer (with the Windows 7 operating system). Click "Start" - right-click on the "Computer" icon - select the "Properties" menu item. In the newly opened window in the list on the left, select "Additional system parameters" - select the "Computer name" tab - "Change" and specify the name of our workgroup:

This completes the setup. Now we have a local network of two computers and the Internet is distributed over it. For those who are especially curious, you can check the availability of a connection using the ping command line utility, so to speak, "ping" our grid. This is done very simply both in Windows XP and in Windows 7, first you need to call the command line: "Start" - "Run" and enter cmd. Then enter the ping command in the text console window that appears and make sure there is a connection. You can ping each other (by specifying the IP address), as well as different Internet addresses (by specifying the IP address or DNS symbolic name). How to do this is explained in the example below:


That's all, a working network of two computers is ready.
In this article, you learned how to connect the Internet to 2 computers. I hope you are convinced that there is nothing difficult about this.
How to share the internet using usergade software
Transferring data between devices is one of the most important uses of a personal computer. An efficient and inexpensive way to connect multiple PCs is to use a network (LAN, Ethernet) twisted pair cable.
A twisted pair cable consists of eight copper conductors twisted in pairs, enclosed in a plastic sheath, sometimes with shielding in the form of aluminum foil or braid. Outside, the cable has a PVC outer sheath.

Pairing and shielding is used to reduce cable noise and increase data transfer rates. The cable is designated UTP (unshielded) and FTP (shielded twisted pair).

Straight or crossover cable
One of the main questions about connecting a PC with an Ethernet cable is what type of cable, straight or crossover, to use.
To find out, you need to determine which devices the cable will connect to:

In a straight cable, the connections (pinouts) of the contacts at both ends are the same (1-1 2-2, etc.). This type of cable is used for transmission, but not for the exchange of data between devices.

In a crossover cable, the transmitting pair at one end is connected to the receiving pair at the other (pinout 1-3, 2-6), i.e. the pin connections in the cable are “crossed”, which allows data exchange between the two devices.

Note! The color of the contacts in the examples indicates the color of the insulating sheath of the cable conductors.
Many devices today support an Auto-MDI (X) port interface where data transmission is automatically configured.
Reference! If at least one of the devices in the connection supports Auto-MDI (X), this excludes the obligatory use of a certain type of cable - crossover or straight-through.
Twisted pair connection of two PCs
To directly connect two PCs, it is best to purchase a crossover cable of the correct length to avoid misunderstandings. Next, you need to connect the computers with this cable.
Step 1. Find an RJ-45 connector on the computer panel for connecting a network cable. This connector is found on almost any PC or laptop.

Step 2. Insert the Ethernet cable plug into the connector until it clicks, linking the two computers together.

The hardware connection of the PC is now complete.
Programmatic connection setup
To set up a PC connection, you need to transfer them to a common workgroup.
Step 1. Press the "Win + R" key combination on the keyboard of the first PC ("Win" is to the right of "Ctrl"). Type in the field "sysdm.cpl" and click "OK".

Step 2. In System Properties, click on the Computer Name tab and click Change.

Step 3. Think up and type in the line the name of the "working group" in English letters. In the line "Computer name" you can leave the previous name of the PC or choose any other. Click "OK".

Step 4. Restart your PC for the settings you have made to take effect.

Step 5. After rebooting, press "Win + R" on the keyboard and type "control" in the field. Click "OK".

Step 6. Click View Status ... if Category is specified, or Control Center ... if Icons are enabled.


If the "View" mode is set to "Large icons", click on the link "Control Center ..."
Step 7. Click Change Adapter ....

Click "Change adapter ..."
Step 8. Click on "Network Connection ..." and select "Properties".

Click on "Network Connection ...", select "Properties"
Step 9. Click the Networking tab, click TCP / IPv4 and click Properties.

Step 10. Specify 192.168.0.1 (mask 255.255.255.0). Click "OK". Setting up the first PC is complete.
Step 11. Repeat " Steps 1-10 " on another PC, specifying the same “workgroup” name, but entering the IP address 192.168.0.2 (mask 255.255.255.0).
Setting up PC access
To exchange data between PCs, you need to give permission to access their files and folders.
Step 1. In the "Network Control Center ..." (see. Steps 5-6 of the previous section) click "Change advanced settings ...".
Step 2. Expand all network profiles in the dropdown list and enable all permissions to detect, access and control the PC.
Step 3. Scroll to the bottom of the list and select disable password protection. Click "Save Changes".
Step 4. Repeat Steps 1-3 on another PC.
You can now view the connected PCs in the Network category.
Step 1. Double-click the This PC icon on your desktop.

Step 2. Left-click on the Network icon.

An icon will appear representing another PC on the network.

Checking the connection
The correctness of the PC connection to each other can be checked with the ping command, for example, using a PC with an IP address of 192.168.0.2.
Step 1. Press "Win + R", type "cmd" and press "OK".

Step 2. Enter in the window: ping 192.168.0.1 and press "Enter" on the keyboard. Lines starting with "Reply from ..." will appear. This means that the PC "sees" the other PC and the connection is established.

If the message "Request timed out ..." is received, it means that there is no communication between the PCs. In such a situation, it is necessary to recheck all the settings indicated above.
Note! The network connection can also be blocked by the Windows firewall or antivirus installed on the PC. In addition, the Ethernet cable or the network cards of the PC may be faulty.
Internet access
A network connection with two PCs accessing the Internet is possible if an additional network card is installed on one of the PCs and Internet distribution is configured.
After the physical connection of the PC, in addition to the settings mentioned above, you will also need to specify the gateway number in the TCP / IPv4 protocol setting on both PCs.
Step 1. Open the “Local Area Connection” settings with the right mouse button and select “Properties” (see Steps 5-8 in “Programmatically Configuring the Connection”).

Step 2. Specify the gateway 192.168.0.1 if the Internet is configured on a PC with an IP address of 192.168.0.1.
Step 3. To do "Steps 1-2" on another PC.

The general Internet connection is now set up.
How to crimp a twisted pair cable
Sometimes the length of a commercially available Ethernet cable is not enough to connect PCs that are far apart from each other. In this situation, you can purchase:

Crimp Standards
There are two options for crimping a twisted pair cable:

Reference! If a crossover cable is required, then on one side the connector is crimped according to the 568A standard, and on the other - according to 568B.
Ethernet cable crimp process
Step 1. Step back 3-5 cm from the cable cut, carefully cut the outer sheath and remove it.

Step 2. Untwist the strands and arrange the conductors in the order required for crimping. Pull the nylon thread or foil screen back.

Step 3. Step back from the edge of the outer sheath 12-14 mm and cut off the ends of the conductors perpendicular to the cable axis.

Step 4. Align the wires and insert them into the RJ-45 connector until they reach the front of the connector. The outer sheath of the cable must fit inside the connector using the plastic retaining clip.

Note! It is required to insert the cable into the connector with a certain force.
Step 5... Insert the RJ-45 connector into the "8P" crimper socket until it stops.

Step 6. Squeeze the crimp handles with force until a distinct click in the tool.

RJ-45 connector crimped.
Cable Crimp Test
If a Lan tester is available, you can immediately check the crimp on the Ethernet cable.
Insert the cable into the tester connectors and press the test button. Sequentially synchronously lit indicators will show the presence of a contact and the correct connection of the wires.

Lack of glow or glow of a different color will indicate a broken conductor, crossing or short-circuited conductor. If there are crimping defects, cut the connectors and crimp the cable again.
Video - How to connect 2 computers via Lan Cable
When installing electrical wiring in a house or apartment, connection of wires is the most important moment... For a trouble-free and safe power supply, you will need a reliable and high-quality wire connection.
Careless attitude to the connection of wires and cables can lead to very bad consequences. It would seem that there is nothing difficult in connecting the wires, twisted them, wrapped them with electrical tape and everything is ready, but everything is not so simple ... as folk wisdom says "Electrical is the science of contacts", and the connection of wires and cables must be carried out with full responsibility, since the percentage of accidents and damage in power supply systems due to poor-quality wire connection is very high. Whatever the quality of the electrical contact between the wires, wire connections have greater resistance, which means they get hotter. And the worse the contact, the more it heats up, which will eventually lead to melting of the insulation, a short circuit, and then a fire.
In practice, several methods of connecting wires are used, I will tell you about the most common.
Twisted wire connection
Connecting wires twist, distributedeverywhere, but if we turn to the main book of electricians PUE, then according to:
p. 2.1.21 "Connection, branching and termination of cables and wire cores should be carried out by soldering, welding, crimping or crimping (screw, bolt, etc.)"

As we can see, there is no twisting of wires at this point, which means that wire twisting is prohibited. But twists have always been, are and will be used to connect wires when installing electrical wiring. And a well-done twist can last for more than a decade, but the twisting of the wires must be done efficiently. The technology for connecting wires and cables by twisting is quite simple:
- the length of the twist should be at least 4-5 cm;
- the connected wires stripped of insulation must be cleaned of oxidizable film, for example, with an ordinary knife or sandpaper;
- it is necessary that the wires to be connected twine around each other evenly and tightly, providing a sufficiently reliable contact.
One "but", there may be problems when handing over the electrical installation of the fire inspection, tk. the connection of wires by twisting according to the PUE is prohibited. However, this applies mainly to industrial consumers, retail premises, etc., the fire inspector will not come to your apartment or private house with an inspection.
Twisted wire connection- this is necessary measure, when there is nothing else left, and it is better to use a wire connection using the methods described below.
Soldering wire connection
If solder twisted wires, then we get a connection of wires soldering, which guarantees a reliable and high-quality contact, which has a sufficiently low contact resistance, high conductivity and mechanical strength. But it is important to solder the wire connection correctly, for this you need:
- irradiate the wires to be connected with rosin (flux);
- the solder should flow into the inside of the twist;
- after the solder cools down, you can grind it with sandpaper, because sharp edges of the solder, may puncture the insulation;
- insulate the wire connection.


But such a connection of wires by soldering is very laborious and requires certain skills. TO negative sides of soldering wire connections, I would attribute:
- the need for isolation;
- complexity (not everyone knows how to solder well), and for those who solder well, doing it, for example, standing on a ladder or ladder, to put it mildly, is not very convenient;
- if a mistake was made when connecting the wires, it will no longer be easy to disconnect them after soldering, so it is better to leave more stock of wires and cables;
- high time costs.
Welding wire connection
Wire connection welding gives even better electrical contact of the wires. But here it is still more confused than with soldering wires, since the presence of:
- welding transformer;
- welder skills;
- masks (goggles) for welding, special gloves, electrodes;
- construction hair dryer for heat shrink tubing.

![]()
Welding wire connection, you can do only from homogeneous metals... Such a connection of wires can be found infrequently, our people do not really like difficulties, and many electricians do not like this method of connecting wires due to the large investment of time, but it is worth noting that connecting wires by welding is faster than soldering.
Crimping wire connection
Wire connection crimping, consists in squeezing the connecting sleeve (aluminum or copper tube) with special press pliers, into which the wires are inserted. The wires are pre-stripped from insulation to the length of the sleeve, then we place the wires inside the sleeve and crimp it for reliability in two or three places. If the sleeve is much larger than the wires that need to be crimped, then you can fill the sleeve with additional wires. We isolate the resulting wire connection by crimping with electrical tape, or better with a heat shrink tube + hair dryer.


Liners for connecting wires by crimping, there are copper, aluminum and copper-aluminum, i.e. crimping can be used to connect copper and aluminum wires.

Crimping the wires is reliable enough if done correctly. Crimping skills will also come in handy when, for crimping NShVI bushings.
The disadvantages include the cost of pressing tongs for connecting wires by crimping and sleeves, the inseparability of connecting wires by crimping, i.e. crimped the wire in the sleeve and "forgot" about it.
Bolted connection of wires and cables
Bolted connection wires, as a rule, are used when connecting wires made of different metals, that is, if we have one wire made of copper, and the other made of aluminum, and between them it is necessary to lay a steel washer.


Such a connection of wires turns out to be very cumbersome, it is inconvenient to place it in junction boxes and insulate it. Periodic broaching is required.
Wire connection with screw terminals
Wire connection screw terminal blocks, as well as bolted, can be used to connect wires from different metals. This connection of wires meets the requirements of PUE, but requires periodic tightening of screws in the terminals, which weaken over time, which means that the contact itself also weakens, which over time can close.


Periodic pulling the screw connection of the wires involves, what access to connection in the box should always be open, which will not look very nice in an apartment or a private house. Also, when tightening the screw, you can damage the wire itself, especially the softer aluminum one. And if you need to connect a stranded wire, then you need to either solder the stripped ends of the wire, or crimp it with tubular tips.
Connection of wires with PPE caps
Wire connection PPE caps(Connecting Isolating Clamps). PPE are plastic caps with a conical spring inside, which, when twisted, compresses and fixes the wires, and the plastic cap of PPE itself insulates the connection of the wires, and is fire and mechanical protection.


This wire connection is quick and easy, for its correct implementation it is necessary:
- strip the insulation from wires and cables to a length slightly less than the length of the PPE cap itself;
- fold them into a bundle, namely into a bundle, and not make a twist out of them;
- wind the PPE clockwise with your hands onto the bundle of wires;
- hold out PPE with pliers.
The advantages of such a connection wires and cables are obvious (no special tool is required, no need for additional insulation, speed and simplicity), but there are also disadvantages:
- you can not connect stranded wires;
- the quality of such a connection will be worse than that of the above, so I would recommend using these clamps for a small load, for example, in lighting circuits.
PPE caps are subdivided by the total cross-section of the twisted wires and are designated by numbers from 1 to 5, which indicate the number of twisted wires and their cross-section.

Wire connection with self-clamping (spring) terminals
Well, in conclusion, we will consider the simplest, rather effective, convenient, and most importantly, fast connection of wires - self-clamping (spring) terminals... Wago spring terminals have become widespread, which allow you to connect wires:
- not possessing any special skills;
- there is no need to purchase special tools (soldering iron, welding transformer, press tongs);
- some Wago terminals have a special paste that allows you to connect copper and aluminum wires and prevents oxidation;
- no additional insulation needed;
- quick detachable connection (squeezed the lever and pulled out the required wire).
Wago terminals are available for connecting wires and cables from 0.75 to 4 sq. Mm., The number of wires to be connected is from 2 to 8. Wago terminals


Invented the Wago terminal blocks in Germany. Perhaps the most significant disadvantage is their price, the average cost of a Wago terminal block for 3 wires will be about 11-12 rubles, so if there are a lot of junction boxes, then the total cost of Wago terminal blocks will be considerable. You should not use Wago terminals when wiring wiring with loads of more than 16 A. In general, it is better to use them as much as possible on the lighting line for wiring in a private house or apartment, and choose Wago terminal blocks with a margin of at least one step higher.


 switch")


 If you change the processor, what will change in the computer")


 Cobra")


