I present to you very simple schema Charger for a car battery. There is nothing superfluous in the scheme, so we raise its reliability. The article presents a few simple variants of the charges that even beginners can collect. For the battery of his motorcycle, he decided to collect a charger, as the generator did not justify himself, especially in winter.
In order for the battery to charge the source stable current. The current will serve as a regular network transformer. The secondary winding should issue a current for the standard charging mode, it will be 1/10 battery capacity.


As well as a straightener scheme with voltage adjustment. The current value changes when the voltage changes in the battery.

For his charger, the TS-160 transformer took, it can be found in Soviet TVs. He took off the winding and rewinding received 14 volts by 10 amps at the output, it is quite enough to charge any batteries.
Let's step on to make the housing. The case was assembled from zinc tin - quickly and cheap.
Since I have a fan, for this I made a hole, the truth is not so much warm, but for the reliability it would not hurt.


In front, also made a place for a voltmeter and for crocodiles. Next, put the scheme - a transformer, a voltmeter, a fan, by the way the diode bridge is taken with a margin - CABV-3510. And to avoid any interference after the bridge, a condenser with a capacity of 5 thousand ICFs, you can put a few instead of a single capacitor, of course without changing the overall container.

Here are the devices ready, the truth is the case and it was possible to do more beautifully and neatly, but for quick and so it will go. The charger can be applied to charge automotive batteries to power the LED tapes (12 volts) and to adjust the converters.
The problem of the served battery is known to many motorists. However, a reasonable question arises immediately: "What to charge it?". The answer is simple: "Purchase in the store ordinary charger" Fortunately, the cost of such devices is low, about 500-1000 rubles. But there is another option - to collect car battery charger. Moreover, some motorists believe that homemade "charging" is pride. Make it can every man. In this article we will consider the principle of assembly battery charger And, in fact, let's try to collect it.
Previously, the TC-180-2 brand transformer was used in large old tube black and white TVs. It is from it that can be created battery charger. You can take any other one who at the output of at least 12 in the voltage and the current of at least 2 A. but, in this case, we will do car charger Using the TC-180-2 transformer.
Below I apply charger scheme, guided by which we and we will make further actions. With this scheme, you can collect "charging" on any other transformer.

This TC has two secondary windings. They are calculated (each) on the voltage of 6.4 V and the current strength of 4.7 A. With their consecutive connection, the output voltage of 12.8 V. It will be enough for it in order to charge the battery. Thick wire must be connected on the transformer conclusions 9 and 9 '; To the conclusions 10 and 10 'you need to solder diode bridge with these thick wires. This bridge is 4 diodes d242a or others, which should be at least 10 A.

To large radiators set diodes. The diode bridge collect on the size of a fiberglass plate suitable (how to make a diode bridge I described the ink). Transformer primary windings must also be connected sequentially, and the jumper is set between 1 and 1 '. Cord with fork for the network Connect to the conclusions 2 and 2 bar soldering iron. In the primary network it is desirable to install a fuse in 0.5 A, and in the secondary plug in 10 A.

The cross section used in the manufacture of the wiring charger should be more than 2.5 mm 2. The figure for which the current of secondary windings is designed to exceed. For example, if your network is calculated on a voltage exceeding 220 V, then at the output of the transformer, respectively, there will be more than 12.8 V.
Charging current limit consistently with the battery, turning on the slope of the minus wire with a 12 volt lamp, the power of which is 21-60 watts.
The ammeter connected to the charger will help control the voltage and current. The measurement limit of the indicators is: the voltmeter must be at least 15 V, and the ammeter is not less than 10 A.
Connect the battery neatly, not allowing even short-term incorrect connection of the plus with a minus. Sour wires to check for performance, even briefly, it is impossible (the so-called check on the spark).
During the attachment and disconnection of the charger, it must be de-energized.
Carefully and carefully operate the charger, leaving it in a working form unattended.
Sometimes it happens that the battery in the car is to sit down and it is no longer it turns out, since the starter lacks the voltage and, accordingly, the current to turn the motor shaft. In this case, you can "see" from another owner of the car so that the engine earns and the battery began to charge from the generator, but this requires special wires and a person who wants to help you. You can also charge the battery yourself by means of a specialized charger, but they are quite expensive, and they are not particularly used to use them. Therefore, in this article, we will consider the homemade device in detail, as well as instructions on how to make a charger for the car battery with your own hands.
Device self-made
The normal voltage on the battery disconnected from the car is between 12.5 V and 15 V. Therefore, the charger should issue the same voltage. The charge current must be approximately 0.1 from the tank, it can be less, but it will increase the charging time. For a standard battery, a capacity of 70-80 A / H current should be 5-10 ampere, depending on the specific battery. Our self-made charger for AKB must comply with these parameters. To assemble a charger for a car battery, we need the following items:
Transformer. We are suitable for any of the old electrical appliances or bought on the market with a dimensional power of about 150 watts, it is possible more, but no less, otherwise it will be very hot and may fail. Excellent if the voltage of its output windings is 12.5-15 V, and the current of about 5-10 amps. You can see these parameters in the documentation for your item. If there is no necessary secondary winding, then you will need to rewind the transformer for another output voltage. For this:
So we found or gathered the perfect transformer to make the battery charger with their own hands.
We will also need:

Prepare all materials can be moved to the process of assembling the automotive memory.
Build technology
To make a charger for a car battery with your own hands, you need to follow the step-by-step instructions:
- Create a scheme of homemade charging for AKB. In our case, it will look like this:

- We use the TC-180-2 transformer. It has several primary and secondary windings. To work with it, you need to connect successively two primary and two secondary windings to get the desired voltage and current at the output.

- With the help of copper wire, connect the conclusions 9 and 9 '.

- On the fiberglass plate, we collect a diode bridge from diodes and radiators (as shown in the photo).

- Conclusions 10 and 10 'We connect to the diode bridge.
- Between the conclusions 1 and 1 'we install the jumper.

- To the conclusions 2 and 2 'with a soldering iron, secure a network cord with a fork.
- In the primary chain, we connect the fuse by 0.5 A, the 10-amp, respectively into secondary.
- In the gap between the diode bridge and the battery, connect the ammeter and the length of the nichrome wire. One end of which is fixed, and the second must provide mobile contact, thus resistance will change and limit the current supplied to the battery.
- Insulating all the connections with a heat shrink or tape and place the device into the housing. It is necessary to avoid electric shock.
- We establish the movable contact to the end of the wire so that it is long and respectively resistance were maximal. And connect the battery. Reducing and increasing the wire length, it is necessary to set the desired current value for your battery (0.1 of its capacity).
- In the process of charging, the current flow supplied to the battery will decrease itself and when it reaches 1 amp can be said that the battery charged. It is also desirable to control directly the voltage on the battery, however, it must be turned off from s / y for this, since it will be slightly higher than the real values.
The first launch of the collected circuit of any power source or zoom is always produced through the incandescent lamp if it caught fire in full heat - or somewhere an error, or the primary winding is closed! The incandescent lamp is installed in the gap of the phase or zero wire supplying the primary winding.
This scheme of the self-made charger for the battery has one big drawback - it does not know how to independently turn off the battery from charging after reaching the desired voltage. Therefore, you will have to constantly monitor the testimony of a voltmeter and ammeter. There is a design deprived of this disadvantage, however, for its assembly, additional details will be required and more effort.

Clear example of finished product
Operating Rules
The lack of a self-made charger for the battery of 12V is that after complete charging automatic shutdown The device does not occur. That is why you will have to periodically look at the scoreboard to turn it off on time. Another important nuance is to check the memory "on the spark" categorically prohibited.
Among additional precautions should be allocated as follows:
- when connecting the terminals, make sure not to confuse "+" and "-", otherwise the simple home-made charger for the battery will fail;
- connecting to terminals must be carried out only in the off position;
- the multimeter must have a measurement scale over 10 A;
- when charging, you should unscrew the plugs on the battery, in order to avoid its explosion due to the boiling of the electrolyte.
Master class on creating a more complex model
Here, in fact, all that I wanted to tell you how to make a charger for a car battery with your own hands. We hope that the instruction was for you understandable and useful, because This option is one of the simplest types of homemade charging for AKB!
Also read:
Good day of Lord Radio Piters! In this article I want to describe the assembly of a simple charger. Even quite simple, because it does not contain anything superfluous. After all, often complicating schemes we reduce its reliability. In general, there will be a couple of options for such simple car chargers that can be soldered anyone who at least once revenge the coffee grinder or changed the switch in the corridor)) in its experience I can assume that it will be useful to everyone who has at least some kind of attitude to machinery or electronics. For a long time I was visited by the idea of \u200b\u200bcollecting the simplest charger for the battery of your motorcycle, as the generator sometimes simply does not cope with the charge of the latter, it is especially difficult for him in the winter in the morning when you need to start it from the starter. Of course, many will say that with the kick starter is much easier, but then the battery can be thrown out at all.Electrical scheme of homemade charger
What is needed in order to charge? The source of stable current, which would not exceed some safety. In the simplest case, they will be the usual network transformer. It must be issued on the secondary of such a current, which is needed for a standard charging mode (1/10 battery capacity). And if at the beginning of the charging cycle, the load will start pulling the current of the larger value - there will be a stress drawdown at the output winding of the transformer, which means the current will decrease. There are two options for rectifiers:


The latter scheme will allow you to change the value of the charging current, due to the voltage change in the battery. If you do not trust the transformer, then the function of the current stabilizer can be assigned to the conventional 12 volt car light bulb.

In general, for myself I decided to charge quite powerful, as the foundation took the TS-160 transformer from the Soviet lamp channel, rewound to his needs, 14 volts were released at 10 amp, which makes it possible to charge the battery sufficiently large capacity, including any automotive.
Case for charger
The housing was assembled from zinc tin, as I wanted to make as simple as possible. 
A rear of the housing was drunk a hole under the fan, for greater reliability I decided to add active cooling, and the valves were pushing, let them not lie.

Then he began to make a stuffing, screwed the transformer, the diode bridge also took with a reserve - KRVS-3510.
, since they are not worth a lot:

In the front panel made a hole for a voltmeter, also screwed the jack for crocodiles.

It turned out just that I wanted simple and reliably. Basically, this unit is used to charge the battery and power 12 volt LED tapes.

Well, in extreme cases, to adjust the automotive converters. And so that there are less interference, after the bridge put a pair of capacitors with a total capacity of about 5 thousand μF.

Externally, of course, it was possible to do and more accurately, but I here are the main reliability, the laboratory power supply unit next to the queue is worth it, and I will embody all my designer skills. All the best, with you was Column!.)
Discuss an article car charger with your own hands
The market is literally filled with various technical innovations. Therefore, to purchase a memory for AKB, especially since the price of such products is quite affordable, today is not a problem. But many car enthusiasts are still preferred by the simplest chargers. The main reasons are two - some do not believe in the reliability of modern devices, and others do not need their numerous functions, and they consider it an excessive waste of money.
The simplest "charging" for the battery is 12 in easy to make a power transformer, which is in many old models of household appliances.
What kind of tr? It is clear that the winding is primary - by 220. Secondary can be one or more; This is not applicable. The main thing is that from the transformer can "remove" U 2 \u003d 13 ± 0.5 V. More or less - the scheme will function incorrectly if this term is appropriate in this case. Ideal for the manufacture of zoom power transformer From TV receivers of old (still lamp) models (TS-180). Yes, and in the first TVs of the color image there are TR, which has the desired conclusions of the secondary windings.

What should be done?
- Measure the voltages on all windings. Even if they are indicated in the passport, on the housing, check their performance is worth it. With regard to TC-180, two "guns" are taken (they are given 6.3 V), and are connected by the jumper sequentially. As a result, it turns out the required minimum - 12.6.
- Collect the diode bridge. For example, based on the P / C of the d242a series. They can be found in the same TV used, dig and use. As an option, buy a ready-made diode assembly in the store (KBPC10005 or similar; the seller will tell you, if you need to explain why it is needed).

- Make a radiator. It is necessary that with a long charging bridge did not overheat. For diodes, the ribbed design of aluminum (or duralumin) plates is suitable. The purchase bridge is enough to fasten on the basis, laying under it only one, pre-applying a layer of thermal paste. It can be bought in the same radio market.

- Collect the scheme. It can be seen from the drawing that it does not need to be a "high electronics" - everything is extremely simple and understandable.

To make a charger according to this scheme for even those who only approximately understand what electrical engineering and its laws are. More "advanced" motorists are likely to like others. In the performance, they are more difficult, but their advantage is possible to regulate the battery process of the battery.


It often happens so that you need to go, but Akb "Sel", and charging, according to a well-known law, there is no hand. In such force majeure circumstances, a primitive scheme from a lamp and a diode may become a "chopstick".
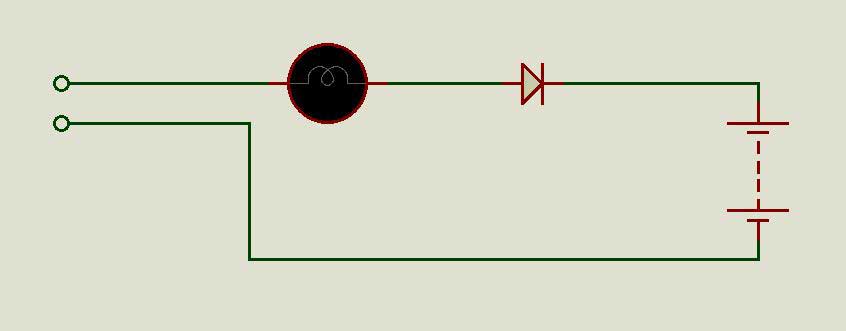
Since the load current is relatively small, you can use a 1N4004 diode or similar in characteristics. It turns on in the cathode chain (its output is indicated by a strip on the housing) to the terminal "+" battery. But the battery must be completely disconnected from the on-board network of the car to avoid further problems with its electronics.
The principle of operation of the scheme is easy to understand. The current is regulated by the lamp itself, since its intensity thread has a certain resistance (i \u003d p / u). The power of the lighting device can be selected by calculation, although to simplify the task it is enough to bring some examples. They are enough to understand how to assemble the scheme.


60 W Light Bulb provides in the circuit of a current of 0.27 A. with a diode (it passes only one semiprode of sinusoids) the load is 0.318 x I. To obtain i marks \u003d 0.15 A, you need to turn on the lamp to the chain.
Constantly use such a primitive scheme for charging a car battery, naturally, is not worth it. But in a difficult situation, when there is no other solution, it will even help it very much.
2017-07-20


 in Photoshop How to make a grid in photoshop CS6")


")


