UPnP (abbreviationUniversal Plug and Play) – kit network protocols published by the forum of the same name.
The UPnP Forum is an open association of industry representatives with the goal of setting standards for UPnP technology, which aims to simplify the integration of smart devices, initially at the home and then at the corporate level.
UPnP is built on the basis of such standards and technologies as TCP / IP, UDP, HTTP, XML and provides automatic connection between similar devices and their joint work online .
In this case, in order to give access, for example, to the resources of the FTP server located on the PC, it is necessary to perform a port forwarding operation on the router and assign a static IP address to the computer.
Note! Using the UPnP function on the router, all port forwarding settings are made in automatic mode, therefore this way suitable for people who are just starting to study the computer. The downside to UpnP is that it reduces the security level of your home network.
In most cases, the user gets a router with activated mode UpnP. Let's check the activation of this mode in the settings of our router.
To do this, in any available browser, write the IP address of your router (as a rule, this is 192.168.0.1 or 192.168.1.1), enter your username and password.
TP-Link

Section "Forwarding", subsection "UpnP" - "Status - Enabled"
D-Link

Section "Advanced", subsection "Advanced Network" is checked in the "Enable UPnP" field.
ASUS

"Internet" section, "Connection" tab - "Enable UpnP" checkbox is selected in the "Yes" field.

After the UPnP mode has been enabled on the router, you must also enable it in the application that requires port forwarding.
For example, to enable UpnP in Skype you must go to the section "Additionally", subsection "Compound" and check the box next to "Enable UpnP".
How to create a DLNA home media server

DLNA- a technology that allows devices to be combined into a single digital network for the purpose of receiving / transmitting and viewing various media content on-line.
In practice, it looks like this, there is a computer with hard disk larger capacity, which stores photos, films, audio recordings and other media content. 
What if you want to watch one of the films not on a PC screen, but on a large diagonal TV?
Or friends have come to you and you want to show photos from your vacation either on big screen TV, or on the phone, because you do not want to go into the house.
What if each family member wants to watch their media on their personal device (phone, tablet)?
The problem is solved by creating a PC-based media server and combining all devices into a single network using a router.
Draw your attention to that routers that support the 802.11N standard (data transfer rates up to 300 Mb / s) do not always cope with the transmission of large streaming volumes of high-quality video over Wi-Fi, and fading occurs on the TV screen.

Download and install the program.

After the installation is complete, you should specify from which directory and what type of content will be broadcast to the network (the "Add" button on right panel programs).
The selection is made by placing green dots in front of the respective catalogs and content type.
To add resources hosted on network or removable drives check the boxes in the corresponding boxes at the bottom of the window.

If necessary, you can add the program to startup and install the service « Home media-server", this will allow the program to start automatically after turning on the computer.
For DLNA launch-server, press the "Start" button in top panel programs, after which you need to turn on the TV.
To launch the content, right-click on the file and select "Play on ..." instead of three dots, there will be your device (in our case, a TV).
Local service "Home Media Server "(HMS) deployed on the user's computer with an ip address 192.168.1.2 will be available from playlists, but requires some additional configuration.
Installing and configuring HOME MEDIA SERVER (user manual Baryon)
The advantages of watching videos in this way over watching the built-in player via DLNA:
- lack of "brakes" when viewing files m2ts, while rewinding works;
- viewing files from a media server located outside of your local network using all the capabilities of HMS
I recommend version 1.19, it seemed to me that in this version the WEB interface works more stable (in other versions, sometimes an empty window opens in the browser). Direct link to the file: http://www.homemediaserver.ru/files/119/ setup_ms.exe
If you have not come across this program, here are the basic settings:
Select in the tab "Devices" "Samsung TV(DLNA, 16: 9, 1920x1080) "
and click on the tools icon in the "Default Device Type" line. In the device settings window, check the box Web

Here, on the bookmark "Additional" you need to uncheck the box "Creating playlists of media resources in Web-navigation mode"

Now HMS will be available at: http: // Your IP: 45397... The port number is defined on the tab "Server".
To be sure to disable video transcoding, which is turned on with or without reason, I recommend deleting everything except tsmuxer and hmsmpeg in the window "Transcoder-Profiles", after setting the checkbox "Transcoding Buffer - No Disk Usage"

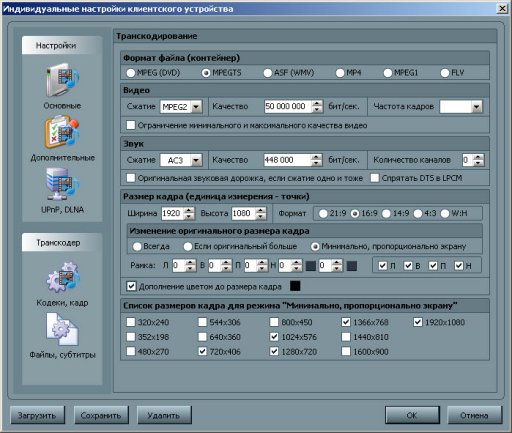
Note: transcoder tsmuxer does not recode the video stream, but only changes the container of the original video file to MPEGTS (while the extension remains the same), which absolutely does not degrade the image quality; transcoder hmsmpeg in combination with tsmuxer transcodes only the audio stream (DTS, DTS-MA, AC-3) into AC-3 (helps when the sound is interrupted on BD-Remux).
Transcoding loads the processor of the computer with HMS and, if the comp is weak, it may not cope with this task, which in turn will cause "brakes" on the image.
In most cases, you do not need to recode or transcode anything for the built-in Samsung player, and to play the file unchanged, you need to navigate in the HMS directory tree in the following sequence:
Movies-Transcoding-Media directories-Directory name- (T) File name-Original- (O) File name
- It's important to know:
- rewinding is possible only when viewing files that are not transcoded;
- pause works when playing both original and transcoded files;
- in files m2ts with a single track DTS-MA neither pause nor rewind works
http: // ip of the computer with HMS installed:45397
A window with a directory structure should open in the browser:

If the IP address of the computer on which HMS is installed is different from 192.168.1.2 , then in order for the HMS directory structure to open in the application, you must either change the IP of the computer to the specified one, or add a block with your IP to the start playlist of the application: start.xml:
- For application nStreamLmod
<!]>
tsnakeman
http: //site/widget/logo/hms.png - For application OVP (Online Video Player)
<!]>
Please note that the application message:
Not correct server response status: 1007!
may appear if port 45397 is blocking the firewall.
V modern world it is difficult to imagine our life without the use of high technologies. So, probably, many have heard of such a concept as UPnP. What is UPnP and DLNA support, we will try to figure it out. In addition to this, there are some basic tips for setting up the equipment, since this is not always done in a fully automatic mode.
UPnP. What is UPnP?
From the point of view of modern computing, mobile and media systems, UPnP is the universal connection of multiple devices when combined into one system. This is the so-called Universal Plug & Play standard. In other words, this technology can be called a universal device connection with its automatic initialization.
In fact, it is this approach that allows you to create a single home UPnP server on the basis of the available In this case, the information stored on one of the connected devices will be available on any other. Most often, computers, laptops, mobile devices, video or music players act as a source, and the playback of media content is carried out on a TV. But! In most cases, such devices should be DLNA compliant.
What is DLNA?
DLNA is a universal set of standards used to connect equipment for transferring media data. An ordinary home local network is used as a data transmission medium based on the automatic assignment of IP addresses to connected devices.

This does not change the external user address. IP is assigned exclusively within one local network. The main component used by DLNA (UPnP media server) is the router, which is responsible for automating the assignment of appropriate IP addresses to devices. Most often it is a (A) DSL modem or router, although there are still gradually aging connections using
Device connection options
Let's start with the fact that in this case the main step is to create a connection between the router and the TV. Today, you can find three main options:
- connection using cables (Ethernet);
- connection using an internal or external Wi-Fi adapter;
- connection by means of the mains without any cables at all.
However, here you need to clearly understand that automatic combination of devices into a single whole will not be enough. You need to create a virtual UPnP DLNA server (if one already exists, say, on a TV like Smart TV, it's generally great). The corresponding software, which will be discussed a little later.
Home Media Server Benefits
If we consider the list of basic capabilities using UPnP transceiving technologies (DLNA), they are quite diverse, although they are used only for working with media content.
So, for example, when creating a home media server, you can easily view photos and videos that are present on a computer or laptop, smartphone or tablet, on a large TV screen. But this is not all.

Few of the unprepared users know that with the help of such technologies it is possible to arrange and broadcast online television or watch videos on the same YouTube hosting not on a computer (with the appropriate software or a regular Internet browser), but on a television panel. And this, in turn, makes it a universal tool for watching programs, clips or films, listening to music, etc.
Now a few words about the basics regarding setting up a home media server. Understanding UPnP technologies is not enough here. What is UPnP, we have already figured out a little. Let's see how this knowledge can be applied in practice.

First, you will initially need to enable the use of these protocols on your router and your TV (or, if you have one, your cable or satellite TV box). On a router, as a rule, such settings are enabled by default, but to be sure, you should go to the appropriate section and make sure that the UPnP parameter is in the Enabled state.

But that is not all. In the "operating system", if this service is not involved, it also needs to be activated. To do this, go to the "Control Panel" in the section of programs and components (in older systems - the menu of add and remove programs), where you can view the installed and used Windows components.

V network services you need to connect the client discovery (management) service, and also use UPnP. What is a PNP client in this case? A universal bridge capable of automatically recognizing any media device, even without installing the appropriate drivers. To make it clearer, in the local wireless network when connecting a smartphone or any other mobile gadget, they are simply not needed.
Used programs
At this stage, let's move on directly to the software that allows you to create, use and manage your home media server. Today there are a lot of such packages. But they may have completely different capabilities.

For example, if you install a server based on Samsung apps All Share, only music, videos or photos stored in folders can be selected on the TV general access devices. There is no question of any broadcast of TV programs from a computer.

It is much more convenient to install a more serious package like Plex Media Server, which has such an impressive list of features that few programs can match it. In addition, the software itself is released in Russian and is distributed free of charge.
Concerning mobile systems, for example Android, for such devices it is appropriate to use a small applet called MediaHouse or Bubble UPnP. Both applications can be easily found in the service Play Market and install it on your device absolutely free. The advantage of such programs is that when installing the corresponding computer client, DLNA configuration is not required here at all. It is enough that the smartphone, tablet and computer (laptop) are connected to one private virtual network... After starting the application from a computer terminal, a list of all available devices... For fidelity in the computer version, you can "expand" desired folders(create sharing). That's all.
Conclusion
Hopefully, this brief information will give many novice users an understanding of UPnP / DLNA technologies. In general, even when setting up a home media server, there should not be any special difficulties either, unless the inclusion of UPnP support on the router, TV and in the "operating system" itself. But, as practice shows, at all modern devices and in latest versions Windows all of these services are enabled by default. The user only has to solve the problem by choosing the most appropriate software for his requirements.
In this article, we will set up a media server (DLNA) on a computer for a Philips TV. After setting up, you can watch movies, photos, and listen to music on your TV on your computer (laptop). All this by DLNA technology... This means that the TV can be connected to a computer via Wi-Fi. More precisely, the computer and TV must be connected to the same Wi-Fi router... By network cable, or wireless network.
Let me explain in more detail. Do you have a Philips TV (in this article, we will focus specifically on these TVs), with the support (if you have Smart TV, then DLNA support is definitely there)... Your TV is connected to a Wi-Fi router (via Wi-Fi, or using a cable)... Also, a computer is connected to this router. We launch a DLNA server on a computer, open the necessary folders with video, photos, or music, and just start viewing on the TV. Everything is by air, without wires. It is very convenient, you do not need to record movies on a USB flash drive all the time. We just get access to the computer, select the desired movie and watch.
In the way described below, you can run a DLNA server on Windows 7, Windows 8, and even Windows 10. To start and manage the server, we will use a free, simple excellent program"Home Media Server (UPnP, DLNA, HTTP)". I recently showed how, so there we started the server using a proprietary program. Since Philips does not have such a program, we will use the "Home Media Server". The program is really very simple and cool.
We need:
- Philips TV with DLNA support. The TV must be, or. I will show on the example of Philips 43PUS7150 / 12 with Smart TV (Android TV).
- A computer that is connected to the same router as the TV. It can also be connected by Wi-Fi networks, or over LAN.
- Home Media Server (UPnP, DLNA, HTTP) software for DLNA server setup.
You can do without third-party programs and set everything up by standard means Windows. I wrote about how to do this in the article.
In fact, a server launched in this way will be able to see absolutely any TV: Philips, Sony, LG, Samsung, etc. Sony, by the way, already has models on Android TV. So, the instructions for them should also work. Except that the access may differ before viewing the content of the DLNA server on the TV itself.
Setting up a DLNA server for your TV with the "Home Media Server" program
First, download and install the Home Media Server (UPnP, DLNA, HTTP) program. I recommend downloading it from the official website: https://www.homemediaserver.ru/index.htm. Click on the button Download opposite the EXE version. The file size is approximately 35 MB.
Save the file, then run it and follow the instructions to install the program.
Run the program with a shortcut on the desktop, or from the Start menu. First of all, we need to configure access to files on the computer. We can only open certain folders for the TV, everything local drives, or even removable media.
In the program window, click on the top button Settings... We are interested in the first tab Media Resources. There will already be three folders open. These are standard. To open access to all local drives on your computer, check the box next to Local drives... To open access to removable drives, check the box next to Removable disks.

If you want to open, for example, only one local disk or folder, then do not check these boxes, but click on the button Add... And in the explorer, select the drive or folder that you want to open for viewing on TV. The folder will appear in the list. You can delete folders by simply highlighting it and clicking Delete.

I think the meaning is clear. You can open only one folder, which contains, for example, your movies. And you can open all the disks. I advise you to check the box next to Local drives. Then, the TV will display the My Computer folder, in which you can view all the files.
At this point, the setting can be completed by pressing the button Ok... If you want, you can also go to the side tab Server, and change the name of your DLNA server. It will be displayed on the TV.

Click the button Ok to exit the settings.
To start the DLNA server, press the button Launch.

If your TV is turned on and connected to the router, then in the program window by opening the tab Playback Devices (DMR), you will see your TV. This means that everything is fine. If the TV does not appear, then check the connection and see the tips at the end of this article.

The program can be minimized. You can proceed to DLNA setup on your TV.
Watching DLNA Movies on a Philips TV from a Computer
Press on the remote remote control button SOURCES.

On the menu Sources of choose Network (media)... Or run the program Media from the Android TV menu.
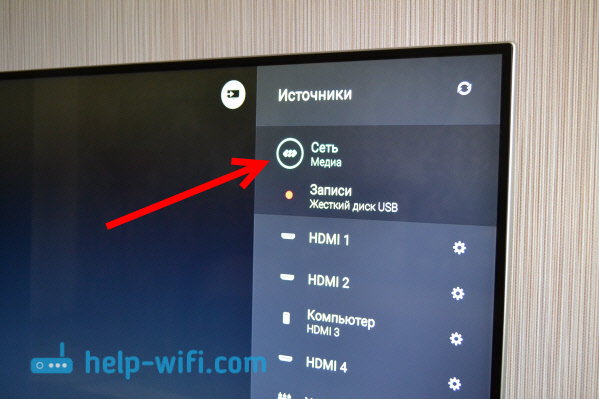
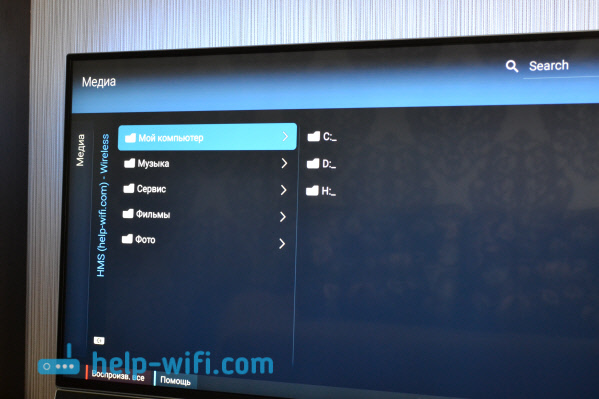
Select the server running on the computer from the list.
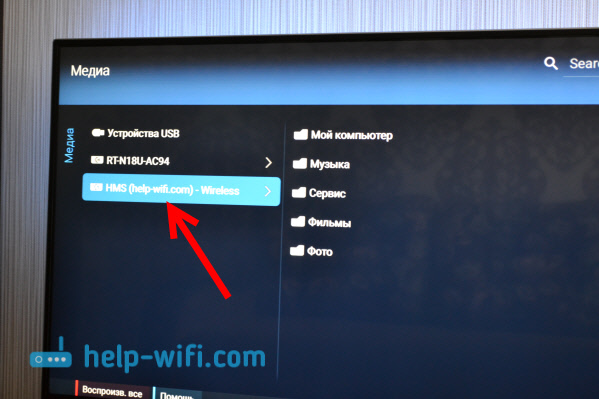
If you have opened all local drives, then you will have a My Computer folder. Select it, all disks will be there. You can open the folders you need, and start watching movies, photos, or playing music from them. If you open one of standard folders: Movies, Photos, or Music, then there will be all the available content, sorted into different categories. To view content by folder, select Media Resource Directories.
Select a folder with your movies, and just start viewing the desired file.

That's the whole setup. From the TV, we got full access to the videos, photos and music that is on your computer. The program "Home Media Server (UPnP, DLNA, HTTP)" will prevent your computer from falling asleep and interrupt the movie playback. You can also control the viewing from the program itself on the computer. There are a lot of settings and possibilities there, I think you can figure it out.
Why the DLNA server (files) is not displayed on the TV
The most common problem when setting up such a scheme is the lack of a running server on the TV. When the files from the computer are just not displayed.
In such situations, the first thing to do is always check the Wi-Fi connection of the TV and laptop, or the cable connection. Perhaps one of the devices just turned off. Turn your TV off and on. You can also restart your computer and start the server again. You can also try disabling the antivirus that can block the TV's connection.
If the DLNA movie plays with delays, it is buggy
In such cases, you most likely started watching a very difficult movie. And the router does not cope with the transfer of information. Usually, this problem appears on cheap routers, and when connected via Wi-Fi. Large movies, in high quality, which do not want to be played via DLNA, are best viewed from a USB drive or hard drive.
If, when opening a video, the TV says "Format is not supported"
There are times when the TV does not want to play a video file. Most likely, the standard player simply does not support the format, there is no codec. In this case, if you have an Android TV, then from Google play Store you can install the VLC player. He also knows how to play files from the local network. And most likely, it will play videos that were not opened with a standard player.
Owners of modern digital gadgets - smartphones, tablets, as well as high-tech TVs with Smart TV support can create a real media server at home, with which they can access different types multimedia content with different devices... How to use this opportunity in practice?
How a home media server works
What is a Home Media Server? This is a system within which various devices networked - computers, televisions (if they support the corresponding functions), mobile gadgets and other modern devices can interact and exchange multimedia content. Another notable technology that can be leveraged through a home media server is IPTV. That is, having built the appropriate one, the user will be able to organize something like a mini-TV studio at home.
Sharing media content in HMS
One of the main advantages of the HMS program, as we noted above, is its versatility. With its help, virtually any device can be combined into an infrastructure, the central part of which is a home media server. For Philips, Samsung, LG and other brands, it doesn't matter what type of software is on the main network module.
To solve a problem related to the organization sharing to media files - videos, photos, music - launch the program, then select from the list of devices displayed in the main window, the one with which it is supposed to launch files on the media server. For example, it could be a TV-enabled TV.

After that, you should specify the media resources that are to be distributed among the devices connected to the network. It is necessary to go to the HMS settings, select the item "Directory list", after - "Media resources", and then, by clicking the "Add" button, specify the address of the corresponding files. As soon as these actions are performed, it is necessary to press the "Scan" button, and then activate its automatic implementation, so that the relevant content is timely displayed on the TV.
How do I use the media server on TV? Very simple. You need to load an interface using the TV remote control, in which it is supposed to indicate the source of the TV picture - this can be an antenna itself, an Internet channel, a flash drive, or, as in our case, a media server created using the DLNA standard. The corresponding item should appear in the TV menu, and the files that we marked in HSM as being shared will be available for launch. Modern TVs tend to recognize the home media server without any problems. For LG, Samsung, Philips and other brands, ensuring support for standards like DLNA is the norm.
Using IPTV on your home network
Another common problem solved by the owners of home networks is the organization of TV broadcasting using IPTV technology. The most important condition here is that the user subscribes to the corresponding service of the provider (it is usually paid). When using the HMS interfaces, it is also very easy to configure the media server in terms of using the IPTV.

You will need to download and install the VLC Media Player program on your PC - it will be used to work with the relevant content. It is necessary to bind it to the HMS interfaces by going to "Settings", then - by selecting "Media resources", after - "Internet resources" and specifying the folder in which the VLC program is installed.
After that, you need to upload a playlist of TV channels in m3u format to HMS - many providers allow you to download these files from their sites. After that, go to "Settings" again and mark the "Internet TV" option in the "Transcoding profile" item. After that, you need to restart the media server. Then you can start watching channels in IPTV format using your TV.


