A laptop, computer or tablet with Windows 10 can be used as a Wi-Fi router that distributes the Internet to other wireless devices. Such a program point Wi-Fi access can be used to organize a local wireless network or general use Internet connection (wired or mobile 3G / 4G connection) available on Windows computer, multiple devices (phones, tablets and other devices). In the first releases of Windows 10, it was possible to create and manage such an access point only from the command line. Windows 10 1607 has a simple graphical interface to create an access point - "Mobile hotspot".
So, today we will look at how to create a virtual access point on Windows based 10 without using additional third-party programs... We assume that your computer has two network adapters: a wired Ethernet adapter (connected to the provider's network through which you can access the Internet) and a wireless Wi-Fi adapter... We want a computer with a network Wi-Fi card could be used by other devices as a Wi-Fi hotspot and provided general access to your internet connection.
Advice... Instead of wired connection 3G / 4G connection via USB modem or telephone can also be used to access the Internet.
Checking whether the Wi-Fi adapter driver supports Ad-Hoc mode
Before you start creating an access point, you need to make sure that the driver of your Wi-FI adapter can work in the virtual access point (Ad-Hoc) mode. For this in command line run the command:
netsh wlan show drivers
The command line will display information about the used Wi-Fi adapter driver and supported technologies (for more details on the supported Wi-Fi driver standards, see the article). Line presence Hostednetworksupported: Yes ( Hosted Network Support - Yes ) , indicates that this driver supports operation in access point mode. Otherwise, try to update the driver version or install another Wi-FI adapter.
Mobile hotspot in Windows 10
In Window 10 1607 (Creators Update) and above, there is a simple graphical tool for sharing the Internet over Wi-Fi. This function called " Mobile hotspot"(Mobile Hotspot). The function is located in a separate section Options -> Network and Internet -> Mobile hotspot... On this tab, with just a couple of clicks, you can launch the access point on your Windows 10. All you need to do is turn on the " Allow other devices to use my internet connection". Name new wifi networks and a password will be generated automatically (you can change them) and select an Internet connection to which you will provide access to other devices (the list Internet connection sharing). If your computer has only one internet connection, it will be selected automatically.

Limitation... Therefore, not all types of connections can be shared. For example, PPPoE connection thus, it will not be possible to distribute.
The same window will display a list of devices that are connected to your access point in this moment... The name and MAC address of the device and the IP address assigned to it are displayed. As you can see, up to 8 devices can be connected to the access point on Windows 10 at the same time.

Common Windows 10 errors when creating a mobile hotspot
If an error appears when you try to create an access point ‘ Unable to set up a mobile hotspot. Turn onWi-Fi‘Try to update the driver of your Wi-Fi adapter and / or remove the virtual Microsoft Wi-Fi Direct Virtual Adapter according to (it is through this virtual adapter that the Internet is distributed). After that, restart your computer and try turning on the mobile hotspot again.

Another one common mistake- ‘’. Try simply restarting your Internet connection.

Another error: ‘ Failed to set up a mobile hotspot because the computer has no connectionEthernet, Wi-Fior connecting to cellular network ‘. Most likely there are problems with your internet connection (no network). Check the connection. Also, this error appears if you are connected to the provider via PPPoE, this type of connection is not supported by the mobile hotspot.

Create a virtual Wi-Fi network from the command line
Let's look at how to create a virtual Wi-Fi hotspot from the command line.
Let's say we want to create a wireless network named Hotspot(this is the SSID of the network) and a password to connect 3 i3iPass... Open a command prompt (with administrator rights) and run the following command:
 If everything is correct, the command will return the following text:
Hosted networking is enabled on the wireless network service.
The SSID of the hosted network has been successfully changed.
The hosted network user key passphrase was successfully changed.
This command will create a new virtual wifi Microsoft Wi-Fi Direct Virtual Adapter that will be used by other wireless devices as an access point. Now let's enable the created virtual adapter:

Line Thehostednetworkstarted(Hosted network started) indicates that the software Wi-Fi hotspot has started successfully.
The Network and Sharing Center will have a new wireless connection With name Hotspot.

Other Wi-Fi devices can now see and connect to the created access point. Within such a network, devices can use common documents and peripherals, but access to the Internet through such an access point is not yet possible.
Allow connected devices to use the Internet connection
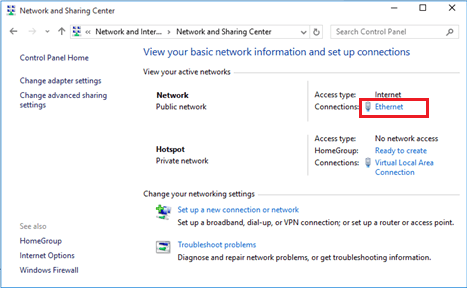
Now let's allow all devices connected to our virtual Wi-FI hotspot to use a wired network connection to access the Internet. To do this, in the Network Control Center, click on the name of the network adapter through which you can connect to the Internet. In our example, this is a connection named Ethernet.
 In the window with network adapter statistics, click the button Properties.

In the properties window of the network adapter, you need to allow general access to the Internet through this connection. To do this, go to the tab Sharing(Access). Check the box “ Allowothernetworkuserstoconnectthroughthiscomputer’SInternetconnection"(Allow other network users to use the Internet connection this computer), and in the drop-down list select the name of the virtual adapter that we created earlier.

Save your changes. In the Network Sharing Center window, the Hotspot network will change its type to Internet, which means that this network (and all devices connected to it) now have access to the Internet.

Now all devices that connect to the Windows 10-based access point we created get access to the Internet through an external network interface computer. Try to connect to the created hotspot from your phone, tablet or other laptop.
Viewing the current virtual hotspot settings
The current settings of the access point you created can be viewed using the command.
Netsh wlan show hostednetwork

The command will display the name (SSID) of the network, supported types of authentication and encryption, the maximum number of devices that can simultaneously use this access point (Max number of clients) and the current number of connected clients (Number of clients).
The following command outputs various settings security of your Wi-Fi hotspot and connection keys:
Netsh wlan show hostednetwork setting = security

The access point on Windows 10 does not know how to work in the hidden SSID mode.
Possible errors and solutions with Wi-Fi hotspot on Windows 10
Question... After restarting Windows, the Wi-Fi hotspot does not turn on.
Answer... To restore the wireless network, you need to start the hosted network with the command
netsh wlan start hostednetwork
You do not need to re-enter the network name and password.
Question... When I try to start the hosted network, I get the error “The Wireless AutoConfig Service (wlansvc) is not running. The hosted network couldn’t be started ”.
Answer... Start the service WLANAutoConfig(Wlan autoconfiguration service) from the services.msc console or from the command line:
net start WlanSvc
and re-launch the virtual hotspot
Question... When starting the Wi-Fi network, the error “Failed to start the hosted network. The group or resource is not in the desired state. "
Answer... Check if your Wi-Fi adapter is turned on. Then open device Manager, on the menu View select item Show hidden devices... In chapter network adapters find MicrosoftHostedNetworkVirtualAdapter and turn it on (Engage). If it doesn't help, run the commands sequentially:
netsh wlan set hostednetwork mode = allow
Then recreate the access point:
netsh wlan set hostednetwork mode = allow ssid = Hotspot key = 3i3iPass
netsh wlan start hostednetwork
Question... How can I view the status and settings of the access point?
Answer
netsh wlan show hostednetwork
Answer... You can stop the access point with the command:
netsh wlan stop hostednetwork
The access point is deleted (the SSID and network password are deleted) like this:
netsh wlan set hostednetwork mode = disallow
Question. The device is connected to a Wi-Fi hotspot, but the Internet is not working on it.
Answer: Check if your device has received settings DNS servers(try to manually specify the address public DNS google server- 8.8.8.8 in your client settings. Also try restarting the Sharing Service (ICS), or disabling and re-enabling sharing for the adapter that connects your Windows 10 PC / laptop to the Internet.
A few more typical problems due to which your access point may not work on Windows 10:

Sooner or later, the user may need to distribute the Internet from the main device to others. But at the same time, there may not be a router that would provide wireless Internet access. What to do in this case? The most simple method there will be installation special program such as Connectify. But it has a number of disadvantages, starting with annoying advertisements and ending with "unkillable" processes that slow down work operating system and a limited session of 1 hour, after which you have to restart the hotspot in the program.
In modern operating rooms Windows systems it is possible to create a virtual WiFi hotspot without using third party funds and programs. The thing is that these versions of the OS have virtual WiFi (Virtual WiFi) technology. So if Network Card supports SoftAP (a standard thanks to which two devices with WiFi can communicate without external intervention in the form of programs), then you can create a virtual adapter that acts as an access point and provides WPA2-PSK encryption.
How to make a wifi hotspot
Consider an option - an access point wifi windows 7 (there are differences in other windows operating systems, but the principle is the same).
The first thing to do for this is to configure the network settings. The command line (cmd) is launched with administrator rights and it is written in it:
netsh wlan set hostednetwork mode = allow ssid = "invented network name in English" key = "invented network password in English" keyUsage = persistent
How it's done with pictures. Run the command line with administrator rights: Start - All Programs - Accessories - Command Line.


Select with the right mouse button Run as administrator

Next, the command line opens. We register the command. as described above. The simplest thing is not to type the line from the keyboard, copy it to notepad, write down the network name and password and paste it into the command line.
After the command is executed, Windows will install the new hardware itself. After that, you can open Device Manager and find the newly appeared Microsoft Virtual WiFi Miniport Adapter there.
Open the Device Manager like this: Start, select the components Control Panel, System and Security, and then in the System section, select Device Manager.
Then you need to go to Network Connections, where the newly created Wireless network connection 2 (In version 8.1, it will appear only after the next step is performed - starting the network through the command line).

The second thing to do is to start the network. To do this, you need to write in the same command line (cmd):
netsh wlan start hostednetwork
This will launch SoftAP, and in the current connections, two connections will be displayed at once - permanent and virtual.
To stop work virtual network, you need to write in the same command line (cmd):
netsh wlan stop hostednetwork
When the computer is turned off, the virtual network also stops working and will not appear on the next computer startup. In order for it to be created every time, you need to configure this event through the Task Scheduler.
To configure Internet sharing, you need to go to the Properties of this adapter and go to Access. There, put a tick in the active box and find the created virtual connection in the list.
Thus, a wifi access point is created on windows.
The inconvenience of this type of connection is the impossibility of saving ready-made settings for instant connection in the future. That is, you either have to create a virtual network every time, or set its creation on a schedule, which is also not convenient. Therefore, programs were invented, one of which was mentioned above. it Connectify and Virtual Router Manager... They are very easy to set up, because in order to get virtual WiFi, it is enough to come up with a name and password for the session and specify the SSID.
Also, these programs are able to run from the start of the system. But these programs are also not without drawbacks - at the beginning of the article, reasons were named why it is better to choose built-in Windows capabilities... In general, this is a matter of taste - for one-time or constant use of a virtual network, it is best to contact standard tools operating system, and if you need it from time to time, then it is best to use a third-party program, for example MyPublicWiFi
Thinking about turning your laptop into a free Wi-Fi hotspot and sharing your existing Internet without buying expensive Wi-Fi routers? Or, finally, stop learning passwords for it from neighbors? Then this instruction is what you need. Before you can create a Wi-Fi network on your laptop, you must first connect and configure it. Read more about this in articles and.
First step. Preparation
- We open the network control center.
- In the window that opens, we find the line "change sharing settings".
- We open it and prohibit everything that relates to the general Internet in it.
Second step. Making a wireless connection
- By clicking on the "Network Control Center" located on the taskbar, we open it.
- Next, select the setting of a new connection.
- Find the "computer-to-computer" network setting and select "Next".
- We also skip the next window.
- We stop when we need to set a name for a new network.
- We write the name, and leave everything else unchanged and click "Next".
- After the notification that the network has been created appears, we return to the "Network Control Center" again.
- While in it, we go to the "Wireless Network Management", in which we look that as a result of all our manipulations we have a new network.
- Further, by clicking on it with the right mouse button, select "Properties" from the list.
- We go into them and make sure that there is no encryption.
Third step. Creating a network bridge
- Go to the "Network Control Center" and open the "Change adapter settings" tab located on the left side.
- Hold Ctrl key, and select "Wireless LAN Connection" and LAN connection.
- Click on any of them and select the bridge setting.
- We are waiting for the completion of the procedure for creating a bridge. (There will be visual confirmation).
- Important! During or after the creation of the bridge, a window will appear prompting you to select the location of the network.
- Reference! The bridge is needed to transfer the internet from the cable to the new wireless network.
- Choosing a home network.
Fourth step. Network connection
- Open the list of wireless networks and connect the created network by clicking "Connect".
- Next, we connect to the created Wi-Fi access point from another laptop, phone or netbook, having previously updated the list of networks that are available in them.
- Reference. If you encounter problems with creating a network bridge, check if Internet sharing is enabled.
The private network has been created. To turn off Wi-Fi on a laptop, use point 4.1, just click "Disable". It only remains to find out
Wi-Fi is one of the most popular ways to access the network. Wi-Fi has many different advantages, but most importantly, the user does not have to deal with wires. A distinctive advantage is also the fact that several devices can be connected to one network at the same time. To do this, you need to create an access point.
First of all, you need to make sure that the device on which the access point will be created has a built-in Wi-Fi adapter. Today, such adapters are found in all modern, but not all tablets or phones. Depending on this, you need to make sure in advance that the devices can connect to the Wi-Fi network. Wifi hotspot access can be done without a router, but a device with a Wi-Fi adapter is required.
Start creating a Wi-Fi hotspot
The first step in creating a Wi-Fi access point is as follows - you need to go to the "Network Connections" folder ("Network Connections" are located in the "Control Panel") and then double-click on the "Wireless Network Connection" icon. Then you can turn on Wi-Fi on your computer. After that, you need to call the context menu by right-clicking on the "Wireless network connection" icon. V context menu select Properties and in the window that appears, go to the tab " Wireless networks". On this tab, you need to find the "Use Windows to configure networks" field and put a check mark, after which you need to click "Add".
The next step is to enter data in the appropriate fields. The first step is to write down the name of the network, authentication must be open, and where data encryption is indicated, it must be indicated that it is carried out using WEP. The network key (must be between 5 and 13 characters) is also entered independently. The key index is necessarily equal to 1. Then you need to find the "Connect if not broadcasting" field and check the box. In the field "the key is provided automatically" the check mark is removed.
The last steps
As a result, there is open window"Wireless network connections"And the" Properties "tab. You need to find the "General" tab, where there is an item "Internet Protocol (TCP / IP)". At this point, you need to go to the properties and find the "Use the following IP address" field. Be sure to check the box next to this item. After it is delivered, you need to register:
IP address - 192.168.0.1;
Subnet mask - 255.255.255.0;
The preferred DNS server is 192.168.0.1.
After everything is done and if the entered data are correct, the Wi-Fi access point on Windows XP can be used.


 Pc radio does not display channel list")
