There are many types of BIOS: Ami, Award, Phoenix Award, UEFI. Let's figure out which buttons to press when loading a computer or laptop in order to go to BIOS and put the boot from the USB flash drive to install windows. I want to note that the traditional key delete, F2 to enter bios. Below are button combinations on how to enter BIOS to boot from a USB flash drive.
Buttons for entering bios from laptop and computer manufacturers.
Buttons from BIOS manufacturers

How to boot from a USB flash drive in BIOS to install Windows
To begin with, it is not always necessary to go into BIOS to swap the bootloader for installing windows. For this, there is a so-called launch menu. To go there, you need to turn on the computer, sometimes a key is written. AT this case F12. Press the key that is written in the word boot menu .

What will we start the computer with: a USB flash drive or other devices. The next step is to install windows.

How to boot from a USB flash drive in Ami Bios
- Click device priority.

In line 1st Devise set priority from the flash drive. This is usually all, but many have come across why I did everything right, but the computer does not start from a USB flash drive. It is just necessary to indicate sometimes, in addition to priority, forced loading in the line Hard Disk Drives.

- AT Hard Disk Drives we set a forced launch from a flash drive.
- AT 1st drive choose a carrier.
- Press F10 to save.
It turned out that in the settings of 1st Devise and Hard Disk Drives there is a bootloader with USB Flash those. we put a priority option, tried and failed. Then we set a forced launch and everything worked out for us. And so in all versions of the BIOS, if the priority boot did not work.

How to boot from a USB flash drive in Award Bios
- Go to advanced features.

- Click First Device, in context menu set from which bootloader we will start the computer. We have selected the primary devices to launch.

- Hard Disk Priority put the flash drive in 1st place. (If in First Device chose to start from the drive, then you need to put a USB flash drive in Hard Disk Priority).
- Award is ready, press F10 to save.
How to boot from a USB flash drive in Phoenix Award Bios
- Setting Advanced, in line First boot device put a flash drive or other device.
- Click F10 to save.

New UEFI BIOS in which you can control the mouse.
- Line Boot Priority, change places by dragging with the mouse. Can be done through advanced settings > Exit/Advanced mode and choose advanced mode.

- presses Boot and choose in Boot Options #1 loader.

It turned out to be very simple to go into BIOS and boot from a USB flash drive to install Windows, you just need to change just the type of boot. And remember about the priority and forced bootloader.
All the best!
One of the most FAQ users at Windows installation: "why can't the computer (BIOS) see my flash drive?". Naturally, I repeatedly answered it, and more than once gave my recommendations on the blog. Now I decided to collect all of them together in this one article.
I must say right away that the computer (laptop) "sees" your bootable USB flash drive (on how to create it correctly) - you need to configure the BIOS (UEFI) accordingly. If this is not done, then no matter how much you fight, nothing will come of it ...
In the article I will show on the example of several BIOS versions(UEFI) how to do it right. I think the note will be very useful for those who do not reinstall the system so often.
Perhaps the article should start not with the BIOS settings, but with how to enter it 👀... This is also far from being so obvious and simple for an inexperienced user.
In general, it all comes down (usually) to the fact that immediately after turning on the computer / laptop, while only the first logo appeared at boot, press special. key (preferably several times). If you pressed the correct key, you will see the coveted BIOS settings window.
Most common buttons to enter the BIOS: F2, Esc, Del. If you have a laptop, then it is possible that you need to press them together with the Fn button (ie, for example, Fn + F2). It depends on the keyboard settings in the same BIOS...
The main difficulty is that there is no single key to enter the BIOS! Each manufacturer may have their own specials. keys (sometimes, these are whole combinations of 3-4 buttons!).
Below I will give several options on how to enter the BIOS and give links to articles where you can find out these treasured keys.
Option number 1
If you have Windows 8/10 installed on your computer, you can not guess at all with the buttons, but enter the BIOS from the OS interface. This is done quite simply, see the instructions, the link to which is given below.
To help!
How to enter UEFI (BIOS) from Windows interface 8, 10 (without using special keys F2, Del, etc.) -
Option number 2
To find out the key to enter the BIOS, you can use the documentation (which came with your device upon purchase), or special. tables and specifications (of which there are plenty on the Internet).
I also have several tables and instructions posted on my blog, maybe you can learn something there.
Instructions!
1) how to enter BIOS or UEFI (instruction) -
2) tables with buttons to enter the BIOS / Boot Menu for different PC manufacturers -
Option number 3
Pay attention to the first screen that appears immediately after restarting the computer (to see the first screen - just restart the computer, not turn it on ...).
If you do not have time to see the "first" screen (or read the information on it) - press the key Pause (break).
If you manage to do this, the screen will "freeze" and wait for your next click (ie, you can read and view everything).
The screenshot below shows the AMI BIOS welcome screen: F2 or Del- these are the buttons to enter the BIOS settings (in English: to run Setup).

AMI BIOS: F2 key - enter BIOS settings.
Option 4
Some laptops have special buttons to enter the BIOS (they are usually small in size, and are located either next to the power button or next to the power socket).

You need to press them with a pen (or pencil) when the laptop is turned off. After clicking on it, the device will turn on and you will be presented with a boot menu (from which you can go to the BIOS).

Boot menu / Lenovo (as an example)
Basics of work
Note: for those who are already more or less familiar with BIOS management, this section of the article can be skipped.
Control keys, change settings
In the BIOS, you will have to manage and set settings without using the mouse (This scares many novice users. By the way, UEFI supports the Russian language and the mouse).
In fact, even in Windows (where the mouse works) - many actions are much faster to do using the keyboard!
Control buttons, for the most part, are the same everywhere. (although there is a difference, but usually it is not significant). One more detail: on the right or at the bottom in the BIOS there is a hint: it indicates all the main control keys (see photo below).

Control keys (AMI BIOS)
Main keys:
- F1 - call help (help);
- Arrows ← and → - select the settings section (for example, Boot, Advanced, etc.);
- Arrows ↓ and - select a specific parameter in the desired section;
- + and - - change the setting (increase/decrease);
- F10 - Save BIOS settings and exit (you can press it while in any BIOS section);
- ESC - exit;
- Enter - set (approve) the selected parameter / or open a parameter or section for further configuration (in general, one of the most basic keys).
In general, knowing these ten buttons, you can easily change all BIOS settings.
Saving settings
You can change any settings in the BIOS, but they will only take effect after you change them. save and reboot the device (by the way, the computer / laptop restarts automatically after exiting the BIOS).
- Press a key F10- in most BIOS versions, it means to save the settings and reboot the device;
- Go to section exit and click on Save Changes and Exit(save settings and exit, an example is shown in the screenshot below - arrows 1 and 2).

By the way, you can exit the BIOS without saving the settings - to do this, select in the section exit option Discard Changes and Exit (discard settings and exit / don't save settings, exit).
You can also exit the BIOS by simply restarting the computer. (although it's not recommended to do this once again...).
Reset settings to optimal
If you changed any settings in the BIOS and the computer stopped booting (or, for example, the sound disappeared) - well, or you just decided to return everything as it was - then know that the BIOS has a special reset function. Those. this function will return all settings to default (i.e. will do everything by default, as it was when buying).
There are two ways to reset settings:
- press the button F9(although it does not work in all BIOS versions);
- go to section exit, then click on Load BIOS Defaults(see screenshot below).

Reset settings to default - AMI BIOS
By the way, after loading the default settings, you need to save them by pressing F10 (about this - see a little higher in the article).
In a variety of different versions BIOS - the name of the item for resetting the settings may differ slightly. For example, the screenshot below shows the section exit at Dell laptop- click here Restore Defaults and then save settings - Save Changes and Reset. After rebooting the device, it will work with default settings.

Reset settings to default // Dell laptop // Restore Defaults
BIOS setup for booting from a USB flash drive / disk
Let's move on to the most important thing. I will consider the BIOS settings using the example of one of the most popular BIOS versions - AMI BIOS and Award BIOS(in principle, the main thing is to understand the meaning - everything is done in the same way everywhere, there is a slight difference in the menu designation).
AMI BIOS
First you need to go to the section Advanced(extended, see arrow 1 on the screenshot below), then you need to open the section USB Configuration. Then check that all USB ports are enabled (i.e. that the inscription next to them is on Enabled)!

Check USB ports - are they enabled?
- 1st Boot Device - CD/DVD... (means that the first boot device from which the PC will try to boot is CD/ DVD disc gadfly. If it does not have a boot / installation disk, then the computer will try to boot from the 2nd Boot Device);
- 2nd Boot Device - SATA: 5M-WDC WD5000 (HDD computer. Windows is installed on it, so it will boot if there is no disc in the CD / DVD drive).
Naturally, with such a boot queue, the computer will not boot from a USB flash drive!

How it was and how it should be to boot from a USB flash drive // AMI BIOS
In order for the BIOS to see your flash drive, you need to change the boot queue to the following:
- USB: Generic USB SD;
- CD/DVD: 6M-TSST;
- SATA: 5M-WDC WD5000.
In this case, the BIOS will first check the USB flash drive inserted into the USB port, then the CD / DVD drive, and then boot from the hard drive. In most cases, the best option.
Award BIOS
In principle, it is configured in the same way, a slight difference in the designation of the menu. And so, after entering the BIOS, I recommend immediately opening the partition Standard CMOS Features.

In this section, check if USB ports (devices) are enabled. Just check that opposite the lines where "USB" is mentioned is everywhere (example in the screenshot below).

USB ports: do they work? Work!
- First Boot Device (first boot device) - USB-HDD (most optimal choice for booting from a USB flash drive, this is a USB-HDD. In exceptional cases, if the BIOS suddenly does not see your flash drive, try USB-FDD) ;
- Second Boot Device (second boot device) - Hard Disk (hard disk).

Laptop BIOS setup
It is performed in the same way as for a computer. True, there may be some "serious" differences in individual models, but in general everything is identical.
In laptops, to configure the boot, there is a separate BOOT section. By opening it, all download options are available to you.
I will give a universal version of the parameters, which is most often used (using Dell Inspiron 3000 series as an example):
- secure boot- (protected boot mode disabled. Only newer Windows versions 8, 10, and many have several operating systems, or use 7-ku ...);
- - (fast loading - in most cases, it doesn't speed up much...)
- 1st Boot Priority - the first boot device (USB-drive);
- 2nd Boot Priority - the second boot device (hard drive).

In many other laptop models - BIOS setup is performed in the same way, the menus and settings are similar or the same.
A few words about UEFI
On the modern computers and laptops use UEFI instead of BIOS. It is a more extended and advanced version of the BIOS: for example, you can work with the mouse in it, there is often Russification of the menu, etc. As part of this article, I will say that in terms of editing the Boot partition, everything is the same here ...
For example, the photo below shows the main UEFI window on an Asus laptop, which is displayed immediately after entering it. In order to open the extended menu and find the Boot section - pay attention to the bottom of the window: you need to press the key F7 (or just press F8- and immediately start downloading from a USB flash drive).

In the advanced settings in the Boot section, everything is done in the same way as in the "regular" BIOS: you need a flash drive (in my case "jetFlashTranscend 16 GB") just move to the first place, and then save the settings (key F10) .

Booting from a flash drive / disk using the Boot Menu
Why set up and change the boot queue in the BIOS when you can boot from a flash drive by pressing one button?
We are talking about Boot Menu - boot menu, translated into Russian. If you call this menu, then you can choose where to boot your computer / laptop: from a hard disk, from a CD / DVD, from a flash drive, from an SD card, etc.
The button for calling the Boot Menu is usually indicated on the first screen that you see after turning it on. An example in the photo below:
- F2 or Del - enter the BIOS settings;
- F11 - call Boot Menu.

By calling the Boot Menu, you will see all the devices from which you can boot. An example in the photo below: you can boot from a hard drive, flash drive and CD / DVD drive.

Why the BIOS does not boot from a USB flash drive / disk
1) Disabled USB controller in BIOS
Almost all BIOS versions have an option to disable USB ports. Of course, if they are disabled, then you will not be able to boot from a USB drive. Check if they are enabled (or reset the settings to default) - a little higher in the article, I gave how this is done.
2) The bootable flash drive is written incorrectly
Often it can be written incorrectly due to incorrect program settings. (in which you recorded it), or a "broken" ISO image with the system. I recommend reading this article:
3) After rebooting the computer, the installation starts again
Quite often the following situation occurs. You inserted a USB flash drive, the computer booted up from it and the installation began, then it rebooted, and the installation began again. And so in a circle...
In this case, just remove the flash drive and restart your computer. It will boot from the hard drive (where have already been copied setup files from flash drive)- and the installation will continue (rather than start over).
4) USB 3.0 and USB 2.0
Now on modern PCs / laptops there are several types of USB ports: USB 3.0 (USB 3.1) and USB 2.0 (USB 3.0 - marked in blue). "Old" Windows operating systems do not support USB 3.0, so in cases where the flash drive is "invisible", I recommend trying to install the OS from USB port 2.0.

Case in point: USB 2.0 and USB3.0
5) USB-HDD, USB-FDD, etc.
In the BIOS, when setting the boot order, you usually need to select a USB-HDD, but in some cases the BIOS does not see the USB flash drive. In this case, try changing the USB-HDD to USB-FDD.
6) Error "Reboot and Select proper Boot device or Insert Boot Media in selected Boot device and press a key"
It often occurs if you have connected, for example, a disk (floppy disk) to a computer that does not have boot records. Simply remove and disconnect all media other than the one from which you intend to install (for example, USB flash drives).
Instruction! Solution for "reboot and select proper..." error -
7) Disconnect all add-ons from the computer. equipment
It is also recommended to disconnect the second monitor, printers, scanners, etc. from the computer. The fact is that when installing Windows - this can create additional problems. For example, I had a case where Windows misidentified the default monitor and was "sending" the image to another monitor that was turned off (and I observed a "black" screen...).
8) Enable Legacy Mode
In the Boot section, you need to change the boot mode from EFI (UEFI) to Legacy (if any). I made a recommendation about this above. The fact is that not all Windows OS support the "new" chip (besides, you need to correctly burn the USB flash drive for this installation mode).
9) Turn off Secure Boot
In the BIOS, in the Boot section (usually) there is a Secure Boot option - also disable it, set it to Disable / Off (if any).
10) Enable Launch CSM (if available (usually the Boot partition))
In the BIOS, under the Boot section, change the Launch CSM mode to Enable (if available).
Installing, reinstalling and restoring the operating system, as well as carrying out certain types of diagnostic work, as a rule, requires the mandatory use of special boot disks or flash drives. But in order for the computer to be able to boot from external media, in the settings of the basic input / output system or otherwise BIOSa, you must set the appropriate priority, that is, literally indicate from which source the system should boot.
The procedure for setting up booting from external media is quite simple, however, it raises many questions for many novice users. And this is quite understandable. Firstly, it is rare to encounter the need for such a download, and secondly, in different models computers, the procedure for entering the BIOS and changing boot priorities may differ in detail. Let's consider everything in more detail.
On the this moment there are two types of basic input/output system: classic BIOS and its enhanced version UEFI. Both of them represent special programs, recorded on the motherboard chip and designed to configure and check the readiness of the hardware components, and transfer control of the PC to the operating system. Unlike BIOS, UEFI is more autonomous, it has a convenient GUI with mouse support, allows you to integrate drivers, run EFI executable files, work with GPT disks. In addition, computers with UEFI start up an order of magnitude faster than PCs with a regular BIOS.
How to get into BIOS or UEFI
To get into the BIOS or UEFI, immediately after turning on the computer, press and hold the Del, F2, or Esc button. Which button should be used to enter the BIOS / UEFI in your desktop or laptop model should be indicated in the supplied user manual. However, on new computers with Windows 8.1, this may be a problem. If technology is enabled on the system fast loading, you just won't have time to press Del or F2 in time. In this case, you must do the following:
open Settings -> Change PC settings -> Update and recovery -> Recovery -> Advanced boot options, and then click Restart Now. After rebooting, you will be taken to the "Select Action" window. Click Diagnostics -> Extra options-> UEFI Firmware Options. The computer will restart and you will be taken straight to the UEFI interface.

Note
Determining which interface your computer is using is very simple. To do this, press Win + R and in the window that opens, execute the msinfo32 command, and then in the system information window, find the item "BIOS Mode". old version I / O systems will be marked "Obsolete", the new one - "UEFI".

Configuring Boot from CD/DVD/USB Flash Drive in BIOS
In most BIOS versions, the Boot section is responsible for configuring boot options.
It contains a list of all devices connected to the computer. Since the hard drive and CD-ROM are built-in components, they will be present in the list for any, but if you want a flash drive to be there, you need to insert it into the USB port in advance, even before entering the BIOS. The first device in the list is the device from which the system is currently booting. Using the arrow keys, you can change the boot priority, and by pressing the F10 key, you can apply the new settings.
In some BIOS versions, the Boot section may have additional options, such as Boot Device Priority, Hard Disk Drives, and so on.
In the case of booting from a CD / DVD-ROM or a regular flash drive, it will be enough to move this device to the top of the list in Boot Device Priority and save the settings. If the flash drive is formatted as an HDD, you will first need to go to Hard Disk Drives, select the first device (1st Drive) in the list, press Enter and select the flash drive in the menu that appears. Then the same will need to be done in the Boot Device Priority subsection. Save the settings with the F10 key. This is about AMI BIOSes.


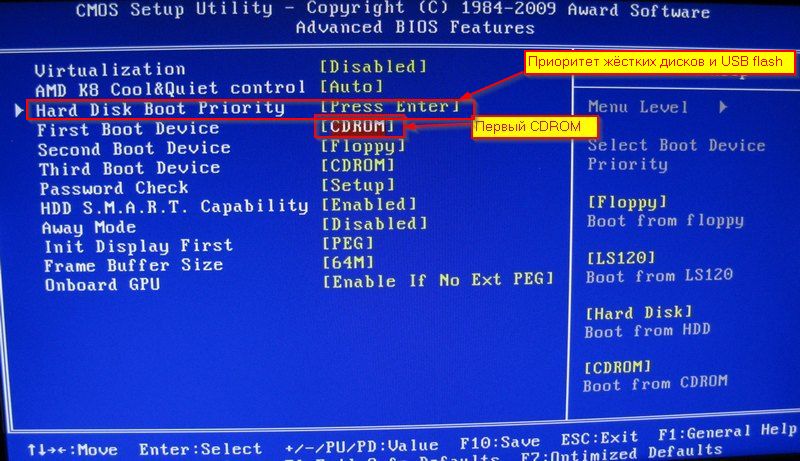
The procedure for setting up booting from a DVD / USB flash drive in BIOS AWARD or Phoenix is somewhat different. Here in the main BIOS menu you need to find the Advanced BIOS Features section, and in it find the First Boot Device item, which is responsible for prioritizing boot devices. Being on the First Boot Device, press Enter and in the menu that opens (list of devices), select the CD-ROM or, if available, a USB flash drive. If there is no flash drive in the list, switch to the first item Hard Disk Boot Priority, press Enter, select our flash drive in the list, move it to the top of the list. To save the settings, press Esc twice, and then Save and Exit Setup and confirm the saving of the parameters with the Y key.


Setting up boot from CD / DVD / flash drive in UEFI
Setting boot priority in UEFI is easier, and not just because you can use a mouse. Most UEFI interfaces have a Boot Priority panel at the bottom of the window, which displays all devices connected to the computer, including flash drives and removable HDDs. To install a boot from a particular device, just drag it with the mouse to the beginning of the panel, and then save the new settings when you exit UEFI.

You can also click the "Exit / Advanced mode" button, go to the Boot tab in the window that opens, select "Boot Option # 1" in the Boot Option Priorities list and set a USB flash drive, hard drive, CD-ROM or other connected to computer device.

The new settings are saved when exiting UEFI or by pressing the F10 key.
Have a great day!
Not from a DVD disc, as many people usually do, but from a USB device, then the first step is to go into Bios and set the boot from a USB flash drive. Otherwise, you won't get anything. Since, when booting, the computer will access either hard drive, or to DVD.
In this article I will try to describe in as much detail as possible and for different versions of BIOS.
Booting from flash drive in bios
I won't be wrong if I say that laser discs are slowly receding into the background. More and more are being released personal computers without DVD-ROMs. The distribution kit of the operating system also does not have to be on DVD, it can easily fit on a flash drive. I won't be surprised if they soon disappear, yielding to cloud storage. One way or another, but as long as the technology exists, it must be able to use it.
How to get into Bios
Each manufacturer of computers and laptops has its own buttons to get into the BIOS, such as "F1", "F2", "TAB", etc.
But the most common option is of course "Delete".
Being directly in the BIOS, we are interested in the "Boot" section - it is there that the parameters that we need are changed.
Phoenix Award
Now it's a rarity. I remember him from old computers with operating Windows system 98. I just had one.
The first thing we do in this and subsequent cases is to check if the USB controller is activated. To do this, we need to go to the "Peripherals" section.
And opposite the inscription "USB Controller" the parameter "Enable" must be set. If it is missing, it should be included. This is done with the help of Top and Down, - go to the desired line, press Enter and select.
Now we press "ESC" (this is the exit from the previous menu) and head to "Advanced". Here we are interested in the line "First Boot Device", where using the above method we set the value to "USB-HDD", as shown in the screenshot below.


Award
Again, the very first thing is to see if the controller is connected. Heading to "Integrated Peripherals".

We find "USB Controller". Use Enter to select the "Enable" value.

We return to the main ESC window with an apt, head to "Advanced BIOS Features" and then "Hard Disk Boot Priority".

In the picture above, unfortunately, booting from the hard drive is set. And there should be "Patriot Memory". You can change it with the help of "+" on the keyboard, by going to the desired line.

The next step is to press Enter on the line "First Boot Device". We now have a “CD-ROM” there, and we need to put the “USB-HDD” or “USB-FDD” already familiar to us.

And save the settings by going to "Save & Exit Setup".

AMI
Again, at the very beginning, we check the USB controller for operability. To do this, go to "Advanced" and then "USB Configuration".

Please note that "Enable" is set opposite "USB 2.0 Controller" and "USB Function".


As you can see from the picture below, the hard drive is currently exposed. Using Enter, change the position to "Patriot Memory".

Should look like this.

Then we go to "Boot Device Priority".

BIOS UEFI
For example, I will use a Lenovo laptop.
After turning on, simultaneously press the combination of hot keys En + F2. This brings us to the InsydeH20 Setup Utility. More often it can be observed in laptops from Toshiba and Acer. Use the Up and Down buttons to go to "Security" and, on the contrary, "Secure Boot" set "Disabled". Attention, I did not highlight this word in vain!

Now we go to "Boot" and look. Should be UEFI opposite "Boot Mode".

Little by little, the discs are becoming obsolete. Increasingly, the question arises of booting the operating system from a flash drive. Or such a need arises due to technical reasons. For example, in a portable PC, the drive is out of order. In this case, booting a laptop from a USB flash drive will help out. Thus, you can work with netbooks, in which the drive is simply not provided. However, it’s not enough just to put information on a USB flash drive, first you need to format it and turn it into a bootable one. Let's deal with everything in order.
What is download
If it’s quite simple, then downloading is sending programs or any data in general to a computer from a device connected to it. Why are we talking about loading the operating system every time the PC is turned on? But because in this context the hard disk (from which the OS is sent for direct work already in random access memory) acts as a connected device. Both the drive and the flash drive are perceived as the same connected device.
Therefore, in fact, it is absolutely indifferent for a computer or laptop where the necessary information comes from. Will it be booting from a flash drive or directly from the hard drive. It's all about the BIOS settings.
How to boot from flash drive
BIOS is an abbreviation of English words that translate as base system input-output. And she has a strict order of tasks. By default, your computer will first try to boot from a floppy (historically). Then he will turn to the drive. Then comes the turn of the hard drive. But booting from a USB flash drive in the BIOS is either in last place (which you can’t get to bypassing the hard drive), or it’s not provided at all. To correct this situation, you need to change the priority of the system. It's easy to do.
You can enter BIOS only when you start the computer until the download starts. The buttons for entering almost every manufacturer are individual. Ideally, it would be correct to look at the documentation at motherboard. But, based on the fact that ideal situations in our lives are extremely rare, just try to ask Google (or Yandex - it's more familiar to you) which key will allow your computer model to enter the BIOS. And in the most extreme case, you can use the "scientific poke" method. That is, successively try all possible combinations. There are not so many of them - these are the Esc, Del, F2, F8, F9, F10, F11, F12 keys.

For example, let's take Asus laptop. Booting from a USB flash drive should be a priority for him. When starting the computer, continuously press the F2 key (if it does not work, try Del). This will take you to the BIOS. You can only use the keyboard to navigate here. Use the arrow keys and the Enter key.
Go to the tab that says Boot (it means "boot"). There you are interested in the line Boot Device Priority ("priority of boot devices"). After confirming the selection of this line by pressing the Enter key, you will see a numbered list. In the first row in the second column in square brackets will be written floppy drive("floppy drive"). The second position is Hard Drive (“hard drive”), and the third one is Disabled (“disabled”).
When any line is selected, a window appears with a list of possible assignments. In addition to those described above, you can install a CDROM ("disk drive") or USB Device ("device connected via USB port"). This is exactly what is required in order for boot from a USB flash drive to be activated in the BIOS. After you set the new command priority, press the F10 key and confirm your choice by clicking on "Ok" in the window that appears. After these changes in BIOS, booting from a USB flash drive will be carried out automatically.

USB media preparation
However, if you just throw it on the program, nothing will work. In order for the computer to boot from a USB flash drive correctly, the flash drive must be bootable. This can be achieved either using special programs, or by writing the necessary tasks on the command line. First, consider two popular programs. We will not dwell on the fact that to begin with the program must be installed on a computer. Let's go straight to work directly with her.
A few words about the ISO format
Don't just try to copy the files. Be sure to find in ISO format. The fact is that the creators of programs often use copy protection in some files. This will be enough to make the whole program not work. And the peculiarity of the disk image in ISO is that each byte is copied sequentially there. Conventionally, this can be illustrated by the difference between a picture painted by an artist and a digital photograph. They can display the same object, but the photo will still be more accurate. So, in order for the boot from the USB flash drive to be successful, you need exactly the “photo” - the ISO disk image.
How to work with UltraISO
- The program must be opened using administrator rights, otherwise nothing will work. To do this, right-click on the icon. In the menu that opens, select "Run as administrator".
- Then expand the File menu ( top row- first position) and give the command "Open ...". Or, if you prefer using the keyboard, press Ctrl + O.
- To this moment operating system in ISO format must already be in the computer's memory. Select it by pressing the left mouse button.
- Now go to the "Boot" menu. This is the third position on the top row.
- Give the command "Burn image hard drive... "(next to the desired line is the icon of a four-color shield).
- Carefully check the information that will appear in the pop-up window. Pay special attention to the "Writing Method". It should say: USB-HDD +.
- Click on the "Record" button (bottommost row).
- Do not be afraid of the warning that all information will be erased. Confirm that you wish to continue.
- After that, the recording process will begin, during which the window will indicate the data on what stage the recording is at. You will need to wait a few minutes.
- Soon the program will please you with the message "Recording completed!".
Do not be afraid of such a voluminous description. In practice, everything happens easier than it looks. It's just that this detailed explanation will save you time (and possibly nerves) when you first get acquainted with the program.
Windows7 USB/DVD Download Tool
Once you install the Windows7 USB/DVD Download Tool on your computer, there are only three steps to take. simple steps. Remember that the program must be opened with administrator rights.
- Step one: in the window that opens, the program will ask for the source file (source file). Click the Browse and Next buttons.
- Step two: Choose media type ("select media type"). The choice is yours USB device(flash drive) and DVD (disc). Choose the first type.
- Step three: specify the path to the flash drive and click Begin copying (“start copying”).
The program will do the rest on its own. You just have to wait until the end of the copying process.
Although, at first glance, this program seems easier to use, it would be useful to know that there were times when booting Windows 7 from a USB flash drive written by the above program simply did not start. This doesn't always happen. But if you run into a similar problem, just use UltraISO. Windows boot from a flash drive recorded by this program always works correctly.

Using your own resources
However, perhaps without resorting to any additional programs. It will suffice to ask desired parameters on the command line.
Left-click on the "Start" button (the icon with the Windows logo in the lower left corner of the desktop). In the search bar, type the word "execute". In the list that opens, select the "Run" program. In most cases, it will be first on the list. In the field that appears, enter You called command line. And now we will describe how to act with it.
Working with the command line
We will work to ensure that on the laptop we have a boot from a USB flash drive. Acer Aspire serve as a prototype. If you did everything correctly, the following line should appear: С:\Users\ACER>. In this line, enter (call a utility that manages partitions on a hard drive). The computer will provide the requested information. In the case of Acer Aspire, it looks like this:
- Microsoft DiskPart version 6.1.7601.
- Microsoft Corporation, 1999-2008.
- On the computer: Acer-V5_PC.
- DISKPART>.
Enter the following command: list disk (request a list of available disk drives). A table will appear with a list of disks whose numbering starts from zero. See what number is assigned to the removable media you have chosen (the size column will help determine). In our example, this will be "Disk 1". Type in the line: select disk 1 (“select disk 1”). Remember that the number may differ depending on what position your computer has determined for the flash drive. A confirmation should appear:

- Disk 1 selected.
- DISKPART>.
- create partition primary ("create a primary partition");
- select partition 1 ("select partition 1");
- active ("make active");
- format fs=NTFS ("format to NTFS system").
Wait until the process score reaches 100%. At this stage, if desired, you can assign an individual volume letter to the flash drive. Although this is not required. But if you decide to name it, enter: assign letter = T (“assign the letter T”). You can choose any letter. And the final touch is the Exit command.
What else needs to be done before installation
After all the preparatory work has been done, you can proceed directly to installing the operating system. Let's try to avoid everyone pitfalls in this process.
So, first of all, let's remember that Windows download from the flash drive will be made to the C:\ drive. Therefore, it is necessary to important information from there, save either to another drive or to removable media. All information on this disk will be lost.
The same goes for everything software. However, it is better not just to move the programs to an adjacent disk, but to reinstall them again. This will allow you not to clog the system registry once again.
Pay special attention to drivers. In some cases, they are attached to a computer or laptop, but sometimes they need to be installed or updated. Be sure to save the drivers from the C:\ drive to any other drive. Otherwise, after the download from the USB flash drive has already been completed, you may regretfully find that, for example, the Internet connection is not supported due to the lack of the correct driver. Therefore, after installing the operating system, the first step is to re-equip your computer or laptop with all the drivers.
Booting Windows 7 from a flash drive

Installing an operating system is not such a terrible and complicated action as it might seem at first glance. Especially with this detailed step by step instructions you have nothing to fear at all. Just be careful and do not confirm the action if you do not understand why it is needed.
If you have already prioritized booting from a flash drive, simply restart your computer (the flash drive must be connected, of course). It should appear with an inscription at the bottom: Windows is loading files ... ("Windows is loading files"). This means that the process of copying data from the media has begun.
Soon you will see the inscription Starting Windows (“ Starting Windows”), after which you will see the installation window on the usual colored background. The first thing you will be asked to choose is your preferred language, time format, and keyboard layout. Everything is selected without problems from the pop-up lists. Click the "Next" button. On the next window, you are only interested in the "Install" button (it is located in the middle of the screen). Press. Then accept the terms license agreement(Tick the box and click Next.)
The next step is to select the installation type. You need a full installation (second option). Now the computer will offer you disks on which you can install the system. It is preferable to choose one that allows you to reserve at least 50 GB of space for Windows. Select it by clicking the left mouse button. Below you will see a list of actions that can be performed with this disk. Click "Create". At the moment we are making a partition where the operating system will be stored. You will see the size data (don't be alarmed by the huge number - it's megabytes). Click Apply.

The system will warn that, in addition to this section, it will create additional ones. This is fine. Agree ("Ok" button) - and click "Next". This is where the installation process really begins. It is quite long, it can take something like half an hour. During installation, the system will reboot itself several times. However, no action is required from you.
After the installation is complete, there will be only a couple of touches left. You will be prompted to enter a username and computer, set a password (you can skip this step) and enter an activation key (you can skip this too, but you still have to activate the program within 30 days). Last action- setting the time and date.
Congratulate Yourself - download from Windows flash drives was successful!


