Secure Boot in BIOS with UEFI support
Secure Boot Protocol Secure Boot, based on special certified keys available only for Windows 8 and higher, will not allow you to install the operating system on your computer from any installation media other than media with "eight" or "ten". Therefore, to start installing another system on your desktop or laptop, you will need disable Secure Boot in UEFI-BIOS.
The "Secure Boot" parameter, which is responsible for disabling the Secure Boot Protocol, is in most cases found in the "Security", "System Configuration" or "Boot" sections. But I want to say that to install, for example, Windows 7 on a new laptop with UEFI-BIOS, it will not be enough to disable only "Secure Boot" in the UEFI-BIOS, you also need to enable the compatibility mode with other operating systems.
The parameter responsible for this is called differently for all manufacturers: "Launch CSM", "CMS Boot", "UEFI and Legacy OS", "CMS OS". And it is, in the overwhelming majority, in the "Advanced" section, and in it, in the subsections "Boot Mode" or "OS Mode Selection".
On a laptop:
How to disable Secure Boot and UEFI on a Toshiba laptop
When the laptop boots, press the F2 key and enter the UEFI-BIOS. Go to the "Security" section and find the "Secure Boot" parameter, switch it to the "Disabled" position.
In such a simple way, we were able to disable Secure Boot in the UEFI-BIOS. But that is not all. Now you need to enable compatibility mode with other operating systems. We go to the "Advanced" section, find the "System Configuration" subsection and go into it.

Here we select the "Boot Mode" or "OS Mode Selection" parameter, and switch it from the "UEFI OS" position (possibly "UEFI Boot") to the "CSM Boot" position (possibly "UEFI and Legacy OS" or "CMS OS") ...

For the changes to take effect, press F10 and confirm the saving of changes by selecting "Yes". Reboot. Now we can load any operating system on our laptop.
How to disable Secure Boot and UEFI on an HP laptop
Sometimes it’s not so obvious. For example, on some HP Pavillion notebook models, you need to perform a few additional steps to disable Secure Boot.
Press the F10 key when loading the laptop (possibly ESC, then F10) and enter the UEFI-BIOS. We go to the section "System Configuration", we find the subsection " Boot options"And go into it.

Find the "Secure Boot" parameter and switch it to the "Disabled" position. On the other hand, we switch the parameter of the compatibility mode with other operating systems "Legacy support" to the "Enabled" position.

We answer the warning with “Yes”.
In order for the changes to take effect, press F10 and confirm the saving of these changes by selecting "Yes". Restart your computer. After the reboot, a window appears with the warning "A change to the operating system secure boot mode is pending ...". In English, we are offered to enter the code 8721 on the laptop keyboard (in your case, the code, of course, will be different) and press Enter. After this, the changes in the UEFI-BIOS settings will be saved and the laptop will reboot again.

When you turn on your HP laptop, press the ESC key and you will be taken to the start menu. In it, select "F9 Boot Device Options" and, going to the boot menu, select the installation USB flash drive (already connected) or the installation DVD with the distribution kit operating system.
How to disable Secure Boot and UEFI on an Asus laptop
(Aptio Setup Utility)
When the laptop boots, press the DELETE key and enter the UEFI-BIOS. We go to the "Security" section and, having found the "Secure Boot" parameter, switch it to the "Disabled" position.

Then go to the "Boot" section and, having found the "Fast Boot" parameter, switch it to the "Disabled" position.

For the changes to take effect, press F10 and confirm the saving of changes by selecting "Yes". Reboot the laptop. Enter the UEFI-BIOS again. Go to the "Boot" section and, after finding the "Launch CSM" parameter, switch it to the "Enabled" position.

Press F10 again and confirm the saving of changes by selecting "Yes". Reboot. When you turn on the Asus laptop, press the ESC key and get into the boot menu. In it, select the installation flash drive (already connected) or the installation DVD with the operating system.
How to disable Secure Boot and UEFI on a Samsung laptop
(Aptio Setup Utility)
Press the F2 key when loading the laptop and enter the UEFI-BIOS. Go to the "Boot" section and find the "Secure Boot" parameter.

Toggle it to the "Disabled" position.

At the warning that the computer may boot with an error, press Enter.

In the same section, the “OS Mode Selection” parameter will appear below.

Switch it to "CMS OS" or "UEFI and Legacy OS".

Again, a warning will appear about the possibility of the next boot of the laptop with an error. We press Enter. For the changes to take effect, press the F10 key and confirm the saving of the changes by selecting "Yes". Reboot the laptop. Now we can load any operating system on our laptop, if it doesn't work, please contact ComprayExpress.
How to disable Secure Boot and UEFI on Acer Aspire laptop
(InsydeH20 Setup Utility)
Press the F2 key when booting the laptop and enter the UEFI-BIOS. Here we go to the "Main" section and, having found the parameter "F12 Boot Menu", Switch it to the" Enabled "position. With this action, we allowed the appearance of the laptop boot menu when you press the F12 key.

Next, go to the "Security" section and, having found the "Set Supervisor Password" parameter, press the Enter key. In the upper field, set the password (later we will reset it) and press Enter. In the lower field, enter the same password and press Enter again.

Press Enter again at the message “Changes have been saved”.


In order for the changes to take effect, press the F10 key and confirm the saving of the changes by selecting "Yes". Reboot the laptop. Since it makes sense to remove the previously set password (the ability to disable / enable "Secure Boot" will remain), again enter the UEFI-BIOS using F2, go to the "Security" section and, having found the "Set Supervisor Password" parameter, press the Enter key ... In the upper field, enter the previously set password and press Enter. In the second and third fields, do not enter anything, just press Enter.

Press Enter again at the message “Changes have been saved”. That's all! The password has been cleared, and the ability to disable / enable Secure Boot is preserved. For the changes to take effect, press the F10 key and confirm the saving of the changes by selecting "Yes". Reboot. Now we can load any operating system on our laptop.
On a stationary computer:
How to disable Secure Boot and UEFI on Asus motherboard
Press the DELETE key (possibly F2) when the laptop boots up and enter the UEFI-BIOS. Press F7 to go to "Advanced Mode".

We go to the "Boot" section, find the "Secure Boot" subsection there and go into it.

Switch the "Secure Boot" option to "Other OS".

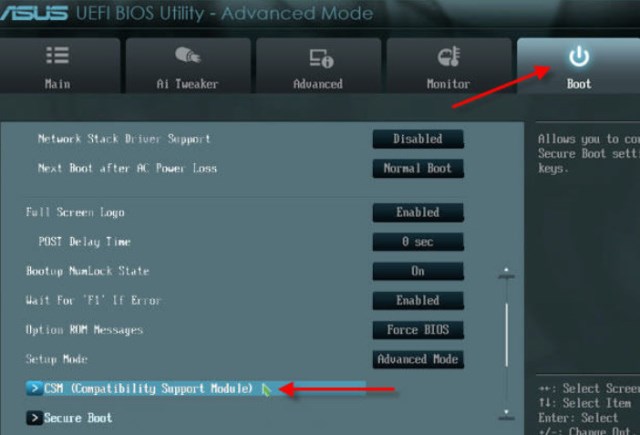
Switch Launch CSM to Enabled.

In the additional options that open, select "Boot Device Control" and switch to the "Legacy OpROM only" or "UEFI and Legacy OpROM" position.

Go to the parameter "Boot from Storage Devices" and switch it to the position "Legacy OpROM first" or "Both, Legacy OpROM first".

By these actions, we were able to disable Secure Boot and enable advanced boot mode. For the changes to take effect, press the F10 key and confirm the saving of the changes by selecting "Yes". Reboot. Now we can load any operating system on our computer.
How to disable Secure Boot and UEFI on Asrock motherboard
Press the DELETE key (possibly F2) when the computer boots up and enter the UEFI-BIOS. We go to the "Security" section and, having found the "Secure Boot" parameter, switch it to the "Disabled" position.

In order for the changes to take effect, press the F10 key and confirm the saving of the changes by choosing "Yes". Reboot. Now you can load any operating system on your PC.
Press the DELETE key when loading the PC and enter the UEFI-BIOS. Go to the "BIOS Features" section and, having found the "Windows 8 Features" parameter, switch it to the "Other OS" position.
Then the parameter "Boot Mode Selection" is switched to the position "Legacy only" or "UEFI and Legacy". And finally, switch the "Other PCI Device ROM Priority" parameter to the "Legacy OpROM" position.

To save the changes, press the F10 key and confirm the saving of changes by choosing "Yes". Reboot. Now we can load any operating system on our computer.
How to Disable Secure Boot and UEFI on MSI Motherboard
When the PC boots, press the DELETE key and enter the UEFI-BIOS. Here we go to the "SETTINGS" section, go to the "Boot" subsection, and find the "Boot Mode Select" parameter, switch it to the "Legacy + UEFI" position.

For the changes to take effect, press the F10 key and confirm to save the changes by choosing "Yes". Reboot. Now we can load any operating system on our computer.
Write in the comments if it helped you this instruction solve the problem with installing the operating system on Personal Computer or laptop.
If you have any difficulties with setting up BIOS, you can contact us for advice or help computer wizard... Call tel:
Vitaly Voshchatinsky. 2 years ago:
Thank you so much for the work done. But in my case the laptop Acer aspire there is simply no way to change the BOOT MODE. Is there a solution to this question?
Zoro Vitaly Voshchatinsky. 2 years ago:
Good day! And I have such a miracle)) Can you find a solution?
Vitaly Voshchatinsky Zoro. 2 years ago:
V service center"vyser". oh acer. I was told. that this model has support only for Windows 10. I invited a guy on an advertisement and he installed Ubuntu 17 for me in 3 hours, but the computer does not turn off. then all will slow down. but you can physically turn off the power supply only by pressing the turn button.
Andrey. 2 years ago:
acer aspire laptop. set the password and boor mode did not unlock, only secure boot ... I don’t know what to do next Max Chu
Andrey. a year ago:
Same problem. I don’t know what to do. Can only flashing BIOS will help. but again how to do it. 10 does not allow installing another version.
Denis Kuptsov. 2 years ago:
CHUVAAAK MANY THANKS !!! so that for a long time I change myself and my friends vindos! but 1 time I decided to reinstall it on my laptop! and the piper thought he broke the computer)) damn what I would do without you))) I love you)))
Ivan Hello. 2 years ago:
Bliiiiin thank you! At least this security turned off! Wait a minute at work, so I can't test whether the seven will get up, but after the change I'll try ..... Thank you so much. The site is bookmarked .....
Dalai Lama. 2 years ago:
Thank you Bro for your efforts to help unreasonable users! Zae..worried to look for answers! Your article is great!
Irina Yusupova. 2 years ago:
I could not figure it out in any way, I had already rummaged through the entire Internet until I found this article - it is quite accessible and clearly described. Thanks.
Stanislav. 2 years ago:
A huge, human thanks, a detailed article for HP laptops helped, I suffered for a long time, and then with your help everything was successful in 5 minutes, and now Windows 7 is already completing the installation, thank you!
Stanislav. 2 years ago:
Thanks for the detailed instructions! racked my brains for a very long time, but then everything turned out to be extremely simple! The site is bookmarked, so to speak for the future!
Paul. 2 years ago:
As if on purpose, I myself had such a problem after activating dozens from 8. But the necessary programs did not work in it, I decided to install a 64-bit seven, but, like many, I ran into the notorious security boot, which did not allow it to be done. Toshiba's instructions helped, thanks
Simon Markin. 3 years ago:
I wanted to put Linux on a new laptop. But nothing worked with this new BIOS for me. The article helped one hundred percent. I now have Ubuntu.
Dmitry Vernik. 3 years ago:
Here I have just ASUS! Thanks for the article, it helped a lot! I have been looking for detailed instructions for a long time!
Ivan. 3 years ago:
The article saved, everything is painted in great detail and shown in the photo. After reading I was able to install Win 7 instead of the pre-installed Win 8.1)))
Yuri Shokin. 3 years ago:
It's good when there are such detailed articles and guides on the BIOS functions. It was not clear to me how to disable the secure boot on laptop lenovo, made by analogy with other brands. With such timely prompts, I coped with reinstalling the operating system quickly, thanks for the valuable advice.
Evgeniy Maslennikov. 3 years ago:
Tin, guys, in other words, just can't describe how much I suffered over the past weekend, thank you very much for your advice!
Ivan. 3 years ago:
Respect for the author! I finally came across an article in which it is normally described how to disable Secure boot in different UEFI BIOSes. Otherwise, you will always comb the entire Internet until you collect the complete picture. Thank you very much made it easier reinstalling Windows 8.
Ivan Schepelin. 3 years ago:
Thank you! I'm in this complete zero, but with your recommendations and with the help of your friend, they managed to install Windows 7 on the Acer laptop)
How to disable Secure Boot in the UEFI BIOS? Hi admin, could you please give a quick overview on this topic? Very often friends have to reinstall on Windows 7, and for this you yourself know, you need to disable the "Secure Boot" option in UEFI. Laptops and computers from all different manufacturers and the interface is also different, respectively, the options containing this setting are slightly different and sometimes it is difficult to understand all this.
How to disable Secure Boot
Hello friends! Secure Boot protocol based on special certified keys (available only in Windows 8) will not allow your laptop to boot from any boot disk except for the installation disk with the "eight" itself. Therefore, in order to boot your laptop or computer from an installation disc with a different operating system, you need disable Secure Boot in BIOS UEFI.
The Secure Boot protocol option is mainly found in the Security sections, less often System Configuration or Boot, but I want to say that for Windows installations 7 for a new laptop with UEFI BIOS, it is not enough to disable only one Secure Boot option in the interface in UEFI, you also need to enable the "compatibility mode with other operating systems" and it is also called differently by all manufacturers: "Launch CSM", or "CMS Boot" , "UEFI and Legacy OS", "CMS OS", and is located in the main section of the UEFI BIOS called Advanced, then see the subsection "BOOT MODE" or "OS Mode Selection".
Let's look at the settings of the InsydeH20 BIOS setup utility, typical for all laptops, with UEFI elements, for example, Acer laptops have this BIOS, and then we will also consider other similar utilities that may have latest laptops and stationary computers.
How to disable Secure Boot on a Toshiba laptop. InsydeH20 setup utility
We go into BIOS and go to the Security section, see the "Secure Boot" option we need, move to it using the arrows on the keyboard and press Enter,
Again, use the arrows to select Disabled

And press Enter. With such simple actions, we were able to disable Secure Boot in the UEFI BIOS.

But that's not all, now we need to enable the “compatibility mode with other operating systems. Go to the "Advanced" section and find the "System configuration" option

And we go into it, here we select the option "Boot Mode" or "OS Mode Selection", and put it instead of the position of UEFI OS (maybe UEFI BOOT) in the position "CSM Boot" or "UEFI and Legacy OS", "CMS OS"


For our changes to take effect, we save our changes in BIOS, press F10,

Then we agree Yes and press Enter

a reboot occurs. Now we can boot our laptop from an installation disc with any operating system.
Then you can enter the laptop boot menu (usually you need to press the ESC or F10 key when turning on) and select your (already connected) bootable USB flash drive with the operating system or installation disk if you do not know how to do this read our article.
How to disable the Secure Boot option on an HP laptop
Sometimes everything does not go so smoothly, for example, on some laptop models, you need to go through a few more additional steps.
We enter BIOS UEFI and select the "System Configuration" option, enter it and select Boot Options, also go into it.

We see our secure boot option Secure Boot, set it to Disabled (disabled), and the option "compatibility with other operating systems" "Legacy support" set to "Enabled",

We answer Yes to the warning.
We save the settings, press F-10, select Yes and Enter, the laptop reboots, after the reboot, this window appears with the warning "A change to the operating system secure boot mode is peding ..." (in your case, the code of course will be different) and press Enter, after this changes in the UEFI BIOS settings will be saved and the laptop will reboot.

When you turn on the HP laptop, press the ESC key and get into the start menu, in it we select F-9 Boot Device Options (change the boot settings), then select our USB flash drive or floppy drive with an installation disk to boot.
How to disable the Secure Boot option on a Samsung laptop. Aptio Setup Utility
This utility is mainly installed on Samsung laptops. Press the F2 key when loading the laptop and enter the BIOS. Go to the Boot section, disable the "Secure Boot" option,

Using the arrows on the keyboard, select it and put it in "Disabled", press "Enter"

At the warning that the computer may boot with an error, press Enter.

In the same section below the "OS Mode Selection" parameter appears, select it and press "Enter"

set it to "CMS OS" or "UEFI and Legacy OS" and press "Enter".

Again, a warning appears about the possibility of the next boot of the laptop with an error, press Enter. We save the changes we made in the BIOS, press "F10", agree Yes, press Enter. The laptop reboots, press F10 when loading and get into the boot menu, in it we select the laptop's floppy drive or bootable USB flash drive.
How to disable Secure Boot on Acer Aspire laptop
Friends, first of all, we have, but here I will just note that on Acer Aspire laptops, the Secure Boot option is inactive by default, in order to activate and then disable it, you first need to assign a password to enter the UEFI BIOS. What do I need to do!
We enter the tab " Security"and select the item" Set Supervisor Password", press Enter and assign a password. After assigning a password, the Secure Boot option will become active and you can put it in the Disable position.

How to disable the Secure Boot option on a Packard Bell laptop

Press the key when loading F2, less often F6 and get into the UEFI BIOS of the laptop,

Here we go to the tab Boot.
If, before turning on the laptop, you connected a USB flash drive to it, then it may not decide directly in this menu.
Set the Boot Mode option to Legacy BIOS.
And the option Secure Boot put in position Disabled.
Now the flash drive should be determined... Put the flash drive to the first position, save the settings and reboot. If bootable USB drive made according to our articles, then the download will be successful.

How to disable Secure Boot on a desktop computer
Many desktop computers have modern motherboards with UEFI BIOS and Secure Boot protocol. Take, for example, the mother ASUS board, Asrock, Gigabyte. I must say that on motherboards for stationary computers functionality The UEFI BIOS is much expanded, here you have both the Russian language and the ability to use the mouse and make all kinds of adjustments to the operating parameters of the components.Press Delete or F2 when loading and enter the UEFI BIOS. Click Advanced (F7).
Go to the Boot tab, then select the Secure Boot option,

Press Enter and enter it, press Enter again and select Other OS (another operating system),


Now we leave here and select CSM (Compatibility Support Module),

Set the Start CSM option to Enabled.

In the additional options that open, select Boot Device Parameters and set Only Legacy OpROM or UEFI and Legacy OpROM.


By these actions, we disabled Secure Boot and enabled the advanced boot mode. Press F10, and save the changes we made to the UEFI BIOS. Save configuration and reset? Yes.
Disable the Secure Boot option in the UEFI interface of the Asrock motherboard.

If you have motherboard Gigabyte read our detailed article.

Maternal MSI board... Subsection "Boot mode select".

Note: On many laptops, it is impossible to disable the Secure Boot option, as it is inactive, in this case it may help.
Have you ever tried to install another operating system in parallel with Windows? If so, depending on what you were trying to install, you might have come across the safe UEFI boot(UEFI Secure Boot). If Secure Boot does not recognize the program you are trying to install, it will not allow you to complete the installation. Secure Boot is really useful for protecting your computer from malware... However, it also prevents the loading of quite "respectable" operating systems such as Kali Linux, Android x86 and TAILS.
Fortunately, there is a way to resolve this situation. In this article, we will show you how to disable the UEFI Secure Boot feature so that you can install a second operating system.
First, let's take a look at exactly how Secure Boot protects your system.
Secure Boot is a feature of UEFI, that is, a single extensible firmware interface, and UEFI, in turn, is a more advanced alternative to the BIOS interface found on many devices.
Secure Boot can be compared to a checkpoint. Before admitting a program to the system, it checks it. If the program is properly digitally signed, it is passed through the gate. If the digital signature cannot be recognized, Secure Boot prevents the program from starting and requires a system reboot.
But it happens that, although the program is safe and has a reliable source, its digital signature is not present in the Secure Boot database.
So, even if you download Linux distributions directly from their developer's site and check checksums to make sure that the software hasn't been compromised, Secure Boot can still "block" them. Other operating systems, drivers, and hardware may suffer the same fate.
How to disable Secure Boot
First of all, you should remember that Secure Boot is not just some annoying "feature" that you need to get rid of as soon as possible. In the end, this function is on guard for the interests of your own computer.
Also, keep in mind that when you re-enable Secure Boot, you may need to reboot the BIOS. In this case, you will not lose your data, but personal BIOS settings will be reset. In addition, it may turn out that once you disable Secure Boot, you will not be able to return it.
So, to disable Secure Boot, do the following:
- Turn off your computer. Then power on and enter BIOS mode again. This mode is usually entered using the F1, F2, F12, Esc, or Del buttons (depending on the computer model). Windows users can enter the menu additional parameters boot (Advanced Boot) by pressing Shift and selecting Restart. Then you need to click on Troubleshoot> Advanced Options: UEFI Firmware Settings.
- Find the Secure Boot feature. If available, select Disabled. Usually the Secure Boot option is found in the Security, Boot, or Authentication menus.
- Click on Save and Exit. The system will reboot.
So, you have successfully disabled Secure Boot. Now feel free to take a flash drive with an operating system that you could not install before, and try again.
How to activate Secure Boot again
To re-enable Secure Boot, you will have to remove all traces of the unsigned operating system from your computer, otherwise nothing will work.
- Uninstall any unsigned software installed while Secure Boot was disabled.
- Turn off your computer. Then power on and enter BIOS mode again. This mode is usually entered using the F1, F2, F12, Esc, or Del buttons (depending on the computer model). Windows users can enter the Advanced Boot menu by pressing Shift and selecting Restart.
- Find the Secure Boot option and select Enabled. Usually the secure boot option is found in the Security, Boot, or Authentication menu.
- If you fail to enable Secure Boot, try resetting the BIOS to restore it to factory settings. After resetting to factory settings, try enabling Secure Boot again.
- Click Save and Exit. The system will reboot.
- If the system does not boot, disable Secure Boot again.
Diagnosing an error preventing Secure Boot from being enabled
To solve the problem of a system boot failure with Secure Boot enabled, try the following:
- Check that in BIOS menu the UEFI option was enabled. This will also ensure that legacy boot mode is disabled.
- Find out the type of section of your hard disk... To do this, enter in search bar starting windows menu Computer Management (Computer Management). Next, select Disk Management. Find your main drive, right-click and select Properties. Now find the type of disk partition. UEFI requires GPT, not MBR, which is more earlier versions BIOS.
- There is only one way to change the MBR type to GPT: create backup your data and erase all information from the disk.
- Some firmwares have an option to restore factory settings (Restore Factory Keys), which is usually found in the same menu as other Secure Boot options. If you have such an option, restore factory settings, save them, exit and reboot.

If you cannot activate Secure Boot, the Trusted Boot feature will come to the rescue. True, it can only recognize the digital signature of Windows 10. Trusted Boot checks drivers, startup files, and other aspects of Windows.
If Trusted Boot detects a corrupted or malicious program, then, as with Secure Boot, it will prevent it from booting. However, unlike Secure Boot, Trusted Boot is capable of automatically fixing some bugs.

Collaboration between Secure Boot and Trusted Boot
Do you need Secure Boot?
It is worth remembering that by disabling Secure Boot, you are exposing your computer to potential threats.
We can say that today, at a time of rampant rootkits and other malware, secure boot is more urgent than ever. So, provide your UEFI system additional level safety, and sleep well.
If you bought a PC or laptop with a preinstalled operating Windows system 8, and then want to remove it to change, for example, "seven" or any version of Linux OS, then you will have problems with this, because of the secure boot system "Secure Boot".
Microsoft developers in development latest version Windows 8 completely dropped support for sixteen bit BIOS versions... Instead, the system has become 100% compatible with the so-called UEFI BIOS, which has a secure boot system “Secure Boot”.
Secure Boot is designed to prevent malware from running until the operating system and antivirus software are loaded, respectively.
It would seem that it is a very wonderful system, but, because of Secure Boot, it is simply impossible to install another operating system on a PC or software not having digital signature... Let's take a simple example. You bought new computer with preinstalled Windows 8 and decided to install on it additionally or instead of the "eight" OS Windows 7 or some Unix-like system. You can forget about this, the Secure Boot feature will not allow you to do this. If you do not agree with this state of affairs, then you will need to disable Secure Boot in the UEFI BIOS, that is, go into the I / O system and disable this annoying system.

Most modern motherboard manufacturers deactivate this function even before they complete the devices or go on sale. If the Unix developers of similar systems have already decided this problem having added support for secure boot UEFI BIOS to their operating systems, their colleagues from Microsoft do not intend to make changes to Windows Vista and Windows 7. And given the fact that these systems are used by many millions of people, it is easy to know how to disable Secure Boot necessary to fully enjoy the PC.
Disabling Secure Boot is very simple, for this you need to restart the PC and at the very beginning of its boot press the “Del” key on the keyboard several times (other key options are possible, for example, F8 or F2) to start the BIOS (input-output system).
We will not describe the process of disabling Secure Boot for all BIOSes (meaning software developers). Since this is simply not realistic, and we do not yet have such an opportunity to have desktop and mobile PCs of all manufacturers at hand. Let's take the example of Pheonix SecureCore Tiano, this BIOS is used on almost all laptops manufactured by Samsung, as well as for the UEFI BIOS Utility Asus.
- Disable Secure Boot in Samsung laptops. Go to BIOS in the Boot section. Find the Secure Boot option and set it to “Disabled,” then set the OS Mode Selection to “UEFI and CSM OS”. Ready. You should now be able to uninstall Windows 8 with Samsung laptop and install another OS.
- Disable Secure Boot in Asus laptops... Open the UEFI “Boot” section, then “Secure Boot”, then go to the “Key Management” option and change its value to “Crear Secure Boot Keys”. Done, intrusive feature disabled.
CSM is a compatibility module for the operating system. If your motherboard is equipped with BIOS (UEFI) developers other than those described above, then in addition to the described actions, try to activate the Legacy BIOS function.
CSM stands for Compatibility Support Module for Operating System... In other BIOSes (UEFI), you may need to enable the compatibility option: Legacy BIOS. If you have problems with the installation, you can try switching the SATA controller to AHCI mode... How to do this is written in the article "Enabling ACHI support for SATA drives"
8 and 8.1, after installing the updates, we encountered system errors that are associated with the so-called "secure boot". What is it? This is a feature that prevents unauthorized OS and software from starting when the PC is turned on. It is needed for additional protection of your computer from viruses and rootkits that can harm the system at the moment it boots. But what if the specified function causes persistent errors? It's all about given parameters... This article will take a closer look at how to properly configure Secure Boot. Let's figure it out. Go!
If there is such a problem, this article is for you.
There are a number of issues with Secure Boot mode. The most common error message is “Secure Boot is not configured correctly” or “Secure Boot Violation Invalid signature detected”. What to do in this case? It is often sufficient to simply enable the specified function through the BIOS. But some users do not have such an item in the BIOS at all. Then you should try to disable it. How to do this, further in the article.

Now you will know exactly what to do if Secure Boot settings are incorrect on your computer. As you can see, this situation is not difficult to fix. In just a few minutes, your system is working properly again. Write in the comments if the article helped you to deal with the error, and share with other users your experience in solving this problem.


 Pc radio does not display channel list")
