What should we have in our arsenal to reinstall windows 7?
An installation disk with the same “seven” will be quite enough. However, there are still options for reinstalling the OS, not only with boot disk, but, for example, from a USB-drive (flash drive), from the HDD or from the emergency recovery disk. But there are no fundamental differences between the process among these options. The order of operations is the same as in desktop computer from a disc, and on a laptop without a disc (from a USB stick).
If you decide to reinstall windows 7 over old system then all your data will be saved. However, once again reinsured does not hurt anyone. No one is immune, for example, from a sudden voltage drop in the network, a power outage, or simply a failure in the program itself. So we still advise you to copy all valuable information to a USB flash drive or disk.
You may also need drivers (for a video card, for motherboard and etc.). Make sure you have all the driver discs that came with your computer. If something is missing, then before you reinstall windows 7, the missing drivers should be downloaded from the Internet.
Having prepared all the drivers, saving the necessary data to removable media, we can start repairing the computer.
windows 7 reinstallation process
We do all the manipulations directly from the computer, while setting the BIOS is not required. Loading installation disk and click "install" in the window that opens.
To install for free in Russian, you need to download boot files. It is better to buy a licensed disk and install the OS from it. If you do not have such an opportunity or you want to try out the operating system, you can download a disk image from the official site. This article will tell you how not to screw up yourself.
Most of windows 7 on the internet is not licensedWho seeks will always find
To install Windows 7 Ultimate for free from the Internet, you first need to find where to download it. There are a lot of safe sites on the Internet. The only thing is that most of these versions are not licensed, and therefore, after 30 days the system will require an activation key. On the Internet you can find a cracked OS that has a built-in tablet and does not require activation.
Maximum opens up wide possibilities for the user. This is a productive and advanced version. She offers additional functions, encryption system, multilingual user interface etc. Keep this in mind, as some highly specialized programs require exactly the "maximum" edition of the OS.
WATCH VIDEO
OS installation methods: flash drive and others
The most common way is. This method can be used regardless of whether there is a disk drive or not. So, to reinstall windows 7 from a USB flash drive, we create a bootable drive. If you already have it, from friends or acquaintances, then the matter is small: restart the computer and wait for the automatic installation of the OS to begin.
If you only have a disk image with installation files and an empty USB flash drive, you will have to create an installation USB drive. There are many options, but we will go the simple way. Download one of the programs:
- UltraISO
- Windows Download Tool
- WinSetupFromUSB
We throw off the loaded ISO image to a flash drive. Easier to work with the program Microsoft Windows 7 USB/DVD Download Tool. We indicate the location of the image on the PC and click "Next". After a couple of seconds, the installation flash drive is ready.
First you need to mount the image of Microsoft Windows 7 on a USB flash driveThrough bios or boot menu the process is simple. To configure the BIOS, you need to know the hot keys to enter this mode. They are different for every computer model. Therefore, first rummage on the Internet and find the right combination. After turning on the PC, press the keys and a menu will open in front of you:
- We are looking for the “Startup Settings” section (called Boot” - “Boot Device Priority)
- Select a flash drive as the first boot device
- Press F10 to exit BIOS
- Computer restarts and starts automatic installation
The problem with this method is that then you have to go back into BIOS and change the startup settings back.
We enter the BIOS when the computer startsAnother method is to launch the boot menu. He also needs special button: Del, Esc, F2, etc. In the dialog box, you immediately change the launch options, and the OS installation begins. Moreover, the parameters automatically return to the standard ones. You can install windows 7 through bios not only using a USB flash drive, but also an installation disk. We will not consider installing Windows from a disk, since the process is no different from the one described above, it just does not require preliminary media setup. The disc must be inserted to restart the PC. If it fails to install on windows computer 7, you need to go back to the BIOS or boot menu and do the same steps.
enter the boot menu - press the buttons: Del, Esc, F2 or others.HDD
Few people know, but you can install windows 7 from your hard drive. This option is suitable for those who want to install windows without a disk or flash drive. This method is very simple in that you do not have to create an installation flash drive or delve into the BIOS. To start the required process, we need:
- OS ISO image
- Any program for working with images ( Daemon Tools)
- You may need EasyBCD to work with the boot record
After you have found an image with the OS on the Internet, you need to prepare the hard drive. To do this, you need to create a partition under the OS on the HDD:
After you have found an image with the OS on the Internet, you need to prepare the hard drive- "Start" - "Computer" (right-click) - "Management" (run as administrator)
- "Disk Management"
- Depending on how many disks your PC has, we will need to work NOT with the system one.
- We do not touch the system disk, select the second one and right-click "Compress Volume".
- We determine the volume we need - 25 GB is enough - “Compress”
- A new disk will appear in the window, but it is not ready yet. Right-click on the new part and select "Create a simple volume"
- Here you can give a name to the disk, for example, D and click OK. We are waiting for formatting. Ready.
There are also other ways to make a partition on a disk using third-party programs.
So, when the HDD is ready to work, download the above programs and install. Using Daemon Tools, you need to unpack the image and with virtual disk throw over setup files to the section D we created.
Using Daemon Tools, you need to unpack the image and transfer the installation files from the virtual diskRun EasyBCD as administrator. In the Add New Entry menu, select the WinPE tab and in the Name field name our system (whatever you want). Below we indicate the path to the boot.wim file, which lies in the sources folder on the disk we created earlier. Click Add Entry. The HDD is ready for installation.
Network download
There is an installation of windows 7 over the network. This method is very complex and time consuming. You will need a set of automatic Windows installation(AIK) for Windows 7 distribution with Windows 7 and DHCP and TFTP servers. If you do not understand this, then there is no point in delving into this topic. It is better to use one of the above OS installation methods.
Installation process
If you decide to install Windows 7 from the Internet for free, it remains to follow the step-by-step instructions and make sure that the data is entered correctly. Regardless of the method you want to use, after turning on the computer, windows will automatically install:
Installing Windows 7 takes a certain amount of time, depending on the power of your computer- Choose a language
- We accept the terms of the license agreement
- Select "Full installation"
- It is recommended to format all drives
- The PC will restart and continue with the installation
- Give and set a password
- In the activation window, click "Next"
- "Use recommended settings"
- Setting the date and time
- We search for a home network
Setting up Windows 7 after installation ends here.
Further work with the operating system
If it doesn’t start on windows 7, you will have to look for the right software. Program Driver Booster automatically scans your computer for recommended driver updates. Programs for installing drivers on windows 7 are useful if you do not have an installation disk with all the necessary start-up firewood.
After reinstalling the OS, you need to download the drivers for the video card so that the images are correct, the drivers for the sound video card, necessary programs for windows 7, type Microsoft Office and browser.
System errors
Problems may occur during OS installation. One of the main ones is the place from where you are trying to download windows 7 for free. Initially, the installation files may be incorrect, and therefore there will be problems during installation. A common error when the necessary drivers were not found when installing windows 7. This error is due to the presence on modern computers two USB 2.0 and 3.0 connectors. You can fix this problem by moving the flash drive from one slot to another.
A common error when the necessary drivers are not found when installing windows 7Often users are faced with the fact that windows 7 is not installed on the hard drive. This issue is related to creation errors bootable media. The reason may be user inattention. Some drives do not read all discs, especially older models. Also, the computer can independently protect the system from pirated copies, so during. If you still have problems, it is better to contact the service center.
In this article, I will talk about how to independently install the Windows 7 operating system from a disk to your computer or laptop.
I offer detailed and step-by-step instructions with a visual demonstration of screenshots of the installation of the operating Windows systems.
If you think the installation operating system- this is something complex and incomprehensible that only a specialist can handle, then I will disappoint you: this is not true. Now you will see for yourself.
All you need to install Windows 7 (or Windows 8) is a computer or laptop, an operating system disk (because in this article we will install Windows from a disk), detailed instructions, which I will now give you, and, perhaps, attentiveness! I hope that after installation you will not look like . 🙂
After installation, I recommend installing immediately. You understand that in our time of electronic payments, this is very important. Also now (yet) nowhere without Adobe Flash Player . Like him right install read . You may also be interested in the very not bad. If stored on a computer private information, create a .
Important: Most of all possible problems that occur during the installation of Windows 7 is due to an incorrectly prepared installation disk and (or) the quality of the “OS assembly” written to it. How to burn an operating system image to disk, you can read in the article.
Remember: if this is a disc not out of the box, that is, bought in a store, then you need to use only original images from Microsoft MSDN. It is the original image, which is also available on the Web, as well as various assemblies, that is the key to the successful installation of Windows and its normal functioning.
Do not use assemblies of unknown origin. You put all third-party fixes, fixes, homemade builds at your own peril and risk. The consequences may be irreversible.
Before installing Windows 7:
Remember two main things to do before installing Windows.
First is to determine in advance which hard section disk will install the system. Typically, in most cases, this is the C:\ drive. Remember (or create) the volume label and size.
Remember, your desktop is located entirely on the C:\ drive, or rather, here: C:\Documents and Settings\ Username \Desktop. Think in advance about the integrity and safety of files that are archived for you, copy them from the desktop, that is, from drive C, to another drive or flash drive.
All programs installed on the C:\ drive will also be removed, but this is not a reason to drag the entire folder with programs to other drives. It is much easier to re-install these programs on a clean system. Don't be lazy, it's not every day you reinstall Windows.
Second the moment is the drivers for your computer or laptop. They need to be taken care of in advance. They are included with most laptops, but if they are not available (or need to be updated), we look for them on the official website of the manufacturer and download them in advance.
Everything you need to know about installing drivers, I recommend reading the article "Installing Drivers or Five Iron Rules", which is located.
If you skip this important point, then after installing Windows, you may be left without the Internet, because it is not a fact that the windows distribution will initially contain the drivers for your network card.
Installing Windows 7 from disk:
We insert the disk with the Windows operating system into the drive and restart the computer. By the way, if you do not have a drive, then you can install the Windows operating system using the usual.
Let's continue. Our task is to configure the computer to boot from a DVD. This can be done in 2 ways:
- 1. select a device (DVD) in a special boot menu;
- 2. change the boot priority in BIOS (from HDD to DVD).
The first method, choosing a device in the boot menu, is easier and more convenient. After installing Windows, there is no need to return the boot from the HDD ( hard drive). However, this feature is not available on older computers, in which case you will have to go into the BIOS and change the boot priority.
Start - reboot, wait for the screen to go out and at the first sign of the system waking up (the appearance of the logo), press and hold the Delete key on the keyboard. Why the Delete key? These keys can be F1, F2, F3 + F2, F10, Ctrl + Alt + Esc, Ctrl + Alt + S, Esc.
There is no universal button to enter the boot menu or enter the BIOS, and it all depends on the manufacturer of the computer (motherboard). The surest way is to read the instructions from the computer or from the motherboard. The table below shows an illustrative example of such keys.
The boot menu looks something like this:
Press F10, agree and confirm the exit with saving (Save and Exit) by selecting "Ok".
Phoenix Award
Consider the second version of the interface. To boot from a disc, you need to change the priorities so that the DVD drive is the first device. We find the item “Advanced BIOS Features” and use the arrows to switch to the first device (First Boot Device), change to CDROM.
Press F10 and confirm the exit with saving (Save and Exit).
If you have problems at this stage, I recommend watching this video.
Let's continue. If everything is done correctly, we will see the following window with the inscription: "Press any key to boot from CD or DVD".
Here you need to press any key, for example, the spacebar. This is done only 1 time and only at this stage of the installation. We see the following window with the inscription "Windows is loading files".
Files are being extracted, after which we will see the inscription Starting Windows and the Windows 7 installation window itself. Windows installation has begun !!
Select the desired language and click "Install".
Next, we need to select the edition of Windows 7. Choose the one for which you have a key or which you are going to activate. On laptops, it is usually indicated on a piece of paper with a key located on the bottom of the laptop. Entering the serial number itself will be a little later, it has been moved to the end of the installation.
A few words about the ability to install 32-bit (x86) or 64-bit Windows versions. If you have more than 4 GB of RAM (aka RAM, RAM, Memory), then set it to 64-bit, if not, then 32-bit (x86).
Read and agree to the terms of the license. Next, we need to select the type of installation - select "Full installation".
Now you need to select the partition on which Windows will be installed.
If you have this section reserved by the system (note that it is still in megabytes (MB), not gigabytes), for example, as in the following screenshot, then select Disk 0 Partition 2.
In order not to be so excruciatingly painful when choosing a partition, before installing Windows, look at how many gigabytes your C drive occupies.
If you have one partition on your hard drive and it is more than 250 GB, then it would be more correct to create two local disk. One section is specifically for Windows (usually about 50-100 GB are allocated), and the other is for storing your personal information (how much will remain, XXX GB).
Note: The partitions you create should be named Disk 0 Partition 1, 2, 3..., not "Unallocated Disk Space". Otherwise, the operating system simply will not see partitions with such names.
If necessary, create a section or sections and click "Apply":
Attention: problems may arise at this stage - when Windows 7 asks for a driver for further installation or when the system does not see your hard drive in order to continue the installation.
Or install (if prepared) hard disk controller drivers. If you already have two or more partitions on your hard drive, then you can skip the above paragraph. So, we have selected the "System" section, and now we need to start formatting.
The installer warns that all our data will be deleted. We need this, because we are interested in a clean installation of Windows. We agree and wait. The whole process usually takes a matter of seconds. After formatting, we see that there is more free space, calmly click "Next".
And here is the beginning of the installation, the process is started. You can take a breath.)
We are waiting, sir ... Usually it takes 15-25 minutes. When our system installs, it will prompt you to enter a username and computer name. Enter.
If you wish, you can enter a password and a hint. Windows will then prompt you to enter serial number. Enter (if any). If not, then skip this step and uncheck "Automatically activate when connected to the Internet."

In today's article, we will consider the issue of reinstalling the operating system (hereinafter OS) Windows 7.
Most users greatly exaggerate the complexity of reinstalling Windows 7, in fact, this process is quite simple, the main thing is not to rush and carefully follow the recommendations outlined in the article.
So let's get started.
Step 1. Back up your data
Before you reinstall Windows 7, you must copy all important data from the system drive.
Typically, this content standard folders Video, Documents, Downloads, Images, Music, Desktop, etc.


IN BIOS menu we need to select boot from DVD drive, save the changes, after which the computer will restart.
After all the manipulations in the BIOS, it will not boot from the computer's hard drive, but from the installation one.
If everything is done correctly, then after the reboot you should see the following image on the monitor screen:

Step 3Reinstall Windows 7
At this stage, the contents of the installation media are loaded into the computer's RAM.
The following 2 screenshots show the initialization of the Windows 7 installer:


Starting from this window, we have the opportunity to customize our OS.
At this stage, we can select the language (the "Language to install" field), the display of the time format (the "Time and currency format" field), the keyboard layout or input method on the tab of the same name.
As a rule, there is no need to change anything here and you can safely press “Next”.

And if this item was not completed initially, you should restart the computer, go into the BIOS, select boot from the hard drive, run backup then repeat all the previous steps again.
If all data is saved, select the system disk and click " Format».
Important: Do not confuse the system drive on which the OS is installed and the logical drive(s) on which you store data. In our case, “Partition 2” is the system drive, “Partition 3” is the logical drive on which data is stored.

The system once again warns that all data on the disk being formatted will be deleted. Click "OK".


After that, the direct installation of the OS on the hard drive begins, which is divided into several stages.
At all stages, installation occurs automatically, without user intervention.
In terms of installation time, on average, it takes 10-15 minutes and depends on the characteristics of your computer.

 After the reboot, you need to go to the BIOS menu and select boot from the hard drive, saving the settings.
If you did not have time to complete the BIOS setup procedure at this stage, you can do it later.
The installation media can be removed, the operating system is installed on the hard disk, but not configured.


The next step is to enter the username and PC name. Usernames and PC names can be absolutely anything, they can contain uppercase or lowercase Latin and Cyrillic letters, numbers.
To switch the language, use the layout switching panel (located at the top). We press "Next".

After creating a user account, you must set a password for it. We recommend creating a password with at least 8 characters.
Since the password is not displayed as you type, pay attention to which layout is selected. Letters, numbers and some special characters can be used as characters.
Also, a mandatory field to fill in is the password hint field, the password hint, as conceived by the developers of Windows 7, should make you associate with the password that was entered during installation.

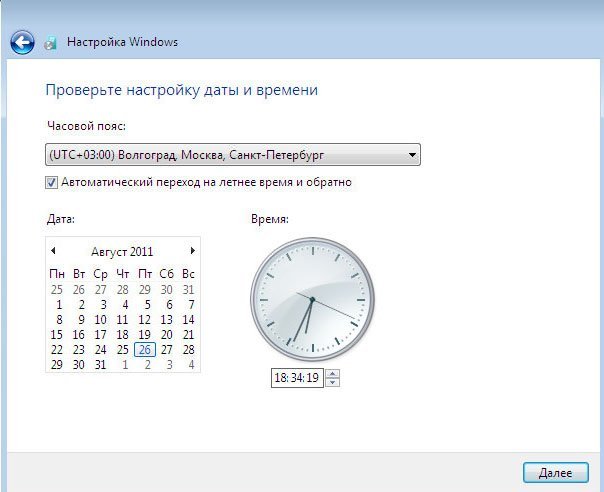
Set the time zone, date and time. We press "Next". After what happens final setting operating system and its loading.


Friends, many letters come with the question of how to properly reinstall or update the Windows 7 operating system and what is the actual difference between these two concepts.
Letter #1. Please bring clarity to a vague question for many than reinstalling Windows 7 different from the update and which is better to prefer? The operating system 7 that I have installed behaves extremely unstable, it takes a long time to load, many programs have stopped installing, sometimes errors of this kind occur, for example, some system file is missing or dynamic library. Rolling back with a restore point a significant amount of time ago did not help. I do not want to reinstall again, as many programs are installed. You said in your comment that you need to restore system files, put things in order in autoload, hold Windows optimization 7 or, as a last resort, update or reinstall Windows 7, unfortunately I have not heard anything about the latter.
I would like to know first:
How to actually carry out this update or reinstall the operating system and what will happen to my personal files on the system partition, will they be lost?
Secondly: they say that the update is launched only from a running operating system. Is it so? After all, in XP it was possible to run an update even when the system did not boot at all. Thanks in advance, Pavel.
Reinstalling Windows 7
To make everything clear to you, I will guide you through the process of updating my operating system, and then I will show you how to reinstall Windows 7 in two ways and you will see everything with your own eyes, but first I will still explain to you what an Update is and Reinstalling Windows 7.

What is a Windows 7 update?
this is a system installation over the old one, that is, you insert a disk with the Windows 7 distribution kit and start the system installation right in the running seven, but in the installation menu you choose not a full installation, but an update. What does she give?
First of all, damaged system files will be replaced, working system files will not be replaced, with your own personal data: installed apps, documents, music, nothing will happen, all your programs will run and all your household on all disks will remain untouched. Same way Accounts users will be transferred without changes, all this will be done by the tool - Migration Tool Windows Data(very important files, it's still better to transfer them manually). I also want to say that you will have to re-enter the product key, select the language, region, set the time, and so on. A warning. If you have unlicensed Windows 7, then after the update you will have a window in the lower right corner of your desktop with a warning that your a copy of Windows is not genuine.
- Another frequently asked question is how does Data Transfer Tool work? At windows update 7, temporary folders of your data will be created containing information about accounts and user settings, your Email, files in the Favorites folder, personal files and user folders - music, pictures, videos, as well as settings installed programs. As your system is updated, all data will fall into place, and temporary folders will be deleted. When upgrading, the data transfer tool does not allow the user to select files to transfer, but when reinstalling, you can choose what you want to transfer (details later).
Will the update solve all your problems related to Windows work 7? In most cases Yes, but unfortunately no one can guarantee a 100% result here. In my opinion, if possible, it is better to delete and re-format a partition with a poorly functioning operating system, after transferring all important files to other hard drive or portable volumes. USB stick and install the system with all the programs again.
- Note: Windows XP has the same update mechanism and can be run both in a running operating system, and in cases where you cannot log into Windows XP due to problems, then you can boot from the XP installation disk and select setup menu option, . Be aware that unfortunately there is no such possibility in Windows 7 and the update can only be carried out in a working operating system.
What is reinstalling Windows 7?
Reinstallation is a complete replacement of all operating system files, that is, formatting a partition with an unstable system and installing Windows 7 again. Naturally, all your files and the system itself from the disk (C:) will be deleted. To transfer all your files from system disk(C:), you will need to use Windows Easy Transfer, but it will no longer work automatically, as in the case of an update, but we will use it ourselves and we will also choose what we need to transfer from the old system to the new one.
- Now the question arises: What is the difference between reinstalling the system and installing it again? Friends are here. When reinstalling Windows 7, if you wish, you can use the File Transfer Tool, since you already had the system installed once, but when you simply install the system again, install the system on the partition of the new hard disk you created. In short, I don’t know how to explain it even more clearly!
What can I say, let's first update my Windows 7 together, and at the end of the article we will reinstall the system using the file transfer tool, it has also been working with errors for me lately and you will see with your own eyes, and then select what you need.
Windows 7 update
We insert the installation disk with Windows 7 into the drive, if you do not have autorun, click setup.exe.

Before updating, we can connect to the internet and download Latest updates from Microsoft official site
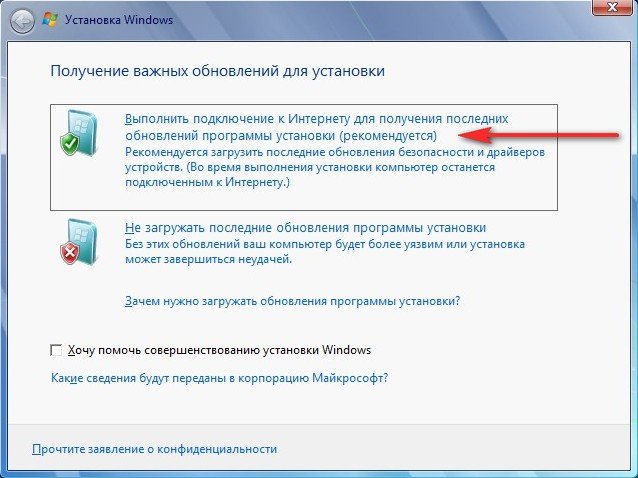
Choose Update

Compatibility check

copying Windows files

Collecting files, settings, and programs, Unpacking Windows files, Installing features and updates, Transferring settings and programs files


The computer restarts.
In this place, you need to boot from the hard disk, and not bootable flash drive or boot disk with Win 7.
Update registry settings

Enter the key


We set the time
The update process has been completed, the accounts have been saved
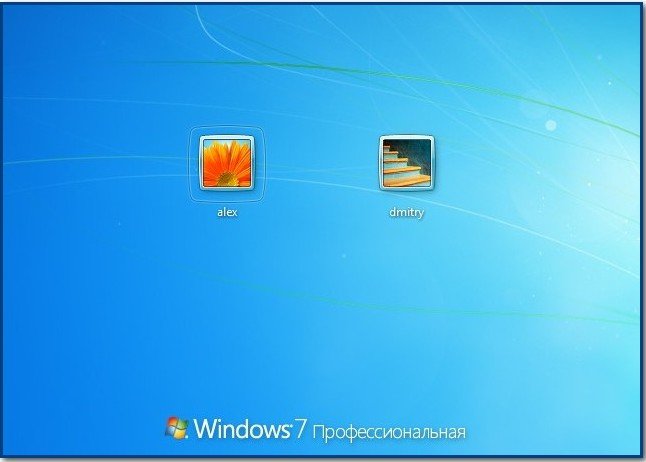
I have all the files in place, all programs run.

Reinstalling Windows 7
Now let's find out what Reinstalling Windows 7 is. According to the rules, we will reinstall Windows 7 on the same disk on which the old operating system is installed. If before Windows was installed, for example, on the partition (C :), then you also need to reinstall it on the partition (C :) and NOT on any other partition (otherwise it will already be installing the second operating system). All your files on the partition (C:) will be replaced with the files of the newly installed Windows 7 operating system.
- First of all, we will launch the Easy Transfer tool, which will copy all our personal data from the Windows 7 partition to portable media or another hard drive partition, then boot from the installation Windows disk 7 (how to set in) and install the system again. Immediately after installing Windows 7, we will launch the Easy Transfer Tool and copy back all our files, in the end we will get with you a new operating system and all our data: music, documents, personal folders, and so on.
- Note: You may ask: Is it possible to run a new system installation directly from a running Windows 7 and not climb into the BIOS. Answer: This method is given at the end and we will also consider it.
Let's now see what the Data Transfer Tool will transfer from our files, launch it.
Start, write in the input field Data transfer tool

In this window, we see detailed information about which files we can transfer from the old operating system to the new one, now we will choose.

The data migration tool suggests us to use:
- Data transfer cable - a cable specially designed for this purpose, which still needs to be bought, is used to transfer files between two computers, in principle we do not need this, because we have one computer.
- Network - transferring files over the network is also not our option.
- External drive or USB flash drive. What we need. If you don't have much data, you can even use an 8GB or 16GB flash drive. By the way, if you don't have a flash drive or portable USB disk, you can use another partition of your hard drive for storage, like me.
So you have selected External disk or USB flash drive, and I have a partition on the hard disk (D:).

We select This is my source computer, that is, the data needs to be transferred from it.

Data is analyzed and can be transferred to new system, in step Usernames and General items, click Settings, and also, if you click Advanced, then a complete picture of what the Data Transfer Tool will include in the archive will open.
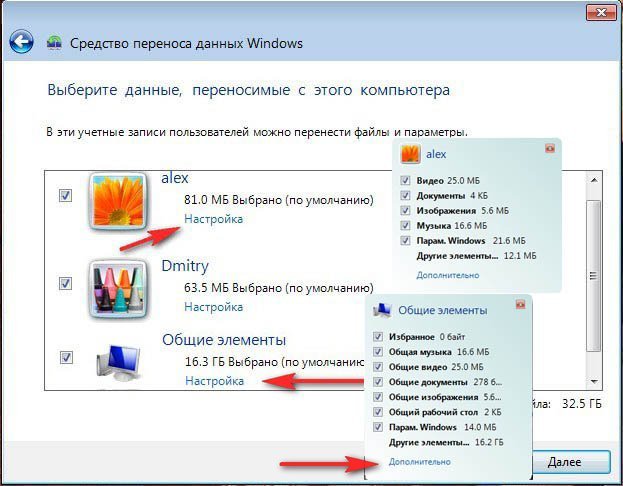
Please note that the folders of both users of the operating system and personal data are included in the archive, this is correct. But we definitely don’t need to transfer the data located on all partitions of the hard disk, except for the system (C :), since we will be reinstalling Windows 7 located on (C :) and the reinstallation process in our case will only affect system partition(FROM:). Uncheck all hard drives.


However, if you decide to transfer data from all partitions, then you can leave the checkboxes unchecked, just keep in mind that the data transfer file in this case will take up a very large volume ..
What else should not be included in the archive that the data migration tool will create? For example, you may not include the C:\Program Files folder, it will be more reliable after reinstalling Windows 7 install all programs again.
So click Save, you can assign a password


File transfer is in progress. On disk (D:) a migration file is created with the extension (MIG)


Now it's the turn to reinstall Windows 7, insert the installation disk with the seven into the drive and reboot, at the beginning of the installation it is better to click on the Disk Setup button and select Format the partition with the previous Windows 7, but in general the whole process is step by step, starting from changing the priority of the boot device in the BIOS and before installing the operating system itself, is described in our article.
I think you did it and installed the system, now let's use our Data Transfer Tool again.

Choose This is mine new computer(requires transferring files and settings to this computer)
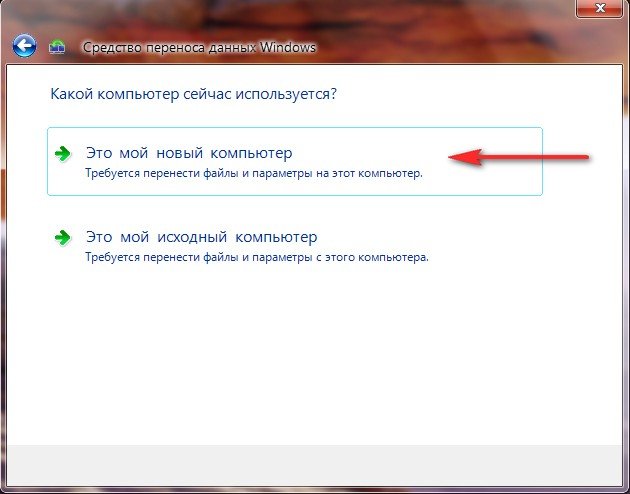
Your external HDD with a data transfer file, must already be connected.
I, in turn, specify the hard drive partition (D :), the transfer file is located there.


We can click Settings and select files to transfer to the new system manually, as we have already done with you, or simply click Transfer.


 and geographic information systems (GIS) and can be the result of their work.")


