Imagine several situations that each PC user periodically faces.
Situation 1. You bought a new computer and now want to transfer all the data from the old computer to it. How to do it?
If there is a spare HDD of sufficient capacity in the reserve, then you need to copy all the information from the old PC to it, connect to the new and start the copy process again.
Thus you can transfer only custom files And folders, but if in such a way to try to transfer the installed programs, then they will not work - they must be reinstalled.
Situation 2. You want to update the version operating system, for example, go with already outdated Windows XP on Windows 7 or 10, but at the same time save the settings and performance of programs already installed on PCs. How to do it?
And in the first and in the second case to help come easeus program TODO PCTRANS, which has a lot positive feedback On the network, and which will be easily litient, be it a beginner or advanced user.
Supported operating systems
Todo PCTRANs works on all operating systems windows family from XP version before, including Windows Server. At the same time, data transfer from a computer to a computer is possible only if you are installed on both PCs same Windows versions Either the data is transferred from PC with more old version OS on PC with a newerFor example, with Windows 7 on Windows 8 or 10. Thus, transfer data from Windows 7 to Windows XP is not possible.
Direct data transfer between two computers
1. In order to copy everything files and installed programs between the two PCs, they must be interconnected in one network LAN, wired or wireless. The TODO PCTRANS program must be launched on both and the Via Network Connection option is selected:


3. In the next window, you need to select which data type you want to move: Applications (applications) or User Data (Custom Data). Clicking on the square icon, you can specify specific directory and folders:

By pressing the TRANSFER button, the data migration process starts.
Transferring data through the creation of an image (backup)
This method is useful in the case when you need to update the OS on one computer or laptop, saving all the settings, or connect two PCs into one network to transfer data between them (as in the first case) is not possible.
1. Run the TODO PCTRANS software on the computer and select the "Via An Image File" option. In the next window, select "CREATE THE Image File".

2. Specify required folders and applications, click the "Save" button.

3. Copy the created image on the second PC, start the program on it and select "Via An Image File" -\u003e "Transfer from the Image File".

4. Run the copying process.
Difference of free and Pro versions
The difference between FREE and PRO is that in free version Programs can be configured to transfer only two applications. The license for the Professional version is sold at a price of $ 49.95.
If you bought a new hDD or solid State SSD. drive for his computer, it is very likely that a big desire to do reinstalling WindowsYou do not have drivers and all programs. In this case, you can clone or, otherwise, transfer Windows to another disk, and not only the operating system itself, but also all the installed components, programs, etc. Separate instructions for 10-ki installed on the GPT disk in the UEFI system :.
In fact, Seagate Discwizard is full copy previous program, only for work it requires at least one hard disk Seagate on a computer.

All actions that allow you to transfer Windows to another disk and completely cloning it similar to Acronis True Image WD Edition (in fact, this is the same program), the interface is the same.
Download the Seagate Discwizard program from the official site https://www.seagate.com/ru/ru/support/downloads/discwizard/
SAMSUNG DATA MIGration
SAMSUNG DATA MIGRATION is designed specifically for windows transfer And data on SSD SAMSUNG brand from any other disk. So, if you owner of such a solid-state drive is what you need.

The transfer process is made in the form of a wizard from several steps. At the same time, in the latest versions of the program, not only the complete cloning of the disk with operating systems and files, but also selective data transfer, which may be relevant, given that SSD dimensions are still less than modern hard disks.
The Samsung Data Migration program is available on the official website https://www.samsung.com/semiconductor/minisite/ssd/download/tools/
Important: The same Windows transfer utilities on another disk are also from other SSD and HDD manufacturers. Usually, from can be found by setting a request consisting of a brand and phrase "Data Migration", so you will find, for example, Intel Data Migration Tool and similar programs For other brands of discs.How to transfer Windows with HDD on SSD (or other HDD) in Aomei Partition Assistant Standard Edition
One more free programIn addition, in Russian, allowing you to conveniently perform the transfer of the operating system from the hard disk to the solid state drive or on the new HDD - Aomei Partition Assistant Standard Edition.
Note: This method only works for Windows 10, 8 and 7 installed on the MBR disc on computers with BIOS (or UEFI and LEGACY loading), while trying to transfer OS with GPT disc, the program reports that it cannot do this (perhaps it will work simply to copy the disks in Aomei, but it was not possible to experiment - failures when rebooting to perform the operation, despite the disabled Secure Boot and check digital signature Drivers).
Steps to copy the system to another disc is simple and, I think, will be understood even to the novice user:

If everything goes successfully, after completing you will receive a copy of the system that can be downloaded from your new SSD or hard disk.
Download aomei. Partition Assistant. Standard Edition You can free from the official site https://www.disk-partition.com/free-partition-manager.html
Transferring Windows 10, 8 and Windows 7 to another disc in Minitool Partition Wizard Bootable
Minitool Partition Wizard Free, on a par with Aomei Partition Assistant Standard, I would be entitled to one of the best free programs for working with discs and sections. One of the advantages of the product from Minitool is the availability of fully operational boot ISO The PARTITION WIZARD image on the official website (free Aomei makes it possible to create a demo image with impaired important functions).
Writing this image to the disk or flash drive (for this developers recommend using RUFUS) and downloading your computer from it, you can transfer Windows or other to another hard disk or SSD, and in this case We will not interfere with possible OS restrictions, as it is not launched.
Note: Me with a system cloning to another disc in Minitool Partition Wizard Free has been verified only without EFI downloads and only on MBR disks (Windows 10 was transferred), for performance in EFI / GPT systems I do not pass (I could not make the program in this mode, despite the secure boot disconnected, but it seems that the bug is specifically of my equipment).
The process of system transfer to another disk consists of the following steps:

Upon completion, you can close the Minitool Partition Wizard, restart the computer and install the download from the new disk to which the system was transferred: in my test (as I already mentioned, BIOS + MBR, Windows 10) everything went successfully, and the system booted as none What did not happen with the disconnected source disk.
Free download boot image MINITOOL Partition Wizard Free can be from the official site https://www.partitionwizard.com/partition-wizard-bootable-cd.html
Macrium Reflect.
The free MACRIUM REFLECT program allows you to clone entire discs (both rigid and SSD) or individual sections, and no matter what brand is your disk. In addition, you can create an image of a separate disk partition (including Windows) and later use it to restore the system. Also supported the creation of bootable recovery discs on windows database PE.

After starting the program in the main window, you will see a list of connected hard drives and SSD. Mark the disk on which the operating system is located and click "Clone This Disk" (cloning this disc).
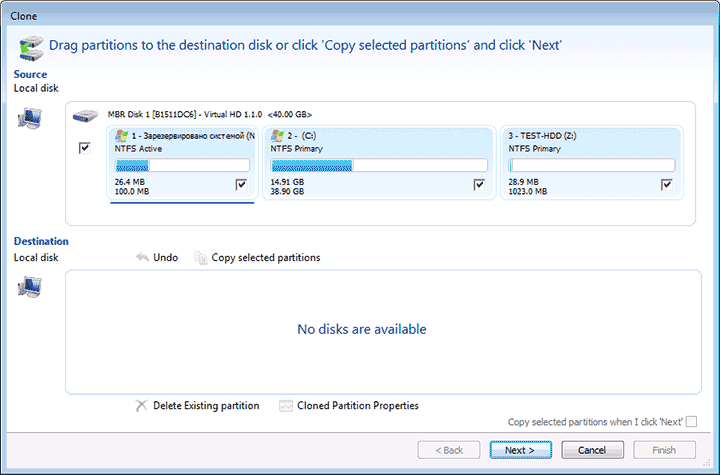
At the next stage, the source hard disk will already be selected in the "Source" paragraph, and in the "Destination" item, you will need to specify the one to be transferred to the data. You can also choose only separate partitions on the disk to copy. Everything else happens automatically and not difficult even for a novice user.
Official site for download: https://www.macrium.com/reflectfree
Additional Information
After you have transferred Windows and files, do not forget to either download the download from the new disk in the BIOS or disable old disc from computer.
The article describes methods with which you can transfer data from one computer to another With a guarantee of data security and without much effort. Transferring files, settings and programs to a new computer may be complex and frightening for the user, especially if he does not know how to do it right and where to start.
Often everything comes down to copying the user the most necessary and important data from the old PC to the external medium of information, followed by copying the new computer's hard disk. This method also has a place to be, but it is associated with the risk of loss of data in the process and / or as a result of information transfer. But what about the applications and the settings of the operating system?
In fact, there are several ways to help transfer data from one computer to another better quality and making less effort, and what is very important - with a guarantee of safety.
Content:Data Transfer Tools
There are many utilities for transferring data, settings and programs to a new computer. To use them, it is enough to install such a program on both computers and move your files, applications and settings with them.
A tool with such functionality is provided for free and Microsoft is Windows Easy Transfer. And although, starting with Windows 10, it is already missing as the built-in utility in the operating system, Microsoft offers to use the other third-party application - PCMOVER EXPRESS.
Principle of operation of the program Next: Connect the external information medium to the computer and run the application; Transfer your data from a computer to an external carrier after which connect it to another PC to which data must be transferred; Launch this application On a new computer and transfer data from external media to this computer.
Backup and restore files
To transfer the system files and settings to another computer also allows the backup and file recovery tool to be built into the system.
![]()
With this tool, you can create an image of the system. This will be the full image of the operating system, including system files, installed programs and personal files. It is enough just to deploy on the new computer the image of the system that was created from the old computer.
Just copy files
You should also not forget about the possibility of copying files manually, so you can transfer personal files from the computer to the computer. To do this, connect to the computer an external information carrier of sufficient volume (for example, outdoor hard Disk) and copy all the files to it that must be transferred. After that, connect this disc To the new computer and transfer the necessary files.
If all your files on your computer are well organized and you know their location on the hard disk, then difficulties with the implementation of this method you will not have.

Thus, you can postpone files, but not settings. If you also need to transfer the browser bookmarks, you will need to export / import using the functions of the browser itself. All modern browsers also have synchronization functions with which you can import all settings.
Cloud storage
Services cloud storage You can store user data, settings and other data, and cope with it. To do this, it is enough to install the service client on your computer and configure data saving with it. On another computer, it will be enough to establish the same client and go to the created early account, and you will have access to all data stored in it.
Such services on this moment Many, most popular Dropbox and Google Drive, as well as integrated in Windows - Microsoft Onedrive. You can use any convenient for you.

If the computer has failed
If the transition to a new computer is due to the inoperability of the old, then the user's personal data from it can also be transferred.
To do this, connect the hard disk of the old computer to the new one and check how it is determined by the operating system (it all depends on the causes of the failure of the old PC). If it is determined by the computer as another hard drive and are available in it to use all files - it is enough to implement the actions that are described in the paragraph "Just copy files". Only you can copy them straight to the hard disk of the new computer.
If a hard files The disk from the old computer is not displayed, you can restore them using a program to restore the hard disk data - HETMAN PARTITION RECOVERY. To do this, launch it and scan hard drive. All program detected Files Save to a new hard drive computer.

The transition to a new computer should not be called by the user of difficulties. Some tools provide the possibility of transfer even installed programs and applications. But the most an important factor In data transfer, there are personal user files that should not suffer or be lost, in the process or as a result of data transfer. The methods described above should help the user avoid such unpleasant consequences.
Windows Easy Transfer is a free program from Microsoft, with which you can easily move custom data from old system in a new one.
The utility allows you to transfer not only user files, but also accountschosen browsers email, as well as user installed applications. FROM using windows Easy Transfer You can postpone user data from Windows XP in Windows 7, from Windows Vista in Windows 7 and from Windows 7 in Windows 8, or vice versa. As already mentioned, the program is distributed by the developer for free, you can download it from the official Microsoft website, as well as on the link below.
We carry user data using Windows Easy Transfer
Download for free windows utility Easy Transfer from our site or Microsoft website, then set it into the system from which you are going to carry user data. After installation, start clicking on the icon on the desktop "Data transfer tool for Windows 7".
In the starting program of the program, a list of those data that can be transferred using this tool will appear.
![]()
To continue working with the program, click on the "Next" button. Easy Transfer offers the user with the ability to copy data using a USB cable, an external drive (for example, flash drives), or using a network ( network connection Computer computer). Select a data transfer method, or a device that will act as a temporary storage. In our example, this is a regular USB flash drive.

In the next step, Windows Easy Transfer will ask you to confirm that all data (files and parameters) that are subject to transfer are on this computer. To do this click on "This is my source computer".

Next, the utility will start checking the data transfer capabilities from the source computer, and upon completion of the scan, will give the user a brief information on the files and parameters that are available for transfer.

In the same window with information, the user will be able to edit the list of files, see or change them. To do this, you need to click on the "Setup" button and then "additionally". After that, on the screen of your monitor, the File Manager window will appear where all files and folders will be displayed that the program selected for transfer.

In the File Manager you can cancel any folder and files selected to transfer. We strongly recommend that you carefully view all these folders to eliminate the ability to "forget" any data. To add some file or folder, you just need to mark the corresponding checkboxes. After editing a list of data for transfer, do not forget to click on the "Save" button so that the changes you entered into force. After you click the Next button, the program will start saving all the data to a special file, but first it will offer you to protect your password data. If you want to protect the file with the data, then specify the password in the appropriate field for it.

If the password file protection you do not need, then leave the password fields empty and click on the Save button. After that, specify the device where the file with the data is recorded, as well as its name.

After you specify a removable drive to save the data, and set the name of the future file, click on the "Save" button, and then two times in a row on "Next" to start the process of copying user data into a special file. Upon completion of the copy process, close the Windows Easy Transfer program and remove the USB flash drive from system Block Computer.
Well, almost everything, more precisely, we told about how to create a special file with user data from an old computer, now it's time to transfer this data to a new or other computer.
So, to restore the saved data in the new system (computer), run on it windows program Easy Transfer, then click on "Next", select "Yes (if you saved files to an external hard disk or a USB flash memory device, connect it now)". Insert your flash drive with user data file and specify it as a source. Click on "Next", then by "this is my new computer" and again "Next". As a result, the process of transferring data will be started, upon completion of which you will see all the user data of the old computer on the new one. Good luck!
Download Windows Easy Transfer
- Distribution status: free
- Site program: microsoft.com
- Developer: Microsoft.
- Documentation: Yes
- Interface: Multilingual
- OS: Windows 10, 8, 8.1, 7, Vista, XP
New computer Or even a simple hard disk upgrade for many means the inevitable process of installing a new operating system. Contrary to the deceptive simplicity of the Windows installation wizard, the procedure for preparing a new PC to full work is always tedious and takes a lot of time. It's not enough to install Windows, you need to postpone all the data from the user profile, as well as set a considerable number of applications to which you are used to over a long time on the old PC.
Fortunately, there is a way to save your time and speed up the boring procedure for installing and setting up working programs. Via special utilities You can transfer old data to a new hard disk, and in some cases, even migrate from one version of the operating system to another, while maintaining custom files and the entire arsenal of the previously installed software. About what tools you need for migration, read below.
"Windows transfer tool"
The most obvious way to transfer all data to a computer with Windows 8 is to use the built-in utility, which is called - "Windows Transfer Migration Tool". It is part of the Microsoft operating system, starting with Windows XP, it is also in the latest Windows 8. With its help you can transfer files, system and user settings. The work "Windows transfer tools" is built as a wizard. First you need to run it on the old computer and select one of the ways to save data. If you have two computers that are on the local network or are connected by a special cable, the files can be transferred without referring to the external drive. But if you want to install Windows 8 on the old computer, then do not do without connecting an external disk.
After determining the location of the files, you need to choose what is required to be kept. By default, the "Windows transfer tool" proposes to save all files that are stored in the user profile (documents, music, video, images, application settings and systems), as well as the items to which the user provided sharing. It should be borne in mind that with the help of a standard application for data transfer, you can copy to new system Any files and folders, not just those that can be seen in the wizard window. To do this, refer to the advanced settings and manually mark all the items in the file manager. In the wizard window, the total amount of data will be copied.
All data are stored in single File MIG, access to security can be protected by password. As you can guess, the size of such a file can be rather big, so before using the drive it is worth checking which file system is used on it. If FAT32, you need to format the USB flash drive or an external disk in NTFS, because the size of the MIG file is likely to exceed 4 GB, the maximum allowable to FAT32.
After the data is copied to the drive, you can run the "Windows data transfer tool" on the new system. Specify the path to the MIG file, if necessary, enter the password, and you can choose which files you need to transfer to a new computer. It should be borne in mind that to copy custom content it may be needed to enter an account and password that is used on the old computer. All this, understandable case, is made for security reasons. After the process is completed, it will show detailed statistics with the number of transferred accounts, programs and documents, and will also generate a list of applications that were installed on the old computer, but not on the new. You will have to install them manually, but the program will tell you what is missing.

Its work is as simple as possible: just run the program, and it will generate a list of all installed in the application system. Highlight those you want to transfer to a new computer, and let the PickMeApp command Save all the files related to them. For each PickMeApp application, create a file in TAP's own format containing all data. Now the user needs to manually copy these files to the external drive and then rewrite into the PickMeApp installation folder on the new computer. Well, if there are no flash drives at hand, you can use any service convenient for you for "cloud" data storage - Dropbox, Google Drive, Yandex.Disk, etc. Place the TAP files in the folder, the contents of which is synchronized with the "cloud" and they will be copied to the remote server. Install the client "cloud" service on a new computer, and previously copied files will immediately be on the hard disk.
After PickMeApp detects TAP files, a list of applications available for installation will be displayed in the program window. Installation runs directly from the PickMeApp window, and the applications that have already been installed, for clarity are marked with a green marker.
PCMOVER is another alternative solution to which you can entrust the transfer of applications to a new computer. And this program is able to transfer system and user settings. In general, it can be viewed as a "Windows transfer tool" with advanced features.
PCMOver can help both transferring data from one computer to another, and in copying important information when updating the system on the old PC. For each case there is a separate operation mode. If we are talking about transferring data between computers, the program must be installed on both. Communication between devices can be carried out by local network, via a USB cable, using Windows Easytransfer cable. It is also possible to copy data to external disk.

All basic work is performed on the old computer: the program makes it possible to choose which accounts, files and applications must be transferred. By default, PCMOver offers copy all installed applications, Disk files, email messages, custom settings. If you wish, you can view the list of the installed software and cut off the unnecessary, add to the new system separate folders, files of certain types, contents of other disks. Separately, you can set exceptions to some file types and directory names.
After starting PCMOver on a new computer, the user can determine what exactly should be copied: all saved data, only files, files and settings (without applications). Before restoring applications, you can view their list and select only the desired. It should be borne in mind that when transferring commercial applications, not all licenses will work on a new computer. Perhaps some programs will have to activate again. It should also be borne in mind that programs such as anti-virus scanners, firewalls, means for finding spyware modules, utilities for local search, most likely, after transfer will work incorrect due to its specificity. Similar applications It is better not to transfer, but installed directly on the new system.
Since the transfer of a large number of data may take a lot of time, the PCMOVER developers have provided a reference to the completion of the process. The program can report that files are transferred, email or SMS.
The tool from Chinese developers is very reminded by the popular Acronis TrueImage program, but, unlike the latter, it applies to free. With Easeus Todo Backup, you can transfer the operating system to another hard drive, as well as create a copy of these partitions, disks or system. In addition, the program has regular tools for data backup, but they go beyond our topic.
The disk cloning tool can be useful if the old hard drive is already too small in order to accommodate all applications and user files. Connect the new drive and run the data transfer process. Easeus Todo Backup can create a copy of the disk based on all sectors (the size of the target disk must be greater than the old or at least the same). There is also a mode designed to transfer data to SSD drives.

When performing various data transfer manipulations, mode can also be useful reserve copy Systems. They should use immediately after installing the new OS (or after buying a laptop with pre-installed Windows). While still the system is not overloaded with applications and works as much as possible, create its backup and save it as an image. If the Windows subsequently, there will be problems, you can always download this image and restore the system to the initial state.
Sergey and Marina Bondarenko
Written for chip magazine
The need to transfer files, settings and programs from the old computer to a new scare, especially if there is no practice to regularly make backup copies. Simple utilities and several useful tips will help facilitate the task.
With regular backup, everything becomes much easier. But when the necessary files are randomly scattered throughout the hard disk, you risks them lose if the disk or the computer itself fails. No backup copies nowhere!
File transfer utilities
There are many special utilities that allow you to automatically transfer files and settings from the old computer to the new one. Programs, however, will have to be installed anew, but important data and parameters will be saved. In any case, the most important thing is to save personal files. We list several popular utilities to perform this task.
Data transfer tool - Microsoft utility, built directly in Windows. Unfortunately, in Windows 8.1, it has lost part of its functions and no longer supports the transfer of files and settings over the network. Nevertheless, you can still connect an external drive to the old computer, transfer files to it using this utility, then connect the same drive to a new computer and copy data to it in exactly the same way. The utility is embedded in Windows 7, 8 and 8.1. To run it, open the Start menu or the Start screen (key with the Windows logo), enter the keywords for data transfer without quotes to search for the keywords, as soon as you see the link. For Windows Vista and XP, you can download the data transfer tool from the Microsoft official website.

Mac Migration Assistant - Apple Utility, built directly in Mac OS X. It helps to transfer data from the old "poppy" to the new or with a Windows computer on Mac. In the latter case, you need to download from Apple. Well, to run the utility in Mac OS X, press the + [SPACE] keys, enter "Migration" (without quotes) and click.

There are other similar programs, including the paid Microsoft offered to use when upgrading with Windows XP to Windows 7. Unfortunately, it is no longer free, and it is unlikely that someone wants to pay for one-time transfer of files to a new computer.
Archiving and recovery
It should be created regularly. If this is already done, to transfer data to a new computer, it will be enough to create the latest backup and then restore the files from it on the new PC.
However, there is one nuance: backups created using the "Backup" tool in Windows 7 cannot be imported into. Even in Windows 8 there was a function recovery function from Windows 7, but it is no longer available in Windows 8.1.
However, you can create a backup copy of the data on the outer medium using any utility, from the built-in "archiving" to third-party programs and Apple Time Machine on "Macs", and then simply copy files from the archive to a new computer. On "Maks" already mentioned Migration Assistant allows you to import files and from backups Time Machine.

Simple copying files
The easiest way to transfer data is the usual copy of the files. It is suitable for creating simple backups, and to move files to a new computer. Connect a sufficiently capacious external drive to the old PC, copy or drag all the necessary files to it, and then connect it to the new computer and copy the files there. Yes, it's so easy - and if the files are also logically systematized by folders, you can very quickly copy the most important.
Of course, in such a way you can transfer only your personal files, and not the system settings. If you want to save bookmarks in the browser, you should export them, and then imported on a new computer. Modern browsers - Chrome, Firefox (and Internet Explorer, but only in Windows 8) - even have a built-in synchronization feature that allows you to transfer bookmarks from the old computer to a newly created account.

Cloud storage
Cloud storages also facilitate data transfer to a new computer. Many surely enjoy mail Gmail, Outlook.com, Yahoo! Mail or other similar with IMAP support instead of POP3. This means that emails are stored on a remote server, so you can not worry about postponing mail to a new computer (unless, of course, it is not used to receive letters until now POP3).
The same can be said about services that allow you to store files, settings and other data online. Good options - Dropbox, Google Drive. and Microsoft Onedrive. It is enough to install the cloud service client application on old computer And copy all your files there. Then you can enter the same account on the new computer - and all the files saved in the cloud are downloaded. In Windows 8.1, even there is integration with ONEDRIVE - Microsoft proposes to store all files in the cloud so that they are available from any computer without the need to transfer something somewhere. With the same success, other cloud services can be used.
One of the biggest problems arising from the preparation of migration with Windows XP in Windows 7 is to transfer applications, files and settings. Microsoft does not offer automatic update methods with this transition, as it was when migrating with Windows Vista in Windows 7.
Therefore, when switching from Windows XP, you usually have to install Windows 7 from scratch, after which it is possible to reinstall all applications, and then copy custom documents, settings and other non-standard parameters. Microsoft could not provide direct update capabilities, however, the company offers a tool that helps when performing the last operation.
Free data transfer tools for Windows 7 (Windows Easy Transfer for Windows 7) allows you to transfer files and parameters from the old Windows XP computer to a new machine with Windows 7. In addition to other file types, it copies user accounts, documents, favorites browser, Email and application settings.
Windows transfer tool is offered for 32- and 64-bit versions of Windows XP (as well as for 32- and 64-bit versions of Windows Vista). It is included in Windows 7, so there is no need to install it on the new machine. Windows transfer tool is not a new tool, but in the latest version there are several new features that significantly facilitate migration.
You can download the Windows XP tool from the web page download tool for transferring Windows data and select a version for your OS. Run the file received to establish a Windows data transfer tool and download it by selecting the appropriate link in the Start menu.
On the first page, explains what information you can transfer. Next, you need to decide which files and parameters you need to migrate, and select one of three options (Fig. 1).
You can use for data transfer cable directly connecting two computers, network, but it is necessary that both computers are available from this network (on a typical or wireless connection), or an external disk or USB drive. Windows power transfer creates a file which can be transferred to a new computer. After selecting one of the options, confirm that the files and parameters you want to transfer are on the current computer.
Fig. 1. Windows transfer means offers three ways to migrate.
The following steps depend the selected migration option. If you decide to create a file on an external disk, the tool immediately starts the search on the computer files for copying.
In the case of transferring over the cable, you need to connect computers with the cable, open the Windows data transfer tool on the new computer with Windows 7, after which it is possible to select the migration option on the cable migration. (The transfer tool is in the All Programs folder / standard / service.) If Windows Transfer Migration tool is not yet open, when the cable is connected, it will open or a window will appear with a proposal to open it. Must quickly establish communication and search for files for copying.
If you have selected a network transfer, when performing on a computer with Windows XP, the transfer tool will provide a key. After that, you need to run Windows transfer tool on the new machine with Windows 7 and select the migration option over the network. After entering the transfer key, the tool will find an old computer and will report that two computers are found and start scanning.
When performing any of the three migration options upon completion of viewing the old computer with Windows XP, the transfer tool will show user accounts that contain files and parameters included in the transfer process. When transferring using an external disk, you need to continue working with the agent on the old computer; If you use a cable or network, Windows transfer tool must be launched on a new computer.
You can view and even change the list of files by clicking the "Settings" link (CUSTOMIZE). Windows Migration Message Displays the File Manager window (Fig. 2), where you can see all the folders and files selected for transfer. You have the right to choose or cancel the selection of any files and folders. The program as carefully selects the transfer material, but you still need to view the files selected in the Manager to clearly control what will be transferred.

Fig. 2. File Manager Allows you to view a list of files selected for transfer.
Here the transfer process changes again depending on the method of transfer. When using an external drive after selecting and verifying all portable files, click Next (Next), and then specify a password to protect the file with data transfers. The transfer tool will offer to specify the name and location of the transfer file. Although this option is applied when using external drives, if you do not want to connect an external disk with a computer, the transfer file can be saved on the network.
Next, apply the Windows data transfer file to a new computer with Windows 7. To do this, on the new computer, open the Windows transfer tool and select the transfer option from the external drive, then set the transfer to the local computer. Answer the question affirmatively, whether there are already saved files, then specify the transfer file to external accumulator and in the shared network folder.
In the transfer options over the cable and on the network after selecting files and parameters, you need to click the "Transfer" button to start the transfer process. Upon completion of the process, the transfer means will provide a summary of the transferred to a new computer: a list of transferred files and applications, applications only for Windows XP, not transferred to Windows 7, as well as a list of third-party programs installed on the old computer, but still absent on the new one. You can view these reports to the Windows data transfer tools by clicking the "Windows Easy Transfer Reports" link (Windows Easy Transfer Reports) in the All Programs / ACCESSORIES / System Tools folder.
Windows transfer tool must be performed as the last operation during the computer migration process with Windows XP on Windows 7. Maximum fund efficiency is achieved when applications on Windows 7 duplicate the same applications on the computer under windows control XP. I hope that Windows transfer tool will allow you to save a mass of time and effort when you migrate your users to the new world of Windows 7.
The other day I ran into such a task that it was necessary to carry out the transfer of the user's profile from one section of the hard drive to another.
At first glance, there seems to be nothing complicated, just notify the folders and copy to another section. However, it should be noted that this method of transferring the profile to another section of the disk is not suitable. In such cases, various third-party programs are used for backing up the entire disk. I suggest to consider the already built-in program " "With which you can transfer user folders: these are documents, images, music, including hidden files etc. It should also be noted that you can transfer your data that is stored on the computer with the Windows XP operating system to the Windows 7 operating system.
Windows 7 data transfer
So, click on the "Start" click, select: All Programs\u003e Standard\u003e Service\u003e Windows Migration Tool.

As a result, the "Data Transfer Means" window will open, which provides a list that can be transferred at all, it may be documents, messages, music, etc.

We are offered 3 options. I propose to consider briefly each of them, in general it should be noted that the "data transfer tool" contains in itself, in which the data transfer algorithm is stocked.
1. Data transfer cable - using a special USB cable, you can connect two computers and transmit data. Just do not think this is not the USB cable that connects from the computer to the printer.

If you decide to transfer information using the data transfer cable, it should be noted that on another computer, you will also need to start a "data transfer tool". For some time the computers will be connected. In the absence of problems when connected, the "data transfer tool" will transmit data to another computer.

2. Net – if computers are connected to a local network, you can copy the information from one computer to another. We continue to consider -
This method implies data transfer to other computers united by means of a local network. When you click on the "Network" link, a window will open in which it will be necessary to click "Next".
As you can see, the data transfer algorithm is written on items, I think that you will be understood.

Then the "Data Transfer Wizard" will generate a key that needs to be entered to a new computer, thereby connecting both computers with each other.

After a successful connection, the data transfer compatibility will be checked, and then the transfer of information from one computer to another will begin.
3. External disk or USB - Flash memory device. This method involves using a USB flash memory device or an external hard drive.

We will need to specify which action with the data we want to do. That is, either the data must be copied to the computer or the data will need to transfer from this computer to another media. In our example, choose "This is my computer" and click on the link - this is my source computer.

As a result, the window will open in which you will need to specify which data we want to transfer. With the help of checks, we note the documents we need, which must be sent to the flash drive.

Then in the next window, you will need to set a password. For example, I set a password of 12345 and click "Save" and choose an external disk ( flash drive) To save. In general, such non-hard ways you will know what is generally such - the transfer of Windows 7 data transfer.

Thus, you will create a folder in format.mig on the flash drive. To carry out the transfer of the saved folder. Mig, for example, to another computer, you run "Data transfer tool" and when the data transfer facility will ask you to specify a computer (according to the figure below), you must click on the first link "This is my The computer you want to transfer files and parameters to this computer. "

Well, I hope the information in this lesson on the topic Windows 7 data transfer It was useful for you. I complete this, see you in the next lesson!
And finally, here's a video
The data transfer tool is a simple tool, but the knowledge of some subtleties will save you from bitter disappointments. My tips will help you save and restore your data by walking all the pitfalls.
To avoid problems, you need to ask yourself four simple questions:
- what you need to transfer
- will it all saved
- how to transfer something that is not automatically saved
- is it possible to restore everything on the new system
And then you will not have any questions that Herzen and Chernyshevsky were asked at one time. However, I will try to answer them too.
Today in the program
Note on Windows 8.1 and Windows 10
Unfortunately, in Windows 8.1. The data transfer tool is deprived of the ability to save files and settings. It is capable only to restore them. It is probably due to the integration of oneDrive in the operating system, as well as a wide range of synchronized parameters. Unfortunately, cloud synchronization does not allow to transfer a number of user settings and program parameters.
IN Windows 10. Data transfer tools are not at all. Alternative - Console Utility USMT.included in adk. It is pretty simple, and the question is solved by studying the pair of its parameters.
What data are saved automatically
Microsoft has provided automatic saving All your settings and data, as well as stored in the file profile.
Standard libraries. If these libraries enter folders located outside the system partition, they are also saved.
All user environment settings, including conductory options, folder view, desktop, taskbar, and start menu, including all icons fixed in them.
A new computer or even a simple hard disk upgrade for many means the inevitable process of installing a new operating system. Contrary to the deceptive simplicity of the Master windows installations, Procedure ...


