In this article I will tell you how to customize the interface of the Taxi program for comfortable work, so that all the necessary buttons and the most necessary reports are always at hand.
1) Let's start with the most common question of my favorite clients related to the lack of the "Operations" menu. Many accountants used it to search for reports, processing, documents that were sometimes very difficult to find in other sections of the program.
As such, there is no Operations menu in Accounting 3.0. Its counterpart is called "All functions" and by default the display of this section in the program is not set. To turn it on, you need to enter the menu, which opens using the orange button with a triangle in the upper left corner of the program. In the list that appears, select the "Service" section and open the "Options" section.
In the window that opens, check the box "Display the command" All functions "and fix the result by clicking the" Apply "button.

Now in the same Main menu (orange button with a triangle) we see the section "All functions"

In which everything that we are so used to seeing in Accounting 2.0 in the section "Operations":

2) Now let's consider the possibilities of the program in terms of customizing the TAXI interface. For example, now my program looks like this:

Those. sections above. Open windows in tabs at the bottom. Let's see how to change the arrangement of all elements of the working window of the program. Open the main menu again and find the section "Panel settings" there.


Then everything is simple. With the left mouse button, grab the section whose position we want to change and drag it to where we want to see this panel. For example, like this: I will move the "Open panel" to the top, and drag the "Section panel" to the left side of the window.

We press the button "Apply" or "Ok" and voila, this is how our program began to look:

Perhaps it will be more convenient for someone to work this way.
3) One more tip for setting up the program. As a rule, each accountant has some sections or reports that he uses on a daily basis. Well, for example, SALT or SALT on the account. And it would be very convenient if they are always there, always at hand. This can be achieved in a very simple way by placing the required reports in the "Favorites" section. Find the balance sheet in the "Reports" section. Hovering over it to point the mouse, we see next to a gray asterisk.

By clicking on it, we mark the selected report as "Favorites"

Section "Favorites"using the panel editor already known to us, we will place, for example, at the bottom of the working window of the program.


4) And one more "secret" for setting up the program interface. In various sections of the program there are documents that some people never use. Well, just by virtue of the specifics of the organization's activities. For example, in the section "Purchases" documents related to EGAIS.

We do not need these documents and we can remove them from the desktop. To do this, in the edited section in the upper right corner, click on the gear and in the menu that appears, select the item "Navigation settings"

In the window that appears, we see two columns. On the left are commands that can be added to our desktop. And on the right, those commands that are on our desktop. Find the EGAIS section on the right column and click on the "Delete" button

Accordingly, the documents that are in the right column can be added to the desktop by clicking the "Add" button
5) And finally, for those who do not want to get used to the Taxi interface. You can change the interface to the one that was in the first versions of Accounting 3.0.
In the section "Administration" we find the item "Interface"

Here, the developers offered us the choice to change the program interface to the same as in previous versions 8.3 and similar to Accounting 7.7. Having chosen the appearance of the program that interests us, it will have to be restarted.

This is how the program will look like with the previous interface.

For interest, let's see what an interface similar to Accounting 7.7 is.

I don’t know, I don’t know. I'll probably return to my usual "Taxi".
Well, that's all I wanted to tell you today. I hope some information will be useful to you while working with the program.
The information that the user can display on his home page is configured by the developer configurably:
In this case, any form from the number of controlled ones can be added to the work area of the start page:
Question 10.12 of exam 1C: Professional on the platform. How is the work area of the start page determined?
- Filled in automatically generated forms based on standard commands
- Collected from a list of common forms
- Typed from a list of freeforms
- Collected from the list of basic forms
- Is typed from the list of any forms defined in the configurator
- Typed from a list of managed forms
The correct answer is sixth, see the post.
Question 10.13 of exam 1C: Professional on the platform. You can place forms in the desktop area:
- Horizontally in any quantity, vertically in any quantity
- Horizontally no more than two, vertically no more than two
- Horizontally no more than two, vertically in any quantity
- Horizontally in any quantity, vertically no more than two
The third correct answer - you can make one or two columns, and each of them has an arbitrary number of forms.
Question 10.14 of exam 1C: Professional on the platform. The start page can be displayed:
- In the main window
- In the sub-window, hold down the "Shift" key
- Depends on configuration settings
- Options 1 and 2 are correct
The correct answer is the first. The start page can only be in the main window.
Question 10.19 of exam 1C: Platform Professional. The navigation bar can exist:
- Only in the main window on the desktop
- In the main window on the desktop and in sections
- In the main window and sub windows
The third answer is correct. The navigation bar is part of the command interface of the form, and the form, in turn, can be opened in the main window or in a pop-up window.
Question 10.91 of exam 1C: Professional on the platform. Interface panels can be located on the screen:
- Only at the top
- Just below
- Left only
- Right only
- Above, below, left, right
Question 10.124 of exam 1C: Professional on the platform. Where is the interface appearance setting in 1C: Enterprise mode?
- In the home page setup dialog
- In the panel settings dialog
- In the dialog options
- In the menu "All functions"
Question 10.127 of exam 1C: Professional on the platform. What do I need to open to customize the panels in the configuration?
- Configuration command interface
- Home page work area
- Command interface of the main section
- Client application interface
The fourth correct answer is that the panels are configured in Enterprise mode.
Subsystem in 1C 8.3- a metadata tree object that is responsible for building the configuration command interface.
Below in the article we will talk about subsystems starting from version 8.2.
The fact is that in version 8.1 (as well as for a regular application 8.2) there were also subsystems, but they served completely different purposes, more for the developer than for the user. With the help of subsystems in 8.1, different functionality was usually separated. The subsystems also helped when combining different 1C configurations - it was possible to specify which system to transfer.
1C subsystems and an interface for the programmer
In versions 8.3 and 8.2, subsystems are the primary tool for building a command user interface. Metadata objects "Subsystems" have a hierarchical structure, to configure the "submenu" in the interface, you need to add a subordinate subsystem:

Properties and settings
Consider the settings and properties of subsystems in the configurator:

Get 267 1C video tutorials for free:
Include in command interface- if you forgot to set this flag, subsystem will not be displayed in the interface.
The button opens the interface settings panel, where you can configure interfaces depending on the role of the current user:

Picture- the picture assigned to the subsystem is displayed in enterprise mode. You can choose a standard picture, or you can add your own, having previously created it as a configuration object Picture:

In the tab Functional options the list of functional options in which this subsystem is used is indicated.
Tab Structure defines a set of metadata objects participating in a given subsystem.
In the tab Other you can describe the help to the subsystem and specify the setting Include in help content- whether to include this help topic in general configuration help information.
If no report or processing is displayed in the managed interface
This problem very often arises among novice developers - like a report or processing was added to the subsystem, but it is not visible.
The first reason for this might be that the object does not have a managed form defined.
The second reason is that the "Use standard commands" checkbox is checked on the Commands tab of the object. This is due to the fact that to open the processing, either your own procedure can be described, or the standard one can be used:
We configure "Taxi" for ourselves in 4 steps (1C: Accounting 8.3, revision 3.0)
2016-12-07T18: 49: 42 + 00: 00In this article I will talk about how to make work in the new interface 1C: Accounting 8.3 "Taxi" really convenient and comfortable for an accountant.
Follow just 4 steps to customize the Taxi interface for yourself and enjoy all its benefits. If you are still in doubt: to switch or not to switch, then my opinion is unequivocal - to switch. Taxis are better. Taxis are more convenient. And it is very easy to readjust to it.
If you have not yet enabled the "Taxi" interface, turn on:
Select the "Taxi" option and click the "Restart" button:

Then necessarily go to the "Administration" section, the "Interface" item:

And here we also set the "Taxi" option and press the "Restart" button again:

Step # 2. Setting up the section panel.

Here we select the sections on the right side of the window that we rarely use or do not use at all and press the delete button:

Most often, such "unloved" sections are "Leader", "Production" and "OS and intangible assets":

And finally, in the lower left part of the window, set to show "Picture and text", if with pictures it is easier for you to find sections:
Click OK and the section panel will transform:

Result: only the necessary remained, pictures appeared.
Step # 3. Customizing the open windows panel
In the new interface, you cannot switch between open windows, because the open windows pane is hidden by default. Let's display it.


After dragging, click OK and now the windows we open will be displayed at the bottom of the main 1C window:

Result: at the bottom of the main window are displayed directories, documents, magazines and so on that we open.
Step # 4. We turn on the "All functions" menu.
A very useful feature when you tried to find a report or document, but could not do it through the section panel. In this case, the "All functions" menu will help you out from which you can open all reports, documents, reference books, etc.
This option is hidden by default, but it is easy to show it.


Check the box "Show command All functions" and click OK. Now any report, document, reference book, journal or processing can be selected like this:


Result: it became possible to open reports, documents, journals, directories and processing that could not be found in the main menu of the system.
We are great, that's all
By the way, for new lessons ...
Yours faithfully, Vladimir Milkin(teacher
This is the second part of an article about setting up the Taxi interface that appeared in the 1C: Enterprise 8.3 application. In I talked about how to add new panels to the interface and change their location according to your preferences. In the second part I will teach you how to manage application sections and their content, as well as change the parameters of the initial page of the interface.
In the screenshot below, the interface looks like we made it look in the last lesson. For me, such a working view is not very convenient. I prefer to have the section panel on the left as it is by default. And it's not just a matter of habit. It's just that when all the sections are compactly collected on one side, they can all be covered with one glance, which cannot be said about the stretched menu at the top of the interface.
But since the sidebar is taking up too much space in the screenshots, I'll leave the sections where we moved them. Although I recommend that you leave this menu where the developers themselves put it.
Hereinafter, screenshots created using "1C: Salary and Human Resource Management 3.0" are used, but, as I said in the previous article, these settings are relevant for all new configurations, since the "Taxi" interface is used in them too.
So, the next function that I want to tell you about is customizing the section panels. It allows you to remove individual sections from the interface.
Here the question may arise as to why someone might need to delete entire sections of operations from the program. In fact, everything is very simple. Let's say you have a small company in which only one employee deals with personnel and salaries. Of course, in this case, nothing can be deleted, since from time to time he will use all the available tools.
But suppose you have a human resources specialist on staff who maintains an HR record and a payroll accountant. The personnel officer does not need a payroll calculation, and the accountant does not need personnel operations. Therefore, each of these specialists can be left with only those sections that they really need so that unnecessary elements do not distract your employees from their work.
Of course, some objects, within the framework of their powers, are used by both personnel officers and accountants. For example, sick leave or leave. But, as a rule, access to such objects is duplicated in the corresponding sections.
To delete or add a previously deleted section, you need to select the "Section Panel Settings" function in the "View" subsection of the settings.
In the window that opens, it is easy to remove any elements from the interface and return them back. This can be done in several ways.
First, you can use the "Add", "Add All", "Remove" and "Remove All" buttons. If you do not use the button that removes or adds all possible objects, then the action will affect only the selected objects.
In order to select several consecutive menu items, you need to select the upper one with the mouse, and then, holding Shift, click on the lower object of the selected group.
In order to select several objects in any order, you need to mark them with the mouse while holding down the Ctrl key.
Secondly, you can add or remove objects by simply dragging the mouse.
But the third way is closer to me. Following it, you just need to double-click on the desired object. If it is located among the available objects, it will immediately become selected, otherwise it will be transferred from the selected to the available ones.
At the top right, you see two blue arrows. They are needed in order to change the order of the items in the menu.
Now, using the knowledge gained, let's remove the "Salary", "Payments" and "Taxes and Contributions" items from the section panel, and raise the "Administration" section to the top of the list of selected sections.
Now let's accept the changes and see how our menu looks.
Everything turned out as we had planned. To quickly return everything back, you need to go to the section panel settings again, click the "More" button, select the "Set standard settings" option and accept the changes.
It is no coincidence that I spent so much time describing these actions, since they are widely used in all 1C: Enterprise 8.3 configurations and will be needed in the following examples.
The next thing I want to tell you about is customizing the start page. Now it hangs an invitation to configure the system from scratch or transfer data from other configurations, but in the future, when the program is configured, other data will be displayed there. For example, if we talk about the configuration "1C: Salary and HR 3.0", then it can be the staffing table and the history of accruals.
To manage the settings of the start page, you need to go to "View", "Setting up the start page".
As you can see, everything is the same here as in the settings of the section panel. The only difference is that the start page also provides for the activation of the second column, which can be activated by adding some of the available forms there. But you should only do this if you have a large enough display. Otherwise, the second column will only get in the way, eating away at the work space.
You can experiment with customizing your Home screen yourself. You can return everything to the default settings in the same way as we did after setting up the section panel.
The workspace of each section is divided into a navigation bar and an action bar. Visually, they do not differ from each other, therefore, for clarity, I marked the navigation bar in the next screenshot with a red stroke.
Through the navigation bar, the user gains access to lists of reports, documents, and so on. And with the help of the action bar, he can immediately create a document, a report and the same "and so on."
For clarity, let's look again at the previous screenshot illustrating the Salary section. As you can see, in the navigation panel, which I have circled with a red frame, there is a section "Sick lists". If you click on it, a list of all sick leaves will open, which we have so far empty. Here you can create a new sick leave by clicking the "Create" button.
But in the same section "Salary", in the action menu, there is also an item "Sick list" located under the eloquent heading "Create". By selecting it, you will create exactly the same sick leave as in the previous example, but for this you do not have to go to their general list and click an additional button.
The content of the navigation bars and actions can also be controlled. Therefore, if you are sure that some function should be in a certain section, but it is not there, it may simply not have been added to the list. You can do this yourself using the "Customize Navigation" and "Customize Actions" features. This is done in the same way as for sections and the home screen.
Check out how this section began to look after I enabled all the functions available for it.
It's just some kind of porridge, isn't it? All actions do not fit on the screen, even if you expand it, and to see them all, you have to use the scroll bar. Therefore, it is advisable to activate only those functions in the action menu that are really needed quite often. The same documents that you need much less often, it is better to create by navigating to them through the navigation bar and not include them in the action bar.
Here it will be useful to remind you that access to any 1C: Enterprise 8.3 object in the Taxi interface can be obtained through the All functions option, which I wrote about in the first part of the article.
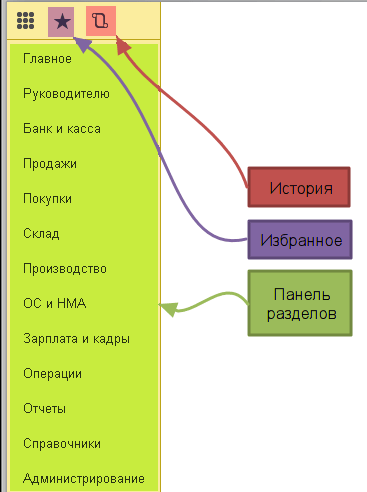
In the upper right corner of the "Taxi" interface there is a panel with buttons that duplicate some of the application's functions. You yourself can choose which buttons will be displayed in this panel. To do this, you need to use the "Add or Remove Buttons" function and mark with the checkboxes those that you need most often, as shown in the screenshot below.
This concludes the article on setting up the "Taxi" interface. Next time I will tell you how to get started in the 1C: Salary and Enterprise Management 3.0 configuration.


