Why Windows 10
Because 2017 is in the yard, the very middle, and progress does not stand still. No matter how vista-affected Windows is scolded, the system has made great progress along with the rest of humanity, and the top ten is very good for work and everything else. If there are clear reasons to put some old versions, please unsubscribe in the comments.
Ways to transfer Windows 10
- Via special programs like Paragon Migrate OS to SSD (paid) or EaseUS Todo Backup Free (free).
- A clean install of Windows on a new drive is a prettier way for me personally. The installation itself is quick and easy, marking a new disk and formatting the old one is right there in the process. A sort of general cleaning in the computer industry.
Clean install of Windows 10 from a USB drive
I assume that you already have a legal copy of Windows 10 installed, which you are going to transfer to new SSD disk. And it goes without saying that all your work or family files and folders are already saved on external hard disk or cloud! Making regular backups is generally a good thing.
1. Create Windows 10 installation media.
Connect to computer USB a disk with a capacity of at least 5 GB - empty or with files that are not a pity, because the entire contents of the flash drive will be erased.
- Go to the microsoft.com downloads page and download the media creation tool - click the "Download Tool Now" button at the top of the page, save the file, and run it when the download is complete.
- Accept the terms of the agreement.

- Choose to create installation media.

- View system settings, change if necessary.

- Choose to record to a USB device.

- Information about the selected USB drive.

- Waiting for the download to finish installation files Windows 10. Depending on the speed of the Internet, the process may take a different time. In my case, it took about 40 minutes to fully load.

- Click "Done" when finished.

2. Installing Windows from a USB drive
- We go into the BIOS settings to set the flash drive as boot disk. To do this, we restart the computer, and at the moment the manufacturer's logo appears, press the Del key on the right side of the keyboard. We put the USB drive first in the boot queue. The specific type of BIOS depends on the manufacturer, but the meaning is the same.

- Save settings and reboot again.

- Launching the installer. We check the parameters, then the "Next" button.

- Click the "Install" button.

- We agree that Microsoft does not owe us anything and all that.

- Select "Custom: Install Windows only".

- Choose which disk to install the system on. The example screenshot shows two completely blank, unpartitioned disks. Bigger in size - old HDD on which it was installed former system Windows (I just deleted it with the "Delete" command at the bottom of the window). Smaller in size this case- New SSD. I select it and click "Create".

- I create a markup for the second disk.

- I select the largest partition from the first disk (Disk 0 in the screenshot), then "Next".

- We are waiting for the installation program to prepare everything. Then the computer will restart itself. The whole process can take 10-20 minutes depending on the speed USB disk and SSD.

- Setting the region.

- Keyboard layout.

- Additional layout.

- We connect to the network.

- Microsoft account sign-in.

- Set a PIN code if needed.

- Drive if needed.

- Privacy options. If there is no definite opinion on this, just leave it as it is.

- Completion of installation.

Life after reinstallation
She is wonderful! Windows starts - you will not have time to pour some tea. 3ds Max installs in 9 minutes, starts in 30 seconds instead of 3 minutes from HDD. Whether such pleasant little things are worth all the fuss - everyone decides for himself.
An SSD is different in its properties and way of working from hard HDD disk, but the process Windows installation 10 on it will not differ much, there is a noticeable difference only in the preparation of the computer.
Preparing the disk and computer for installation
Owners SSD drives know that in previous versions For the correct, durable and full-fledged work of the disk, the OS had to change the system settings manually: disable defragmentation, some functions, hibernation, built-in antiviruses, the paging file, and change a few other parameters. But in Windows 10, the developers took into account these shortcomings, the system now performs all disk settings itself.
It is especially necessary to dwell on defragmentation: it used to greatly harm the disk, but in the new OS it works differently, without harming the SSD, but optimizing it, so you should not turn off automatic defragmentation. It's the same with the rest of the functions - in Windows 10 you don't need to configure the system with the disk manually, everything has already been done for you.
The only thing is that when partitioning a disk, it is recommended to leave 10–15% of its total volume as unallocated space. This will not increase its performance, the write speed will remain the same, but the service life may be slightly extended. But remember, most likely, the disk will last longer than you need without additional settings. You can release free interest both during the installation of Windows 10 (during the process in the instructions below, we will focus on this), and after it using system utilities or third party programs.
PC preset
In order to install Windows on an SSD drive, you need to switch the computer to AHCI mode and make sure the motherboard supports SATA interface 3.0. Information about whether SATA 3.0 is supported or not can be found on the official website of the company that developed your motherboard, or using third-party programs, such as HWINFO (http://www.hwinfo.com/download32.html).
Switching to SATA mode
- Turn off your computer.
- As soon as the power-on process begins, press the special key on the keyboard to go to the BIOS. Usually the Delete, F2 or other hotkeys are used. Which one will be used in your case will be written in a special footnote during the inclusion process.
- BIOS interface in different models motherboards will be different, but the principle of switching to AHCI mode on each of them is almost identical. First, go to the "Settings" section. To move through blocks and items, use the mouse or arrows with the Enter button.
- Switch to additional settings BIOS.
- Go to the sub-item "Embedded Peripherals".
- In the "SATA Configuration" block, find the port to which your SSD is connected and press Enter on the keyboard.
- Select the AHCI operating mode. Perhaps it will already be selected by default, but this had to be verified. Save the settings made in the BIOS and exit it, boot the computer to proceed to prepare the media with the installation file.
Preparing the installation media
If you have already prepared installation disk, then you can skip this step and start installing the OS right away. If you do not have one, then you will need a USB flash drive with at least 4 GB of memory. Building on it installation program will look like this:
- We insert the USB flash drive and wait until the computer recognizes it. Open the explorer.
- The first step is to format it. This is done for two reasons: the memory of the flash drive must be completely empty and divided in the format we need. Being on home page explorer, right-click on the flash drive and select "Format" in the menu that opens.
- Choose a mode NTFS formatting and begin the operation, which can last up to ten minutes. Please note that all data stored on formatted media will be permanently erased.
- Let's go to the official Windows page 10 (https://www.microsoft.com/ru-ru/software-download/windows10) and download the installation tool.
- We launch the downloaded program. We read and accept the license agreement.
- Select the second item "Create installation media", as this method of installing Windows is more reliable, because at any time you can start over, and also use the created installation media to install the OS on other computers in the future.
- Select the system language, version and bit depth. The version you need to take is the one that suits you best. If you are a regular user, then you should not load the system with unnecessary functions that you will never need, install home windows. The bit depth depends on how many cores your processor works in: one (32) or two (64). Information about the processor can be found in the properties of the computer or on the official website of the company that developed the processor.
- In the media selection, check the USB device option.
- Select the flash drive from which the installation media will be created.
- We wait until the media creation process is completed.
- We restart the computer without removing the media.
- During power on, enter the BIOS.
- We change the boot order of the computer: your flash drive should be in the first place, and not HDD so that when you turn it on, the computer starts to boot from it and, accordingly, starts the Windows installation process.
Installing Windows 10 on SSD
- Installation begins with the choice of language, set the Russian language in all lines.
- Confirm that you want to start the installation.
- Read and accept the license agreement.
- You may be asked to enter license key. If you have it, then enter it, if not, then skip this step for now, activate the system after installing it.
- Proceed to a manual installation, as this method will allow you to set up disk partitions.
- A window will open with disk partition settings, click on the "Disk settings" button.
- If you are installing the system for the first time, then all the memory SSD drive will not be distributed. Otherwise, you must select one of the partitions to install and format it. Break unallocated memory or existing disks as follows: allocate more than 40 GB to the main disk on which the OS will be installed so that in the future it will not be clogged, 10–15% of shared memory leave the disk unallocated (if all the memory is already allocated, delete the partitions and start creating them again), we give all the remaining memory for an additional partition (usually drive D) or partitions (drives E, F, G ...). Do not forget to format the main partition given under the OS.
- To start the installation, select the drive and click Next.
- Wait for the system to install automatic mode. The process may take more than ten minutes, do not interrupt it under any circumstances. After the procedure is completed, the creation will begin account and setting the basic system parameters, follow the instructions on the screen and select the settings for yourself.
Video tutorial: how to install Windows 10 on an SSD
Installing Windows 10 on an SSD is no different from the same process with HDD drive. Most importantly, do not forget to turn on the ACHI mode in BIOS settings. After installing the system, you should not configure the disk, the system will do it for you.
Many users try all possible methods increase the speed of your computer. To this end, in addition to standard overclocking with help special utilities, set to your system unit more modern types storage media, namely solid state drives, which have a higher data transfer rate.
Thus, they are faced with the need to migrate the operating system from a standard 3.5-inch hard drive on an SSD drive, however, the whole problem is that not everyone knows how to implement this.
What does moving the OS to a solid state drive do?
Before considering the main methods for transferring dozens to a solid-state hard drive, it is necessary to understand the main advantages of this, in addition to more high speed reading electronic data that the user receives.
Probably, every user is faced with the fact that some applications or processes on the computer take a very long time. This is due to the fact that conventional hard drives are unable to quickly write and read information. However, the situation changes dramatically if in a portable or desktop computer install an SSD drive and transfer Windows 10 to it. It would seem that this is so, but the difference is very noticeable. The system will start to work noticeably faster and much less time will be spent to perform the same tasks. At the same time, it is recommended to transfer only the OS to the SSD without any third-party programs. Nevertheless, if it becomes necessary to transfer the entire system as a whole, with all installed utilities, then with the help of some tools you can implement this.
General information on transfer
Among novice users, there is an erroneous opinion that in order to transfer an operating system from one hard drive to another, it is enough just to copy all the contents. However, such a transfer will not lead to anything, and the system itself simply will not work. Migration is a systematic process that can be performed using the top ten integrated tools or third-party utilities that have been developed to accomplish this task. It is worth noting that no matter which transfer method you choose, it is very simple and does not take much effort and time. In addition, this process is automated as much as possible, so no special actions are required on the part of the user.
In this article, we will take a closer look at each of existing methods transferring dozens to an SSD drive, and also consider the most popular applications with which you can implement this idea.
Standard Tools
Move top ten to hard drive type SSD You can also use standard Windows tools. In this case, this tool is the “Data Backup and Restore” section, which can be found in the “Control Panel”. This method is one of the simplest, since there is no need to search the web for various third-party applications and install them on your computer.
So, you have installed a brand new solid state drive in your system unit and want to transfer Windows 10 to it. Where to start? The first step is to create an image of the system and burn it to optical drive or a USB flash drive, from which the OS will be restored. After starting the recovery process, you will need to specify the path to the drive on which the previously created image is located. At the same time, it is recommended to disconnect the old HDD from the motherboard to avoid various kinds of problems. In addition, if in the future you will use the old hard drive to store personal information, then you first need to format it. If this is not done, then both operating systems that are on each of the drives will conflict, which will make normal work on the computer impossible.
Regardless of whether you use a laptop or a desktop system, the process of transferring dozens from a standard HDD to an SSD is absolutely identical, except that it will be quite problematic to install an SSD in a laptop yourself, and when contacting service center you have to pay a lot of money. In addition, if the factory warranty has not yet expired, then installing any iron leads to its cancellation, so you should think very carefully before doing anything.
Third party tools
An alternative to standard Windows tools, with which you can transfer the top ten to a solid state drive, are special applications from third-party developers. To date, you can find a great many of them on the Internet, however, when choosing one of them, you must take into account the fact that some utilities were developed exclusively for hard drives of a certain manufacturer, therefore, with hard drives of other brands, they will work unstable or will not function at all. For example, the Acronis True Image utility is designed for HDDs from WD, the Seagate Disk Wizard application works perfectly with hard drives of the same name, and Samsung has developed proprietary software for its products. If we talk about universal programs that can work with all models of hard drives, Paragon Migrate OS is worth noting.
Paragon Migrate OS to SSD
Paragon is a very well-known software developer that has many different utilities, both free and commercial, designed to perform various functions. One of the most famous applications is Paragon Migrate OS to SSD, with which you can transfer the operating system from one HDD to another. It is worth noting that you will have to pay for this program, since it is not freely available, however, it is worth it. Paragon Migrate OS to SSD is a powerful tool for migrating your system to an SSD. Its work is fully automated, so all that is required from the user is to start the process and wait for it to complete. The utility supports migration as soon as system files OS and personal data of the user, however, the first option is more preferable, since it saves a lot of time and free space on the hard drive. You can choose your preferred transfer mode in the program settings. It is worth noting that after the copying of the system is completed, it will be necessary to enter the BIOS and install the solid state drive as the primary bootloader.
Acronis True Image
Another popular hard drive tool is Acronis True Image. The utility has a simple and clear interface as well as stable performance. It is universal and works equally well with the hard drives of all modern manufacturers of computer components on the market. However, it is worth noting that if a WD hard drive is installed on your PC, then to transfer dozens to it, it is recommended to use a special assembly of this program, which is called the WD Edition.
Transferring a system to an SSD using Acronis True Image is best done in automatic mode, which can be launched from the Disk Cloning section. The time it takes to complete a copy depends on the overall size of the system, as well as the speed of the HDD from which the transfer is being made.
Seagate DiscWizard
As you might guess from the name, the utility was designed to work with hard drives manufactured by Seagate. As for the main aspects of the work and the process of transferring dozens, this tool is an almost complete copy of the two previous applications discussed earlier. Copying also takes place with the help of a wizard that performs all actions without user intervention, so even the most backward user will be able to deal with Seagate DiscWizard.
Samsung Data Migration
This is another representative of narrow-profile utilities designed to service Samsung hard drives. The developer implemented in his product step by step wizard, following the recommendations of which you can transfer Windows 10 to a solid state drive without any problems. The main advantage of Samsung Data Migration is the ability to selectively transfer, thanks to which the user can independently specify the types of data that will be copied to the new hard drive. This is very useful feature, since solid state drives have a much smaller volume compared to standard HDDs, so literally every gigabyte counts. As for the transfer process itself, it, as well as in the case of other similar utilities, is maximally brought to automatism.
Macrium Reflect
Another application for transferring dozens, which has free license, is Macrium Reflect. The main advantage of this software is full compatibility with all hardware, so this utility stands out against the background of many others that can only be found on the network.
According to consumer reviews, Macrium Reflect has great functionality and allows you not only to transfer the operating system from one drive to another, but also create system images and burn it to a CD that can be used as a boot disk. Thus, if you are looking for universal application, with which you can perform absolutely any operation with the hard drive, then this program is the best fit for you.
What else do you need to know about cloning Windows 10?
So, we have considered the most common tools for transferring the system, however, it remains to talk about some of the nuances that must be considered when performing this procedure. On many computer forums, you can find a lot of information about such a utility as AOMEI Backupper Standard. It is also free and allows you to copy ten to an SSD drive. Nevertheless, it is not recommended to use it for novice users, since the system is cloned by creating a bootable CD or USB flash drive, and from them it is directly transferred to a solid state drive. This process is more time consuming and requires the user to have certain skills. However, which tool to use is entirely up to you.
Installing a Solid State Drive – one of the most effective methods that can breathe a "second life" into a computer, even with not the most recent configuration. The operating system accesses files faster and becomes much more “responsive” to user actions. At the same time, it is absolutely not necessary to install and configure the OS from scratch and software. In this article, we will talk about how to transfer Windows 10 to an SSD without losing data.
Microsoft does not provide special tools for cloning in the system. However, built-in Windows features 10 allow you to perform this operation.
Media preparation
According to official guidelines technical support company, we need an additional, third, hard drive. Unlike those connected via USB, SSDs intended for internal placement are not pre-formatted. As a result, they are detected by the computer but not displayed in the OS. To clone Windows, you first need to make all drives visible.
- We mount the drive in the PC and turn it on. Having opened file manager, we see that the OS recognized only the system partition.

- Using the key combination Win + X, we call the "Power User menu". We pass to the indicated point.

- The disk management manager starts with an initialization window. At this point, the user must select a partition table. For x32 bit systems, only the MBR is needed. x64 bit users Windows versions GPT is better.
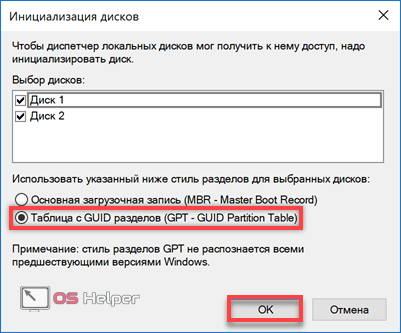
- Having decided on the partition table, we will format it. Both drives must be NTFS file system. By clicking on the unallocated area, we call context menu. Select the item marked in the screenshot.

- The creation wizard is activated simple volumes. We will carry out further actions, following his prompts.

- The size of the volume is not resizable, but we create one using the entire available volume.

- The letter is assigned automatically. Since the placement of disks in the system is temporary, only for the period of cloning, we will leave it unchanged.

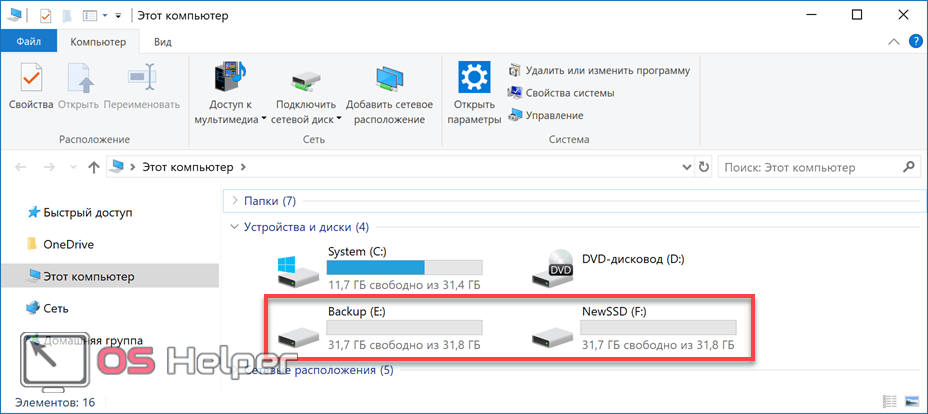
- At this stage, we set the text label. For convenience, we will assign the name "Backup" to the intermediate HDD.

- At the last step, the wizard displays the parameters set for the drive in the form of a list. We complete the work by clicking on the "Finish" button.
 We perform a similar operation with a new SSD, giving it the name "NewSSD". Having opened the "Explorer" we make sure that they are all visible from under the OS.
This completes the preparation of media for cloning.
Intermediate copy
The next step, allowing you to move Windows to a new "place of residence", will be the creation of an intermediate copy.
- The tool we need is in the classic control panel. Run it by typing "control" in the "Run" system menu. To do this, press Win + R.

- Open the element indicated in the screenshot.

- In the quick navigation area, select "Create a system image."

- The wizard that starts prompts you to determine the storage location. Using the drop-down menu, specify the intermediate hard drive, which we have given the name "Backup".

- At this stage, the system shows us what data will be included in the finished image. We agree and move on to the next step.

- We complete the wizard by clicking the "Archive" button.

- The system HDD is being imaged.

- The operation is not accompanied by timestamps. Its duration depends on the amount of stored data. Upon completion, we will be prompted to create a rescue disk.

If you have Windows 10 installation media, you can skip this step. Otherwise, you will need a flash drive with a capacity of at least 8 GB.
Transfer to SSD
At the last stage, the old HDD can be removed from the computer, leaving the drive with backup and a new SSD ready for transfer.
- The download is performed from the installation media with the Windows distribution. After checking the language settings, move on.

- At this stage, instead of installing, we select the recovery mode.

- In the window for selecting actions, go to the marked item.

- In the region of additional options the desired section is framed. By selecting it, we launch the recovery wizard. Since we are performing a full migration, the next step is to confirm the solutions offered by this mode.

- Having received the last warning, we activate the recovery procedure.

At the final stage, the computer will automatically restart, and operating system will start from the solid state drive. Reactivation is performed without user intervention after checking the hardware configuration.
Disk cloning software
As we saw in the example above, it is possible to clone Windows 10 using the system, but the procedure is lengthy and laborious. Sometimes it's faster and easier to reinstall the OS from scratch than to look for a suitable intermediate backup drive.
Against this background, applications specifically designed to facilitate migration look favorably. The average user does not need to clone disks on an industrial scale. In most cases, this is a one-time operation. For this reason, we will only consider software that has free versions or allowing you to perform the necessary operations in the trial period.
Macrium Reflect
The program is published by Macrium Software in several editions. The Free Edition allows you to transfer the OS directly, without intermediate media.
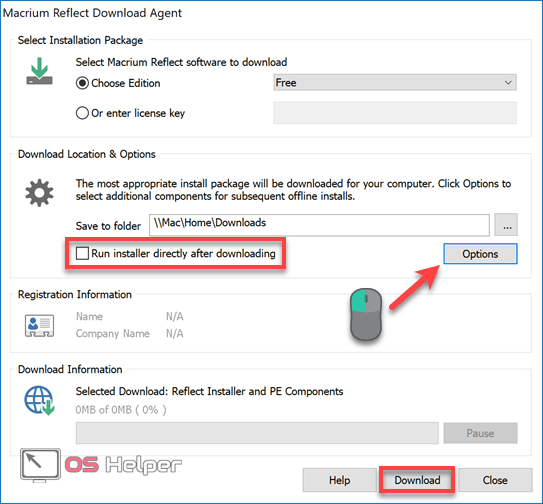
- Installation is performed using the Download agent. Previously, the user can select the necessary components using the "Options" button. By clicking "Download", we start the download. The circled "Run installer" box is checked by default. If you do not remove it, the program will start installing automatically after the download of components is complete.
- We check the correctness of the architecture: it must match the bitness of the installed OS. In the drop-down list, select a "clean" installation. Such a distribution will not include boot disk creation and disaster recovery tools.

- The main window of the installed Macrium Reflect displays the disk structure available on the PC. The boxed option opens the cloning options.

- At the top is the original datum disk. At the bottom of the window, select the target SSD. The section marked with the number "3" contains advanced copy settings.

- Here you can not change anything. The default smart copy option will suit any user. The migration process will check file system and the TRIM function is automatically enabled.

- After checking all the options, press the highlighted button to copy the existing structure to the new drive.

- By clicking "Next" we launch the Migration master, which will give us a detailed technical information about each partition of the created disk.

- At the final stage, remove the crossed out checkmark. She is responsible for creating a recurring schedule, and we have a one-time operation.

- Macrium Reflect will warn you before starting the transfer that the data on the disk specified in the window will be completely destroyed. We agree and wait for the completion of the process.
 As a result of the actions performed, we receive a valid license a copy of Windows on new media.

You can remove the old drive and start working on the SSD without having to reinstall the system.
Acronis True Image
One more noteworthy the program is Acronis True Image . It differs from other products of this company by the ability to perform the cloning operation during the trial period. For example, Acronis Disk Director allows you to do this only after purchase full version. In True Image, the limitation is the need to use intermediate media.

The declared option of cloning on the fly becomes available in the full edition of the program.
- You can use any suitable size USB drive as an intermediate. We connect this to a PC and indicate it as a storage location.

- Let's start the backup process.

- Go to the "Recovery" tab. Select the target disk in the window and press the button marked with the number "3".

- To clone, open additional options.

- Tick the source – backup of the current drive. Select the destination disk from the drop-down menu – new SSD. We start the transfer process.

The operation is performed in the background, its progress is displayed in the system tray. When Windows transfer 10 on the SSD is completed, the program automatically makes adjustments to the bootloader.
Manufacturer software
Samsung, one of the leaders in the issue solid state drives, created his own software to make it easier for users to migrate the system. The proprietary utility is free, but only works with manufacturer's disks. The list of supported SSDs can be viewed on the official page, where Samsung Data Migration is available for free download.
Transfer issues
There are no system restrictions for working with SSD. Microsoft introduced full support for SSDs with the release of Win 7. However, the transition can be difficult for laptop users. Manufacturers are reluctant to allow changes to the factory configuration.
As a result, some top MSI and ASUS models do not allow you to replace the HDD. The user will not be able to install a cloned SSD in it, because the laptop refuses to work with it. The only way out is to contact the manufacturer's technical support to find out in advance the possibility of an upgrade and supported drive models.
Finally
Features that the user gets when using free programs cloning is enough for a one-time transfer of the system. In terms of functionality, they are somewhat inferior to professional tools such as Paragon Migrate OS to SSD, but they cope with their task.
Video instruction
For those who want to learn more about how to use the programs for migrating to SSD, below is an overview video.
In this tutorial, we will show you how you can transfer Windows 10 and all installed data to a new hard drive. The same process can be applied when migrating data to an SSD. We will be migrating from a 250 GB hard drive to a 1 TB hard drive. Below in the picture is my main drive, which contains the operating system and all my files. 1 TB is also installed. To see it we have to go to Disk Management because it is not formatted. So, click This PC-> Manage-> Disk Management. As we can see, the 1TB disk is not even initialized. In this case, make sure there is a boot entry and click OK to initialize.
Our source disk is disk 0, which is my 250 GB hard drive. It contains my operating system and all data. Drive 1 is the destination drive. We will clone everything on this drive. Also, make sure the target drive is empty, and if you have information in there, make sure you did backup, because the target disk will be overwritten with the information from the source disk, in this case disk 0. With this set, we go ahead and have to close Disk Management here.
So, for this tutorial, we will be using Paragon Hard Disk Manager Premium. This program is no longer free. You can probably download it for free, but cloning won't work. This is the program that is being used; this program does not slow down the operating system like most of the free programs we have used before. So once you install it, go ahead and launch it.
Click on transfer operating system and read the following note carefully.

The target disk will be replaced with the information from the source. Press the Next button and now it is automatically recognized by the operating system and the wizard itself will tell you that it is going to copy the operating system Windows system 10 64 edition which is on drive C which uses 16 GB on a 250 GB hard drive for a 1 TB drive.

Remember that both drives in this case are serial ATA. Now you can also choose which folders to copy, but all folders will be selected by default. Now check the "Use all available space for the OS partition" checkbox. If you don't check the icon, it will create a partition of a smaller partition on the larger drive. If you don't know anything about a section, be sure to check the box. Then click the copy button.
The copy process may take some time depending on how much information there needs to be copied. Once this is done, be sure to read this.

We intend to summarize it for you. You have two options.
Using the first one, you can delete the original drive once the cloning is done and keep the drive as the main drive. Second: you can go into the BIOS and select the target disk as the first boot device. In our case, we removed the original drive. Go ahead and click close.
After that, we must restart the computer under Windows control 10, remove the source drive and save on the destination drive, which is 1TB. However, if you want to keep booting from it, then select the target drive as the first boot device in the BIOS.
Now, as you can see, a normal reboot and as if nothing happened and the boot is from a new hard drive. You can click on my computer and notice that you are using a 1TB drive, not a 250GB one.

All your data and operating system are activated and ready to go.
That's all. If you have questions feel free to leave them in the comments section below.


 and geographic information systems (GIS) and can be the result of their work.")


