When installing the operating system, as well as when changing files, redistributing space between partitions, it is necessary to format the hard disk. This is a fairly common operation performed by PC users. If you have not done anything like this yet, then let's deal with the theoretical part of the question.
Formatting process, what is it?
Layout of areas of information storage, in which some of it is deleted, is called formatting. It creates a system for accessing stored information.
As a rule, it is performed for:
- changes from one file system to another;
- deleting files from the hard disk.
On this moment exists a large number of various file systems. They are used on various equipment, including not only computers, but also mobile devices... To work in the latter Windows versions the file system is NTFS.
Video: How to Format a Hard Drive
Why format your hard drive?
Formatting is done to remove files from the hard drive, as well as to change one file system to another.
In most cases, they resort to it:
- before installing a new operating system;
- to create an installation image of Windows, for example, on a USB flash drive;
- for the reason, the need to clean the disk from files, in case they are not needed.
Formatting with Windows tools
Despite the large number of various programs for working with the hard disk, the Windows operating system has its own set of utilities.
Consider the process of formatting disks using Windows:
- select the drive you want to format;
- press the right mouse button;
- select the Format item;
- in the window that appears, select the file system, cluster size, and formatting method;
- as a file system, it is recommended to set NTFS, and leave the cluster size by default - 4096;
- after setting the necessary parameters, click Start.

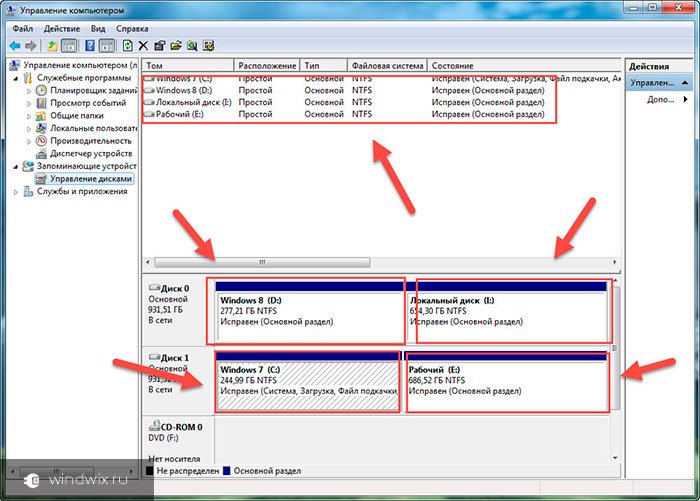
Windows also includes a more complete service for working with hard drives.
To open this menu, do the following:
- right-click on My Computer;
- select Management;
- open the Disk Management item;
- v this menu the user can perform various operations with the hard disk including formatting.

Command line formatting
You can also perform this operation using command line:
- press the key combination Win + R;
- enter cmd and press Enter;
- in the command line, write the command format y :, where y is the letter of your drive, maybe, for example, c or d;
- the system will ask you to confirm the operation by pressing the Y key;
- after confirmation, the system will start the formatting process;
- when finished, this message will appear


Formatting HDD in BIOS
If you need to format from the BIOS partition hard disk, you have to tinker a little. Unfortunately, the BIOS does not have tools for formatting the hard drive, therefore, you should use third-party programs to perform these operations.
One of the most common is Acronis Disk Director. To work with it, you need to create a bootable media with the files of this program in the operating system. But before you start creating bootable media, there is another option to consider - formatting using the Windows Installer. This decision is a simpler option in comparison with the Acronis Disk Director program.

For this method you only need a disk or flash drive with the recorded installation package of the operating system.
To format, follow these steps:

Attention! The drive letters may not match. For a more precise definition of the required disk, use the command wmic logicaldisk get deviceid, volumename, size, description.
Creating a bootable USB flash drive Acronis Disk Director
To create a bootable flash drive you will need:

Algorithm of actions:
- insert a USB flash drive;
- install and open the program;
- in the application, open the Tools section and select the Creation Wizard bootable media Acronis;
- click next;
- select the type of bootable media Windows PE;
- in the next menu, you should mark the necessary components for writing to a USB flash drive;
- after selection, you need to select the medium to which the recording will be made, and click Next. The USB flash drive should be formatted in FAT 32 format using the Windows utility;
- you can also create an image for later burning to a flash device or disc using the Ultra ISO program.
Working with a bootable USB flash drive Acronis Disk Director
To download a USB flash drive you need:

How to format an external hard drive to NTFS
The most convenient formatting method is to perform all actions using standard operating system utilities. This solution does not involve installation additional programs and creating additional bootable disks.
If you do not have an operating system installed, then in this case you should use special programs such as Acronis.
Steps describing how to format a hard drive as ntfs:

Utilities
In addition to standard program Windows has a variety of utilities that are used for the same purpose.
Of the most common options, the following can be noted:

What is the best program in ntfs to format drives?
Each program has its own characteristics, but the main direction for all utilities remains one - working with disks, including creating partitions, forming into other file systems, etc. Therefore, the choice of a program is purely personal question each user, which depends on his preferences.

Formatting problems and solutions
How to format a disk quickly without losing data?
Unfortunately this is not possible. All stored information will be deleted. Only part of the data can be restored.
Which drive is better: external or external?
Formatting external drives is the same as for a regular hard drive. At this process all information will be deleted, including windows, after execution the disk turns out like a new one without windows.

Unable to format hard disk
If you did everything according to the instructions, but did not achieve the result, do not sound the alarm. It doesn't always mean something bad.
- format command - cannot be used for system disk if she is in his environment;
- if the operating system is located in another partition of the hard drive, it cannot be deleted;
- settings antivirus software access to different sections of the hard drive may be closed;
- different applications and viruses can block access.
If you removed the above factors, but you still cannot format the hard drive, you will have to resort to special programs. The most popular tool is HDDscan, which is easy to install and free.

Algorithm of actions:
- download the utility;
- open and install;
- run as administrator;
- click on the sphere-shaped icon located in the center of the interface;
- select Surface tests;
- check the box next to Erase;
- go to the Add test tab;
- click on Scan;
- in the lower right corner, write down the error data;
- set the EraseWAITs option to ON and select Scan again;
- repeat until the error clears up.
You can also use the Acronis Disk Director program. If it is impossible to format the portable hard drive using this program, most likely the hard drive is partially out of order. And the whole procedure, sometimes it is possible to perform, only from bootable media, that is, not in the operating system.
How to force format a USB flash drive?
You can use the program to format flash drives HP USB Disk Storage Format Tool
- provide the required set of functions;
- have a fairly simple interface that will be easy for novice users to work with.
Command FORMAT allows you to format the disk / floppy disk from the Windows command line.
Command line format:
FORMAT volume
FORMAT volume
FORMAT volume
FORMAT volume
FORMAT volume
Command line parameters:
volume- Specifies a drive letter (followed by a colon), mount point, or volume name.
/ FS: filesystem- Indicates the type of file system (FAT, FAT32, NTFS, or UDF).
/ V: label- Volume label.
/ Q- Fast formatting. Overrides the / P option.
/ C- For NTFS only: Sets the default compression mode for all files created on the new volume.
/ X- Initiates unmounting the volume, as the first action, if necessary. All open volume descriptors will be invalid.
/ R: revision- for UDF only: Formatting in the specified UDF version (1.00, 1.02, 1.50, 2.00, 2.01, 2.50). By default, revision 2.01 is used.
/ D- UDF 2.50 only: Metadata will be duplicated.
/ A: size- Overrides the default cluster size. In general, it is recommended to use the default cluster sizes.
NTFS supports 512, 1024, 2048, 4096, 8192, 16KB, 32KB, 64K sizes.
FAT supports 512, 1024, 2048, 4096, 8192, 16KB, 32KB, 64KB, (128KB, 256KB for sector size> 512 bytes).
FAT32 supports 512, 1024, 2048, 4096, 8192, 16KB, 32KB, 64KB, (128KB, 256KB for sector size> 512 bytes).
exFAT supports sizes 512, 1024, 2048, 4096, 8192, 16KB, 32KB, 64KB, 128KB, 256KB, 512KB, 1MB, 2MB, 4MB, 8MB, 16MB, 32MB.
The FAT and FAT32 file systems impose the following limits on the number of clusters on a volume:
FAT: Number of FAT32 Clusters: 65 526 The FORMAT command will terminate immediately if a violation of the above limits is found using the specified cluster size.
NTFS compression is not supported for clusters larger than 4096.
/ F: size- Specifies the size of floppy disks to be formatted (1.44)
/ T: tracks- The number of tracks on each side of the disc.
/ N: sectors- The number of sectors on each track.
/ P: times- Zeroes each sector of the volume the specified number of times. This option has no effect with the / Q option
/ S: state- Where "state" can be "enable" or "disable". Short names are enabled by default
Examples of using the command FORMAT:
format /?- display help on using the command
format /? | more- display help on using the command with a page-by-page display mode.
format /? > C: \ formathelp.txt- display help on using the command with output to a text file C: \ formathelp.txt
format A:- format floppy disk in drive A: with default settings.
During command execution format messages are displayed:
Insert the new disk into drive A:
and press the ENTER key ...
File system type: FAT.
Check: 1.44 MB
The floppy disk will be formatted using the file system type FAT and a volume of 1.44 MB
If the disk to be formatted contains open files then the command format will give a warning:
The Format command cannot be run because the volume is in use by another process.
You can start Format if you unmount this volume first.
ALL OPEN VOLUME DESCRIPTS WILL FURTHER WILL BE WRONG.
Are you confirming unmounting the volume?
The user has the option to undo or continue formatting by entering Y... After confirming the request, all files will be forced to close and the volume will be unmounted. This operation cannot be performed on the system drive.
The volume is disabled. ALL OPEN VOLUME DESCRIPTS BECAME WRONG.
After the start of formatting, information about its progress, a request for a volume label and the results are displayed:
File Allocation Table (FAT) is being initialized ...
Volume label (11 characters, ENTER - no label needed):
Formatting is complete.
1,457,664 bytes total on disk.
1,457,664 bytes available on disk.
512 bytes per cluster.
2847 clusters per disk.
12 bits in each FAT record.
Volume Serial Number: 3281-2839
FORMAT A: / T: 80 / N: 9- format floppy disk to FAT file system using geometry 80 tracks and 9 sectors per track (720kb floppy disk).
FORMAT F: / FS: NTFS- format removable drive(flash drive) to the NTFS file system. Please note that NTFS is not supported on devices that are optimized for fast deletion. Therefore, in order to format a regular USB flash drive in NTFS, it is necessary to change the optimization method, for which in the manager Windows devices open the properties of the removable disk and go to the "Policy" tab
After installing the policy Optimize for execution formatting the flash drive partition to the NTFS file system will become possible:
Insert the new disk into drive F:
and press the ENTER key ...
File system type: FAT32.
New file system: NTFS.
format L: / fs: UDF / V: UDFTOM / Q- format the optical disk to the UDF (Universal Disk Format) file system. Formatted volume label - UDFTOM... Fast formatting (/ Q) is used, i.e. creating a table of contents without checking blocks. If the rewritable optical disc contains data, the program will ask for the label of the existing volume:
Enter a volume label for drive L: Disk19- label of an existing volume.
If the disk is not empty and the current volume format does not allow quick formatting, then the utility format will give a message:
Invalid current format.
The disc cannot be formatted quickly.
Do you want to start unconditional formatting?
After answering Y formatting will continue:
Performing low-level formatting ...
Creation of file system structures.
Formatting is complete.
4.38 GB total disk space.
Available: 4.38 GB.
After formatting is complete, a rewritable optical disc with UDF file system can be used both in Explorer and in the Windows command line to create, modify and delete files and directories, just like a large-capacity floppy disk or USB flash drive.
List of popular freeware programs for various types of formatting hard drives(HDD, SSD, RAID) and removable media (USB, Firewire, SD). In this article, you will learn how to properly format a hard drive, learn about various types of HDD formatting - including low-level format. Let's also choose a good program for partitioning the hard drive.
HDD Formatting Methods - From Easy to Complex
Formatting is a simple operation that can be performed by inexperienced users. Next, I will tell you how to format the HDD yourself - from simple to complex, depending on your skills and level of PC proficiency.
Using standard Windows tools when formatting
The Windows XP-10 operating system has built-in tools for performing this operation. Formatting the hard drive is done like this:
- Open "Explorer" (or another file manager),
- We go to the section "My Computer"
- Click on the desired disk
- Select the item "Format"
- Next, click on the "Start" button
This is the easiest way to format your computer without additional tools. For all its simplicity, however, all stages must be performed consciously, clearly understanding why you are doing this. Before giving your consent to formatting, carefully check whether the correct drive is selected.
Perhaps the video tutorial shows you more clearly how to format the disk.
Alternative way of formatting in Windows 7/8/10
- Different systems have their own path to Disk Management - the easiest way is to open the program search and enter "management". When the system gives a search result, search for "Computer Management" and open it
- In the menu on the left go to "Disk Management"
- Right-click on the desired section and select "Format". Since the process takes place inside a running OS, the "Format" menu item will be inactive on the system partition
- Next, select a label for the new partition, the type of the future file system and the required cluster size (if you do not know what size you need, leave it as default)
- For high-level formatting, you can leave the "Quick Format" checkbox active. If you need to deep clean the contents of the section, then uncheck this checkbox
- After pressing the "OK" button, the system will ask for confirmation - press "OK" again
Formatting the hard drive via the Windows command line
To start formatting, on the computer, the command line (console). To do this, use the keyboard shortcut WIN + R, in the "Run" window that appears, enter CMD command, press ENTER.
Note... To format the disk through the command line, you need administrator () rights. Start - CMD - open context menu by clicking on the application icon "Command Prompt" - Run as administrator. If you try to format the disk without administrator rights, nothing will work for you: access will be denied. In general, watch the video where I show you how to format as an administrator.
To format through the console, use the following commands:
Format drive letter
Press Enter. We carefully read what is written in the console, further actions with hard disk we carry out according to the situation.
Full formatting of the hard drive via HDD Low Level Format Tool
Low-level formatting will optimize the HDD structure. This is useful in preparation for reinstalling the operating system. At the same time, you can solve problems with faulty sectors of hard disk.
HDD Low Level Format Tool is suitable for low-level formatting. The utility will help you format your computer hard drive, external HDD, tablet sd card and other storage devices.
In addition to the main functions, HDD Low Level Format Tool can be used to read SMART indicators, check read errors, disk uptime, etc.
How fully format hard drive:
- After installation, run HDD program Low Level Format
- In the Drive selection window, select a hard disk (in case several HDDs are connected to the PC). The easiest way to tell one hard drive from another is its size. Click Continue
- Go to the LOW-LEVEL Format tab
- For quick formatting (deleting partitions and MBR records), select the Perform quick wipe option.
- For full formatting of the hard disk, the above option should be ignored.
- Before completely formatting the hard drive, make sure the correct drive is selected. Only then click the Format this device button.
AOMEI Partition Assistant
AOMEI Partition AssistantThe program offers a number of useful functions, including low-level formatting of hard drives and most types of removable media. The interface resembles standard means Windows, so it won't be hard to figure it out:
- The main window automatically displays the disk with the installed OS. If you need to format another device, select it by clicking the "Disk" item in the top menu
- In the lower block of the left menu, select "Erase Hard Drive"
- When you press this button, you will be prompted for the number of passes of the operation. If in the future it is planned to recover destroyed data, then select a value from 1 to 7. If you specify parameter 8 or more, it will be almost impossible to recover information from the device.
- Confirm your choice by clicking "Yes"
- To start formatting, you will need to reboot the system - after clicking the "Restart now" button, there will be no way back, so make sure that you have selected the correct drive and the desired operation settings
After restarting your computer, the program will perform all the specified actions and you will have a blank hard disk at your disposal.
DiskWipe
DiskWipe is an excellent solution for situations when data on a medium needs to be permanently destroyed. The program uses several proven algorithms in its work (Dod 5220-22.M, US Army, Peter Guttman), and advanced settings allow you to select the formatting depth. According to the developers, the program does not contain hidden viruses, etc., and also does not transfer user data.
DiskWipe
Formatting the desired device using DiskWipe is extremely simple:
- Run the program. In the block on the left you will see all devices available for formatting
- Select the desired device and click "Wipe Disk" in the top menu
- The advanced settings will open with predefined default values. For complete and irreversible formatting, you can mark all available fields with checkmarks, and in the right block, indicate "Highest"
- After selecting the settings and clicking "OK", the formatting of the selected device will start
Paragon Partition Manager
A test period of 30 days allows you to evaluate the capabilities of the program and format required devices in various modes. Since Paragon Partition Manager has several options for working with partitions (splitting, restoring, and others), it is distributed shareware.
Paragon Partition Manager
The formatting process is intuitive:
- In the main window, click "Partition Manager" in the menu on the left, then select "Start Partition Manager"
- From the proposed list of devices, select the one you need, open the context menu with the right mouse button, and click "Format Partition"
- Specify the type of the future file system and the name of the volume, then click "Format"
- The procedure will be queued - to apply the changes, you must click on the green checkmark in the top menu
- After confirming the operation ("Yes" button), it will no longer be possible to stop its execution
Separately, it is worth noting the fact that Paragon Partition Manager not only formats the device, but also creates new section with the specified file system, so after the system boots, the disk can be used without additional steps.
reference Information
What is formatting?
Formatting a disc is the process of labeling a storage device — a hard disk drive (HDD), memory card, CD / DVD, or other storage medium. Format operation is equally useful for new and “worn” HDDs that have served their time.
A disk that has no markup is completely useless. In addition to the fact that you mark the disk, formatting erases all data almost irrevocably (although there are many programs for recovering after formatting). Therefore, you need to be careful and prepare in advance to format your hard drive.
Over the years of operation of the operating system (Windows, Mac OS, Linux), the hard disk turns into a "trash heap", since many programs leave their files on the disk, and after uninstallation, their "roots" still remain on the HDD. As a result, the system is slow and unstable. There are various freezes, slowdowns, the disk clicks, makes noise - behaves inadequately. After reformatting, the hard drive is optimized and performs better. Many devices serve for a long time without this procedure. I advise you to insure yourself and format your hard drive at least once a year.
Sooner or later, disk formatting is inevitable. However, before doing this, it is very important to update or reinstall the operating system on your computer. Together with the removal unnecessary files you get a completely clean environment without defects, harmful viruses, unused programs, data that lead to conflicts. Thus, we reinstall the OS before reformatting the hard drive.
Before formatting, do backup all important data on another drive. As already mentioned, during the execution of this procedure, various service information, marks, are written to the disk, which allow you to subsequently record information on the HDD without hindrance.
Stages of formatting a hard drive
Low level- at this stage, the basic marking is applied to the disc at a low level. This is usually the responsibility of the hardware designer. In this case, special tracks and service data are applied to the disk. This information remains on the hard disk almost forever - it can be overwritten only using proprietary utilities. These programs can only replace service data. By the way, if you make a low-level formatting hard disk, then data recovery later you can no longer, unfortunately or fortunately. Therefore, if your goal is to destroy information, then you can use this format. Read about low-level formatting
Breakdown of sections... It is clear that storing data on a disk without partitions is rather inconvenient. For some logical organization, the HDD is divided into special zones, drives - drive C :, drive D: and so on. For these purposes, both the built-in OS utility utilities and external programs for formatting the hard drive, which I have already written about, can be used.
High-level... In the process of this type of reformatting, boot sectors and file tables are created.
Types of disk formatting
You may know that staff funds systems provide 2 methods by which you can format the hard drive - external or internal:
quick format: takes less time, allows you to carry out the procedure as it is. The bottom line is that with this type of computer formatting, files in the file table are overwritten with zeros, while the data is stored as if nothing had happened, you can later restore them. Also at this method you are not optimizing the file structure, and if there were defects on the hard disk, you cannot fix them with the quick method
normal formatting: Longer time and deeper formatting of the hard disk. Data on internal or external drive completely destroyed, the file system is checked for possible errors and damage. bad sectors, bad blocks. Thus, in the usual way of reformatting, you kill two birds with one stone, although you lose a little more time.
As you know, the "format c:" command, originally related to MS-DOS tools, for computer systems with Windows on board it is used quite often. Let many people not be confused that Microsoft's support for MS-DOS was ended a long time ago, since the built-in system tool in the form of a command console works exactly according to its principles, and some actions without the command line cannot be performed at all, as well as access To hidden opportunities Windows. Next, we will consider the main aspects related to formatting and its practical application, without going into the technical components of additionally applied attributes.
What is the "format c:" command?
As already clear, the command itself is intended specifically to format the hard disk, but in this particular case we are talking purely about the system partition in which the operating system is installed (according to Windows default it is installed on the C drive, unless another location is specified, for example, when installing a second OS into a virtual partition).
Immediately I would like to draw the attention of all users to the point that this toolkit can be used exclusively on the command line. For the "format c:" command itself, some additional attributes are provided that allow you to activate certain options, depending on what action needs to be performed when formatting the system or logical partition.
Command scopes
First, let's decide when this command may be needed, and then move on to its practical application.

For the most part, disk formatting is required when installing the operating system or reinstalling it after critical failures or a virus impact, when recovery is Windows tools or the removal of virus threats turns out to be impossible.
The command can also be used when dividing a hard disk into additional partitions using the diskpart tools (although in this case it is not the "C" drive that is formatted, but the created logical partition). Actions with the system partition are performed only in the situations described above. Sometimes such measures even help to restore the performance of the hard drive.
Some of the nuances associated with starting formatting
Digressing somewhat from the description of the "format c:" command, I would like to cheer up the readers. There is such a good anecdote when a phone call is heard in the support service:
My Word doesn't work, what should I do?
Do you have Word on the C drive?
Write: "format c:" and press Enter.
Will it help?
And how! The most effective remedy!
But this is, of course, a joke. The fact is that on a loaded (working) system, no matter how hard you try, formatting the disk ( system partition) cannot be started. Windows simply will not let you do this (well, the system will not give permission to self-destruct?).

Thus, the question of how to make "format c:" is reduced only to boot from removable media initially, then call the console and use the command already in its environment. Sometimes, however, you can find non-standard situations.
For example, a user has two different versions of Windows installed. One is on the "C" drive, the second is on the "D" drive. Formatting of the "C" section can be done if you boot into the environment of the second system and invoke the command console in it.

The same can be observed in the case when some kind of virtual machine with the tested "operating system", which is a complete likeness of a real computer, but in a virtual form.
View all command line attributes
But back to the main "format c:" command. The command line allows you to perform many operations using this function. In order not to describe absolutely all the applied attributes, any user can be advised to view them on their own.

Just call the command line and write the "format /?" Command in it. After its completion, the screen will display a complete list of additional attributes with detailed description each of them.
Practical implementation of formatting
Now about the practical use of the "format c:" command. Windows systems will not allow it to execute, so we assume that the boot is performed from removable media (installation or recovery disk or flash drive).
Entering the command in its standard form will perform full formatting of the specified section. If you set the additional attribute "/ Q", it will lead to quick formatting (Quick format). It is unlikely that an ordinary user will be able to set the size of clusters or other specific actions, so for now you can limit yourself to such a simple example.
Formatting when creating new sections
The creation of new partitions and bootable media looks much more interesting. True, the "format c:" command is not used in this case as such, but familiarity with the general use of the formatting command may be useful for many users:

When using the "diskpart" toolkit, it is sometimes necessary to create a primary partition and then activate the boot partition. At one of the stages, formatting is necessary (you can even use manual indication of the preferred file system), for which an additional operator "FS" is introduced, after which, for example, the type of system NTFS is indicated. If such a pointer is not used, formatting will be performed with the current system preserved.
The use of such tools sometimes allows you to quickly change the disc format from unreadable (RAW) to normal. This is much faster than trying to change it with the same operating system tools.
When using the general command, if the "/ U" attribute was not initially specified, it is possible to undo the formatting by entering the UNFORMAT command, since the old file allocation table is saved along with the root directory. However, such actions are mostly related to processes associated with removable media and logical partitions.
Finally
That's all there is to the formatting command in a nutshell. Here, the description of each applied attribute was not specifically considered, since for most users in practical use they turn out to be unnecessary, but are mainly required system administrators or repair specialists computer technology(in particular hard drives).
But even the general knowledge presented above will help any user to understand what the described command is for, how and where it is used. However, situations are different, so you should not neglect the use of formatting through the command line, especially since the general command is used even when manually creating bootable media using the operating system, which excludes the use of third-party software.
Greetings to all readers of my blog, Denis Trishkin is with you.
Using a computer for a long time, sooner or later there is a need reinstall Windows... This can be done in several ways. The correct one is the one before which you need to format the hard disk. In this article, I will tell you exactly how this happens, and also introduce you to the main concepts.
So what is formatting? Even at school, this process was presented as a division into sectors and tracks, with the loss of all information previously recorded on the carrier. In the realities of today's technological world, formatting is the process of marking up an electronic data carrier, regardless of its shape and structure, whether it be an optical or hard disk, a memory card, a flash drive.
Simply put - the process is the erasure of all existing files in the specified area. Moreover, when new ones appear, they are already placed on top in a solid manner. Because of this, in the future, access to them will be easier, and, therefore, the speed of processing requests will decrease. The OS and individual programs will run faster.
File system types( ^)
Before proceeding directly to acquaintance with the process itself, it is important to acquaint you with such a concept as file system and its types... So, it is a table that indicates the order of storage, recording and naming of information on media. In other words, she is responsible for all processes related to the transfer and reading of data.
There are several of the most famous and used types:

Formatting process( ^)
We need to clarify right away that we are talking about formatting before installing Windows. Therefore, we will focus on working with hard drives, and not with other data storage devices.
This process consists of three stages:
tracks (tracks);
information management program.
1 Low-level formatting - considered the main one. During this process, the information storage area is marked. This is done directly during the manufacture of the hard drive. With low-frequency formatting, all structures necessary for operation are created in the corresponding area. These include:
In the future, this markup will not change over the entire period of use of the media. Many utilities that claim to be able to do low-level formatting don't actually do it. At best they only prescribe new program management.
2 Partitioning. During this process, the entire volume of the hard disk is divided into logical parts (most often they are called letters of the Latin alphabet: C, D, E and others). This is done by the built-in services of the operating system itself or by third-party programs. The process is optional - you can skip it - the media will only have one partition. But due to the fact that modern hard drives have large amounts of memory, they are usually divided into logical partitions.

increase
3 High-level formatting. During the process, logical structures that are responsible for storing files. This type is divided into two types:

How to format before installing a new system( ^)
There are only a few ways to format before installing new windows:
using built-in capabilities;
command line (same tool used);
third-party software (most often this Acronis Disk Director);
use a different computer.
A step-by-step guide to formatting with built-in capabilities( ^)
It should be noted right away that I will be talking about Windows 7, 8, 10, since the previous versions are no longer supported by Microsoft. So, when, during the installation of a new operating system, you have reached the point of selecting a disk, you need:

The built-in tool allows you to format the disk only in a quick way.
At the same time, it does not provide additional functions... That is why many professionals use special formatting programs that work even without an operating system installed. The most convenient is the above Acronis Disk Director... This application is paid, although there is the possibility of temporary use.
Formatting with Acronis Disk Director( ^)
To work with the application you need:
1 Download the program image file using a torrent tracker.


increase
2 Write the downloaded image to a USB flash drive


increase
3 Through BIOS (BIOS), check that the system boots from the USB flash drive first, press the F10 button, agree.
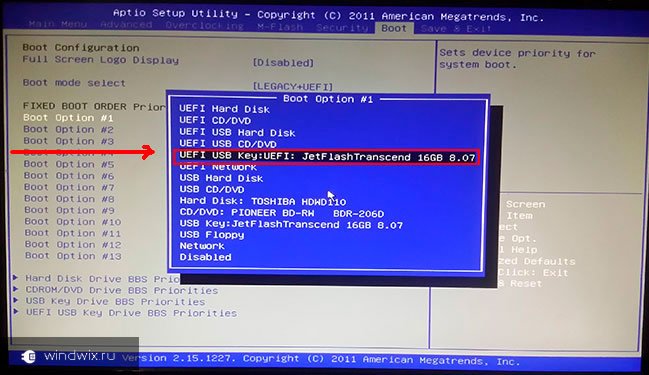

increase


increase
4 After rebooting, confirm the operation from the flash drive.
5 A black screen appears where you need to select full version Acronis Disk Director.


increase
6 On the pop-up window, mark the "manual" mode.
7 After that, select the section and click on the item in the left menu.


increase

increase
9 After that, the program sends us to the initial window for selecting a section. This is required to make additional changes. But since we are only doing the formatting of the disk, on which Windows will be installed later, we click on the checkbox.
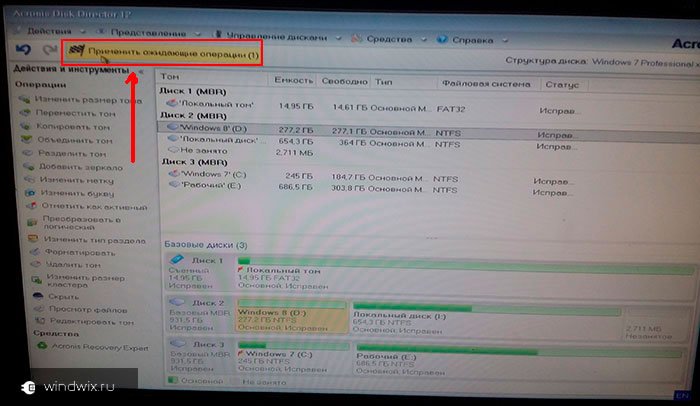

increase

increase
10 We are waiting for the end of the process. After that, you can exit the program and continue installing the OS. In this case, it is no longer necessary to format the disk with the built-in program.


increase
Command line formatting( ^)
Almost no one uses this method, since the above methods are enough for most of them. But sometimes there are still situations when he remains the only one.
Several times I have encountered situations where malicious software(it is a virus) damaged system files on your hard drive. As a result, the operation of important mechanisms is disrupted, which leads to a formatting error in standard utility... It turns out that in order to cope with the "infection", you need to install a new Windows. And it wouldn't make sense without formatting.
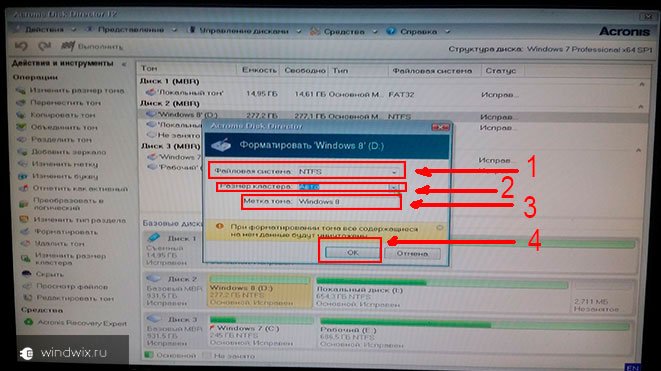
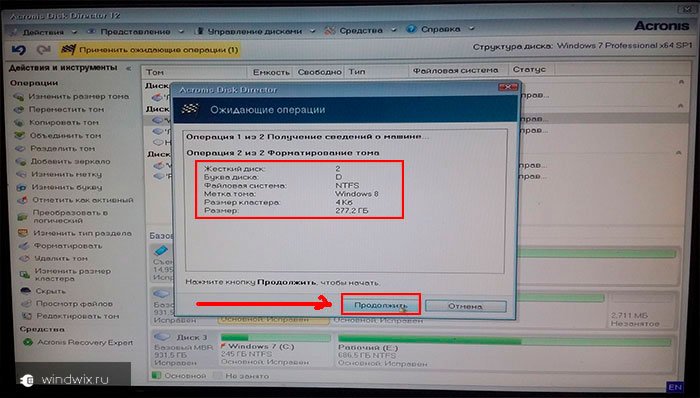
The situation can be solved using third party computer... An infected hard drive is connected to it and in standard system cleared. To do this, after booting the system in the section " My computer"You need to select the damaged section, right-click on it, and then select the appropriate menu. The file system, cluster size, and volume label are listed.


increase
After formatting, the hard drive is installed on original computer and Windows is being installed. Sometimes during this, the system requires you to re-divide the section into sectors and tracks. Don't worry - that's okay.
Formatting your hard drive before installing Windows is an important step. If you don't do it, a new version will work with errors and most likely not for long.
Hopefully, this article will clarify for you the basic questions that are related to the formatting procedure. Subscribe, recommend me to your friends and with sleep become literate in the computer field.


 Cobra")


