DLNA - allows compatible devices such as computer, TV, laptop, telephone, tablet Transmit, receive or play various media system files. The function gives huge opportunities to play media system. The video file downloaded on the PC can be found on the TV, and listening to the phone to listen on the audio system. It is very convenient. You just need to create a DLNA network.
How to create a DLNA network
There are many installation programs. home network DLNA, but you can simply use your own Windows.
Installing on Windows 7:
- Enter the Start menu and select "Control Panel".
The "Start" menu is located in the lower left corner of the monitor, it is necessary to select the "Control Panel" item.
- On the "All Control Panel Elements" tab, there is an item "Home Group", click on it.

On the Control Panel tab, select the "Home Group" item, it is indicated by the Red Arrow
- New window will open, go to the "Change additional parameters shared access. "

The "Change Additional Common Access Parameters" item is located on the Home Group tab.
- Check the connection of all positions.

All positions of the tab "Change additional shared option parameters" must be in an active position.
- Return to the "Home Group" window in its lower part there is an item "Create a home group" Click on it with the mouse.

The "Create Home Group" button is located at the bottom of the "Home Group" window.
- In the next window, enter the name you came up with the DLNA server and click OK.

In the "Multimedia streaming parameters" window, specify the server name and click "OK"
- Record the password that appears in the window can print it (it will be necessary when adding other devices to the home group), click Finish.

Password that appears in the window, you need to record or print
- In the Home Group window, click on "Select Multimedia streaming options".

In the Home Group window, you must select "Choose multimedia streaming parameters"
- The media server window appears, it is necessary to note the content types for which it will be opened general access.

In the media server window, you must mark the types of content that will be available to the home group.
- Click "Next".
The DLNA Windows 7 server is connected. The "Computer" tab will appear the "Network" icon by clicking on it, you can see all connected devices. Semit the desired deviceClick on it. All available media system files will open in the media player window, you can view them and transmit to other devices.
On Windows 10, everything is easier, it is not necessary to create a "home group".
Installing on Windows 10:

Record the Created Password and click Finish.
After holding settings, you can access the media system to your computer from your home network devices to the media system, view them and play them.
Equipment for building home network with DLNA
To create a DLNA network, you will need a computer or laptop with a media server configured on it. Using wired or wi-Fi Wi-Fi Connections It connects to the router, which, in turn, distributes a signal to other devices.
DLNA network will turn your home to the media center
Such devices can be: TVs, laptops, tablets, phones, music centers. If there is no router distribution of the signal, you can configure directly from the computer, but in this case you will need a Wi-Fi adapter for the computer. The principle of building a DLNA home network, like the Internet.
In the end, you will need:
- computer or laptop;
- wi-Fi router or adapter;
- at least one more device with DLNA support.
TV is better to connect to a computer with a cable connection. Wireless communication is convenient and modern, but when viewing powerful media system files, a loss of streaming data is possible and as a result of a television failure.
Connecting TV with DLNA support to Wi-Fi router
You can connect the TV to the DLNA home network, such a step will give the opportunity to fully use the installed server. First of all, the TV must be connected to a Wi-Fi router. This can be done in one of two ways.
It is enough just to connect the TV and the router on the Internet cable with LAN connectors:

LAN location on different models TVs are different, but they are signed everywhere and confused with the outputs of another destination will not work.
You can connect the TV to the router for wireless wi-Fi network. In the new models of TVs, as a rule, there is already a built-in adapter. If the older model has to take advantage external wi-fi adapter. It must be inserted into the USB connector of the TV, while the system itself will detect it and turn on to work.

Wi-Fi adapter need to connect to a TV via USB port
- Take the remote remote control TV, press the Menu key.
- In the menu that opens, click "Network", then "Network Settings" and select "Wireless (General)".
- In the list that opens, select your own and click "Next".
- In the window that opens, enter your home network password.
- If everything is done correctly connects.
Adding other DLNA devices compatible with home network
Configuring the DLNA server on a PC, you can connect to wi-Fi Router Other devices. Connecting to the home network, possibly via a wireless connection, and through the cable.
Laptop or other PC
To add a laptop to the home network you need to configure it with a router. In case of wired connected It is enough to connect LAN connectors of it and a router. For wireless connection You need to pay attention to the lower right corner of the monitor. There you will find the icon, in the form of different gray sticks.

The icon on the panel indicates that the laptop is disconnected from the Wi-Fi network
By clicking on it, you will go out in the Network Connection Settings menu, all networks are displayed here. Select the desired network, click.

On the General Access Management Center tab, the required Wi-Fi network is connected.
If the network without a password - the connection will occur in automatic mode. Otherwise, the window will pop up in which you want to enter a password.

Enter the password from the home network, click Finish.
Video: How to connect a laptop to the Wi-Fi network
Before you can transmit a media system to other devices, you need to make a media server settings.
To add a laptop to the home network you need:

Media player
To embed a media player to the home network, simply connect it to the router. The player automatically connects the found DLNA resources. Enough on the device, acting as a media server, open sharing folders for devices home group.
Setting up DLNA on TV
Televisions connected to the home network find the server and folders with resolved to view the content in automatic order. On LG TVs, the folders of the available media servers appear in one row with pre-installed programs and functions.
There are many alternative programs for creating a media server. Included with LG TV, there is a disk with a program called Smart Share, you can download it on the Internet. This program allows you to create a media server without using Windows. It is enough to download it to the computer, click on its launcher and wait for the installation.

A folder with the Smart Share logo will appear on the program panel and television connections. On the computer in the program settings window, you can assign folders to play content. You can view photos and video files that are in these folders on the TV.
Smart Share. good program For those who are too lazy to dig windows settings. It lands pretty much the system. Even when the TV is turned off, on a weak computer, its presence can be felt. For some reason, it does not always update the folder with the added files. Sometimes you have to do it manually. It is better to configure a normal Windows server.
There is a universal program that allows you to connect any TV that supports the DLNA with a computer. It is called "home media server."
Video: Instructions for installing and configuring the "Home Media Server" program
Using DLNA on Android OS
To use the Android device, first of all you need to connect it to the router:

Devices on Android OS have a large functionality with their help, you can not only view files with a media content, but also allows them to transmit them to other devices. On the Play Market You can download a program that will significantly expand the capabilities of your smartphone or tablet. It is called a DLNA server.
Download the program and set to the phone, then do the following steps:

Video inhibits other problems
Sometimes annoying interference and malfunction interfere with the viewing of your favorite films, do not appreciate all the advantages provided by using the DLNA network. Possible problems And the methods of their solution are viewed in the table provided.
Table: Errors arising when playing a media system and methods to eliminate them
| № | Errors and malfunctions. | Causes of errors and malfunctions. | Possible Solution. |
| 1 | Devices cannot detect the network. | perhaps a failure occurred in wi-Fi work Router. | Try to restart the Wi-Fi router. |
| 2 | Low data transfer rate with wired connections. | Cable or poor mounting in LAN connectors. | Check the integrity of the cable and the density of its attachment in the connectors. |
| 3 | The media server is not available. | Errors in the work of the media server. | Make a reboot media server. |
| 4 | Media device is not available. | Errors in the work of media devices. | Make a reboot of media device. |
| 5 | Video slows down. | Insufficient to view the film data transfer rate. | Temporarily stop watching a movie to download a sufficient data volume to view. |
| 6 | The system stops watching movies indicates the cause - insufficient disk space. | There is not enough space to store temporary files. | Choose low-quality video with a smaller frame size. |
| 7 | A message appears - the film format is not supported by media device. | Media device does not support this format of films. | Locate the movie supported format. |
Often the reason for braking the TV when watching movies is easy to remove small details. The main reason lies in the unstable work of the media server. For normal operation, periodically spend optimization and cleaning system. Do not overload the computer unnecessary programs.
Configure home devices with DLNA support, can each. It is absolutely not hard. A TV connected to the home network acquires second breathing. Having spent half an hour to connect to the DLNA network you can view on big Screen Any content from your devices. Films, photos taken on the phone rollers, now all this can be viewed by simply by pressing the buttons.
In this article, we will look at how to install your DLNA server on Windows on the example of the program Home Media. Server (HMS)
Currently, more and more often, you need to have a DLNA server in the home network, since most modern TVs do not support data transmission protocols such as SMB or NFS, and only work on DLNA.
What is DLNA?
DLNA (eng. Digital Living Network Alliance) - a set of standards allowing compatible devices to transmit and receive a different media content (images, music, video), as well as display it in real time. That is - technology for connecting home computers, mobile phones, laptops and consumer electronics into a single digital network. Devices that support the DLNA specification are optionally configured and combined to the network automatically. (Source - Wikipedia)
Installing DLNA Home Media Server (HMS)
Installing HMS is very simple, but we still tell you in detail how it happens.
First you need to download the installer. At the time of writing the article, the official site did not work. And did not work a month before, so I will give a link to download from our server below last versions HMS:
There are not a lot of settings. In this window, the catalog is selected in which will be installed. hOME program Media Server (HMS) and "Program Group" - the name of the folder in the "Start" menu.
After selecting the installation folder and the folder names in the Start menu, it remains only to check the "Create a program startup label on the desktop", if necessary and click the " Set«.
At the end of the installation, which takes less than a minute ( depends on your equipment), We are offered to immediately run the Home Media Server program (HMS).
This is completed on this.
Initial Setup DLNA Home Media Server (HMS)
So, we have a freshly installed DLNA server, let's start it and see what he first suggest to set up, as well as make a couple useful settings. Let's proceed.
After the first start program, we see the window initial settings.
This window offers to choose a device to be translated by media content. The list has a lot of templates.
If you did not find your or similar to your device, you can leave the standard DLNA Device, as practice has shown, it does not affect something. After selecting go further.
And then the choice of folders appears before your eyes, of which we will take media content. Folders with your media content can be selected now, but you can add them further. We will look at a little lower how to do it. After selecting folders, press the button " Ready«.
After the initial settings, we are offered to make a backup of settings, image cache, databases, customize the schedule of automatic backup. We will not stop in detail now and let's go further. To do this, press the button " Close«.
After that, the main program window appears before us. Let us go right away to several "important" settings.
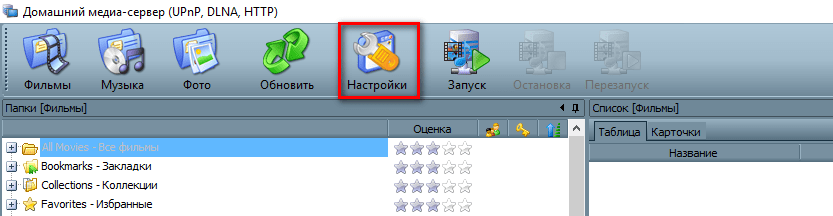
On the left are the types of settings, on the right, specific settings.
Let's go right away in additional settings and configure the autoload of the DLNA server with the power on PC.
In order to choose paragraphs 2 and 3.
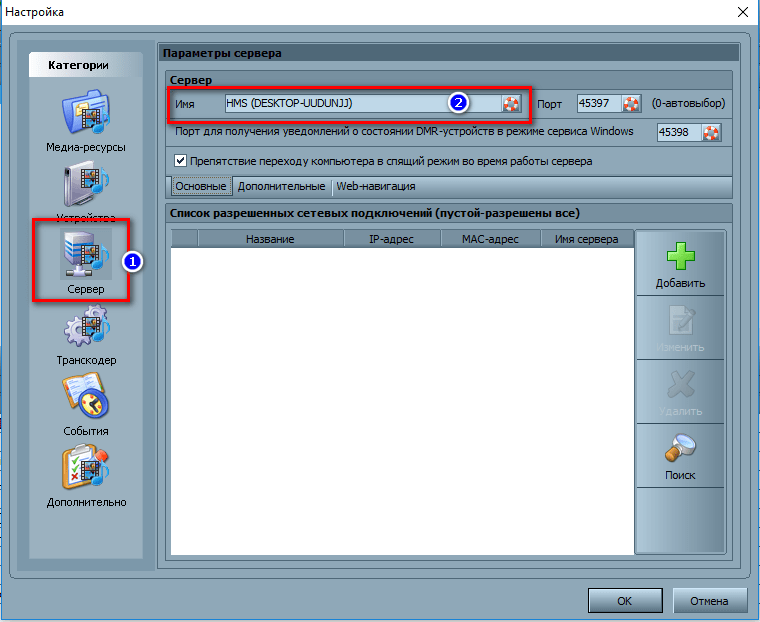
Now let's go to the tab " Server"And we write the name of our DLNA server. How we will see it online.
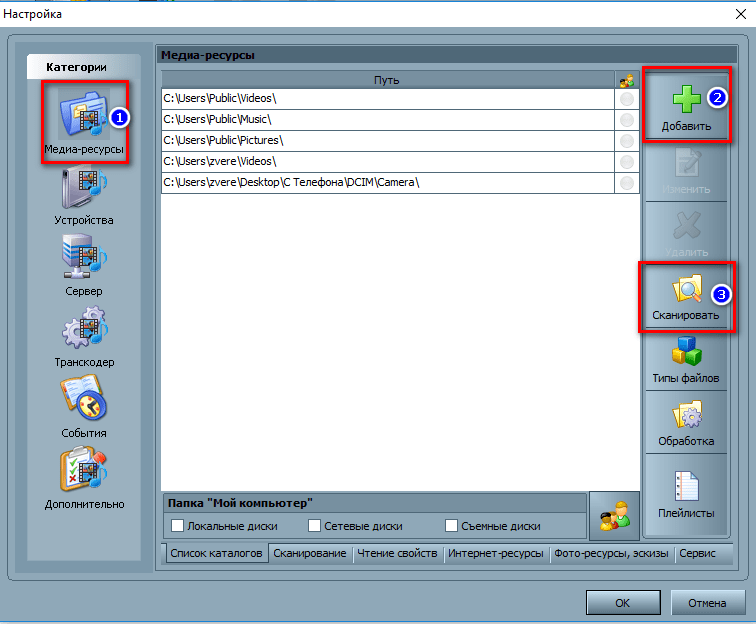
After changing the name, you need to add folders with media content (if you did not make it in the "primary configuration or decided to add more folders. Here everything is simple. Press the button" Add"(2) And choose the folder you want to add. After that, it is necessary " Scan"(3) so that the files from the folder / folder are in the server.
If you do everything right, then your files should appear on the right side (as in the screenshot is highlighted in yellow).
If you have your files there, then we have left quite a bit. Run and use. Here everything is very simple - press the button " Run«.
If you are included " Windows Firewall"The system will ask you, whether to resolve access to the network. Choose in which allow access and click " Allow access«.
 Lovely
If you get access to your own home media server for Windows, then your ability to use the accumulated information will be significantly expanding.
It happens very useful if there are not one at home, but several PCs and TVs, but even on mobile phones, laptops and consoles server will simplify the use of information, because they will combine everything into one network.
With the help of such a network, any user can view the available photos and videos, listen to music and so on using the desired device for this.
1. Home Media Server - this ...
This is a special software that makes it possible to simplify information between devices connected home network - for example, smartphone, computer and TV and other equipment with similar technology.You will need a DLNA for its operation (data streaming standard) and free Apps Type: " Homemade media server UPNP, DLNA, HTTP».
Each of the devices may be associated with a single network using a "wired" connection, even if the home network setting is very complex and with clocks. But this option will provide an incredible speed of up to 1000 megabytes per second.
The second option is wireless connection Devices via Wi-Fi Router, which can maintain speed up to 300 megabytes per second. But when watching video as 4k and 1920r, hanging is possible.
But this connection is greatly simplified - because it requires only a router setting up and connecting TVs, smartphones and PCs to it.
Most often choose exactly the second option - wireless networks Due to the simplified method of connecting and the minimum number of wires around the rooms.
Yes, and in modern worldMost of the equipment simply does not have the right connectors, the same tablets and smartphones.
2. Create a DLNA server
To create a DLNA server, you first need to download and install special software on PC.Today for all systems from Windows 7 and above, you need to perform the following actions:
- through the "Management Item" to go to the "home group";
Picture
If such a "home group" has already been created, then the list of devices connected to it currently will be shown.
If the group is absent, then it must be created using a special item "Create home groups", it is done through the "Creation Wizard". Next, you need to specify which information on the main PC information will be opened for any connected device.

To view movies from the Winchester PC, you need to choose " streaming on all devices. "
The same item will be needed in order to create a DLN server.

We save the changes made and wait for the end of applying the desired settings. During the creation of such a network, the password for it will be set automatically. Viewing a password is available in the "Show or Print Password of the Home Group", and it can be changed in the same item with the appropriate name.

3. Setting up a DLNA server created
After creating a DLNA server, you need to configure it, and to start, select the name of the library itself.
In a special menu of "streaming", devices will be specified that are already connected to the network.
You can quickly access the DLN server settings using windows player Media Player.
On the PC, you should open this application, it will be a "home server".

Thus, on a TV that does not support any format, playback of music and video will be possible.
4. Special programs for settings
Creature DLNa.server can occur with other applicationsHome MediaServer is one and those programs that makes it easy to work with PC files. You can download it on the official website in Russian.

Plex- no less convenient work with media files. The server can be launched on a PC, and controlling it can be done from the menu of the Plex itself or through the browser. Judging by user reviews to 90% of them are satisfied with the work of the program.

PS3 / PS4. - Media server, needed to work with the attachments of the same name, namely: Sony Play Station 4 and 3.
Using simple settings and software and even windowsYou can personally create a home network for communicating home devices locally.
This will greatly simplify viewing various programs or movies on a TV, without buying a package of services for a certain telecomania, and this will make it possible to withdraw information from the Internet to any gadget in the house.
Hi friends! We continue the choice of a software media server for homework. In this article, let's talk about a very powerful and cracked application. And most importantly, completely free.
So, the topic of the article is such - the program Home Media Server: how to download, install and configure.
We talked in detail about the basic functions of programs this class (media servers). If you briefly formulate, then their main task is to provide media resources (video, music, pictures) stored on a computer, other devices in the home network.
Well, how specific devices can provide access this program?
I will answer briefly - any. That is, it can be televisions with DLNA support (merge function to home network), game consoles, media players, mobile devices. If you look, then practically any of your homemade device can be a full-fledged member of the home media network.
So, read the article you will learn:
In addition to the above capabilities, the program can "on the fly" convert video format and audio files to one that supports your device (TV, tablet and so on).
Also knows how to redirect broadcasting streams digital television And the radio from the computer to the telly in real time.
You can run playback of any file from the computer as on a specific device, so on the whole group at the same time. Supported remote access Through the web interface (that is, through the browser).
What more i can say? It is possible to output subtitles, even if your device does not support work with them.
There is a function of working with podcasts - this is the ability to view online cinemas on TV, such as Hdkinomir.com., HdSerials.tv. and many others. For those who do not support the Smart TV function, it is generally a find.
But, as they say, let's start from the beginning.
How to download and configure the Home Media Server program (Click)
Immediately you need to download the HOME Media Server program. After that, unpack the downloaded archive and run the file "setup.exe".
Start the installation process. You will be offered to select a directory to install the application. You can leave the default:

In the next step, you will be prompted to choose the type of device with which our media server will work.

In principle, if the option "Auto-detection" is noted, the program itself will determine and will expose the necessary parameters Your media device.
Now you need to select folders, or local disks The entire you want to make publicly available:

Then the program will ask to make backups settings. We will not do this, because they still not all set up what they wanted. So click the "Close" button:

At this step, the main program window will open. You can study a little to get comfortable. Then click the "Settings" button:

In the window that opens, select Down the Scan tab:


It will give us the ability to manage the server and computer from the TV.
For example, after viewing the movie, you will not need to go for the computer to turn it off. Everything can be done with a TV. Cool, do you agree?
Now select the "Devices" tab and click the "Search" button:

Here again press the "Search" button at the bottom of the window. On the question of running the server, answer "yes":

Run the program and the system tray will appear in the system tray:
After that, a window will appear with the list of devices found. We find the TV and press the mouse button on the red icon on the left in the form of a road sign "Entry forbidden":

Now he must take the kind of green tick. This means that TV and server understood each other and are ready to work on the network.
After that, on the Device tab, all devices found will be displayed. Select the TV and click the "Settings" button:

If you want to access the server from any device of your home network via a web browser, select the "Advanced" tab and check the Web Navigation item:

The option "Creating media resource playlists in Web navigation mode" Recommend to disable.
Now you can access the program through a web browser:

Check if it is:

As you can see, everything works.
To view media resources on the computer, you need a VLC Player player.
If the program interface does not open, go through the "Settings - Server" path and check the port number correctly:

Also disconnect the firewall on your computer and try again.
Therefore, the blog is not to miss an interesting material.
Now briefly tell about the Transcoder tab:

For example, you downloaded a movie in a format that cannot play your TV.
In this case, you can choose a transclode profile that recodulates the video to the desired format. What does the whole process occurs during startup, without any preliminary user actions.
It costs to note that in the program you can set the transcoding settings for the three main principles:
First: For all films (example in the screenshot above).
Second: For specific types of video file extensions.
To do this, go along the path "Settings - Media Resources - File Types - Edit":

The third: For a specific film.
In the main server window, select the desired video file, right-click on it and select "Transcoding Profile":

At first glance, the newcomer may not be clear all these profiles, encoding and so on. Very easy to get confused. To be honest, the author of the article, also not immediately dopher to the essence of the matter. But in fact, everything is quite simple.
See, at the very beginning of the Home Media Server program setting, we indicated the type of our media device, in our case the Samsung TV:

After that, the application itself determines which audio video file formats supports your telly.
And if, for example, you will run a movie with the resolution of which is not in the above list, for it to start the transcoding in order to convert to the readable format. I hope the essence of you became clear.
As a rule, for TVs, Samsung does not need to change anything, so let's leave here all the settings as it is. All problems will be solved as they appear, because the theme of the transcoding setting in HMS is very extensive.
Now go to the final stage. Go to the "Advanced" tab and set the settings as in the screenshot below:

Now the program will automatically boot and quietly "hang" in Windows system services.
Let's return to the main program window. We describe the main control buttons:

The "Movies - Music - Photo" buttons serve to select folders with relevant resources.
Buttons "Run - Stop - Restart" is managed by the server. In the working condition, the start button must be pressed (be inactive).
That's all. Question as a program Home Media Server download, install and configure can be closed.
After the HMS program (abbreviated name) downloaded and configured, click the Start button and go to the TV.
Click on the Source button on the console and look for our server:

If there is no it in the list, we click on the TV with the red button "A" to update. Also for a while, turn off the antivirus firewall.
So, the Allshare HMS item appears, open it. We see the folder catalog:

Select the "Media Resource Catalogs" folder, our films from the computer will appear:

When watching there is a pause and search for time. Very convenient options.
If you return to the initial directory of the folders and go along the path "Service - Media Server" path, then you can control the computer and the program itself from the TV.

Agree that in terms of automation, it is very cool. No need to constantly go through to the computer. We looked at the movie, turned off the computer, then the telly and went to sleep. 🙂
Now let's look at a couple of interesting opportunities to apply the program.
Start with viewing IPTV channels Your provider on the TV screen.
To do this, open the main window of the HOME Media Server program and drag the playlist with the mouse with television channels M3U format:

Then go to the "Internet TV" tab:

Now click the "Settings" button at the top of the window and run along the path "Devices - Your TV - Settings":

In the window that opens, select "Files, Subtitles", then the "Internet Television" tab.
In the column "Transcoding profile" Specify the value "Internet TV (input stream)":

We save the changes by pressing the "OK" button.
Now you need to install VLC Player on your computer. If you have it already there is good. In case there is no, download from here. Just install it, you do not need to set up.
After that restart the Home Media Server program:

Now go to the TV and select the "Internet TV" folder:
 If everything is done correctly, a list of playlist channels will open:
 We look and enjoy!
Perhaps someone will say that if there is a smart TV function on TV, it will be more convenient to watch IPTV channels through, in general without using the computer.
Agree. But what to do people who have televisions without smart TV, and there is just a DLNA (the ability to combine home devices in the media network)? It is here that comes to the help of HMS.
By the way, I propose to consider another one useful feature programs - work with podcasts. With its help, we can partially replace the smart TV function.
So, what are podcasts for Home Media Server?
These are files that are downloaded to the program and allow you to watch online cinemas on TV directly. That is, in essence it is analogy of the technology of "smart TV".
Begin. Download and unpack the podcast you like from the official application forum.
Load it into the server exactly as the playlist with IPTV channels - simply drag to the main program window:

Now select the "Podcasts" tab, then look for your podcast and click on it right-click to call additional menu. Here, select "Update Podcasts":

The update process is quite long, so it will be necessary to wait.
After that, go to the TV and in the Server folder directory, select "Podcasts":

Choose your podcast:

We choose and look:

 I would like to note that the author of the article while watching the pause worked, but there was no search for time. It grieves. It turns out that the rewind does not work in podcasts.
An important nuance in working with podcasts is the fact that not all of them work consistently.
So, like the highlights, we disassembled, therefore the essence of the article " Home Media Server: Download, install and configure"Reveal.
Naturally, for smooth operation of the program, it is necessary that the computer is on the same network, and it is recommended to enable the "UPNP" option (auto identification ports).
As you can see, this media server has great capabilities. But the other side of the medal is a large number of Settings and parameters. The new user is quite difficult to immediately spit into the details.
Therefore, if something is not clear, ask in the comments, we will jointly solve your problems.
Finally. About musical tastes are not arguing, but this song is definitely sympathetic to the author of the article. And you?
Generally, the HOME Media Server program is conceived by developers as homemade media server. But the most often HMS is used as a DLNA server. It is ideal for this purpose and has many useful settings, often functioning even better than such official programs as LG SmartShare PC SW and standard fashion DLNA settings through Windows Media Player. The meaning is to allow TV to play movies, music, pictures and other content right from your laptop or computer. At the same time, they must be connected to one home network, for the organization of which the router or router is usually used. After that, it remains only to configure the program, and the case is in the hat. You can download it on the official website http://www.homemediaserver.ru by clicking on the "Download" button.
Install Media Server is simpler simple: unpack the archive and run "setup.exe", where we agree with all the conditions and click the "Next" button everywhere. After successfully installing and running the HMS, the main program window will appear. When you first start, select your TV from the device list (for example, LG TV). Add Media Resources to which your TV will have access can be in the next window or in the settings later. In the Backup and Data Recovery window, click "Run" and "Close".
HMS as a DLNA server
Immediately go to the program settings. Here we have to configure our home media server type DLNA. To do this, in the category "Media Resources" in the first tab of the "List of directories" using the "Add" button specify the paths to the folders on our computer, where Media files you want to see on a LG TV or other are located. After adding all folders, click "Scan". Although we will configure the autocaning of new media resources, new items are still not automatically appear, and you need to scan using this button manually.
On the Scanning tab, it is important to enable automatic directory scans when changing and starting the program so that new media files are immediately displayed on the TV.
In order for Home Media Server to start when the computer is loaded, in the category "Advance" you need to put the checkboxes "Autoloading the program when starting windows sessions"And" Installation windows services Home Media Server ... ". The HMS setting for the DLNA server is complete, click OK.
Next, select the "PC Connection" tab and click 3 times press the "Next" button. Please note that your home network (wired or wireless, depending on the TV connection method), otherwise, select it.
On the 4 step you should see your PC. If it is not there, restart the server, usually helps. Next, select the device and get to the "Connected Devices" item.
Viewing Media.
After the first connection, our device will be displayed in the last LG Smartshare station - "Connected Devices". If it is not there, restart the server on the PC. For example, to view movies, you need to select the "Movies" folder, then "Catalogs of Media Resources".
Here you will see a list of folders added in the HMS settings. Go to any folder and run the movie. Sometimes the TV can write that "the file type is not supported." Do not despair, it's a glitch, try to run again and from 2-3 times everything will turn out.
Features HMS
The advantages of the home media server from SERVIIO are as follows:
- on the TV you can see a clear structure of PC folders;
- the ability to run the playback of media files to TV from the program itself on the PC. To do this, select a file from the list and click on the Green Play button, which is present if the TV is on;
- relative stability of work (after PC SW DLNA from LG is just a fairy tale);
- a large number of settings.

Disadvantages:
- some confusion for beginners;
- sometimes it does not work automatically scanning new files;
- periodically you have to restart the server so that the device appears in TV.
Despite these disadvantages, HMS is ideal as a home media server, including DLNA. The details of the Home DLNA server settings are on the following video.
Other features
The possibilities of the considered home. Media Server Do not end on DLNA. HMS can provide access to Media computer resources still using UPNP (Universal Plug and Play) and HTTP protocol. It is more relevant for smartphones and tablets.
But for DLNA, this Server may still have a lot. For example, you can give access not only to computer resources, and also flow of Internet radio and television IPTV. There is also an opportunity to broadcast so-called podcasts from various online cinemas, such as HdSerials.ru, HDKinoklub.ru and hundreds of others. There are still possibilities for transcoding media format files that are not supported on TV. How do you like? All this will be discussed in the following articles, subscribe to our newsletter, as well as VKontakte and Twitter.
Note.


 in Photoshop How to make a grid in photoshop CS6")


")


