Hello everyone! As I said, I work SIS. admin in the Internet cafe, and naturally understand computer equipment and local networks.
So, I recently called my aunt and asked to come to configure the Wi Fi router D-Link, which she just bought in the store. I come, set up, everything is in order of aunt satisfied Surfit Internet on a netbook on Wiifa
But it was not there! The next day calls, and says the phone does not see Wi Fi and the laptop does not see Wi Fi! Only a neighbor some kind of access points and everything, well, I come, I think I will check the router at home, I pick it up and I will break home, I connect all the ok everything works! I'm in shock \u003d) I come back to aunt I connect again not working ... So I traveled to a friend, I also worked ... I began to rummage in the router settings, but I could not find anything.
Here my uncle comes into the room and he says from us from below a security company can their equipment blocks? I think for sure! The problem is in it, not see you to aunt Waifai and leaving ...
But after a few days another 1 person called me with an anthole problem! And for a long time I trickly found a solution to this problem! In this article, I will explain everything on the steps now how to solve such a problem!
Nowadays, Wi-Fi router appeared in almost every apartment, and when you turn on the router in the next apartment you can have the abyss of the Internet on Wi-Fi (through the cord in the computer everything will work fine).
Solution to the problem
Show on the example Wi Fi router Router D-Link Dir 300
The problem was that when setting up the Wireles Channel router (channel), the default automatically (AUTO) is shown, shown on the screen:

We need to go to the router (Web interface)if you did not change when setting up the router Local IP address, then it remained by default 192.168.0.1 Write this IP in the browser and go to the web interface of the router.
We go to the item as on the screen and change the channel, we set the number other than the installed automatically (I always hit the first time and everything started to work).

Now the Wi Fi network finds any of your device!
Here is such a simple solution to this problem.
If you have questions, you can have another firmware of the router and you can not find this settingWrite in the comments, I will help you.
Today the Internet is present in almost every apartment. Many users for greater convenience acquire a technique that contains a wireless communication module. After installation, the router is obtained both wired and wireless access to the Internet resources.
The router itself is a substation receiving network signals and transmitting them to connected devices. In addition to possible difficulties at the plot and settings, some modern routers can "delight" the user with their incorrect work, which the computer will notice the exclamation mark in the yellow triangle.
Routher DIR-300 A / C1 glitches
A / C1 router appeared in electronics stores presents a slightly strange technical solution. Therefore, many users often meet router -300 faults. As a rule, problems are different in nature:
Frequent freezing and loss of saved settings - makes impossible installation Access points.
No port display in the interface, which makes it impossible to configure IPTV.
Installing the Fresh Firmware 1.0.12 further aggravates the position - constant hanging appears, and the reboot of the router makes an inaccessible web interface. Despite the MBssID technology, which allows you to serve four different wireless networks at one access point, D-Link manufactured a batch of routers with outdated bootloader. In the impossibility of installing the latest version of the firmware, the D-Link DIR-300 router does not work.
DIR-300NRU B5, B6 and B7 Routers
For these devices, D-Link constantly releases updated firmware that do not solve the main problems of users. With the initial Wi-Fi firmware routers constantly interrupted the Internet connection with some providers, then in subsequent versions, the connection rupture ceased to exist. Now, when firmware 1.4.1 at B7 and 1.4.3, B5 and B6 DIR-300 cuts speed.
After exit the last firmware They returned well-known old problems with the breaking of the connection, which clearly symbolizes the icon. In addition, malfunctions are characteristic of DIR-300 A / C1.
It remains an inexplicable fact that programmers for quite a long time cannot configure the software so that it can fully work. Perhaps the true cause is hidden in the hardware used, and then no repair rOTETER D-LINK DIR-300 will not help.
Other common problems
Cases when only the power indicator on the DIR-300 is not rare. If, in the case of a reboot of the device on the router, only POWER The problem is more likely to be hardware. The reason for this can be:
- Possible loader damage.
- The failure of an element in the chip is most often dried by capacitors in such routers.
View video
Also there are devices in which not all LAN ports work, which causes inconvenience when laying a local network between computers. In the end, it is worth noting that there is no overall pattern or instruction that allows you to get rid of the problems that have arisen when setting up and operating the D-Link DIR-300 router. Therefore, it remains only to hope that the developers of this company still will prepare workable software.
You can be you know other glitches D-Link Dir-300. Write to us!
Router D-Link DIR 300 NRU - Updated Model previous version DIR 300. All network devices of the specified brand are characterized by good quality, attractive and simple interface and, most importantly, a pleasant price. Let's learn how this model is noteworthy with the most common B5 and B7 modifications, how to install it for home use and, if necessary, perform flashing device.
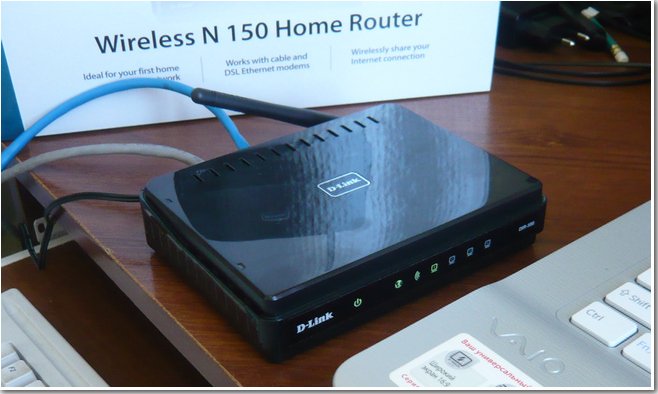
The router is often exploited for home network
From the previous model, this router is distinguished by support for the 802.11n standard. In this device, the maximum speed is up to 150 Mbps, which is quite enough for home use. Externally, the router looks pretty standard, the interface provides 4 LAN ports to create a local network, 1 WAN-port, a reset button to return to factory settings.
Due to the external arrangement of the antenna, the device provides an optimal zone of the Wi-Fi signal coating. The router is quite simple to configure or reflash to any subscriber, which makes it even more attractive among other network equipment models. It has its own highlight - in addition to standard functions, it is possible to turn on or off the connection on the schedule.
Setting up router
To install the equipment and configure Wi-Fi, you should perform actions:
- Enter the device parameters interface - To do this, enter your IP address in the address bar in the address bar (in most cases it is 192.168.0.1), after which you need to enter the word admin in the login field, the string for entering the password must be left empty.

Note. These actions will give the result if earlier the D-Link DIR router was not adjusted. If you need to perform a newly setting, return it to the initial state - before starting the parameters, hold down the reset key for 20 seconds, after which it will return to factory settings.
- To install a Wi-Fi connection, select the section with the same name in the menu, select the Basic Settings tab.
- In the window that appears, enter the data to activate the connection - the network name, the country where you are, the channel and the type of wireless mode.

Setting up Internet connection
To directly configure the connection to the network you need to go to the "Network" menu, in the "Connections" tab. If you need to create new parameters, it is advisable to select the "Add" button and in the window that appears to fill the data - their content depends on the provider. For each of the PPPOE, PPTP connection types, NAT requires the entry of certain data that is in the contract from the service provider - using the form, you can sequentially enter all the necessary information.

You can check the connection status on the D-Link DIR in the Status section, the Network Statistics tab.
Installation of the password
In order to secure your network, set the key to be entered to connect to the Internet. This is done as follows:
- In the Wi-Fi menu, select the Safety Settings tab.
- Mark the WEP switching line checkbox, after which the data will appear to install the password.
- In the list of network authentication from the drop-down list, select WPA-PSK / WPA2-PSK Mixed encryption type - it is most reliable to protect the network from hacking.
- IN next line Enter the Access Key - make it difficult enough so that extraneous users cannot connect to your connection.

Additionally, it is advisable to secure not only the network, but also the router configuration menu itself by changing the standard login and password data on your own combinations. This is done like this:
- Go to the "System" section, open the Administrator Password window.
- Enter new combinations to access the settings, after which you will need to re-enter the parameter menu using the newly installed login and password.

Saving changes
The router parameters have a separate menu to save changes or return to factory settings, it is in the "System" section, in the configuration string. Here you can save the changes made, return to the primary settings or save the file with current data to restore the connection if necessary.

Installing a new firmware
If you want to update software Router, do the following:
- Find and download the firmware file from the world wide web, the main thing is to choose the correct version of the software correctly, focusing not only to the number of the router model, but also on the hardware audit of the device, the data on which is written on the reverse side of the router as a combination of H / w. There are different versions - B2, B5, B7 and others, they all differ among themselves.
Hello everyone. Still interesting to look for development modern InternetI still remember not so long ago were the usual Dial Up modems connected to the COM port, and now the fiber is already fiber, and especially the adsl will not surprise anyone

Of course, with a change in technology and the nuances of the equipment setting are changed, but I can say with confidence that the setting has become much easier, and the Internet is more accessible. Therefore, I want to disassemble with you an example of setting up the router D-Link DIR 300 (and indeed tell what and how, all the routers themselves are configured by the same principle, only the admin interface changes)
First you need to deal with what we are dealing with. In my case, before me, the D-Link Dir 300 router and now we will look at what the process of its setup looks like. At the bottom of the router (No matter what: at least d-link, even netgear) There is always general information, namely: its IP address and login / password to access the settings. (I got them in the Red Frame in the photo below)

Now we need to figure out how we organize the connection to the Internet. It is important to understand that the router itself is not a source of the Internet - its task is just to divide the available Internet to the number of computers and other devices we need. No, do not think that I consider you stupid, I just really tried to prove that Wi-Fi is the Internet! I could not convince a person, and I did not - I think you yourself are understood - Wi-Fi, it is just a way to transfer data that was so conveniently attached to the delivery of the Internet from the source to the final consumer.
So historically it happened that the D-Link Dir300 router became very popular and a bunch of instructions are written on it, but I want to tell everything in more detail with typical examples. In my practice there were 2 options for its setup: it ADSL modem + dir 300 router And directly fiber optic cable + router.
So how to configure the DIR 300 router? For starters, let's determine what and how to connect. You have 2 types of ports on your device: Wan and Lan, do not confuse them ... If you really simplify the explanation, then WAN is where the Internet comes, and LAN is where it goes. Scheme such, router "Picks" Internet and divides it between all network participants, in our case connected via Wi-Fi or LAN cable (By default, all computers on the LAN and Wi-Fi network are open to interact with them)In this case, we are tied such a modest home network.
Setting up a network adapter
If you have never configured your network, you can skip this step - by default it is set to Windows as we need, but in general it will not make sure that I will not extend, at the same time I will explain how IP addresses are issued
Go to "Network and Shared Access Control Center" in the "Control Panel", click "Changing the Adapter Parameters"
Setting up the DIR-300 NRU router does not work, help the Council. Bought this model of the router. In the store I was calmed down, they said that he was the easiest in the installation and with it practically all Russian Internet providers and all on official sites there are instructions for its installation. On the site of our provider's instructions for this model, of course it was not and I also realized that the DIR-300 router was some of the different revisions B1-B5 (I turned out to be NRU B5). And every Internet provider, the router is configured in different ways or it seemed to me. As for the book-leadership of the attached to the router, there is a description of the DIR-300NRU B5 connection to the XP operating system. I want to connect it first to system block With the Windows 7 operating system, and then to the created virtual network, connect the daughter's laptop, but the Windows 7 is installed on it too. I tried to understand everything yourself and know from all these IPOE and PPPoe, PPTP head fell ill. So I have a question for you, I can still connect two of our computers to the router or immediately call a special type of you. And yet, explain in Russian, what is the difference between WAN and VPN? Vladimir. Samara.
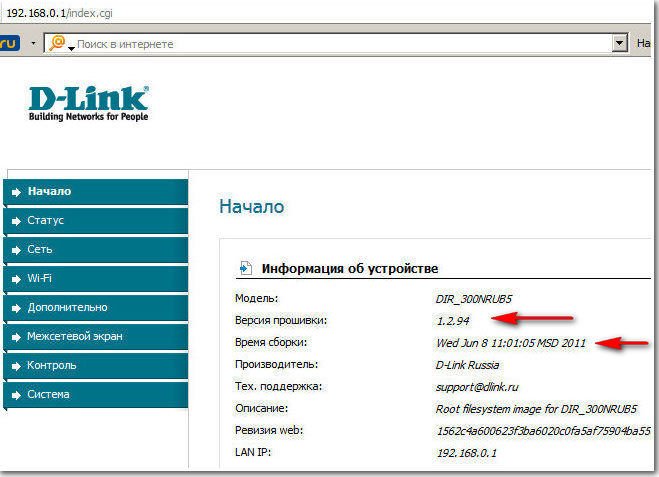
For a long time, my acquaintances are asked for a long time to buy and set up a router. We go to the store, buy and step by step set up, and you are watching everything that happens, everything will be understood even a beginner. You can connect any router, it all depends on your perseverance and of course patience. Setting up the router DIR-300 NRU Not difficult, this router is of great popularity due to the inexpensive price of 1000-1100 rubles and good reliability and works with operational windows systems XP, Windows Vista, Windows 7. On the official websites of Russian providers, there are instructions for installing it, but as I noticed outdated revisions B1, B2, B3, web interface of black-brown settings.
- In 2011, D-Link updated the web interface, now the router settings windows (including the new DIR-300NRU B5 model be green, and the white background, naturally changed the settings. The providers have everything left in their places. These are many users, recently bought a router, confusing. In this moment According to my observations, the D-Link DIR-300 NRU B5 is most often bought with Wi-Fi support at a speed of up to 150 Mbps, using the updated settings interface, a built-in firewall and compatibility with standards without wired bond 802.11b and 802.11g. I advise you to know exactly what you buy and check everything in the store.
Attention! Setting up the D-Link DIR-300 NRU (revision HW: B1, B2, B3), is slightly different from setting the router model DIR-300NRU B5, but the essence in principle is one, now you will see everything.

Now about the settings. Before getting actually on the Internet (global computing network) from our home, we first get to our Internet provider or provider to a virtual private network, (for example Beeline). There are few of these providers in Russia, a lot of subdirements, a simple language of intermediaries. But from how these providers organize their network depends on how to set up a router.
What is the difference between all providers (providing Internet services) and how does this affect the router settings?
Nowadays, one half of the providers uses a modern DHCP or an IPoe network protocol to work, where the distribution of IP and DNS addresses occurs automatically (I must say it is very convenient for the Internet provider), and for Internet access, they use an outdated tunnel protocol or a new second-level tunneling protocol L2TP (unifying PPTP and L2F). Another half of providers works on an outdated protocolPPPoe connected mainly with technologyxdsl (for example Rostelecom ), that is, uses DSL modems, in the router settings, again, choose the type pPPoE connections (information at the end of the article) and already set up a little different than in the first case. Of course, sometimes there are other features, so before you buy a router, my advice to you. Call your provider and find out all the information needed to configure the router, ask the topic from which router models to make a choice, so that it is not to suffer then with the settings, firmware and how you are specimen, like me. Now, let's consider the setting, in my very good router of the company D-Link,DIR-300NRU B5 . Generally set up this router in seven and in But unfortunately I did not look at the accompanying guide, but it actually turns out how our reader said, nothing is written about Windows 7, but there is information about XP. Do not worry, our router works perfectly in both operating systems.

Let's start with what you need to find out on what network protocols your Internet vendor is working -PPPOE or L2TP This can be clarified by looking at the contract with him or you need to call the support service of your provider and just ask, this is the best way. Let's start with the most commonly customizable DHCP network protocol. You also need to know how your IP address provider gives, in the case of the DHCP protocol, this happens automatically, make sure that you can see the properties local connection Your network adapter.
Windows XP.Start - Control Panel - Network Connections - Local Network Connection - Properties - Internet Protocol (TCP / IP) - Succession - Get an IP address automatically and Get the DNS server address automatically.

Windows 7.
Start - dial watching network connections - Connection on the local network - Properties - Internet Protocol version 4 (TCP / IPv4) and properties Get the IP address automatically and get the address of the DNS server automatically.


If you have an item to use the following IP address and addresses in your properties in the Internet protocol properties, the same addresses must be specified in your contract with the provider, which means your Internet provider works via PPTP or PPPoE. Consider setting the router with these protocols at the end. But before connecting the router with these protocols, you also need to set the options for connecting the Internet to the Internet Connection properties and get the DNS server address automatically. Go to the router settings. If you have something wrong with you, you can always reset the router settings to the factory, clicking on the RESET button. Connect the local Internet cable conducted by your provider to the WAN port on the router, as you can see it writteninternet and router and your stationary computer connect with a network cable (in our case of blue) through LAN-port number 1.

Users to whom the Internet comes using ADSL technology must be connected to a DSL modem and a router with a network cable, then the router is already connected to the network cable to the system unit. On the DIR-300 router there are only 4-LAN ports to which we can connect to 4 personal computerson which there is no Wi-Fi.

Turn on the router, open any browser: Chrome, Opera, Mozilla, Internet Explorer. and enter in the address bar 192.168.0.1 and press ENTER.


And here we are in the initial window of the DIR-300 router. First of all, experienced users download the latest version of the firmware (software) for the router and install it, at the moment on our router installed latest version Firmware, so I don't need to download anything and flash. And my advice to you, even when the firmware comes out, try to set the router first as it is, without flashing it, the beginning is easy to make a mistake, but then restore the router, it will be possible only in the service center.

Name - Beeline
Connection Type - L2TP
Connect automatically - put a tick
Service Name - TP.internet.beeline.ru
PPP username - our login is with you in biline, starts with 089 ...
Password - Your password on the Internet
Encryption - usually without encryption
The device configuration has been changed - Save that after restarting the computer, the changes made by you in the router settings are preserved.

Next, again, press the connections, select the Beeline we just created by us, the type of connection L2TP and assign it By default gateway(We celebrate this item). Click to save.

Click on the button Status - Network Statistics. In the WAN field, we see the information that our router successfully received the necessary data from the provider and we have the Internet.

Now, by Wi-Fi, connect the laptop to our router.
Press the Wi-Fi button in the router settings. General settings . We leave everything by default.


PSK encryption key: Invent the encryption key, preferably a 10-digit consisting of letters and numbers in random order, so reliable
WPA encryption - AES or you can TKIP + AES, then your network will be available to almost all existing Wi-Fi devices.
WPA Key Update Period We leave the default.

Sometimes it happens that the router settings flies when it is turned off its power, so it is necessary to open the "System" menu in the upper right corner of the page and click on " Save and restart"Now the changed settings of your router will be stored in its non-volatile memory.

Click OK


Literally immediately after that, my laptop found a virtual network. We assign the network Public network parameter or home.

Connect to our network and enter the invented key.


Now our laptop also has the Internet.
If you have problems connecting a laptop to the resulting wi-Fi network router, then on a laptop Enter
Control Panel\\Network and Internet \\ Network Management Center and common access \Wireless network management,

click twice with the Mouse on the DIR-300 NRU network

Properties of the Wireless Network DIR-300 NRU. Connection Tab, you should stand a check mark at the point Connect automatically if the network is within a radius of action.

In the Wireless Network Properties window, DIR-300 NRU, Security tab Check security settings - Security type, Encryption type, Network security key, Everything must match the router settings.

Here are friends and all the settings of our router in network Protocol DHCP. As for the configuration of our router in PPPoE mode, you will need to go to the router settings. Network -\u003e Connections and select the PPPoE connection type, then register the username and password, as well as a password confirmation. detailed instructions There is on the site D-Link - http://dlink.ru/ru/products/5/728.html
The instructions will show the basic characteristics and help customize the D-Link DIR-300 router, proper setting even such a budget router will help organize houses full local network, and when buying a more powerful router, D-Link DIR-300 will expand the infrastructure, becoming an excellent addition to a new device.
Before setting up D-Link DIR-300, you must connect the router by the following scheme:
- A provider cable coming from the panel in the entrance is connected to the WAN port, which may be called "Internet".
- The laptop connects to one of the LAN ports of the router. By default, these 4 ports are equivalent if this DIR-300 has not previously contained a VLAN configuration.
Reset
When connecting the former D-Link DIR-300, problems often arise both with non-working ports and with the input to the GUI interface. To correctly configure such a router, you need to start with a rollback to factory settings: Press the RESET button, which is located on the housing near the power connector, and hold it for 15 to 20 seconds.
RESET RESET button directly to pCB D-Link DIR-300, so an excessive force cannot be made when you press: it will bring a router in order!
Restoring factory settings will also help if custom router settings are shot: the preset D-Link DIR-300 configuration should be downloaded only after rollback to the original installations.
A detailed description of the methods of restoring the factory configuration is represented in
Computer settings
The computer from which the modem configuration will be performed must receive its local address when you turn on the DIR-300 power. To do this, you need to bring network card PC to the automatic configuration mode.
1. Through the connection icon, which is located on the taskbar, you can log in network settings OS.

2. Then, go to the local connection properties.

3. In TCP / IPv4 properties, you need to install automatically checkboxes.

Log in to the router interface
To log in to d-LINK settings DIR-300, you need to dial the network address of the router in Chrome or IE.
If the PC setting is performed correctly, loaded main page. GUI router and a request for authorization in D-Link DIR-300 will appear.

If it occurs difficulties when installing a computer connection with a router, you should use.
Configuring Internet Connections
D-Link DIR-300 supports all types of connections carried out by Russian providers. Before you configure the router, you need to prepare a contract to correctly enter credentials.
Connection to D-Link 300 can be performed in two ways:
1. Automatically using the Click'n'Connect utility. This option is well suited for the types of IPOE and PPPoE;

2. Manual setting It will be preferable to automatic connections using the VPN server: L2TP and PPTP.

If you need to configure the D-Link DIR-300 router for providers and use these instructions.
Wi-Fi Setup
D-Link DIR-300 is equipped with a N150 wireless module with 2 DBI antenna. In a small room, the router provides a stable coating. You can configure WiFi both manually and using the built-in utility or WPS protocol.
- Manual configuration makes it possible to select a channel, high-speed mode and transmitter power, allowing you to easily configure the router for specific operating conditions.
- The WPS protocol is supported by both TVs and mobile gadgets, connecting devices to D-Link 300 without entering a password.
- Automatic adjustment of the secure WiFi network of the router is performed using the built-in "Master" D-Link DIR-300:

More information on how different ways WiFi configuration in D-Link 300 is contained. It also presents recommendations for improving the coating and wireless speed of the router.
Routing
The network setting has ceased to be the prerogative of Gicks and Iustoms: a huge selection of devices designed to make a better life of an ordinary person appeared on the market.

The homemade fleet of network devices may include both "PC + smartphone + apad" and media server, game console, TV, IP camera and even a refrigerator, and the router is the heart of the home network. To configure it - it means to connect these devices to D-Link DIR-300 physically: wires or via WiFi. And then ensure interaction between them and the Internet, setting the rules for access and broadcast on channel and network levels.
The DR-300 DHCP server distributes all IP address devices and can work both in dynamic and static mode. You need to configure static addresses to register the route, since the router should not be associated with a permanent local IP address with the MAC address of the specified device.
Setting the DHCP parameters in the D-Link D-300 is made on the "Network - LAN" tab. Here are the pool of addresses and configure Mac / IP bundles.


Setting the routing rules is available on the D-Link DIR-300 D-Link Interface tab "Advanced Routing".


Setting up VLAN.
Most new revisions modem D-Link DIR-300 Support VLAN - network separation technology to logical segments. The setting is performed on the "Advanced - VLAN" tab.


VLAN is used to combine devices into target groups, optimize traffic and access distribution.
For example, you can select a children's computer in a separate VLAN router and add a WiFi segment so that the child can connect a tablet or a phone to the D-Link DIRK 300: with any connection, it is connected to, such a router configuration will provide the view, protected content filter.
The reason for using VLAN can also be the installation of an IPTV console. If the provider supplies a taked traffic, then one of the D-Link DIR-300 router interfaces will have to be combined with a WAN port in transparent mode.
Setting up ports d-LINK router DIR-300 for this scenario is described in on the example of Rostelecom television.
Firewall and Nat.
To configure remote access as home computerUnder the network storage connected to the DIR-300, an understanding of how the router carries out network protection mechanisms.
In a broad sense, under remote access It is understood by any traffic initiated from the outside towards the home network and the router. So to organize a game or FTP server.By providing connection from remote machines, some configuration of D-Link DIR-300 must be performed.

NAT is a mechanism that broadcasting the addresses so that the Internet hosts do not see the real structure of the home network on the other side of the router, and process all traffic from local computers, seeing only an external WAN IP address. Thus, NAT in D-Link DIR-300 protects against network attacks, preventing direct access from outside to the internal addresses of devices.
But at the same time, the router will prevent if you need to provide friends with access to FTP folders with photos or to play space. To configure the broadcast rules for NAT in the DIR-300, you need to redirect ports.
To configure the ports of the router, you need to go to the D-Link DIR-300 settings to the Virtual Servers tab.

 +
+
There is another problem: the router receives a gray WAN IP provider, which is constantly changing. Do not have a permanent address, connect to D-Link DIR-300 remote computer It will not work, since the destination address is always different.
To solve this problem, the DDNS technology is used, allowing you to assign a dynamic IP permanent domain name. The DDNS service in real time updates information about changing WAN IP and provides continuous binding to the domain name.
Firewall is a set of traffic filtering rules based on criteria such as: address, port, protocol direction. The filtering of the D-Link DIR-300 firewall is carried out after decapsulation, routing and NAT processing.
Remower the firewall router allows on the "tab" Firewall - IP filters. "


Network Expansion
Wi-Fi router D-Link DIR-300 supports client mode. This means that both with a cable and WiFi, you can connect the DIR-300 router to the upstream router to expand the existing network.
First you need to log in to the settings. In D-Link DIR-300, this feature is on the WiFi - Client tab.

Tick \u200b\u200b"Enable" transfers the router to the client mode, and the "broadcast wireless network"Allows you to connect WiFi devices to D-Link DIR-300 as a relay.
From the list network available You need to select the appropriate SSID name of the higher router and log in, and the network parameters are set in the network name, password and encryption method.
If a wifi password is changed on a higher router, the D-Link DIR-300 client settings will have to reinstall. Therefore, that the router worked as a client without interruptions, it is recommended to fragment a wifi network and use one of the segments as a bridge.
Now it is necessary to configure the D-Link DIR-300 router modem to the device connected to it as the device client have access not only to local nodes, but also on the Internet.
On the DIR-300 tab "Network - WAN", you must specify the ascending direction of the WAN through the WiFi-Client interface and set the routing type used on the local network.

The DIR-300 setup is accompanied by reboot notifications after each change in the configuration.

Found a typo? Highlight the text and press Ctrl + Enter


