Zhovten 27, 2014
Since the MIUI firmware is not stock for NTS smartphones, the installation of it is conjugate with some difficulties. This may lead to data loss on the NTS smartphone and other unpredictable consequences. Neither Xiaomi, nor our website miui.com.ua is not responsible for the consequences of your actions. Therefore, be careful and make a full backup of your data, write the IMEI of your smartphone and learn the address of the nearest service center 🙂
But, let's hope, everything will be good, because There is nothing complicated in the firmware, you only need time, attentiveness and perseverance.
NTS company establishes onto his smartphones its own superstructure over the Android system called HTC Sense., and very negatively refers to attempts to get rOOT rights, unlock the bootloader and change the shell on something else. Therefore, there will be no easy way.
You must understand that the procedure will take you at least half an hour, so you will highlight a time in advance so as not to rush and do everything consistently and correctly.
Let's start. First, you will unlock the bootloader. We will need a computer with the Internet and smartphone. HTC One. X.
First of all, you download and install HTC Sync, if it is not installed on your computer.
Email Address Write Present, because It will come to the registration confirmation. In the send letter, click the link and confirm that you are a person and want to receive an account on HTC.
2. Do not unpack it, but put in the root of the internal memory smartphone htc. One X.
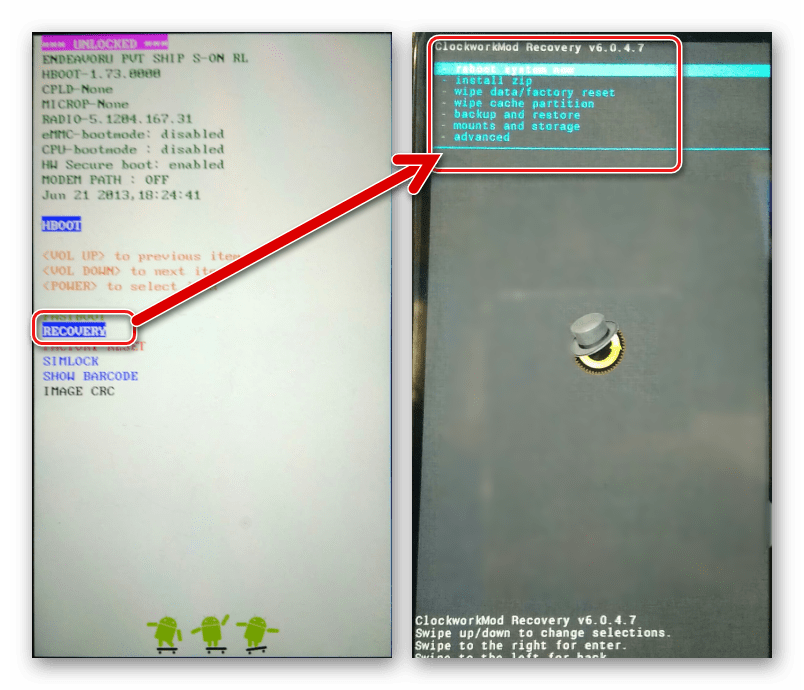
3. Loading in Bootloader (Volume and Power Button)
4. Select the Recovery item, after downloading the recovery, select item Install Zip From SD Card
5. Indicate the downloaded archive and confirm the selection.
6. After installation, select the Reboot System Now.
Now you are super-user! And before miui firmware At HTC One X there are only a few steps.
Now we flash the firmware itself.
1. Download the current for HTC One X
2. Without unpacking the archive, put it in the root of the internal memory of the smartphone.
3. Loading in the recovery (paragraphs 3-4 above)
5. We destroy the data (you first need to copy files to a computer, and contacts in Google or NTS, or on a computer using HTC Sync)
– wipe Data \\ Factory Reset
– wipe Cache.
– wipe Davlic Cache.
6. From pure sheets begin the firmware. Select item Install Zip From SD Card
7. Specify the archive with the firmware and confirm the choice. The installation may continue for a while. After the installation is completed, an inscription will appear: Install from SD Card SuccessFully Completed.
Whether you have another smartphone, it would be all over. But NTS owners are not looking for light paths.
Return to the computer again. From the archive with the firmware I remove the file boot.img. and put it in the folder C: / Android
In the recovery menu, choose Advanced Power Menu.and further – Reboot Into Bootloader.
You still have to open the Windows Console. If not, open it again (start-run-CMD-ENTER-CD C: \\ Android)
Dial the command fastBoot Flash Boot Boot.img and press ENTER
Select Reboot on the smartphone, and if it is successfully loaded, MIUI has to work on it.
Each owner of the smartphone wants to make his device better, turn it into a more functional and modern solution. If the user cannot do anything with the hardware part, then you will improve the software completely for everyone. HTC One X - high-level telephone with excellent technical characteristics. About how to reinstall or replace the system software on this device will be discussed in the article.
Considering NTS ONE X From the point of view of firmware capabilities, it should be noted that the device in every way "resists" interference in its program part. Such a state of affairs is due to the manufacturer's policy, so before the firmware should pay special attention to the study of the concepts and instructions and only after a complete understanding of the processes of processes to move to direct manipulations with the device.
Each action carries a potential danger to the device! Responsibility for the results of manipulations with a smartphone completely lies with the user who carries them!
As in the case of other Android devices, the success of the procedures for the firmware of HTC One X largely predetermines the correct preparation. We carry out the preparatory operations below, and before carrying out actions with the device, we study to the end of the proposed instructions, load the necessary files, prepare the tools that are supposed to be used.

Drivers
The simplest way to add components to the system to interact software tools with One X memory sections is the installation of HTC Sync Manager - manufacturer's branded program to work with your smartphones.


Backing up information
The use of the following methods for installing the system software in the device under consideration involves erasing the user data contained in the smartphone. After installing the OS, you will have to restore information that is impracticable without a pre-created backup. The official way to save the following data.


Necessary
For operations with HTC One X sections, in addition to the drivers, the availability of functional and convenient software tools in the PC is required. In mandatory, load and unpack the disk root C: Package C and. Below in the description of the methods to dwell on this issue we will not, imply that fastboot is in the user's system.

Run in various modes
To install various system software need to switch the phone into special modes of operation "Bootloader" and "Recovery".


Unlock bootloader
Instructions for installing modified firmware presented below assume that the loader of the device is unlocked. Conduct the procedure is recommended in advance, and it is done using the official method offered by HTC. And it is also assumed that before performing the Sync Manager and FastBoot, and the phone is fully charged.
- Go on the link to the official website of the HTC Developer Center and press the button "REGISTER".
- Fill out the shape fields and press the green button "REGISTER".
- Go to mail, open the letter from the HTCDEV command and click on the link to activate the account.
- Following the activation of the account, enter your username and password in the appropriate fields on the HTC Developer Center webpage and click "Login".
- In area "Unlock Bootloader" Click "Get Started".
- In the list "Supported Devices" You need to select all supported models, and then use the button. "BEGIN UNLOCK BOOTLOADER" To move to further steps.
- I confirm the awareness of the potential danger of the procedure by clicking "YES" In the query window.
- Next, set the marks in both checkboxes and click the transition button to unlock instructions.
- In the opened instructions we skip all the steps

and sheets of instructions to the very end. We will only need a field to insert an identifier.
- Transfer the phone to mode "Bootloider". In the commands that opens, you need to choose "FastBoot", After that, connect the device with PC Cable Yusb.
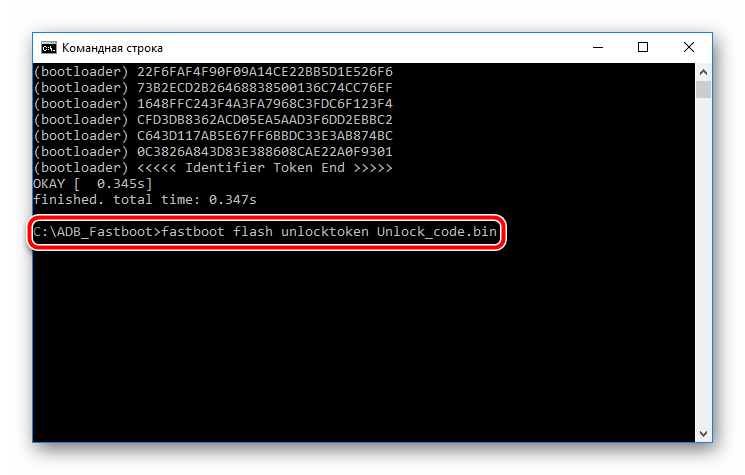
- Open the team string and write the following:
cD C: \\ ADB_FASTBOOT

- The next step is to find out the value of the device identifier, which is necessary to obtain a permit on unlocking from the developer. For information required in the console, enter the following:
fastBoot OEM Get_identifier_Token.

and start executing the command by pressing "Enter".
- The resulting set of characters is highlighted using the-arrows buttons on the keyboard or mouse,

and copy information (using a combination "Ctrl" + "FROM") In the appropriate field on the HTCDEV web page. It should turn out in this way:

To go to the next step click "Submit".
- If the above steps are successful, we receive a letter from htcdev containing Unlock_code.bin. - Special file for transfer to the device. We download the file from the letter and put the downloaded to the catalog from the fastbut.
- We send through the console command:
fastBoot Flash UnlockToken unlock_code.bin
- The execution of the command above will result in a query on the device screen: "Unlock Bootloader?". Install the mark near "YES" and confirm readiness for the beginning of the process using the button "Turning on" on the device.
- As a result, the procedure will continue and the bootloader is unlocked.
- Confirmation of successful unlocking is the inscription "*** unlocked ***" at the top of the main screen screen "Bootloader".


Installation of custom recovery
For any serious manipulations with System software, HTC One X will require a modified recovery environment (custom recovery). Massacing provides for the model under consideration. Set one of the ported versions of this recovery environment to the device.


Firmware
To bring certain improvements to the program part of the device under consideration, raise the Android version to more or less relevant, as well as diversify the functionality, you should resort to the use of unofficial firmware.
To install customers and ports, you will need a modified environment, which can be installed according to the instructions above in the article, but for a start, you can simply update the version of the official software.
Method 1: Android application "Updates by"
The only method of working with the system software of a smartphone, authorized by the manufacturer officially - is the use of the funds built into the official firmware "Updates by". During the life cycle of the device, that is, while the system updates from the manufacturer were updated, this feature Regularly reminded itself persistent notifications on the device's screen.

Today, to update the official version of the OS or be sure to relevant the latter, you need to do the following.


Method 2: Android 4.4.4 (MIUI)
Software from third-party developers can inhale new life in the device. The choice of a modified solution lies entirely on the user, an affordable set of different packages for installation is quite wide. As an example, the firmware was portable to the MIUI RUSSIA command, which is based on Android 4.4.4.

- We establish a modified recovery by the method described above in the preparatory procedures.
- We download the software package from the official web resource of the MIUI RUSSIA team:
- We place the zip package in internal memory apparatus.
- We load the phone B. "Bootloader"Further B. "Recovery". And be sure to make a backup by selecting the corresponding items in CWM alternately.
- Making wipes (cleaning) of the main system sections. To do this it will be necessary "WIPE DATA / FACTORY RESET".
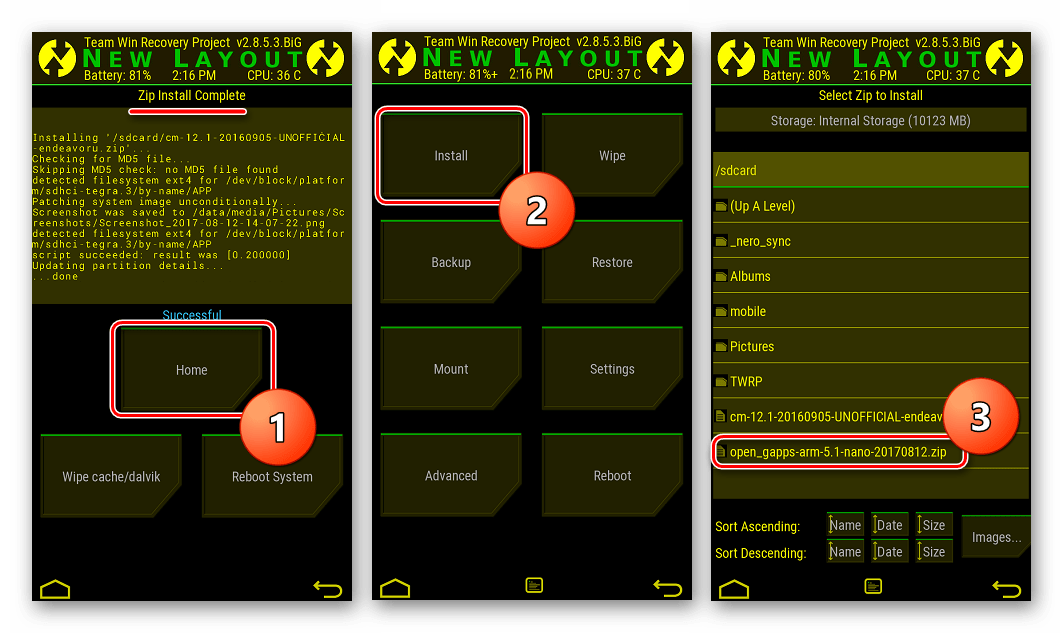
- Go to B. "Install Zip" On the main CWM screen, specify the system path to the zip-package with software, after selecting "Choose Zip From Storage / SDCard" and start installing Miui by clicking "Yes - Install ...".
- We are waiting for the appearance of confirmation of success - "INSTALL FROM SD CARD COMPLETE"returned to the main screen of the environment and choose "Advanced"And then reboot the device in the bootloader.
- Unpack the firmware by the archiver and copy boot.img. In the catalog with fastboot.
- We translate device to mode "FastBoot" From the bootloader, connect it from the PC if disconnected. Run the headbut command string and flash the image boot.img.:
FastBoot Flash Boot Boot.img
- Reboot to the updated android using item "Reboot" on the menu "Bootloider".
- We have to wait a bit initializing MIUI 7 components, and then conduct initial system setup.

It is worth noting, MIUI on HTC One X works very worthy.


Additionally. If the smartphone is not loaded in Android, which makes it impossible to copy packets into memory for further installation, you can use OTG features. That is, copy the package from the OS on the USB flash drive, connect it through the adapter to the device and with further manipulations in the recovery indicate the path to «OTG-FLASH».


Method 3: Android 5.1 (CyanogenMod)
In the Android-devices world there are not many smartphones that successfully perform their functions for more than 5 years and are popular with enthusiast developers who successfully continue to create and port the firmware, which are based on the android new versions.

Probably, the owners of HTC One X will be pleasantly surprised that fully operational Android 5.1 can be installed in the device, but by performing the following, we obtain such a result.
Step 1: Installation TWRP and New Marking
Among other things, Android 5.1 carries the need for a device's memory revisions, that is, changes in the size of the sections to achieve better results in terms of stability and the possibility of performing functions added by developers to a new version of the system. Implement the development and establish a custom based on android 5, you can only using a special version.


Step 2: Castoma Installation
So, a new markup has already installed on the phone, you can move to the installation of custom firmware from Android 5.1 as the basis. We install CyanogenMod 12.1 - the unofficial firmware port from the team that does not need a view.


- "Platform" - "ARM";
- "Andriod" — "5.1";
- "VARIANT" - "Nano".
To start the boot, press the round button with the image pointing down.


Unpack the package cM-12.1-20160905-Unofficial-Endeavoru.zip. and move boot.img. From it to the catalog with fastboot.

FastBoot Flash Boot Boot.img

Then clean the cache, sending the team:
fastBoot Erase Cache.


and we enjoy the work of the new android versionmodified for the smartphone under consideration.

Method 4: Official firmware
If there was a desire or the need to return to the official firmware from HTC after installing customs, you need to reappear to the possibilities of modified recovery and fastboot.

- We load the TWRP version for the "old markup" and place the image in the folder with the fastboot.
- Download the package with the official firmware. The link below is OS for the European Region version 4.18.401.3.
- Load the image of the factory recovery environment HTC.
- Unpack the archive with the official firmware and copy boot.img. From the received directory to the folder with FastBoot.

There put the file recovery_4.18.401.3.img.imgContaining the range of reservoir.
- We flash boot.img from the official firmware through the fastbut.
FastBoot Flash Boot Boot.img - Next, install TWRP for old markup.
fastBoot Flash Recovery TWRP2810.img
- Disconnect the machine from the PC and reboot to the modified recovery environment. Then we go to the next way. "WIPE" - "Advanced Wipe" - We note the section "SDCARD" - "REPAIR OR CHANGE FILE SYSTEM". I confirm the beginning of the change process file System button "CHANGE FILE SYSTEM".
- Next Press the button "FAT" and shift the switch SWIPE TO CHANGEand then waiting for the formatting end and return to the TWRP main screen using the button "HOME".
- Select item "MOUNT", and on the next screen - "Enable MTP".
- Mounting manufactured in the previous step will allow the smartphone to determine the system as a removable drive. We connect One x to the USB port and copy the Zip package with the official firmware into the internal memory of the device.
- After copying the package, click "DISABLE MTP" And come back to the main screen of the recovery.
- We make cleaning all sections except "SDCARD"By passing on points: "WIPE" - "Advanced Wipe" - Selection of sections - SWIPE TO WIPE.
- Everything is ready to install the official firmware. Choose "Install", specify the path to the package and start the installation by shifting the switch SWIPE TO CONFIRM FLASH.
- Button "Reboot System"which will appear at the end of the firmware, restart the smartphone to the official version of the OS, you only need to wait for the initialization of the latter.
- If you wish, you can restore the factory recovery with a standard fastboot command:
fastBoot Flash Recovery Recovery_4.18.401.3.img
And also block the bootloader:
fastBoot OEM Lock.
- Thus, we obtain a fully reheasted official version of the HTC software.


In conclusion, I would like to once again note the importance of the scrupulous following instructions when installing system software in HTC One X. Conduct the firmware carefully, estimating every step before it is done, and the achievement of the desired result is guaranteed!
For the HTC One X device, the firmware contains all the necessary updates. The official firmware HTC One X is very easy and quick. You can download the HTC ONE X firmware from the Internet. The One X model from HTC is a powerful flagship apparatus with a wonderful design and simply stunning technical characteristics and capabilities.
This is one of the most powerful gadgets of his time.
Performance
This is a very powerful gadget equipped with stationary memory of 32 GB, based on Android VR 4.0 with high-quality Sense VR 4. The volume of RAM, which is 1 GB, is also not the weakest. The quad-core processor of the high power apparatus, each kernel of which has about 1.5 GHz and an additional kernel for low-frequency processes. HTC One x firmware contains a wide range of modern software. The gadget has two excellent chambers, from which one from the front side, the other, eight-megapixel, from behind.
Fota update
The official firmware HTC One X is easy to install in FOTA-update online via GPRS or Wi-Fi firograms. On the smartphone there should be a free space and 100% charged battery. It should be borne in mind that the fota update is suitable exclusively for "Locked" devices, otherwise you cannot flash the phone.
The process of firmware is extremely simple. Update downloaded and then put in automatic mode. You need to be prepared for the fact that the operation time can be long.

Castomous firmware
Installation of various custom firmware is quite complicated and can be individual for each single version or assembly. You need to unlock the gadget, download the firmware of HTC One X, placing it in C: \\ Android. Reload the phone in Bootloader mode by closing the power button 10 sec, and after the start of the process, hold the "minus" volume. Then choose the FastBoot item, and then connect to the PC.
Using command line, enter the firmware folder and execute the "FastBoot Flash Recovery * .img file", then reboot as before. Using the volume and power button to select Recovery. The device will reboot again. In the menu item you need to select Backup and wait for the completion of the operation. Then restart using the Reboot System Now function.
As usual, developers are attached to themselves, new, more powerful smartphones. Your HTC One M7 is that. I found for him at least 20 most different versions software. Everyone has its advantages and cons, and by description to choose the one that is suitable for you for a hundred percent it is impossible. To begin with, I will give a list, in my opinion the most interesting firmware, and then I will describe the procedure to install them to your smartphone. All firmware are unofficial, and therefore their installation is responsible to the full user. Also, the firmware of the informal version carries it to the abolition of warranty and service obligation of the manufacturer.
- Google Play. Edition (4.4.2) http://d-h.st/aqb. Principle new firmware from Google. I will not once again tell how high-quality products produces this company. This was created on the basis of Android 4.4.2., One of the very first.
- Google Play Edition (Lollipop) https://www.androidFilehost.com/?fid\u003d95832962473398291.Enhanced system settings, outdoor autorun, and work optimized random access memory. Highly good set Already installed in the firmware of applications, because after installation you will spend time mostly only to restore your own data.
- Android 4.4.4 KTU84P.H1https://www.androidFilehost.com/?fid\u003d23501681358555860. The manufacturer recommends complete cleaning of the system from foreign files and old firmware files before installation. new system. It is also very nice that she is updated! Works stably, removed problems with the radio module.
- Skydragon Google Play Edition v6.0.0 (L 5.0.1) https://www.androidFilehost.com/?fid\u003d95851939534733845.Another firmware from Google. Works stably 100 percent. Installed absolute new core firmware. Conducted boot optimization. Pre-installed programs with huge functionality.
- Android 4.4.3 KTU84L.H4.https://www.androidFilehost.com/?fid\u003d23501681358549229. The developers approached the question a little on the other. Instead of making a new product on an old basis, they brought to mind the official version of the firmware. Everything works, loads quickly, applications, in my opinion, began to boot twice faster.
- Official SM12 http://download.cyanogenmod.com/?device\u003dm7. The manufacturer talks about possible, but not confirmed problems with the work of the radio. Everything else works. Animation without micro friezes, there is a video call, significantly reduced battery consumption.
- Modaco.switch based onAndroid 4.2.2. http://loadbalancing.modaco.com/download.php?file\u003dswitch.beta13.fresh.zip.In this firmware, the developer declared a very serious battery savings. Sense 5. The graphics are very different from the predecessors for the better.
Most recently on the site developer.htc.com Appeared official firmware for HTC Desire . This update to the version Android 2.3 Gingerbread. Although it is available for downloading anyone who wants, but from the update menu in the smartphone itself it is not available. This is due to the fact that the desire has a rather small amount of memory and developers are not recommended to be updated to 2.3 regular users. In the updated firmware there are no background pictures, Facebook application and some programs HTC Sense..
1. Preparation of a smartphone to the firmware.
The first thing you need to do is save contacts to the memory card. To do this, click on the screen "Telephone", go to the address book (where all contacts are displayed) and click the hardware button. menu.. From the menu that appears on the screen, choose "Import Export" and choose "Export to SD card" and get the file on the flash drive "Pcsc_pcsc_00001.vcf" or other species with extension. vCF. file.
All data from an SD card copy to a computer, just in case, because there are photos and possibly others files. Format an SD card, to remove all you already needed, data on the map. After all, all programs will have to be renovated, and they themselves will create directories on the card. Go "Setup" — "Device Memory" — "Extract Memory Card" — "Clear SD card".
Reset HTC Desire before initial settings, then all installed applications naturally disappear, but the phone is released immediately all possible free space in the memory of the device itself and there will be no problems if free space is required during the firmware. Therefore, go in "Settings", Further "Device Memory" and the lowest point will be "Reset factory settings". After reset, I got 136 megabytes of free space.
2. Download the firmware.
Well, of course, the firmware itself is needed, or from our site on this link - or from the official site of HTC.
After downloading, you see 4 files in the archive:
- Flashlight_signed_07072011.apk. - flashlight
- teeter_signed_07072011.apk. - game with ball
- htc_wallpaper.zip. – background pictures (in the archive)
- - Firmware itself (in the archive)
As Android 2.3.3. takes more space then standard programs (flashlight and toy with ball), as well as "wallpaper" were removed by the developers of the HTC from the firmware and are made in the form separate applicationswhich can be installed if they are still needed.
I will run ahead and say that after resetting to factory settings, former Android 2.2. (Official update) on my HTC Desire, 136 megabytes were freed. After the firmware to 2.3.3, there was 128 megabytes. I think you will not be afraid of a loss of 8 megabytes of free space, because now almost all applications are able to move onto an SD card.
3. What is needed?
We find and unpack the firmware itself ( HTC Desire Android 2.3 Upgrade.zip). Inside lies 2 files, PDF. Instruction I. EXE Which is a self-extracting installer, after starting which, unpackled in the temporary folder firmware and the flash driver and automatically starts.
Let's see what is recommended in the instructions. The first item advises the characteristics of the PC on which the firmware will be made. Not less than Gigahertz processor, 512 MB of memory or more, 150 megabytes of free space on disk and USB 2.0. Operating system Windows, ranging from XP HOME and finishing 7 Ultimate.
4. Connection I. setting up HTC Desire for firmware
Install HTC Sync.If you have not yet installed. If installed, but not started, then launch. Download HTC Sync. You can from this site, on the link - or from Say.
We connect yours HTC Desire USB cable to a computer, select synchronization on the display. If everything goes well, then HTC Sync. The computer will see the device. I advise you to connect to system block, since when connecting to a USB a hub in the monitor, an error has appeared during the firmware ( Error: USB Connection Error), which reports incorrect connection or drivers.
We check that your computer does not fall into sleep mode with inaction and after an expiration of any number of minutes. Well, the inclusion of the screensaver also advise to remove. Close everything extra programs on the computer.
Turn off the screen lock. Go to B. "Settings" — "Safety" — "Change the lock method" or ( "Configure Screen Lock") — "Remove the defense".
Check the battery charge level (in the official instructions, it is recommended, not a 30%). Go "Settings" — "About phone" — "Battery".
Run the flash driver, file " RUU_HTC Desire Android 2.3 Upgrade (Gingerbread) .exe»
Attention! Do not forget to save all data from the phone (contacts and files from the memory card). Make a reset to factory settings and clean the memory card. And remember that after the firmware, all your data and settings will be reset.
The firmware time takes about 10 minutes, do not pull the cable from the phone or computer, do not press the buttons on the phone and it is not recommended to use the computer, wait for the procedure.
5. Update HTC Desire before Android 2.3 Gingerbread (Firmware Instructions)
Make sure that you have reset to factory settings, which led to the removal of all installed applications On the smartphone and reset the settings.
In the first window simply click " Next" In the next window, we again warn you that you need to delete all the data from the phone and offer to read Readme (instructions in English).

The third windows are reminded of the shutdown of the hibernation mode in Windows, the battery level and connection check USB cable.
 We put a tick and click "Next", after which it is checked for connecting the smartphone to the computer and the condition of the device.

After a successful check, in the next window you see the "Update" button.

We nod to this button and see in the next window the firmware version on the device and the version to which your desire will flash, press "Next" again.

And the last window that appears before the update process, tell us that by pressing the "Next" button, the device firmware itself will begin, all the information will be displayed on the screen, and at the end we will receive a message about a successful device update. It is not too late to refuse, but we click "Next" again.

Started! This is why all this was done, the process of updating your HTC Desire before Android 2.3.3
It looks like everything as a small window with the progress bar, the message that the process will take about 10 minutes, in no case touch the USB cable connecting the smartphone with PC.

At the end, we get a window with the "FINISH" button and the message in English that the process is successfully completed.

Hooray! Now yours HTC Desire Works under Android 2.3.3.
We restore contacts and the necessary data from backups And re-set the necessary applications.
Possible error messages:
Error: File Open Error - File Reading Error, try again to start "RUU_HTC Desire Android 2.3 Upgrade (Gingerbread) .exe"
Error: Main Battery Power - The charge of the battery smartphone is 30%, put on charging and try when the battery will be fairly charged.
Error: Model ID Error
Error: Customer ID Error - The firmware is not intended for your model of the smartphone.
Error: Image Error - Not the correct firmware file is either damaged, try to re-download the firmware from the site.
Error: USB Connection Error - error uSB connections cable. Connect the cable directly to the computer, and not to USB hubs.


 in Photoshop How to make a grid in photoshop CS6")


")


