Windows 7 and SSD: Are the speed of solid-state disks?
Do the solid-state disks increase windows 7? If you answer briefly, the answer is unequivocal, yes. Conventional hard drives are usually the most narrow place in an absolutely any computing environment. If you improve the performance of the disk, for example, read speed, then the system loading is faster and the system start becomes much faster.
From the data it is clear that when using SSD, the boot of the desktop occurs faster by 62%, thus the final boot time of Windows is reduced to 54% (this number includes loading drivers, as well as processors that have low priority, as well as third-party programs. which are added to autoload).
My personal impressions also confirm the test results. If you use a solid-state disk, then the boot time is able to reduce several times, and therefore applications will start at a very high speed - in just a second or even less.
1. Update the BIOS to the last firmware.
2. Update the SSD drive to the last firmware (all data will be lost)
3. You should translate the disk controller to AHCI mode. Before installing the new operating system, AHCI (Advanced Host Controller Interface) should be activated in the BIOS settings for the SATA controller. If you use outdated IDE or ATA modes, it will take no interference when installing the drivers for the disk controller and thereby reduce the performance.
Advanced - SATA Configuration - SATA MODE SELECTION - AHCI
4. Secure Erase - Clear Disk.
In order to complete the disk cleaning, use the Secure Erase utility. If you use the disk is already long enough, it may be incredibly useful, but this is not a prerequisite. You should not format the drive using the built-in Windows. You can use the Intel Solid State Drive Toolbox for the Intel disks. Lenovo computers have a disk cleaning function as part of the BIOS MENU SETUP EXTENSION utility. For OCZ drives, the Secure Erase utility can be downloaded to Ocz Forum. You can also use the HDDERASE utility that supports a large number of solid-state disks.
5. Loading the system using the Windows installation disk and launch a "clean" installation. Using the Windows installer, create partitions on the disk. If the disk has partitions that were created using other tools, make it delete and create new ones using Windows 7. This is how it is possible to ensure the correct partition alignment.
Install the latest driver version for disk controller itself. If the computer has an Intel SATA controller, use the latest version of the Intel Rapid Storage Technology driver, which can be found on the official website of the manufacturer.
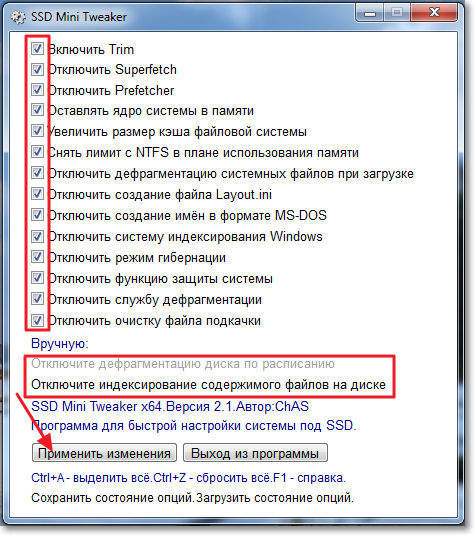
6. SSD MINI TWEAKER
You can mark all the points checkboxes, more precisely can not be. I noted all the items, except that you can leave only Superfetch, disabling this service can increase the program start time. Mark the necessary services, and press the "Apply Changes" button. Almost everything, in the same utility there is a manual item, it means that you need to manually disable the services. There are two, disk defragmentation on the schedule and indexing the contents of files on the disk.
7.1 Disconnect the contents of the files on the disk
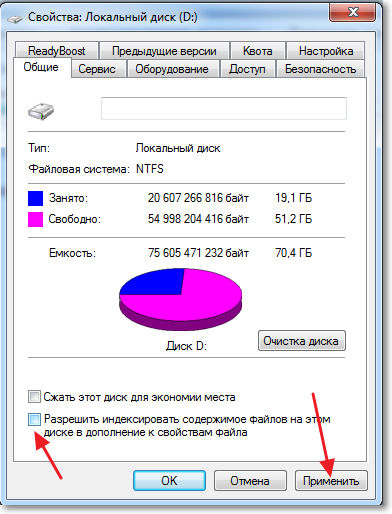
We go to "My Computer", and press the right button to one of the local disks. Select "Properties".
A window will open in which you want to remove the checkbox from the "Allow indexes the contents of files on this disk in addition to the file properties." Click "Apply".
7.2 Move the index files
Windows has an excellent search, but for everything good, as they say, you need to pay. Absolutely all files that are in user folders and emails are indexed in order to subsequently search for content or files. This information is on the system disk as a group of files that are combined into a hidden folder. Depending on how many files were indexed, the volume of the index may even make several gigabytes.
Many people advise you to disable this search service, but I believe that this is not a good advice. It will be much better if you move the index files to the data disk. It can be done in this way:
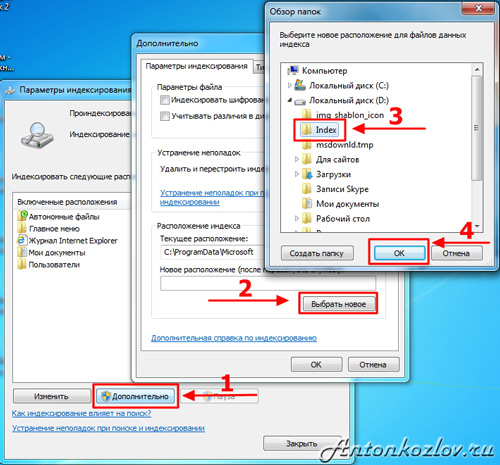
but. Create a new empty folder for index files on data disk. For example, I have this "index" on the disk "D:".
b. In the Start search row, you must enter the word "index" (it must be written without quotes), and then select "Indexing Parameters".
the "Index Location" section contains information about the current location of the index files - by default it is "C: \\ ProgramData \\ Microsoft". You should click "Select New", and then select the folder that was created in paragraph 1, then click OK.
8. Moving Personal Folders with Custom Data
You will be able to save space to the maximum, moving the folder called "Downloads", "Music", "Documents", "Images", as well as "video". For this you need:
but. Open with a conductor disk where you plan to move files and create empty folders for each directory that you plan to move. This can not be done, but then the process is somewhat complicated. In this example, the data disk received the name "D:".
b. Open your own profile directory using the "Explorer", click using the right mouse button on the folder you are going to move, and then select the item "Properties".
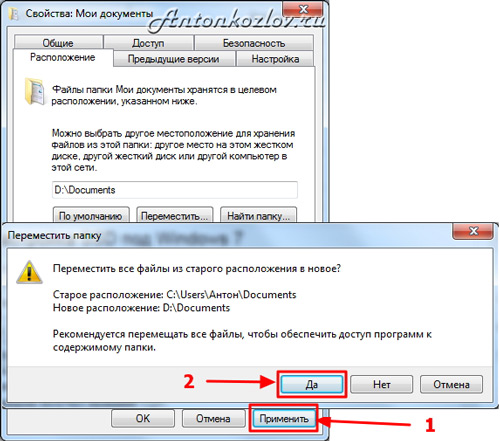
in. Open the tab called "Location" and click the "Move" button. Now you have only to choose the folder you created in paragraph 1 with the same name as the moving folder.
g. Moreover, you can click on the "Apply" button. After that, a window will appear in front of you, refineering whether you want to move files to a new folder and delete the current folder. Just click "Yes."
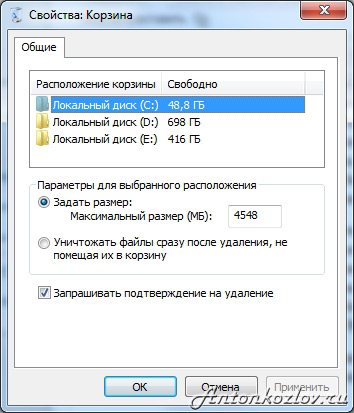
9. Reduce the place for the basket files.
If you have two drives - you should select the minimum number of space for the basket on the system disk, but on the disk with the data of the dedicated place must be greater. What exactly the number of space is to allocate for these purposes only on your desire.
10. Turn off or carry the paging file
SSD is best used with a large number of RAM. In this situation, you can disable the paging file that slows down and wear the SSD.
The name of this file is default "Page File.sys", it is located in the root directory of the system disk. It can be reduced or moved to disk with data. Each of these options has both its advantages and disadvantages, and the calculation of the correct size of the paging file is a separate conversation and a whole article may even be written on this topic.
You can change the settings of the paging file by clicking on the "Parameters" button, which is in the "Speed" section on the "Advanced" tab of the System Properties windows. You will appear the "Performance Options" dialog box, you should open the "Advanced" tab (you need to do this for the second time), and then click the Edit button, which is in the "Virtual Memory" section.
Then remove the "Automatically select a swap file" icon, and only then new options will be available for you.
The amount of RAM at my computer was sufficient, and therefore I decided to limit the size of the paging file of 1024 MB, allowing it to expand when it occurs to 4 GB. After the settings are changed, do not forget to click on the "Set" button.
To move the paging file to another disk, select the option "Without paging file" and click on the "Set" button. Then, in the list, select the desired disk and specify its size, or dwell on the option "Size Size" options. Next, you should click "Set". 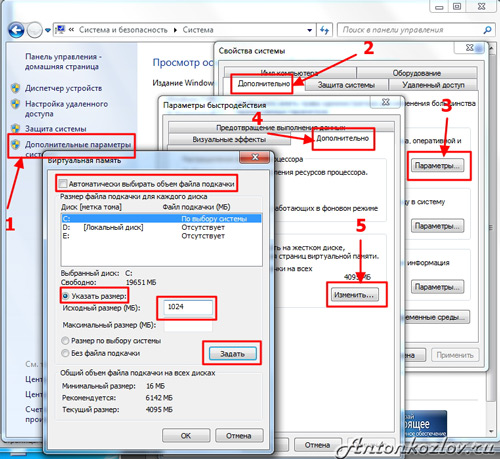
11. Disconnect sleep mode (Hibernate hibernation).
If the computer is characterized by a small disk volume, hibernation can be disabled from the command line with administrator rights. To do this, in the Start menu search row, enter the "CMD" keyword (it must be entered without quotes), and then click ++. The command line window will appear before you, you should enter the command
powerCfg -h off.
and then click. You can turn on the same hibernation using the same command line, the main thing - instead of off to put on. The command line can also help you check the size of the files and hibernation files - for this you should simply enter the DIR C command: \\ / as.
12. Restoration of the system
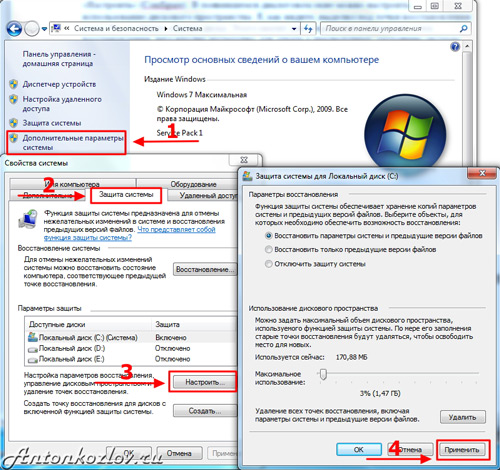
Due to the presence of the "Restore System" function, you can return the former system settings if necessary, as well as save previous versions of important files. To do this, the system periodically creates recovery points - this is a kind of instantaneous snapshots of the current state of the system. This information is stored on the system disk and occupies a certain place. Of course, you can disable this feature, but, in my opinion, you do not need to do. It will be much better to carry out some restriction of space that was allocated for storage.
In order to do this, you need to open the "System Properties" dialog box and select the "System Protection" dialog box. In the list you need to highlight the C drive, and then click the "Set up" button. You will have a dialog box where you can configure the use of the disk space. As you see, for me, for this purpose, only 3% of the total disk is allocated, it will be enough to save several recovery points, and this is enough to return to the previous state of the system, of course, if this need appears .
13. Checking Trim
Windows 7 and 8 should include Trim for SSD, but it can be checked. To query the status or setting parameters of using Trim, you need a command line with administrator rights as to disconnect the sleep mode.
Request Current Status:
fSUTIL BEHAVIOR QUERY DISABLEDELETENOTIFY
If the value is zero, the Trim is turned on. If not, it must be turned on:
fSUTIL BEHAVIOR SET DISABLEDELETENTITIFY 0
14. Configure the file system.
To increase the performance and resource SSD, you can disable the last file access time.
fSUTIL BEHAVIOR SET DISABLELASTACCESS 1
15. Remower a browser cache for RAM or other HDD
Google Chrome and all browsers on the Chromium engine (Coolnovo, Rockmelt, Rambler Nichrome, Yandex.Browser, [email protected]). It can also work for Opera above the first version.
In order to change the cache storage path, you must slightly edit the shortcut from which you run your chrome.
To do this, click the right mouse button on the label and click "Properties". In the object "Object" you need to add the following:
Disk-cache-dir \u003d "<путь>"
Inspend<путь> We write the desired address, it should turn out something like this:
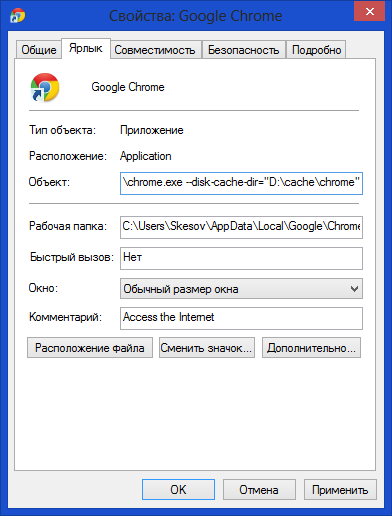
By default, the cache is stored in the folder:
C: \\ Users \\<имя пользователя>\\ APPDATA \\ LOCAL \\ Google \\ Chrom E \\ User Data \\ Default \\ Cache \\
It must be deleted manually. This method will only work when starting from the shortcut in which you add this parameter.
16. Transfer directory for temporary files to normal (HDD) disk
Ways to Temp catalogs are here:
Computer - Properties - Advanced System Parameters - The Advanced Tab - Wednesday variables - TMP and TEMP (for the current user and general).
Someone advises to transfer TEMP to Ramdisk, but it is rather a harmful advice. This is due to the fact that some programs (including updates) write data into a temporary directory, then send a computer to the reboot, and then wait that the data is not going anywhere during this time. Ramdisk is cleared by default when rebooting. But even if your Ramdisk supports data saving to image and recovery after a reboot, this is also not a panacea, because A situation at which the Ramdisk service "will simply do not have time to start and initialize by the time the programs will start contacting the temporary catalog.
17. crystaldiskmark.
CrystalDiskmark is a small free program designed for comparative analysis (testing) of the speed of hard disks of the computer. Allows you to measure the speed of reading and writing data.


