How to change website background to Joomla 3
Dear readers, we continue to publish materials dedicated to Joomla 3. Today we'll talk about how to change the background of your site. It's pretty easy to do this in Joomla.
Change background on Joomla website
First you need to open your site in any browser, for example we use the browser Google Chrome.
1) We right-click on the place on your site where you want to change the background and select the item "View code"(name may differ in other browsers).

For example, we decided to change the background of our site to red. Therefore, we click with the mouse on the right or left side of the site.
2) A window will appear in front of us, where the source code of the page will be indicated.

Here we are interested in the valuebackground-color. As you can see, the site is set to a grayish tint. Let's change it to bright red. To do this, click on the square with the color and select the shade we need. Remember the digital designation of this color (for example, for white itf000000 ).

Now, when we close the source code window, we can see that the background color of the site has indeed changed.

Pick the color you want and move on to the next step.
3) Having chosen the option we need, you need to set the setting for this color in the administrative panel of your site. To find out exactly where the file responsible for the background color is located, let's open the "View Code" window again.
Now hover over the title next to the tag body and you will see in which file the code responsible for changing the background color is located. By the way, the numbers after the colon indicate the line number where this code is located.

We launch your control panel and find this file.

In this article, we will look at how to edit the appearance of a template. Joomla.
Any person who creates a site wants to make his site unique, or at least not like others.
Now almost all templates for Joomla are publicly available, anyone can download and install them on the site.
Let's take an example of the modification standard template Beez5.
Changing the template background (background)
I use Chrome browser, press F12 or right-click on the desired location and click "View Element Code".
As seen in the figure, for the background template responds tag body with style background.
Styles set background color #EEE and a background image (the path to it). It is these parameters that give us the background of the site.

To change them, you just need to replace these parameters (specify a new color and a path to a new image).

All changes are made in the file that is specified in the developer panel, here it is beez5.css, after the colon there is a line in which the parameter needs to be changed, we have line 19.
The path to the file can be viewed by hovering over the name with the cursor.
Website logo change
Changing the logo is very easy and there are several ways to do it.
Method 1:
Just like in the first method, hover over the logo, right-click and click View Element Code. All we need to know is the address (path) to the logo. Now we make our logo, give it the same name (fruits.gif) and just replace the old logo with it.

Method 2:
This method is the easiest, but not found in all templates. Go to: Template Manager - Beez5 (style) - Specify the logo.

Method 3:
We do everything the same, only we replace not the file, but the path to the logo. As you can see in the picture, the picture is inserted through html, not through css. Therefore, you need to change the source code of the template. It's easy: Template Manager - Beez5 - Edit Template home page. Looking for a line with
and change the path to the logo to the desired one. In this template, the path is written on php because there is option #2. Therefore, it is better to use option #1 or #2.

Change the width of the template and blocks
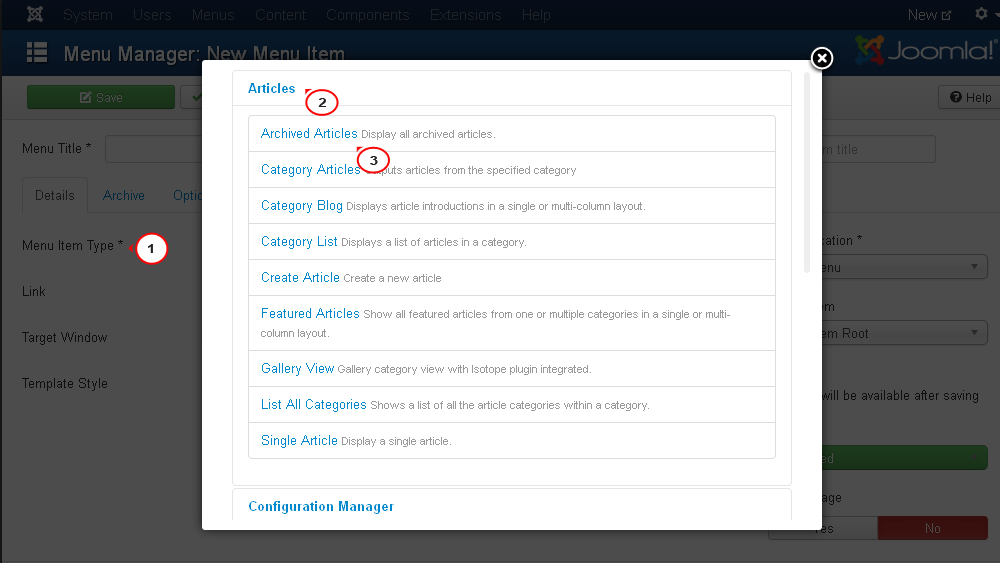
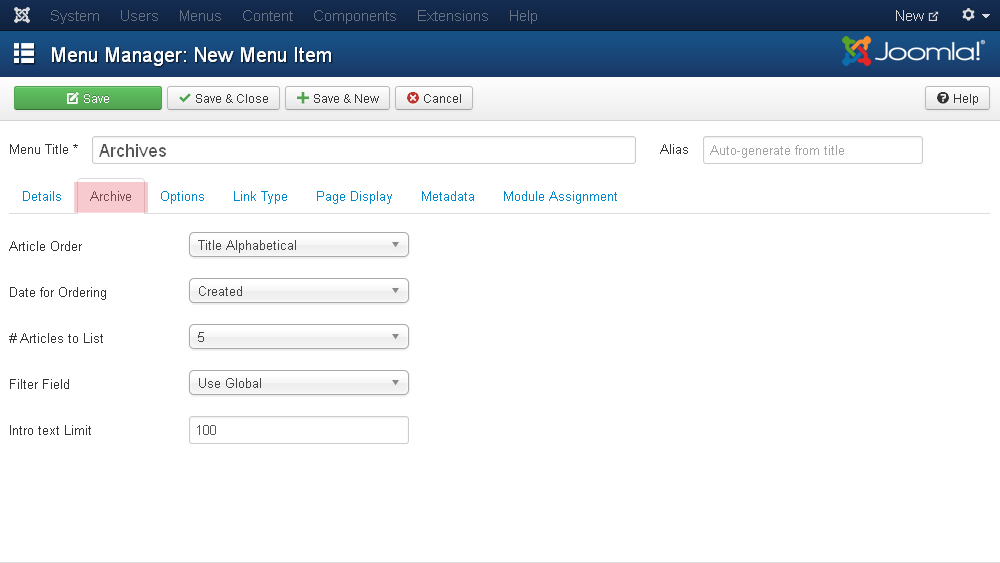
Finding the main block div. As you can see in the picture, this Individual blocks are edited in the same way. We find the block, look and change the style. All this is done in the same way. Right-click on the text and click View Element Code. We will be shown the block and block style responsible for the text parameters. The color of text and links is set by the -color parameter. All files can be edited with editors like notepad++ or through the standard "editor" Joomla. Template Manager - The desired template. Here you are given a list of files (index.php, 404 page template, print page template, styles.). That's all. Your opinion is important to us. Write your comments. This tutorial provides a quick guide to working with archived articles in Joomla 3.x. Archiving articles allows you to save them on your Joomla site for the future, but makes them less visible to your site visitors, since such articles are no longer displayed with the rest of the site content. Once archived, these articles can only be viewed from the Joomla Archived Articles menu, the Archived Articles module, or by searching by article name using the built-in Joomla site content filter. Articles can be easily archived in the Article Manager. To do this, do the following: You can configure the Archived Articles module to display a list of archived articles sorted by month. Do the following: You can also create an Archived Articles menu button to display a list of the site's archived articles. Do the following: In the Joomla control panel, go to the section Menu, select the menu to which you want to add a new item and press the button Create (New) top right in the toolbar: Near the parameter Menu Item Type press the button Select. In the pop-up window that appears, open the tab Articles and choose type Archived Articles from the dropdown list: Now you can set the main settings for the menu item: This is where the tutorial ends. Now you know how to work with archived articles in Joomla 3.x. Hello readers of the No Zombies Allowed blog. Today I want to tell you about how change website background. With your own background, your site will be unique and stand out from the gray mass of copy-pasted templates. Changing the background of the site is not difficult enough and it is done in 10 minutes. And now I will tell you how to replace the background for the most popular engines - Ucoz, Joomla, WordPress. We will change the background of the site using css styles. The background can be set in several ways: Of course, you need to choose only 1 method from the presented ones. Instead of #FAFAFA and others like it, put your own color. Next in the CSS body, you need to insert your site's background style. In order to change the site background on Ucoz you need to go to: Control Panel - Design - Design Management (CSS) - Style Sheet (CSS). Next, find the code by type: Body ( font: 13px Arial, sans-serif; line-height: 1.5; background-color: #FFF; ) And then change to your background one of the suggested methods above. In the screenshot, I highlighted with a red line where to go and what style to change. It is preferable that you do not change anything other than background. Those. don't touch padding, line-height, font and the like - it can change not only the background of the site :) To change the background of the site on Joomla you need to go to the administration panel, then Extensions - Template Manager and select the "Templates" tab You will see all CSS files of your template Typically, the CSS that stores the background styles is template.css or main.css. If you still don't know which CSS file you need, use . After you have chosen the desired css file click and edit. Find the body style in this file and change the background Body ( background: #fff; color: #000000; font-size: 100%; padding: 0px; text-align: center; ) Do you need to change the background on WordPress? - it will be no more difficult to do than on any other. To change the background, go to the admin panel, then Appearance - Editor. This will open the main CSS file of your template. All you need to do is find the body styles (they are usually at the very beginning of the file) and replace the background with yours. I have tried to explain as briefly as possible. change website background. If I missed something and something is not clear to you, then write in the comments. Thank you for your attention :) Sincerely yours No Zombies Allowed. Immediately make a reservation, this lesson is designed for those who are familiar with photoshop< и css. So, it remains for us to change the site template. In order to change the template, we need to know what elements our pages consist of, i.e. their html markup and styles. The files we are interested in are located in the templates folder (templates)\siteground-j15-1 (our template). Those. full path - yoursite.ru/templates\siteground-j15-1. In this folder, we see several files and folders: images for the template are stored in the images folder, style sheets are stored in the css folder, and the index.php file is responsible for displaying pages. So, open the index.php and template.css files (from the css folder) in Notepad or Notepad. Let's take a look at the index.php file. In it, html markup is responsible for the arrangement of elements on the page. All that is included in Having studied the html markup, we will know exactly what elements our pages consist of, and accordingly we can change their appearance. But probably, you have already noticed that it is extremely difficult (although possible) to imagine the appearance of the page from the code. Of course, there is a way to make this easier, and its name is the Firebug plugin for firefox browser. After restarting the browser, the plugin icon (beetle) will appear in its lower right corner: We click on it, a panel will open at the bottom of the browser window: We need the HTML tab of this panel. It displays the html code of the page opened in the browser. When you move the mouse cursor over a code element, it is highlighted on the page. Right now we see only two page tags - head and body. If we click on the plus sign next to the body tag, then its contents (nested tags) will open. So we open until the tags of interest to us begin to be highlighted. The first such tag is As you can see, it is responsible for the top of the site header. Now we are looking for this identifier on the page template.css We can see that this div has a background image called header_top_middle.jpg (located in the images folder) that repeats horizontally. Go to the images folder, find the image header_top_middle.jpg, open it in photoshop program, increase it by 3 times (to make it better visible), select the blue color, fill it with brown, as on the sample site (this color in hex code is #671700) and save. We go to our site, refresh the page and see that a brown stripe has appeared: Now we also need to replace the pictures on the left and right of this div, go back to FireFox, click on the plus sign next to So, the left corner is the image header_top_left.jpg, the right corner is the image header_top_right.jpg. Open them in photoshop, enlarge them 3 times (to make it better visible), select the blue color, fill it with brown, as on the sample site and save. We go to our site, refresh the page and see the result: Again, click on the tags in the Firebug panel, look for the tag responsible for the site header, and find it - We click on the plus sign next to it and see what the site header consists of. So the site header is We see that, in fact, our header is filled with blue (#06569d), along the bottom edge of the header (bottom) horizontally (repeat-x) the image header_top_middle_shadow_bg.jpg is repeated, which is a blue square with a darkened bottom (shadow effect). If we look at the sample site, we will see that we have white stripe, and the background of the header itself has the color #671700. So let's change it to photoshop picture(Change the blue square with a blackout at the bottom to a brown square with a white stripe at the bottom): And in the style sheet, change the blue background color to brown: We save and update our site in the browser: But on the sample site we have a picture. First, let's get it. To do this, go to the sample site, right-click on the picture and select the item - Open background image: We save this image as header.jpg (right-click - Save image as). Now go to the style page and change the name of the image in the tag We look at the result and see that the inserted image is wider than our header. Indeed, our image has a height of 181 pixels, so our tags Now we will deal with On the index.php page, we see that in To add what we need, we need to add a couple of additional divs to the index.php page markup: one will be responsible for the left side, and the other for the right side, we will call them respectively logo_left and logo_right, and add another div to them logo_left_text and logo_right_text, in which we will write the necessary text: Let's look at the result: Everything is there, all we have to do is style our divs in the template.css page so they display like they do on the reference site: Please note that we slightly changed the styles for the links in the div-e logo (reduced the size and added a different font). It turned out quite similar to the sample site: Only now the brown stripe at the top spoils the whole thing. Let's remove it, as you remember, the tag is responsible for its output Everything, with the site header figured out. Now, in a similar way, we deal with the main menu and the menu of the product catalog. There will be nothing fundamentally new, so I will explain briefly. The tag is responsible for the main menu Now the same with the product catalog menu, the tag is responsible for it And the same changes just below for the menu items we clicked on: Everything from the menu. Now we need to remove the text below the product catalog menu. This inscription is on the index.php page: As you can see, this is php code, let's make a single exception for this case and remove it: Now we have the same situation in We will also remove this code, but in the tag with id="sgf" we will write the name of the company and the copyright icon: And, of course, change the color to brown in the styles: Our site now looks like this: Very similar to the original. We just have to go through the style sheet and change the styles of the headings (h1, h2, h3...) and links. I hope that you have already understood the principles of template adjustment, and you will do it yourself. As you understand, if you know html and css well, then the template can be changed beyond recognition, it all depends on your imagination. Practice and you will succeed.

Changing the color of text and links


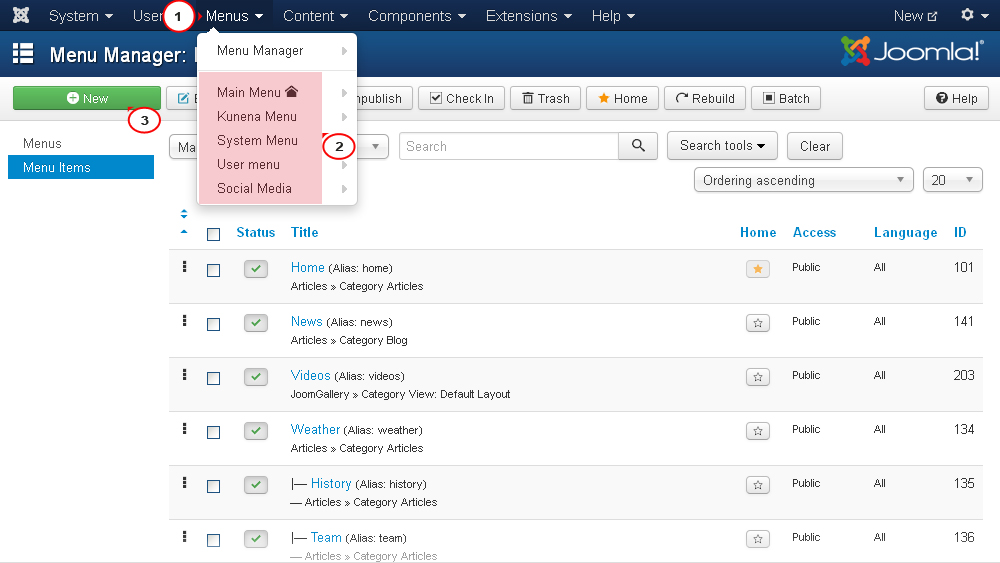
Archive Articles
Displaying a list of archived articles through a module

Displaying a list of archived articles via the menu button
body( //Just a color background:#FAFAFA; /* Background color */ //Gradient for all kinds of browsers. background: #1e5799; /* Old browsers */ background: -moz-linear-gradient(top, #1e5799 0% , #7db9e8 100%); /* FF3.6+ */ background: -webkit-gradient(linear, left top, left bottom, color-stop(0%,#1e5799), color-stop(100%,#7db9e8 )); /* Chrome,Safari4+ */ background: -webkit-linear-gradient(top, #1e5799 0%,#7db9e8 100%); /* Chrome10+,Safari5.1+ */ background: -o-linear-gradient (top, #1e5799 0%,#7db9e8 100%); /* Opera 11.10+ */ background: -ms-linear-gradient(top, #1e5799 0%,#7db9e8 100%); /* IE10+ */ background: linear-gradient(to bottom, #1e5799 0%,#7db9e8 100%); /* W3C */ filter: progid:DXImageTransform.Microsoft.gradient(startColorstr="#1e5799", endColorstr="#7db9e8",GradientType=0 ); /* IE6-9 */ // Repeating image background: url(images/bg.jpg) repeat-x /* Background image */ // Transparent image + color /* The advantage of this method is that you can choose texture, and then quickly change the color No with CSS*/ background-image: url(images/bg.png); /* Image path */ background-color: #c7b39b; /* Background color */ // Static image background-image: url(images/bg.jpg) no-repeat /* Background image */ /* Static image, usually large */ ) How to change the background of the Ucoz website

How to change the background of a Joomla site


How to change the background of a Wordpress site


(menu_t.jpg) inside the tag


Recommended
How many cores are in a computer or laptop (2 ways to view) How many cores are on my windows 10 computer


 How many cores are on my windows 10 computer")


 Samsung s8 irises do not work")
")
