IN Lately operating room Linux system is becoming more and more popular. Distributions based on it are completely free, and the capabilities of each of them are practically not inferior to the more popular and commercial Windows and Mac OS. Since in Russia and other Russian-speaking countries Linux is usually used more in a professional environment, some ordinary home computer users may be deterred by this fact, which is why they are simply afraid to try using Linux at least for some time.
You can install Linux using a flash drive.
In fact, today quite a lot of Linux builds have been created, which in terms of ease of use can even surpass the same Windows or Mac OS. In this article we will describe in great detail what you need to use Linux on your home computer, and we will also provide step by step guide how it is created bootable flash drive Linux and the system is installed.
Flash drive
Most distributions have an installation image ranging from 1 to 2 gigabytes in size. In some cases it can reach 4 gigabytes or more. Therefore for full installation Linux on your computer will need a flash drive of 4 gigabytes or larger, since the image being written must fit on the disk. Most media today fully meet these requirements.

Linux image
Some distributions are designed for professionals, while others can be used even by inexperienced users. These include Ubuntu, Linux Mint, Debian, Manjaro, openSUSE, Zorin, Fedora and elementaryOS. Go to the distribution website and download the installation image. This can be done either directly from the server or through the BitTorrent protocol, through which downloading to high speed. How to burn any Linux distribution onto a flash drive, read on.
Utility for creating a bootable USB flash drive
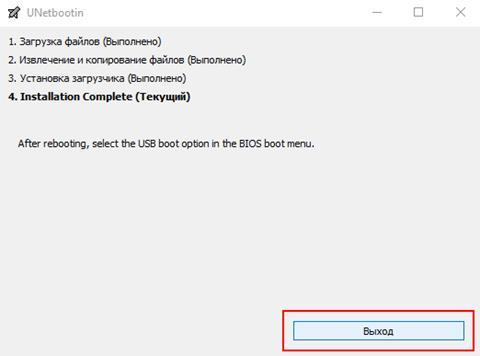
To create bootable media, you need to use special utility. For Windows is the best the choice would be Rufus, and for Linux - Unetbootin. We will tell you further how to make a bootable USB flash drive using them.
System requirements
For normal operation Linux on your computer must meet certain requirements. Depending on the distribution used and the selected graphical shell, they will be as follows:
- RAM: 1–2 GB.
- Processor: two cores, frequency of at least 1.3–1.6 gigahertz.
- Video card: any modern one.
- Free disk space: at least 4–5 GB.
Linux Installation Procedure

What to pay attention to
Internet connection
It is best when you use a router to connect to the Internet, which assigns network addresses automatically in DHCP mode. If you use a direct connection, without a router, it is best when the operator provides a dynamic IP address. Otherwise, problems may arise.
Selecting additional components to download
When installing some distributions, especially those based on Ubuntu, you can select additional components to download and install. This includes updates to the Linux distribution released at the time of installation, as well as proprietary codecs for playing certain file formats, such as MP3 or flash, as well as drivers for built-in devices on a computer or laptop. Of course, they can be downloaded after installation, but it is best if they are downloaded at this stage, since the system will be immediately ready for use.
Selecting an installation option
Depending on whether you have experience installing other operating systems or not, the utility offers two options for how to install the OS and partition file system: automatic and manual. In the first case, you need to place the cursor next to the item that offers to erase the entire contents of the disk and install Linux. When installing everything manually, check the “Other options” or “Manual installation” checkbox.

Hard drive partitioning
Automatic. If you select automatic hard drive partitioning, the installation utility will do everything for you. You will only need to agree with the proposed changes. If you are installing a system from scratch or plan to use Linux as the only operating system on your computer, but do not want to go deep into various settings, you can safely choose automatic marking.
Manual. When installing Linux as a second system, or if you simply want to partition your hard drive by specifying the size of each partition, you will have to create a partition table by clicking on the appropriate button in the menu. Unlike Windows, in Linux there is no concept of drive C or drive D, since the file system is designed on a different principle. Here there is the root of the file system (root), to which all other partitions and directories are connected or, in other words, mounted. There should be 4 of them in total, and each of them should have a specific file system format. Let's list them:
- / - root partition - ext4 file system, size from 10 to 50 GB, the operating system is installed into it.
- /boot - is intended for Grub boot loader files, must have an ext2 file system, and its size is approximately 100 MB.
- swap - used for memory swap, file system - swap, size must be equal to volume random access memory.
- /home - a user partition that will occupy all the free space remaining after occupying the remaining partitions; file system - ext4.

Add all these dimensions, manually specifying the size of each one. Please note that 1 gigabyte contains 1024 megabytes. Don't forget to check if you have marked everything correctly, otherwise you will have to install everything again.
- Select the default keyboard layout. The next step, which will be offered to you by the installation utility, is to select the main language and keyboard layout. You shouldn't have any difficulties here.
- Time zone change. Next, on the world map, select your location and time zone. Choose the city closest to yours.
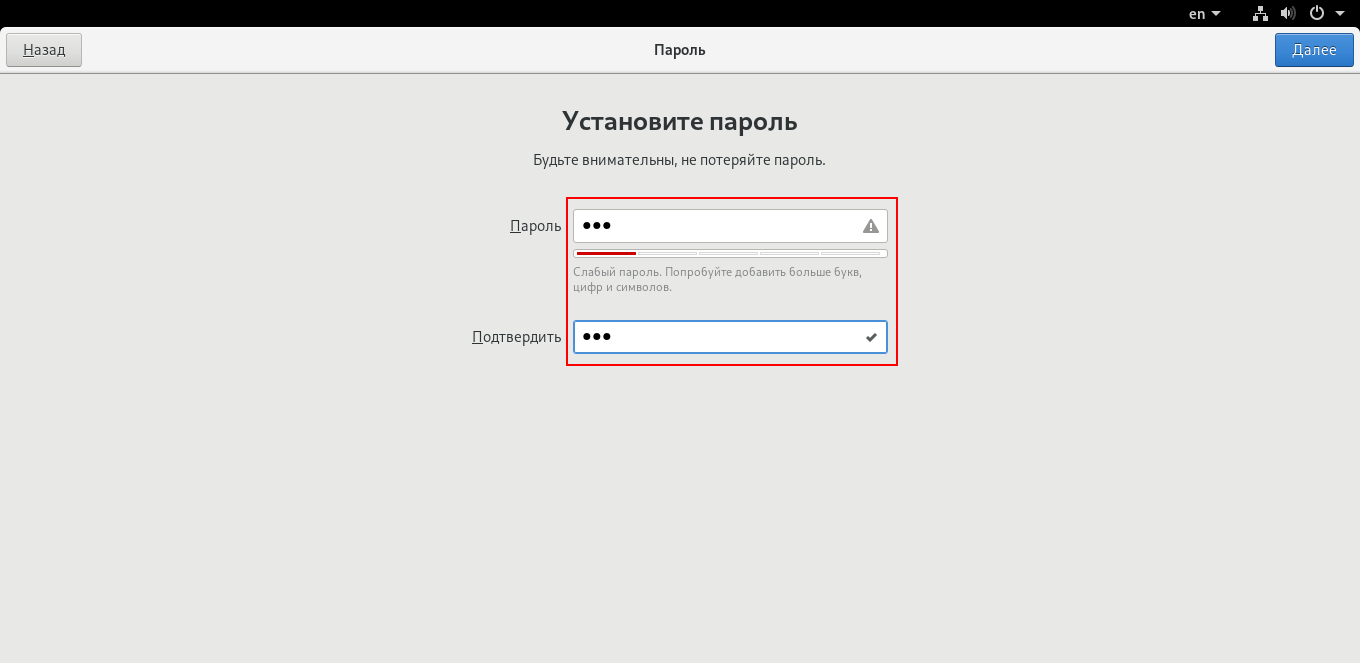
- User credentials. Enter your username, which will be displayed in the login window, followed by your login, computer name and login password. If you do not want to enter it every time you turn on the computer, check the appropriate box.
- Complete installation. Once you have entered all the above details, wait a few minutes until the system is fully installed. This usually takes no more than half an hour, even on older computers. To brighten up your wait, you will be shown pictures describing the capabilities of the distribution you are installing.
IMPORTANT. After installation is complete, reboot, remembering to remove the flash drive from the computer and return it BIOS settings to the initial ones, then enter the username and password. On this Linux installation to your computer from a flash drive is completed.
Conclusion
As you can see, installing Linux is not some unusual or very complicated procedure. If you don’t get involved without sufficient experience with specific assemblies designed for professionals, the whole process will take you no more than an hour. In addition, unlike Windows, Linux already has all the most necessary software installed, so you won’t need to waste time searching for and installing it.
Leave your questions in the comments.
It often happens that when wanting to install an OS, a person is faced with the fact that his disk drive is broken or missing. This problem occurs especially often among laptop owners. But don’t be upset, because there is an alternative - installation from flash driveLinux. To do this, you do not need great programming knowledge, because there are special programs, which will “burn” the Linux image onto your flash drive just like on a disk. All you have to do is start the installation process.
So, before how to installLinuxfrom a flash drive, you will need a flash drive with the image recorded on it. If you don't know how to do this, get all the information you need at .
Step 1 – preparationBIOSfor installation
As an example, consider installing the Linux Mint distribution. In order to installationLinuxMintfrom a flash drive started, you need to configure startup settings.
We insert the flash drive into the computer, turn it on and at the very beginning, when the screen is black and there is a lot of text, press the F2 button. Depending on the BIOS version and the computer, this may be another button - F10, Delete or Esc.
We find ourselves in the settings menu and now we need to find the “Boot” item. Again, in different versions BIOS can be called differently, but focus on this word. After we have found the autorun menu, a list of priorities appears before our eyes. It contains: HDD, floppy drive, removable hard drive, USB inputs, etc. Our task is to find a flash drive in this list and put it in 1st place as a priority.
This is done this way - point the arrows at the name (for example: “USB 40GB DEVICE”) and move it by pressing the F5 and F6 buttons until the flash drive is in 1st place.
Now the system will launch the flash drive first. Press F10 and confirm the exit by entering the Y (Yes) key and pressing the Enter button.
Reboot the computer.
Step 2 – Start the installation process
After your computer restarts, you will see the startup menu. It is often decorated with various images, so you will know exactly what it is. Press Enter.
If nothing has changed or something went wrong, restart your computer and review the menu list in detail. Perhaps the recorded image contains not only, but also various programs.
Step 3 – installation from a flash driveLinux
All the suffering is over! Already at the beginning of installation you are greeted by a friendly Russian-language interface. Start by selecting your language - select your desired language.
Next, you need to make sure that the computer has enough free memory on your hard drive, connected to a power source, and connected to the Internet. You can immediately agree that Latest updates automatically downloaded during installation.
Click “Forward”. We get to the selection menu hard drive. In it you can format and split sections, if desired. Specify the partition (disk) in which you want to install the operating system and click the “Install Now” button.
We get to the section change menu. Here you can increase the amount of memory, change the file system type, format the partition and specify the mount point. We use the “Ext4” file system and set the mount point “/”. If there is no valuable information on the hard drive, it is advisable to format the partition. Click “Install Now”.
Now we select the country and city of residence so that the system automatically sets the time and other indicators to suit your personal needs. We also indicate the keyboard layout. All you have to do is enter the desired name for your computer, username and password (optional). Click “Forward” and start the installation process.
After installation is complete, restart your computer, remove the USB flash drive and wait for it to launch operating system Linux.
Congratulations! Installation completed successfully!
Owners of old laptops, in an attempt to “speed up” the device, express a desire to install Linux. The easiest way to do this is from a flash drive, especially if the gadget is not equipped with optical drive. However, before you get started, you should learn more about this process.
Features of installing Linux from a flash drive
Linux and Windows user experiences may be similar in some situations. But their internal processes are very different. So the installation was not without its peculiarities:
- By running Linux from a flash drive, the user environment and main programs can be tested without necessarily installing it on the hard drive. Therefore, almost all distributions of this OS are called “Live-CD/DVD”.
- Installing Linux from a flash drive or disk can be done either as the only system on a PC or next to another OS.
- To record the distribution, you should use working USB drives, since low-quality media can overheat and turn off during installation.
- It is not recommended to install using a USB flash drive via USB hubs. Especially if, in addition to the storage with the installer, other equipment is connected to it. This can cause a lot of problems.
Programs for installing Linux from a flash drive
There is a huge list software for recording operating system distributions onto USB drives. But the most versatile and proven is Unetbootin, as it works on both Windows and Linux.
How to burn an image using Unetbootin:
- Download the program from the link
- Run it, specifying that the target will be a disk image.

- By clicking the button with three dots, specify the distribution image.

- Select the type “USB Device”.

- Specify the carrier letter. If the media is connected in a single copy, the program detects it automatically.

- Click "Ok". The data on the media will be lost.

Everything is ready to start installing Linux from a flash drive to a laptop. You can close the program.
How to install Linux from a flash drive
The variety of Linux distributions does not allow us to talk about all types of installers at once. However, the most common among users are Debian builds, which include Ubuntu, Fedora, Zorin OS, ALTLinux, etc. And their installers give a complete picture of the ways and how Linux can be installed. First, you need to boot from a flash drive. You need to get into the BIOS.
BIOS setup
Attention! On most laptops, you can get into the BIOS by holding or constantly pressing the F2 key when turning on the device.
However, depending on the manufacturer and model, the keys and their combinations may vary.
- MSI laptops – Del key, F2.
- Dell – Del, F1, Insert or
- Acer – F1, F2, Delete, Ctrl+Alt+Escape.
- Packard Bell – Del, F2.
- Hewlett Packard – F2, F11, Del.
Also available from some manufacturers Boot Menu, from which you can immediately select a device to boot, bypassing the BIOS settings. It is usually accessible by pressing the keys – F10, F11 or F12.
If the Boot Menu is missing, but you managed to get into the BIOS, then the setting for most laptop models looks like this:

Installing Linux using Fedora as an example
Attention! Manual marking for installing the operating system creates more favorable conditions for its further use.
- After booting from the flash drive, the user will be greeted with the following window, in which you need to select the “Start Fedora-Workstation” item and press “Enter”.

- will appear start page installer “Install to” button Hard Drive" starts the installation.

- Next you need to select your language and region.

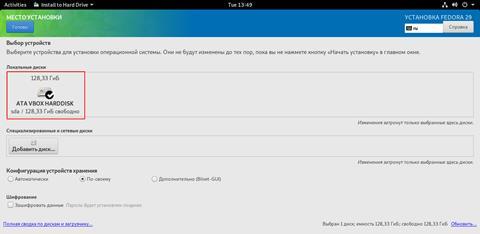
- Click on the Installation Location button.

- Select the hard drive on which Linux will be unpacked.

- Set the device configuration to the “In your own way” mode and click “Finish”.
- Next, change the partition scheme to “Standard partition”.

- Click on the “+” button to begin partitioning the disk.


- Click the “Done” button.

- Then start the process by clicking on the “Start installation” button.

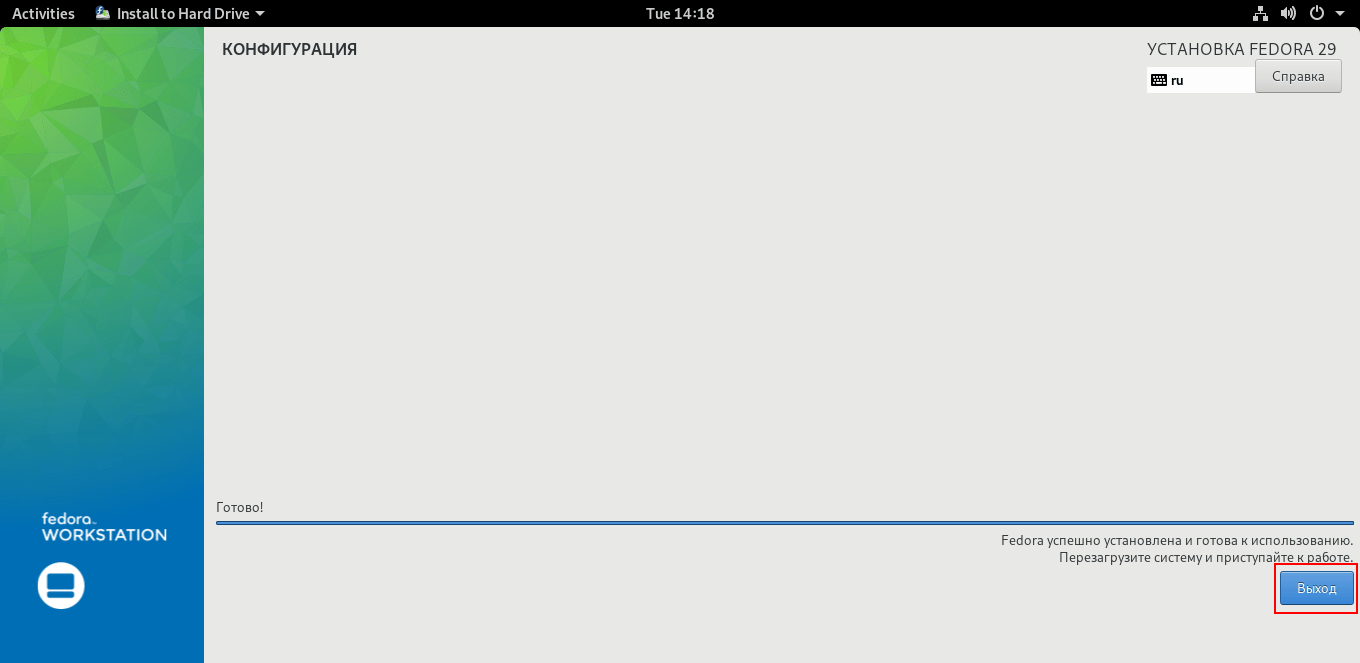
- The unpacking process will begin.

- When Fedora notifies you that the unpacking process is complete, click Exit.
- Then, in the control menu, restart your PC and remove the USB drive.


- The first time you launch Fedora, you'll be presented with a welcome screen, where the last screen will be to enter your username and password.

- At the end of the setup, click on the “Get Started” button, and this completes the installation of Fedora from a flash drive.

Installation from a Zorin OS flash drive occurs through a standard installer for Debian-like builds and has minimal differences from this process in Linux Fedora. Namely:


Installation from a flash drive of ALTLinux and most other operating systems based on this kernel, such as Ubuntu, Elementary, Deepin and others, is the same, only the interfaces differ.
If Linux cannot be installed from a flash drive: common errors
Despite the apparent ease of installation, no one is immune from problems with it. If Linux cannot be installed from a flash drive, most likely:
- The BIOS settings have disappeared or were not installed correctly. Check your settings and save them again. If the situation does not change, try replacing the battery with motherboard laptop, it is responsible for saving settings, date and time on the device.
- If your computer has more than one hard drive after installing the Linux OS, go to the BIOS and select the hard drive to which the distribution package was unpacked as the first boot device.
- Broken image or poor quality recording. This can usually be verified using MD5 sums, but not all distributions come with them. So the most reliable option would be to re-download the Linux image from the official website (without parallel downloads of anything), and then write it to a USB drive without any extraneous running processes.
- Incorrectly marked hard drive. When the root section is smaller than recommended in system requirements specific assembly.
- The bootloader was installed on the wrong disk.
Conclusion
Recently, Linux has ceased to be a product intended exclusively for computer professionals. Thanks to this, anyone who reads this article will be able to independently install Linux from a flash drive.
Very often people have the desire or need to install Ubuntu on a USB drive and be able to use their OS on any computer (as long as it is possible to boot from USB).
This article describes the process of installing Ubuntu on USB drives.
Some important notes and helpful information collected in the article Installing and using Ubuntu on a USB flash drive. It is worth familiarizing yourself with it before you start installing Ubuntu on a USB drive.
Preparing for installation
Download the system image from here. If you do not plan to run the system on machines with more than 4 GB of RAM, it is preferable to choose 32-bit.
Burning an image
After the image has downloaded, it must be burned to a CD or USB drive.
On USB storage The easiest way to burn the image is with UNetbootin. This program exists for most popular operating systems (Windows, Linux, Mac) and is quite easy to use. All you need to do is specify the path to the downloaded image and select the disk on which the image will be written.
You can do without burning the image to any media by using a virtual machine, such as VirtualBox or QEMU. You just need to forward it to virtual machine USB drive. Further instructions for this method will not change.
Before booting, make sure that the BIOS selects USB or CD-ROM as the first boot device, depending on what you are booting from. You can get into the BIOS by pressing the Del key to desktop computers and F2 or F12 for laptops. For information on how to select a device to download, look on the Internet or read the instructions for your computer.
If everything is done correctly, you will see in front of you loaded with Live CD system.
Preparing a USB Drive
Launch the GParted program. 
Select the device you are going to install Ubuntu on. 
Format it to Ext2 or Ext4 file system. You can also divide the USB drive into 2 partitions so that it can be used for its intended purpose (transferring files from one computer to another). To do this, format the first partition in FAT32 (so that the partition is visible in Windows), select the Ext2 or Ext4 file system for Ubuntu as the second partition. It is advisable to allocate at least 6 GB to the second partition so that you don’t have to worry about running out of space to install additional programs. 
Almost no one uses disks to install Linux on a PC or laptop anymore. It is much easier to burn the image to a flash drive and quickly install a new OS. In this case, you don’t need to bother with a disk drive that may not exist at all, and you don’t have to worry about a scratched disk either. By following simple instructions, you can easily install Linux from a removable drive.
First of all, you will need a drive formatted in FAT32. Its volume must be at least 4 GB. Also, if you don’t yet have a Linux image, then internet with good speed will come in handy.
Our instructions will help you format the media in FAT32. It talks about formatting in NTFS, but the procedures will be the same, only you need to select the option everywhere "FAT32"
Please note that when installing Linux on a laptop or tablet, this device must be connected to power (to an outlet).
It is better to download the image from Ubuntu from the official website. You can always find it there current version OS without worrying about viruses. The ISO file weighs about 1.5 GB.

Step 2: Create a bootable USB flash drive
It is not enough to simply transfer the downloaded image to a flash drive; it must be written down correctly. For these purposes, you can use one of the special utilities. Let's take the program as an example. To complete the task, do this:


More details about creation bootable media with Ubuntu, read our instructions.
Step 3: BIOS Setup
In order for the computer to load the USB flash drive when turned on, you will need to configure something in the BIOS. You can access it by clicking "F2", "F10", "Delete" or "Esc". Then follow a series of simple steps:

This procedure is suitable for AMI BIOS; it may differ on other versions, but the principle is the same. Read more about this procedure in our article on setting up the BIOS.
Step 4: Preparing for installation
The next time you restart your PC, the bootable flash drive will launch and you will see a window with a choice of language and OS boot mode. Then do the following:


