Ubuntu is a fairly lightweight operating system whose installation is simple and quick. Each new version LINUX is designed with the most simplified installation option.
The instructions provided describe this process in detail, from creating an image on a flash drive to fully loading the operating system.
The most difficulties can arise during disk partitioning or installation of Ubuntu Linux next to Windows. These and other problems that may arise during the download process are discussed at the end of the article.
Brief Definition
Ubuntu is a Debian-based Linux operating system. Its primary task is to provide a convenient, powerful, but at the same time simple interface for working with a computer.
The advantages include:
- accessibility, since it is completely free and does not require any activation;
- auto-update applications as needed;
- easy installation of programs;
- high protection against viruses.
Preparing for installation
Installing Linux Ubuntu from a flash drive has more advantages compared to the previously popular installation from a CD:
- modern laptops and netbooks often do not have disk drives;
- installation from a USB device is much faster than from a disk;
- The CD quickly fails due to scratches and other defects.
To begin the installation, you need to create a bootable USB flash drive. To do this, you will need a Linux disk image or a CD with it that you can copy.
The general Linux installation process is as follows:
- downloading/copying a system image;
- Creation bootable flash drive;
- changing BIOS settings;
- Linux installation.
It is best to download the system image from its official website, since the newest and most improved version is provided there. You should also take into account the parameters of your computer, as new versions of software may not work well with outdated equipment.
Video: Creating a bootable USB flash drive with OS
Burn image
The flash drive for recording must be at least 1 GB in size. The downloaded image can be recorded using the following programs:
- Pendrive;
- Unetbootin;
- Lili USB Creator;
- UltraIso;
- Universal USB Installer.
Creating an image in Windows
The "Unetbootin" program is suitable for creating a boot device like in an operating room Windows system, and in Ubuntu. It must be downloaded, installed and launched. After that, in the “Diskimage” item, select the desired system file. Among the disks in “Drive”, select the desired boot device and confirm the creation of the image:
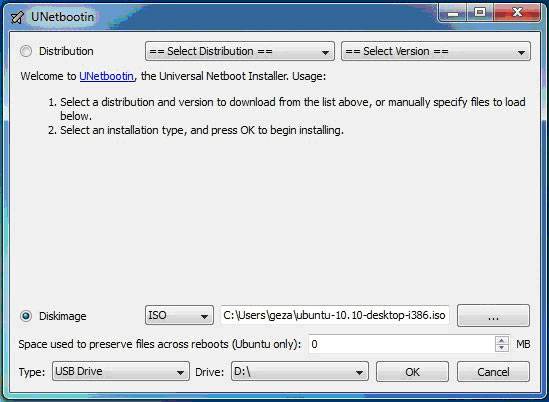
This program has the advantage that it does not require formatting the device, but creates its own files next to existing ones. After finishing recording, you can begin the installation itself.
Creating a bootable USB flash drive
If the flash drive is created from a computer running any version of Linux, you can also use the previous way, but you can do it differently. There is a special utility usb-creator-gtk. To launch it, you need to hold down ALT+F2 and enter “usb-creator-gtk” or in the application menu find “Create a boot disk”:

In the program itself, indicate the location where the Linux ISO image file is located and select the USB device in the window just below:

After that, click “Create boot disk" and the program will start working.
Bootloader in BIOS
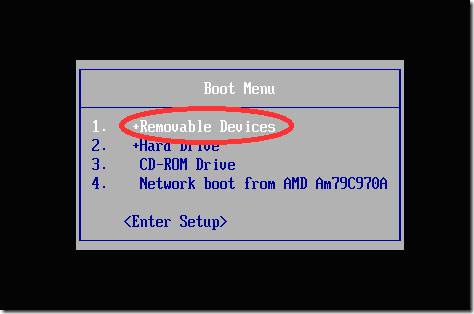
The next step is to switch to BIOS device, from which the download begins. On some computers this is done automatically, just insert the USB flash drive, reboot the device and go to boot menu, which opens when you press Esc, Tab or F8:
But it happens that there is no such option on the computer, so when booting you need to go into the BIOS. For different devices The BIOS structure and input combinations may differ, but usually these are the Del / F2 / F12 keys:

In the window that opens, press the “right” key and go to the “Boot” item:

- in it select the item “Hard Disk Drives”;
- in the menu that appears, press Enter on “1st Drive”;
- a list will open in which you need to select the name of the bootable USB device;
- press Enter and Esc:

The computer will automatically reboot and start from the USB device.
How to install LINUX Ubuntu from a USB flash drive
As soon as the flash drive boots, the following window will open with a choice of language and the next action:

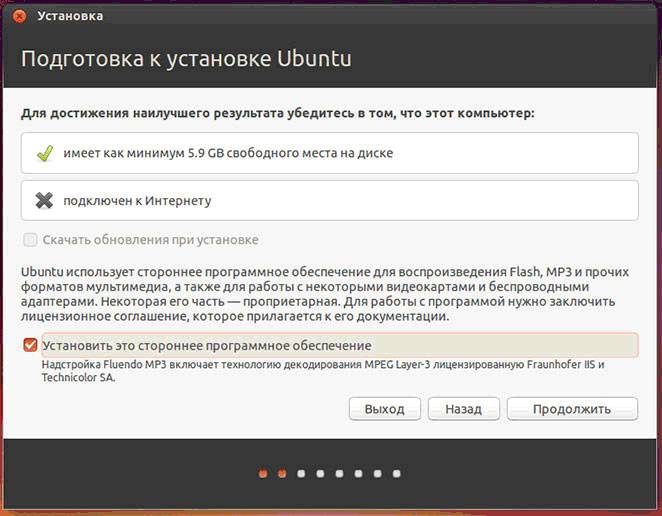
To install the operating system, click on the desired language and “Install Ubuntu”. Next, a window called “Preparing to install Ubuntu” will open, in which you need to make sure that there is enough free space on the hard drive and it is connected to the Internet.
If the computer is not connected to the network via Wi-Fi, then at this stage there will be no Internet, but this is not so scary, since it is needed to download the latest updates, which can be done later.
It is better to check the bottom item “Install this third-party software”, then additional software will be installed.
The next step is the installation option:

Installation next to Windows
If you want to have two operating systems and select the one you need when starting, then click the first item. Next you need to adjust the size of the partitions of your hard drive. Advanced users can partition the disk themselves using the advanced partition editor, but for others this is not recommended.

After clicking “Install Now”, a warning will pop up about creating and changing partitions on the disk; this may take a long time. Continue installing the system, after a while you will need to select regional standards for Ubuntu Linux - time zone and keyboard layout. Then you will need to create a user and password to log into Linux. Fill out all forms and click “Continue”:

Next you should select an image for your user:
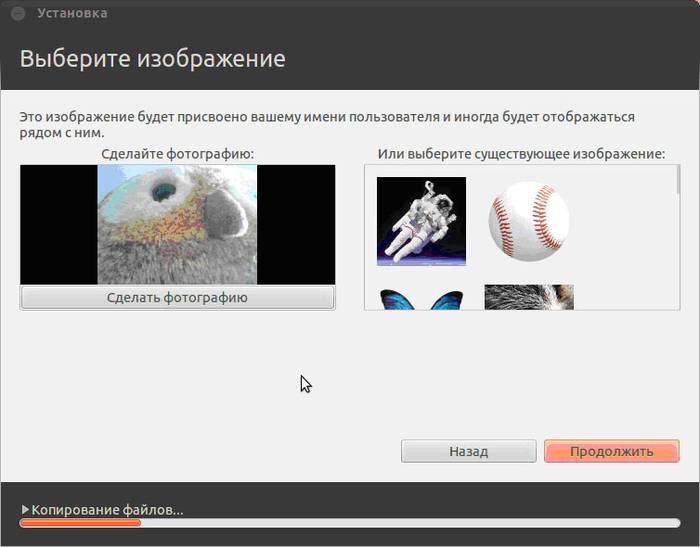
The installer will also prompt you to import accounts from other operating systems:

After the process is completed, you will need to restart your computer, remembering to remove the bootable USB flash drive.

Replacing the current OS with Linux
Pre-prepare clean hard drive or a disk with unnecessary information. Then, when choosing the installation type, click “Erase disk and install Ubuntu”, and then the steps will proceed as in the instructions above.
Another installation option
When you select the last item, a window opens:
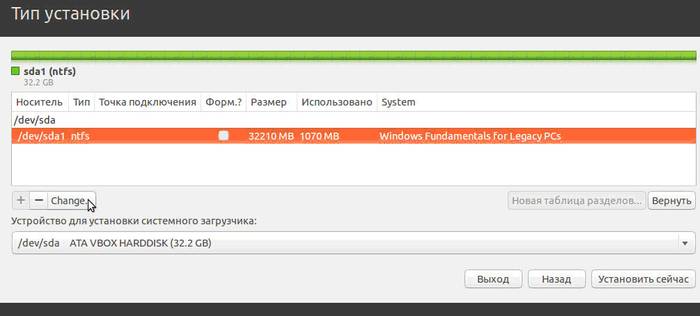
This is the structure of the available hard drives and their sections. The screenshot shows a computer with one hard drive/dev/sda, which has one partition /dev/sda1 and Windows is installed on it. In other words – Disk C. The number of partitions and disks may vary. Ntfs – disk extension type. The task is to select from the available partitions the appropriate one in order to allocate 10 GB for new system. Click the section and the “Change” button:
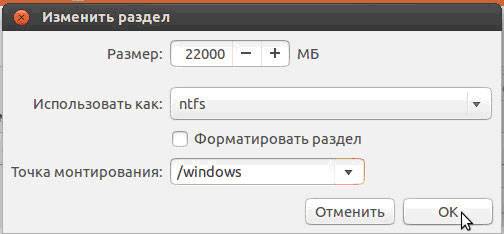
- in the “Size” item, indicate the desired disk size;
- in the “Use as” column, select the desired disk type, in this case “ntfs”;
- Don’t check the “Format” box if you don’t want to lose all your data;
- at the mount point, select “/windows” to have access to your files from the program;
- Click "OK".
Confirm your actions:

Now there is free space in the disk table:

Select a new item and click “+”, another window will open:
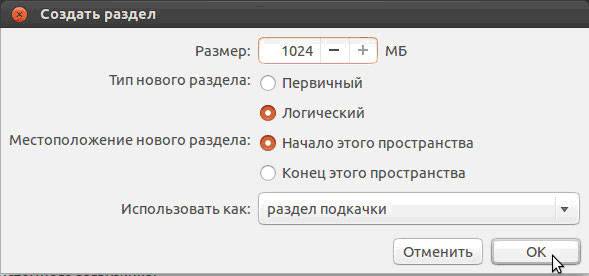
It is intended to create a Swap Partition, which is used in case of shortage of RAM. Place it as shown in the picture. Click "OK".


The final view of the list of sections is this:

Place the Format checkbox only where you need to erase data.
Launching Linux
If Linux is the only operating system, it will boot immediately. If not, there will be four download options:
- Ubuntu system
- recovery mode, similar safe mode on Windows
- running a RAM test
You can wait 10 seconds and Linux will load automatically, or you can select the desired item yourself.
When starting, the computer will ask for a password to log in:

After this, the desktop will load.
Possible installation problems
If the program does not start when installing from a flash drive, the reason may be:
- bad flash drive;
- incorrectly recorded image;
- incorrectly loaded system image.
The reason can only be found experimentally. If you have another flash drive, write the image to it and try installing it. If the system continues to not start from the flash drive, check to see if the required image was downloaded for your computer at all. Still not working? There are cases that the problem is in the image recording process itself. From the programs listed at the beginning of the article, try to record and run the image from a USB device one by one. In any case, the problem is one thing.
If when trying launch Linux After installing the system, a black screen appears and nothing else happens, the problem may be in the driver of the installed video card.
To resolve this issue, hold down the left Shift key to display the GRUB menu before loading the OS. Move the cursor to the top point and press the "e" key. This is needed to edit boot parameters.
After “quiet splash” you need to add “nomodeset”:
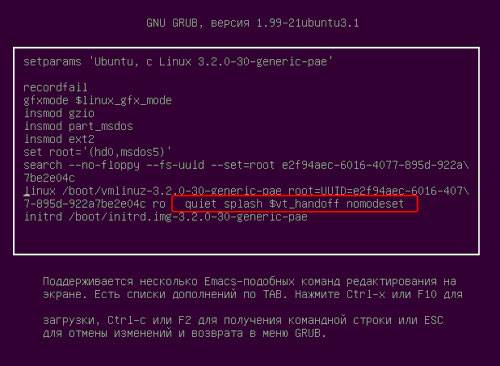
After that, press “F10” to load the OS with the entered parameters, this makes it possible to install proprietary video card drivers in the “System Settings” -> “Device Drivers” menu. Now you need to reboot the system. The Ubuntu LINUX operating system is simple and intuitive to use; installing it from a flash drive is quite quick and easy. Minor problems may occur during and after installation, but they are easy to fix.
>Linux feels great on flash drives and external drives. Therefore, if you want to try a new distribution or just start your acquaintance with Linux, then installing on an external drive is good option(even easier to work with).
By installing Linux on USB you will get portable system, which can be downloaded on another computer.
Unlike virtual computers, the system on a flash drive has full access to the hardware (built-in Wi-Fi adapter, video card, etc.) - thanks to this you can use the computer's resources to their full potential.
When installing and using Linux Not entirely obvious problems may arise on the external drive - in this instruction I will show you how to solve them.
By the way, precisely with possible problems let's get started.
BIOS and EFI
Then on startup virtual machine connect your flash drive or your USB disk to the real computer, and then connect it to the virtual machine:

So, the first option
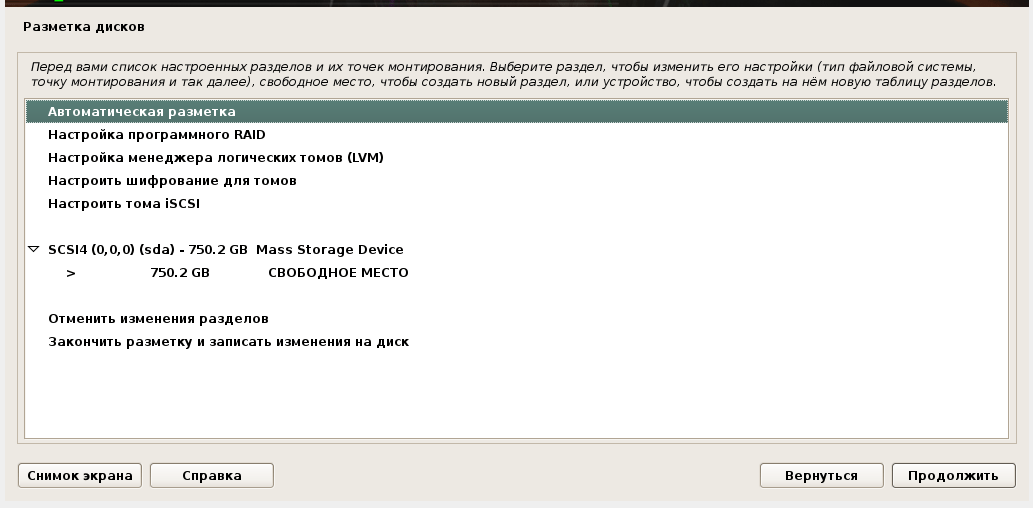
choose Manual disk partition:

There may be some sections:

If you don't need them, delete them all, you'll get:

Now select Automatic marking:
Auto - use the entire disk:

Specify drive:

Leave it as is if you don't know how to use it:

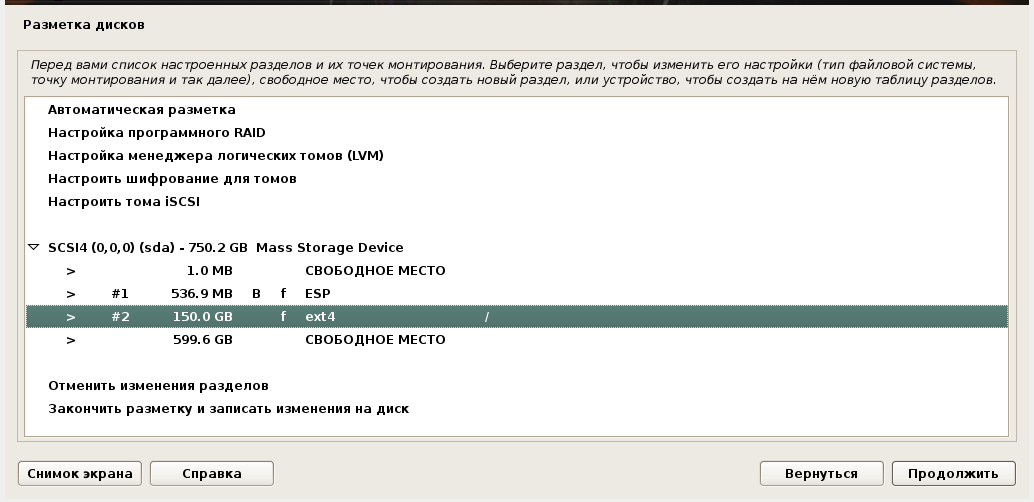
If you install with EFI, then similar markup will be created:

Please note that section ESP must be required - without it, EFI simply will not see your disk. This is a small partition in FAT32 where the bootloader is located. At your discretion, you can edit other partitions, for example, I removed the swap file and reduced the disk size:
We agree with the installer’s requests, which can warn about the absence of a swap file. Confirm the selected disk layout:

I repeat once again that this method always leads to a failure if the disk is not empty - the installer cannot cope with the partitioning of a non-empty disk.
Therefore there is a second option.
At the very beginning, when we get to the download, select Live Mode instead of the installer. When the system boots into Live mode, connect your flash drive/disk to the real computer, and then connect it to the virtual one, if you have not done so before.
Use the following command to check the disk name:
Sudo fdisk -l
It should be /dev/sda

Let's do a complete cleanup of the /dev/sda flash drive. Just in case: complete cleaning means that ALL DATA from the flash drive will be DELETED! Please note that we do this IN A VIRTUAL MACHINE. Don't do that on real computer, if you don’t understand what name your flash drive has, erase the first (most likely system) disk.
Open it with the program gdisk:
Sudo gdisk /dev/sda
To switch to expert mode, enter
Then to remove GPT enter
Agree twice to completely clear the drive.

Reboot the virtual computer:
At the next boot, select the option to install the system - then proceed as usual.
How to install Linux on a flash drive or USB drive
Using the method described above, you can also install Linux on USB directly in physical computer, without using VirtualBox. At the same time, be careful not to accidentally confuse the flash drive with some kind of internal drive and erase the information on it.
Also remember the names of the disks after you disconnect the installation flash drive. For example, in this photo the installation flash drive (sdb) comes first, and behind it external USB the drive I want to install on (sdc):

If you continue the installation, you will then have to rename the disk in the bootloader. I did it simpler, turned off the computer and swapped the flash drive and disk in the USB sockets, it turned out like this:

Now, even after disconnecting the installation flash drive, the USB disk with the system will still have the name sdb and you won’t have to configure anything additional.
Booting Linux from USB from VirtualBox (BIOS)
By the way, this method turned out to be very useful for me: some systems, for example Parrot, do not boot on the physical computer after installation. The problem is solved by booting from this disk via VirtualBox and updating the system. After this, the system is able to boot on a physical computer. Some users also complain about similar problems (Live system works great, but after installation the system does not boot) Kali Linux. Apparently, the issue is some kind of incompatibility with hardware, which is corrected in new versions of the kernel.
Boot Linux from USB from VirtualBox (EFI)
VirtualBox has its own peculiarities with EFI. First, you need to start downloading from external drive as described in this article.

That is, it will be output UEFI Interactive Shell, there will also be a message “ Press ESC in 1 second to skip startup.nsh or any other key to continue».
The reason for the error is that the VirtualBox EFI bootloader does not see the files .efi to continue loading the OS.
There are two options to solve this problem:
1) explicitly indicate to the bootloader necessary files
2) change the name of the required files to default ones - which the bootloader will definitely find.
1. Specify the .efi file to the bootloader:
In the invitation
dial:
Now run the command
to see the contents of the folder EFI:

We see a folder there parrot, now let's see what's inside this folder:
Dir EFI\parrot

So, we see the file there grubx64.efi. It turns out that the file that the system cannot find is located on the path \EFI\parrot\grubx64.efi
Open the file for editing:
Edit startup.nsh
And enter the line there (you may have another one, for example, \EFI\Manjaro\grubx64.efi or some other options):
\EFI\parrot\grubx64.efi
To save:
Ctrl-s
To exit the editor:
Ctrl-q
To reboot:
After this, the system will boot normally:

2. Change file names to fault-tolerant ones
As we just saw, the file to download is located in the path /EFI/parrot/grubx64.efi, the failsafe name that the system looks for by default is /EFI/BOOT/BOOTX64.EFI
You can open this drive and simply rename the folder and file to /EFI/BOOT/BOOTX64.EFI- the system will boot and this will not affect anything else.
Installing multiple Linux distributions on one USB
There is nothing stopping you from installing a second Linux distribution on a USB drive, as well as a third, fourth, fifth, and so on.
The process is always approximately the same - from (part of) free space is created new section and a new distribution is installed on it.
Linux boot loader detects neighboring systems well

and when the computer starts, it offers a choice of booting from one of them.

There may be different nuances with “friendly” distributions. For example, Ubuntu pretends to be Windows and doesn't want to install on USB. Everything can be solved by connecting the disk in a special way as described in this article.
This same Ubuntu does not allow you to manually set the disk size and takes up all the free space...

By using GParted Ubuntu cured of greed:

In general, if you want to take a “step left, step right,” then “friendliness” immediately turns into a headache.
Why Linux won't boot from USB
In addition to the options already listed, when problems may arise, also check whether the options are disabled in your EFI settings Security Boot And Fast Boot.
Iron
- try not to use USB hubs - they cause a lot of problems
- During installation, do not move the flash drives or drive wires.
- Flash drives can turn off due to overheating - remember this
You might find this useful:
I bought myself two of these SATA-USB adapters. First :

Supports USB 3.0, I inserted a 2.5 inch into it SSD drive from an old laptop - it works really fast! About the size of a palm or the size of a modern day mobile phone. The case is transparent, the drive can be installed without a screwdriver or screws - however, I have doubts whether it can be pulled out later without damaging the contacts... I bought it from this seller. 6 bucks, Carl!
And I bought this one at a local store (600 rubles), it only supports USB 2, noticeably slower than the previous one, and it comes with a nice case. I inserted it into HDD drive(also from an old laptop):

It often happens that when wanting to install an OS, a person is faced with the fact that his disk drive is broken or missing. This problem occurs especially often among laptop owners. But don’t be upset, because there is an alternative - installation from flash driveLinux. To do this, you don’t need much programming knowledge, because there are special programs that will “burn” a Linux image onto your flash drive just like a disk. All you have to do is start the installation process.
So, before how to installLinuxfrom a flash drive, you will need a flash drive with the image recorded on it. If you don't know how to do this, get all the information you need at .
Step 1 – preparationBIOSfor installation
As an example, consider installing a distribution kit Linux Mint. In order to installationLinuxMintfrom a flash drive started, you need to configure startup settings.
We insert the flash drive into the computer, turn it on and at the very beginning, when the screen is black and there is a lot of text, press the F2 button. Depending on the BIOS version and computer, this may be another button - F10, Delete or Esc.
We find ourselves in the settings menu and now we need to find the “Boot” item. Again, in different versions BIOS can be called differently, but focus on this word. After we have found the autorun menu, a list of priorities appears before our eyes. It contains: hard drive, floppy drive, removable hard drive, USB inputs, etc. Our task is to find a flash drive in this list and put it in 1st place as a priority.
This is done like this - point the arrows at the name (for example: “USB 40GB DEVICE”) and move it by pressing the F5 and F6 buttons until the flash drive is in 1st place.
Now the system will launch the flash drive first. Press F10 and confirm the exit by entering the Y (Yes) key and pressing the Enter button.
Reboot the computer.
Step 2 - Start the installation process
After your computer restarts, you will see the startup menu. It is often decorated with various images, so you will know exactly what it is. Press Enter.
If nothing has changed or something went wrong, restart your computer and review the menu list in detail. Perhaps the recorded image contains not only, but also various programs.
Step 3 – installation from a flash driveLinux
All the suffering is over! Already at the beginning of installation you are greeted by a friendly Russian-language interface. Start by selecting your language - select your desired language.
Next, you need to make sure that the computer has enough free memory on your hard drive, connected to a power source, and connected to the Internet. You can immediately agree that latest updates automatically downloaded during installation.
Click “Forward”. We get to the hard drive selection menu. In it you can format and split sections, if desired. Specify the partition (disk) in which you want to install the operating system and click the “Install Now” button.
We get to the section change menu. Here you can increase the amount of memory, change the file system type, format the partition and specify the mount point. We use file system“Ext4” and set the mount point “/”. If there is no valuable information on the hard drive, it is advisable to format the partition. Click “Install Now”.
Now we select the country and city of residence so that the system automatically sets the time and other indicators to suit your personal needs. We also indicate the keyboard layout. All you have to do is enter the desired name for your computer, username and password (optional). Click “Forward” and start the installation process.
After installation is complete, restart your computer, remove the USB flash drive and wait for the Linux operating system to start.
Congratulations! Installation completed successfully!
Almost no one uses disks to install Linux on a PC or laptop anymore. It is much easier to burn the image to a flash drive and quickly install a new OS. In this case, you don’t need to bother with a disk drive that may not exist at all, and you don’t have to worry about a scratched disk either. By following simple instructions, you can easily install Linux from a removable drive.
First of all, you will need a drive formatted in FAT32. Its volume must be at least 4 GB. Also, if you don’t yet have a Linux image, then internet with good speed will come in handy.
Our instructions will help you format the media in FAT32. It talks about formatting in NTFS, but the procedures will be the same, only you need to select the option everywhere "FAT32"
Please note that when installing Linux on a laptop or tablet, this device must be connected to power (to an outlet).
It is better to download the image from Ubuntu from the official website. You can always find it there current version OS without worrying about viruses. The ISO file weighs about 1.5 GB.

Step 2: Create a bootable USB flash drive
It is not enough to simply transfer the downloaded image to a flash drive; it must be written down correctly. For these purposes you can use one of special utilities. Let's take the program as an example. To complete the task, do this:


More details about creation bootable media with Ubuntu, read our instructions.
Step 3: BIOS Setup
In order for the computer to load the USB flash drive when turned on, you will need to configure something in the BIOS. You can access it by clicking "F2", "F10", "Delete" or "Esc". Then follow a series of simple steps:

This procedure is suitable for AMI BIOS; it may differ on other versions, but the principle is the same. Read more about this procedure in our article on setting up the BIOS.
Step 4: Preparing for Installation
The next time you restart your PC, the bootable flash drive will launch and you will see a window with a choice of language and OS boot mode. Then do the following:


If you decide to install Ubuntu, but your computer does not have a laser disc drive, you should not run to your friends or to the store. Today, installing Ubuntu does not require a disk drive; you can easily create a bootable USB flash drive.
Creating a bootable USB flash drive using WinSetupFromUSB
- Download the Ubuntu image, fortunately, this OS is free, so there should be no problems at this step.
- Download the WinSetupFromUSB program. It can be found on the official Microsoft website.
- Run WinSetupFromUSB.
- On the main window, select the USB flash drive that you want to use as a boot drive. (Pre-save all important data stored on the drive, because it will be formatted while the program is running).
- Check the box next to "Auto format".
- Check the box next to "Linux ISO".
- Click on the button with three dots and tell the program the location of the Ubuntu image.
- A dialog box will appear on the screen asking you to name the Grub boot loader item. You can write any phrase, for example, “Installing ubuntu from a flash drive.” It will not affect the installation process in any way.
- Click on the “Go” button, after which the application will notify that all data on the flash drive will be deleted. Confirm your choice and wait for the process to complete.
Creating a bootable drive using Unetbootin

- As in the previous case, first download the Ubuntu OS image.
- Download the Unetbootin program from the official website. It is licensed under the GPL, so it is free to use.
- In order to install Ubuntu from a flash drive without any problems, you will have to format it before creating a bootable USB drive.
- Double-click on the "Computer" shortcut. Right-click on the USB drive icon and select "Format".
- After specifying the "FAT32" format, click on the "Start" button. (Formatting will delete all data on the flash drive, copy all the necessary files in advance).
- Launch Unetbootin. In this case, the program will immediately appear in full combat readiness; there is no need to install it.
- The application is one single window in which you will have to define all the settings. In general, you will have to complete three steps to set the settings.
- First of all, specify the path where the Ubuntu image is stored.
- Then select the flash drive you want to use.
- Click "Ok" and wait for the process to complete. You may feel like the program is frozen. Even Windows, when trying to access an application, will note that the process is not responding. Be patient, Unetbootin often behaves this way when writing data.
- If you don’t have an Ubuntu disk image, you can select a distribution kit at the very top of the window, which will be downloaded by the program automatically. This installation method is only suitable for those who exchange data with the Internet at high speed.
BIOS Settings

After creating a bootable flash drive, you need to go into the BIOS and change the settings a little, otherwise installing Ubuntu from a flash drive will not be possible. To do this, restart your computer and watch the messages on the screen. Sometimes to enter BIOS settings you need to press the F2 key, but most often manufacturers set the use of the "DEL" button. Here, go to the "Advanced" tab, and set the First Boot Device to USB. Exit the BIOS and save the changes (usually this can be done by pressing the "F10" button or selecting the appropriate item on the "Quit" tab).
Preparation

- After completing all the manipulations in the BIOS settings and booting the computer, a selection menu will appear on the screen, which will offer to either install Ubuntu from a flash drive or run a LiveCD. Choose your installation.
- After selecting, the preparation window will open. In it, the user will be asked to make sure that there is enough free space on the HDD, and in addition to connect the computer to the Internet.
- Often it will not be possible to connect to the Internet, except when using a Wi-Fi router. If you leave the installation program without the ability to connect to the global network, no errors will occur during the process, the latest updates will simply not be downloaded. They can be installed later.
- At the bottom of the window there will be an inscription “install third-party software”. Check the box next to it: third party software here we consider that which is not distributed under the GPL license.
Editing HDD partitions

- The window that opens will offer several options to choose from: installing Ubuntu from a flash drive next to another operating system, installing Linux as the main OS or partitioning your hard drive yourself.
- Whichever option you choose, the next step will load the section editor. In it, the user will have to choose how much space to allocate for Ubuntu. If the option with self-partitioning is selected, the user will be given the opportunity to completely redraw the partition table (delete existing ones, create new ones, change the size, specify the format, set the cluster size).
- After clicking the "Install" button, the program will display a warning saying that the partition table will be manipulated. They may take considerable time.
- Click "Continue".
Completing preparation and installation

- Some time will pass (the duration depends on the HDD capacity, data exchange speed, fragmentation), and a new window will appear on the screen prompting you to select a language, region, keyboard layout, and time zone.
- At the next stage, the program will ask you to enter the new user name and password. After filling out this information, click "Continue".
- Preparations are complete, installation of Ubuntu from the USB flash drive has begun. After it finishes, a message will appear on the monitor screen asking you to restart the computer.
- After rebooting, do not forget to remove the USB flash drive or return the BIOS settings to their original state.


